
Subscribe to Our Youtube Channel
Related Manuals for Kramer RTBUS-24


Summary of Contents for Kramer RTBUS-24
- Page 1 USER MANUAL MODEL: RTBUS-24 Round Table Connection Bus P/N: 2900-300898 Rev 4 www.KramerAV.com...
-
Page 2: Table Of Contents
Contents Introduction Getting Started Overview Typical Applications Defining the RTBUS-24 Round Table Connection Bus Installing the RTBUS-24 Drilling a Hole in the Table Mounting the RTBUS-24 in a Table Connecting the Cables and Wires Using the RTBUS-24 Technical Specifications RTBUS-24 – Contents... -
Page 3: Introduction
Kramer Electronics Ltd. Introduction Welcome to Kramer Electronics! Since 1981, Kramer Electronics has been providing a world of unique, creative, and affordable solutions to the vast range of problems that confront the video, audio, presentation, and broadcasting professional on a daily basis. In recent years, we have... -
Page 4: Overview
European Advanced Recycling Network (EARN) and will cover any costs of treatment, recycling and recovery of waste Kramer Electronics branded equipment on arrival at the EARN facility. For details of Kramer’s recycling arrangements in your particular country go to our recycling pages at www.kramerav.com/support/recycling. -
Page 5: Defining The Rtbus-24 Round Table Connection Bus
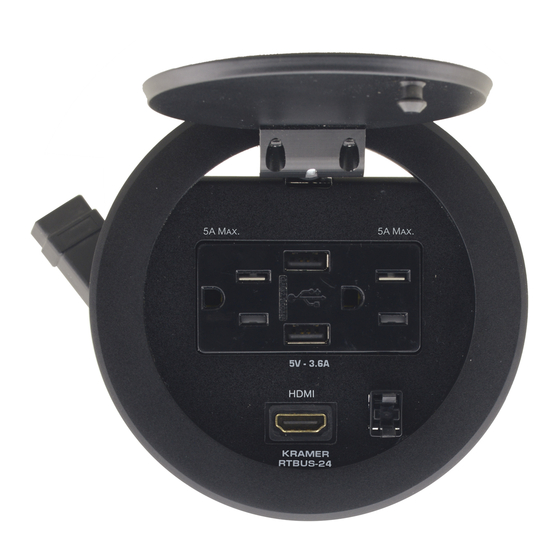
Locking Butterfly Nuts (x2) Tighten to lock the mounting butterfly screw. Mounting Screws (x2) For securing the RTBUS-24 to the table. Mounting Butterfly Nuts (x2) Tighten to secure the unit to the table surface. RTBUS-24 – Defining the RTBUS-24 Round Table Connection Bus... - Page 6 6A. 5V-2A USB CHARGING Port (x2) Use to charge up to two devices simultaneously. Lid Latch For safely closing the lid. HDMI Connector Connect to an HDMI source. RTBUS-24 – Defining the RTBUS-24 Round Table Connection Bus...
-
Page 7: Installing The Rtbus-24
The thickness of the table should be 76mm (3”) or less. 2. Clean the table surface. Take care not to damage the table. Kramer Electronics is not responsible for any damage caused to the table. Mounting the RTBUS-24 in a Table... -
Page 8: Connecting The Cables And Wires
Connect the power cable to a power source. Make sure that when: • A single power socket is connected, consumption should not exceed 5A. • Both power sockets are connected, the total consumption should not exceed 6A. RTBUS-24 – Installing the RTBUS-24... -
Page 9: Using The Rtbus-24
Kramer Electronics Ltd. Using the RTBUS-24 Once the RTBUS-24 is installed, you can easily customize it to your own needs by directly plugging in the required AV equipment. Figure 3: Connecting RTBUS-24 RTBUS-24 – Using the RTBUS-24... -
Page 10: Technical Specifications
36.5cm x 17 cm x 17cm (W, D, H) (14.37" x 6.69" x 6.69") Net Weight 0.728kg (1.6lbs) Shipping Weight 1.53kg (3.37lbs) approx. Accessories Included Clamps set Specifications are subject to change without notice at www.kramerav.com RTBUS-24 – Technical Specifications... - Page 11 What Kramer Electronics Will Do Kramer Electronics will, at its sole option, provide one of the following three remedies to whatever extent it shall deem necessary to satisfy a proper claim under this limited warranty: Elect to repair or facilitate the repair of any defective parts within a reasonable period of time, free of any charge for the necessary parts and labor to complete the repair and restore this product to its proper operating condition.
- Page 12 SAFETY WARNING Disconnect the unit from the power supply before opening and servicing For the latest information on our products and a list of Kramer distributors, visit our Web site where updates to this user manual may be found. We welcome your questions, comments, and feedback.
Need help?
Do you have a question about the RTBUS-24 and is the answer not in the manual?
Questions and answers