Advertisement
Scan for full manual
Step 1: Check What's in the Box
RTBUS-27xl Round Table Connection Bus
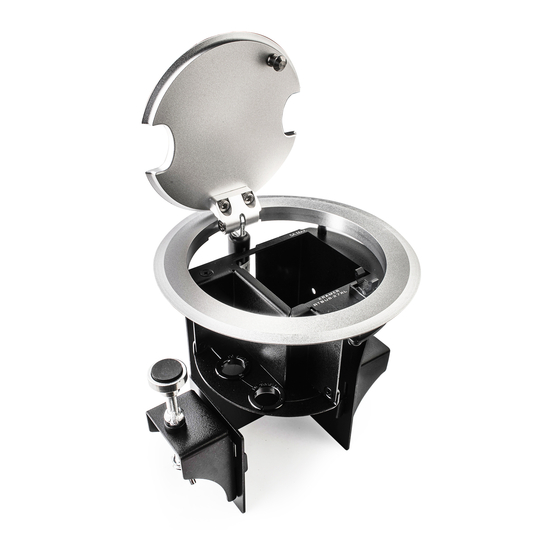
Step 2: Get to know your RTBUS-27xl
#
Feature
1
Pneumatic Mechanism
2
Outer Rim
3
Lower Surface
4
Mounting Screws (x2)
5
Locking Butterfly Nuts (x2)
6
Mounting Butterfly Nuts (x2)
7
Mounting Brackets (x2)
8
Black anodized or brushed
aluminum semi-automatic lid
9
Upper Surface
10
Mounting Bracket Slits (two
sets on each side)
11
Detachable Pass-through
Bracket
12
Pass-Through Opening and
Bushing (x2)
13
5A MAX. Power Socket
14
Lid Latch
Step 3: Install RTBUS-27xl
To mount the unit, follow these steps:
1.
Using any standard cup bit drill with a diameter ranging from 111mm to 114mm (4.37" to 4.49"), drill a hole in the table
in the desired location.
2.
Install the power socket (purchased separately).
3.
Remove the detachable bracket.
RTBUS-27xl Quick Start
RTBUS-27xl Quick Start Guide
This guide helps you install and use your RTBUS-27xl for the first time.
Go to
www.kramerav.com/manual/RTBUS-27xl
Function
Enables automatic lifting and smooth
closing of the lid.
Fits over the table surface.
Includes two pass-through openings.
For securing
RTBUS-27xl
Tighten to lock the mounting butterfly
screw.
Tighten to secure the unit to the table
surface.
Place in the bracket slits after inserting the
enclosure into the table – for securing the
unit to the table surface.
Covers the connecting surface, leaving
the table surface neat and tidy.
Includes power socket opening.
Insert the mounting brackets to the slits
when installing RTBUS-27xl.
Remove and re-install to insert cables.
Insert a cable through the opening and the
bushing.
Connects to 90-240V AC power
consuming device.
For safely closing the lid.
to download the latest user manual
1 Clamp set
1 User manual
to the table.
P/N:
2900- 301349QS
1 Quick start guide
Rev:
1
Advertisement
Table of Contents

Related Manuals for Kramer RTBUS-27xl


Summary of Contents for Kramer RTBUS-27xl
- Page 1 RTBUS-27xl Quick Start Guide This guide helps you install and use your RTBUS-27xl for the first time. Go to www.kramerav.com/manual/RTBUS-27xl to download the latest user manual Scan for full manual Step 1: Check What’s in the Box RTBUS-27xl Round Table Connection Bus...
- Page 2 Insert the cables through the pass-through openings: Mount RTBUS-27xl into the table: 6. Connect the cables: Connect devices to the pass-through cables and power socket. Safety Instructions There are no operator serviceable parts Caution: inside the unit. Warning: Do not open the unit. High voltages can cause electrical shock! Servicing by qualified personnel only.
Need help?
Do you have a question about the RTBUS-27xl and is the answer not in the manual?
Questions and answers