
Subscribe to Our Youtube Channel
Related Manuals for Kramer RTBUS-28XL


Summary of Contents for Kramer RTBUS-28XL
- Page 1 USER MANUAL MODEL: RTBUS-28XL Round Table Connection Bus P/N: 2900-301535 Rev 1 www.kramerAV.com...
-
Page 2: Table Of Contents
Kramer Electronics Ltd. Contents Introduction Getting Started Overview Defining RTBUS-28XL Round Table Connection Bus The RTBUS-28XL Connecting Surface Universal Power Socket Installing the RTBUS-28XL Drilling a Hole in the Table Connecting the Cables Mounting the RTBUS-28XL in the Table Using the RTBUS-28XL Technical Specifications RTBUS-28XL –... -
Page 3: Introduction
Kramer Electronics Ltd. Introduction Welcome to Kramer Electronics! Since 1981, Kramer Electronics has been providing a world of unique, creative, and affordable solutions to the vast range of problems that confront the video, audio, presentation, and broadcasting professional on a daily basis. In recent years, we... -
Page 4: Overview
European Advanced Recycling Network (EARN) and will cover any costs of treatment, recycling and recovery of waste Kramer Electronics branded equipment on arrival at the EARN facility. For details of Kramer’s recycling arrangements in your particular country go to our recycling pages at www.kramerav.com/support/recycling. -
Page 5: Defining Rtbus-28Xl Round Table Connection Bus
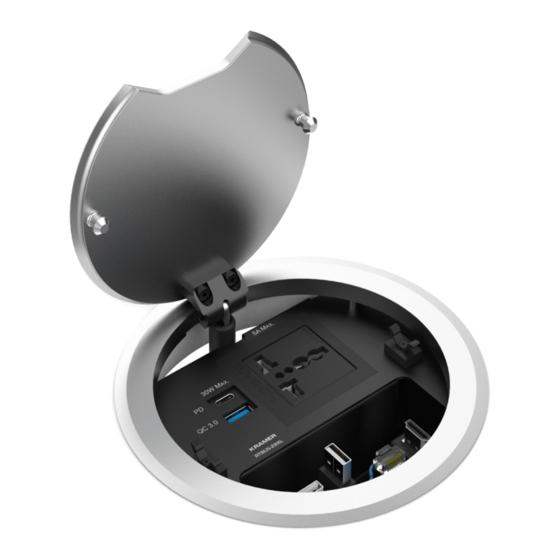
Kramer Electronics Ltd. Defining RTBUS-28XL Round Table Connection Bus This section defines RTBUS-28XL. Figure 1: RTBUS-28XL Round Table Connection Bus Front Panel Feature Function Pneumatic Mechanism Enables automatic lifting and smooth closing of the lid. Outer Rim Fits over the table surface. -
Page 6: The Rtbus-28Xl Connecting Surface
Socket is partially compatible (if the polarity is reversed) with plugs in China, Switzerland, Israel and the USA but does not supply grounding to plugs in Central Europe and France and is not compatible with South African plugs. RTBUS-28XL – Defining RTBUS-28XL Round Table Connection Bus... -
Page 7: Installing The Rtbus-28Xl
5.5”), drill a hole in the table in the desired location. The thickness of the table should be 3”w (76mm) or less. 2. Clean the table surface. Take care not to damage the table. Kramer AV is not responsible for any damage caused to the table. Connecting the Cables... - Page 8 2. Insert a cable into an opening and place the bushing around the cable. 3. Push the bushing into the pass- through opening to secure. We recommend that you use the Kramer C-AC AC Power Cord series to power the unit. RTBUS-28XL – Installing the RTBUS-28XL...
-
Page 9: Mounting The Rtbus-28Xl In The Table
Kramer Electronics Ltd. Mounting the RTBUS-28XL in the Table To mount the unit: 1. Insert the RTBUS-28XL into the hole cut into the table making sure the outer rim is firm against the surface of the table. 2. From underneath the table, slide the mounting brackets into the appropriate slots. -
Page 10: Using The Rtbus-28Xl
Using the RTBUS-28XL Once the RTBUS-28XL is installed, you can easily customize it to your own needs by directly plugging in the required AV equipment, as illustrated in the example in Figure Figure 3: RTBUS-28XL Boardroom Installation RTBUS-28XL – Using the RTBUS-28XL... -
Page 11: Technical Specifications
15.5cm x 14.6cmm (6.1" x 5.7") Shipping Dimensions (W, D, H) 27.5cm x 22cm x 19.5cm (10.8" x 8.7" x 7.7") Net Weight 1.32kg (2.9lbs) approx. Shipping Weight 1.9kg (4.2lbs) approx. Specifications are subject to change without notice at www.kramerav.com RTBUS-28XL – Technical Specifications... - Page 12 Electronics products, this product must be insured during shipment, with the insurance and shipping charges prepaid by you. If this product is returned uninsured, you assume all risks of loss or damage during shipment. Kramer Electronics will not be responsible for any costs related to the removal or re- installation of this product from or into any installation.
- Page 13 SAFETY WARNING Disconnect the unit from the power supply before opening and servicing For the latest information on our products and a list of Kramer distributors, visit our website where updates to this user manual may be found. We welcome your questions, comments, and feedback.
Need help?
Do you have a question about the RTBUS-28XL and is the answer not in the manual?
Questions and answers