Advertisement
Scan for full manual
Step 1: Check what's in the box
KRT-4 Cable Retractor
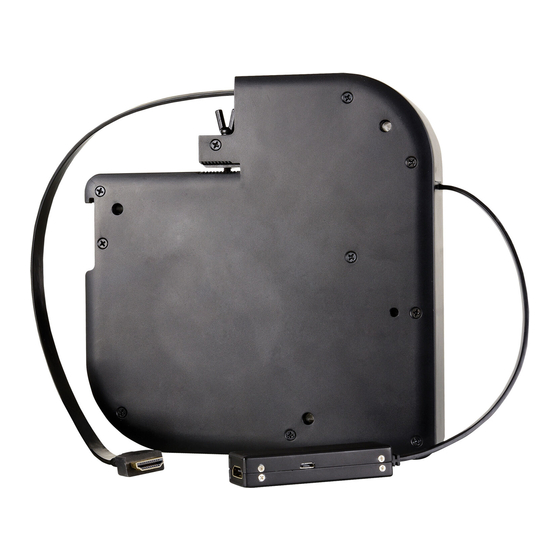
Step 2: Get to know your KRT-4
#
Feature
1
Retractor Enclosure
2
Fixed Cable Female Connector
3
Fixed Cable End
4
Screw Openings for Mounting Under the Table (3) Use to attach the
5
Wing-Head Thumb Screw
6
TBUS Installation Slot
7
Retracting Cable
8
Retracting Cable Male Connector
The terms HDMI, HDMI High-Definition Multimedia Interface, and the HDMI Logo are trademarks or registered trademarks of HDMI Licensing Administrator, Inc.
Step 3: Install KRT-4
Use this procedure to mount
and TBUS-10XL and so on.
•
Before mounting the
KRT-4
power sockets) and mount the TBUS onto a table.
•
Remember to prepare an opening in the TBUS inner frame
for the retracting cable connector (for example, use the
Kramer WCP pass-through insert).
KRT-4 Quick Start
KRT-4 Quick Start Guide
This guide helps you install and use your
Go to
www.kramerav.com/downloads/KRT-4
upgrades are available.
KRT-4
onto the following Kramer TBUS units: TBUS-1AXL, TBUS-3xl, TBUS-4xl, TBUS-5xl, TBUS-6xl
onto a TBUS, you need to configure and install the TBUS inner frame (including inserts and
KRT-4
for the first time.
to download the latest user manual and check if firmware
3 M4x50 screws
KRT-4
HDMI™, VGA, audio (3.5mm), LAN,
USB-3.0, MDP/H (up to 4K30Hz), 3H2
(HDMI extender) and DisplayPort. Refer to
www.kramerav.com/product/KRT-4
updated configuration list.
Function
Contains the retractable cable mechanism.
Connect to a male connector under the table.
Short connector cable.
KRT-4
directly under a table.
Use to turn and lock
KRT-4
to the TBUS enclosure.
Insert TBUS enclosure side into the slot to attach
Pull to connect to a connector above the table.
Connect to a female connector.
• Ensure that the environment (e.g., maximum ambient temperature
& air flow) is compatible for the device.
• Avoid uneven mechanical loading.
• Appropriate consideration of equipment nameplate ratings should
be used for avoiding overloading of the circuits.
• Reliable earthing of rack-mounted equipment should be
maintained.
P/N: 2 9 0 0 - 3 0 1 4 7 0 QS
WCP (KRT) insert kit
is available for the following cables:
KRT-4
to a TBUS.
Rev: 3
for the
Advertisement
Table of Contents

Related Manuals for Kramer KRT-4-LAN


Summary of Contents for Kramer KRT-4-LAN
- Page 1 The terms HDMI, HDMI High-Definition Multimedia Interface, and the HDMI Logo are trademarks or registered trademarks of HDMI Licensing Administrator, Inc. Step 3: Install KRT-4 Use this procedure to mount KRT-4 onto the following Kramer TBUS units: TBUS-1AXL, TBUS-3xl, TBUS-4xl, TBUS-5xl, TBUS-6xl and TBUS-10XL and so on. • Before mounting the...
- Page 2 Attaching KRT-4 (as a Standalone) to the Underside of a Table The thickness of the table should be at least 18mm so as not to damage the table. Kramer Electronics is not responsible for any damage caused to the table.
Need help?
Do you have a question about the KRT-4-LAN and is the answer not in the manual?
Questions and answers