
Related Manuals for Robam CXW-220-A817


Summary of Contents for Robam CXW-220-A817
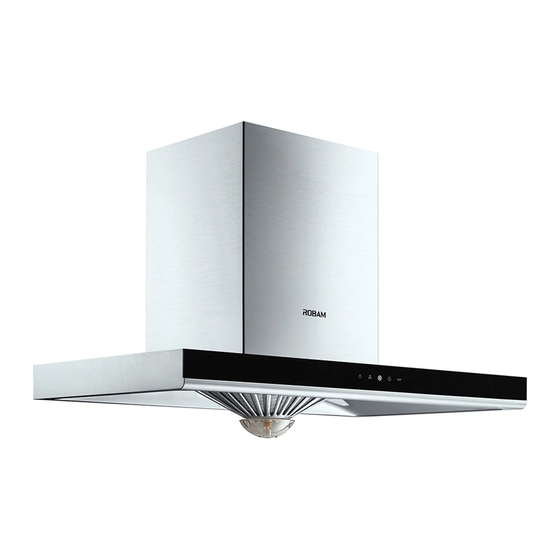
- Page 1 User Manual A8 17 Before operating this unit, please read the ser manual completely and keep it. CXW-220-A817 CXW-220-A815 Range Hood...
-
Page 2: Table Of Contents
CONTENTS Safety Precaution........................1 Important Information......................3 Product Overview........................4 Packing List..........................4 Installation Instructions......................5 User Manual........................... Maintenance......................... Removal of Components....................... Circuit Diagram........................12 Troubleshooting of General faults..................13... -
Page 3: Safety Precaution
Touch Earthed Execution Electric Shock Disassembly Please use this product according to manual strictly, or ROBAM shall not take any Warning responsible caused by improper operation. Danger Don't allow children or weakling to use Don’t touch plug, electric parts or... - Page 4 Range Hood Warning Range hood must be installed, Put out the stove fire in time when it is not used. That the stove fire bakes d i s a s s e m b l e d o r m a i n t a i n e d b y the range hood directly is prohibited.
-
Page 5: Important Information
Range Hood Notice The gas from range hood shall not be T h e t e m p e r a t u r e f o r r a n g e h o o d exhausted to hot flue used for burning gas or working can’t exceed 40℃. -
Page 6: Product Overview
Range Hood Product Overview Technical Specification ≤58dB Noise CXW-220-A817 Model CXW-220-A815 Rated Input Power of the Hood A817:222W A815:224 Power Supply 220-240V~ 50Hz Rated Input Power of the Main Motor 220W ≤2W A817: Total Pressure Efficiency ≥23% Maximum Input Power of the Light A815:≤... - Page 7 Range Hood Installation Warning 1.The air must not be discharged into a flue that is used for exhausting fumes from appliances burning gas or other fuels,the discharge of air must fulfill the requirements of local regulations 2.Note that when installing the metal expansion pipe, the pipe shall match with the hole in size. Overlarge hole is prohibited, as it will result in loose pipe and accidental drops.
- Page 8 Range Hood Installation ● Determine the position The size of removable baffle (reference: 430mm) can be adjusted according to the actual situations. The installation pitch of holes is shown in Figure 2. The hood body shall be centered vertically and kept level. Ceiling hole size is shown in Figure 3.
- Page 9 Range Hood ●Adjust drawing panel Pull the two brackets of the drawing panel upwards to an appropriate height and then pull out the drawing panel by holding both sides. Remove the protective film (excluding cold plate materials) on the drawing panel and insert it along the gap between the main hood panel and the housing.
-
Page 10: User Manual
Range Hood User Manual Switch Control Panel Plug in and 3 ticks from the buzzer will indicate qualified installation. Now the hood is in standby. Under standby mode, press the “Light” button once to turn on the light and repress to turn off. -
Page 11: Removal Of Components
Range Hood Notice ●The hood shall be cleaned and maintained regularly depending on the surroundings, so as to keep its cleanness & efficiency and extend its service life. We recommend that: Clean the exhaust fume collecting hood and hood body after each cooking. To ensure smooth discharge of fumes, the filter screen shall be cleaned regularly according to actual situations. - Page 12 Range Hood Removal of switch ●Removal of A817 switch After removing the spotlight, remove the two screws on the switch with a cross screwdriver and move the switch assembly diagonally upward to take it out from the lamp hole for repair and replacement. Switch ●Removal of A815 switch CX W- 20 0- 83 01...
-
Page 13: Circuit Diagram
Range Hood Cover pla te Dr awi ng panel Housing Mai n hood panel Air passage Electric motor Impeller Retaining ring Top cover plate Switch A81 7 Filter screen Filter mesh Oil cup Circuit diagram A817 Circuit Diagram Terminal box Control circuit blue blue... -
Page 14: Troubleshooting Of General Faults
Range Hood A815 Circuit Diagram Terminal box blue Control circuit blue blue yellow orange gray Yellow/Green black blue brown brown blue 220-240V~ Yellow/Green E Troubleshooting of General faults Warning Fault Cause No response after pressing any button The power plug is not connected 1. - Page 15 、 Model A817 A815 Edition: A/ 0 Publication Date: August,1,2017...
Need help?
Do you have a question about the CXW-220-A817 and is the answer not in the manual?
Questions and answers