
Related Manuals for Harken PowerSeat PWRS-E


Summary of Contents for Harken PowerSeat PWRS-E
- Page 1 PowerSeat PWRS-E PWRS-E.Compact Instruction Manual English Translation Please read these instructions carefully before operating equipment. Rev. 00 FT UPS_30/01-2014...
- Page 3 01-30-14 ENGLISH...
- Page 4 ENGLISH 01-30-14...
-
Page 5: Table Of Contents
Dimensions page Technical Data page Light Interface page Safety Informations page Using the Power Supply page Cleaning the Power Supply page PowerSeat PWRS-E page page Device Description page General page Dimensions Safe Working Load page Rope Requirements page Vibration... - Page 6 Using PowerSeat with a fixed Anchorage page Descent Procedure 1 page Descent Procedure 2 page Fixed Anchorage Descent Procedure page Transport and Storage page PowerSeat PWRS-E.Compact page page Description of Compact version page General page Dimension Using the Compact version Device page...
-
Page 7: Introduction
Harken accepts no responsibility for damage, personal injury or death caused by failure to observe the safety information and instructions in this Manual. The device must be used exclusively by qualified operators in possession of a certificate for temporary work at height with the use of access and positioning systems using ropes according to the current regulations of the Nation in which the device is used. -
Page 8: Glossary And Symbols
Introduction GloSSARy And SyMbolS Intended Use – use of the device according to the information supplied in the instructions for use. Improper Use – use of the device in a way different from that indicated in the instructions for use. Qualified Operator –... -
Page 9: General Information
PWRS-E/PWRS-E.Compact via Marco Biagi, 14 Serial No. / N. di serie Year/Anno 22070, Limido Comasco (CO) - Italy 2006/42/EC AAAA www.harken.com 2004/108/EC (+39) 031 3523511 rope diameter ø 10-12,7 mm EN1891 diametro fune Safe Working Load (SWL) 300 kg 1. name of manufacturer 2. - Page 10 Regulations reference: UNI EN ISO 12100:2010, EN 60204-1, EN ISO 13850, EN ISO 13849-1, EN ISO 13857, CEI EN 61000-6-2, CEI EN 61000-6-4 and authorises Name and Surname: Adress: HARKEN ITALY S.p.A. Via Marco Biagi, 14 CAP: 22070 Province: Como Città: Limido Comasco...
-
Page 11: Standard References
General Information StAndARd REfEREnCES The device has been manufactured in conformity with the TECHNICAL REGULATIONS listed below: Reference technical standards UNI EN ISO 12100:2010 Safety of machinery -- General principles for design -- Risk assessment and risk reduction UNI EN ISO 13850:2008 Safety of machinery - Emergency stop system, functional aspects UNI EN ISO 13857:2008 Safety of machinery -- Safety distances to prevent hazard zones being reached by upper and lower limbs... -
Page 12: Fcc Verification
The same considerations apply when spare parts that are not original or different from those explicitly indicated by the manufacturer as “safety devices” are used. For all these reasons we advise customers to contact Harken Technical Support. -
Page 13: Safety Precaution
Nation in which the device is used. Harken is not responsible for damage caused by the PowerSeat to people, animals or property in the case of: - use of the PowerSeat by operators without proper certification... -
Page 14: Improper Use
- in an explosive atmosphere - after it has fallen from a height of more than 1mtr onto a hard surface. In this case the device must be returned to the manufacturer or to a Harken authorised repair centre. SAfEty dEvICES... -
Page 15: Safety Informations
Safety Precautions SAfEty InfoRMAtIonS WARNING! Do not use the electric cable for other purpose then those intended, and in particular do not use the cable to carry or suspend the device, or to disconnect the plug. Do not go near the cable to heat sources, oil, sharp edges or moving parts of the machine. -
Page 16: Power Supply Informations
Power Supply Informations PoWER SuPPly dESCRIPtIon - GEnERAl The PowerSeat Power Supply is an electronic unit specifically designed to supply only the PowerSeat electric motor. Power Supply convert the AC voltage (110 - 230VAC, 50/60 Hz) into 48VDC voltage and powers the motor. WARNING! Do not use the Power Supply of the PowerSeat to power other electric products. -
Page 17: Dimensions
Power Supply Informations PoWER SuPPly dESCRIPtIon - dIMEnSIon PoWER SuPPly dESCRIPtIon - tEChnICAl dAtA Dimensions 246x306x180 mm (LxPxH) Weight 8,5 kg Supply Voltage 110-230 Vac Frequency 50/60 Hz Cable Schuko Tipo 16 A, 230 Vac Max Output Voltage 54 Vdc Max Output Current 25 A Max Power... -
Page 18: Light Interface
Power Supply Informations PoWER SuPPly dESCRIPtIon - lIGht IntERfACE "0/I" switch turn on and turn off Power Supply. The LED Interface, placed on the front side, provides indication on the operating status of the supply using 5 LED alarms. Alarm Description Line It shows that there is electrical power on the supply cards. -
Page 19: Using The Power Supply
Power Supply Informations WARNING! Before connecting the Power Supply to the AC voltage make sure that voltage is within the range specified in the Power Supply technical data. WARNING! Do not open Power Supply cover and do not modify the power supply. uSInG thE PoWER SuPPly The PowerSeat Power Supply can be used in indoor and outdoor environments. -
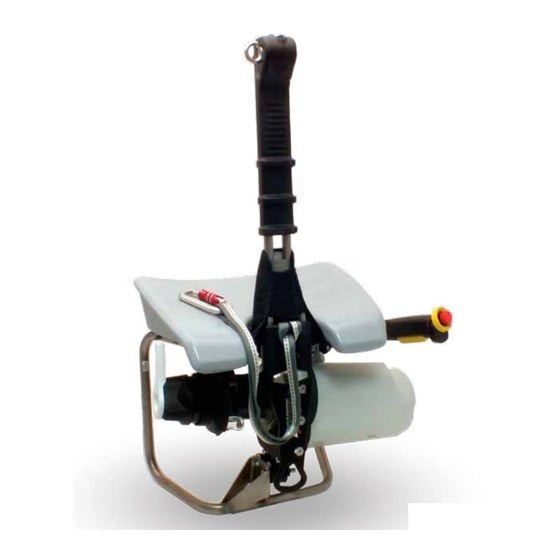
Page 20: Powerseat Pwrs-E
PowerSeat PWRS-E dEvICE dESCRIPtIon - GEnERAl The PowerSeat is designed to help qualified operators ascend a rope and descend using a passive manual device. The rope must be inserted in its housing in the vertical tube, through the deflector sheave, wrapped round the winch drum and locked in the rope grab. -
Page 21: Dimensions
PowerSeat PWRS-E dEvICE dESCRIPtIon - dIMEnSIonS 01-30-14 ENGLISH... -
Page 22: Safe Working Load
PowerSeat PWRS-E dEvICE dESCRIPtIon - SAfE WoRkInG loAd The Safe Working Load of the PowerSeat is 300 Kg (661,4 lb). WARNING! Do not apply a load greater than the Safe Working Load to the PowerSeat. dEvICE dESCRIPtIon - RoPE REQuIREMEntS WARNING! Use only EN1891 certified ropes with a diameter of between 10 - 12.7 mm (3/8"... -
Page 23: Technical Data
PowerSeat PWRS-E dEvICE dESCRIPtIon - tEChnICAl dAtA Below are the principal technical data of the PowerSeat obtained with a rope 11mm (7/16") in diameter at a temperature of 20°C at sea level. Rope Semi static 10mm-12.7mm (1/8"-1/2") EN1891 rope Safe working load... - Page 24 (OPEN JAW). Inspect all screws and check that the marker on the screws and on the plate are aligned. In case of any misaligned contact a HARKEN service center. Ispect the lever control screw, and all screws Rotate the winch drum clockwise by hand...
-
Page 25: Adjusting The Accelerator Control Position
PowerSeat PWRS-E Verify the functionallity of the emergency Rotate clockwise the emergency button to button, pushing the emergency button and rearm the device. verifying the stop of the device. Verify the functionallity of the anti-panic system: push the accelerator lever to start the... -
Page 26: Adjusting The Control Lever Position
PowerSeat PWRS-E 3. Slide out the accelerator control from the 4. Change position to the support and replace support. the accelerator control. 6. Tighten the support's screws. NOtE! Pay attention not to pass the accelerator control's cable outside of the devise frame. -
Page 27: Primary Rope Installation Procedure
PowerSeat PWRS-E 2. Place the control lever on one of 3 pos- 3. Tighten the control lever screw. sible position. uSInG thE dEvICE - PRIMARy RoPE InStAllAtIon PRoCEduRE 1. Place the PowerSeat on the ground. 2. Pull open the clamp and slide the front tube into the housing. - Page 28 PowerSeat PWRS-E 3. Pass the rope inside the pin. 4. Fit the rope into the front tube. 5. Pass the rope round the pulley. 6. Make sure the rope has been fitted correctly into its housing. 7. Wind the rope clockwise around the winch 8.
- Page 29 PowerSeat PWRS-E NOtE! The number of turns needed round the winch drum depends on the load and the condition of the rope. Check the device's descending capacity in its working configuration. Before use ascend with the device, no more than 1 mtr (3,28 ft) and check, according to the de- scent procedure 1, that it's descending smoothly.
-
Page 30: Wiring The Power Supply System
PowerSeat PWRS-E uSInG thE dEvICE - WIRInG thE PoWER SuPPly SyStEM WARNING! Before wiring the Power Supply to the device completely unroll the power cable to allow a device proper use, and verify the integrity of the cable and its connectors. - Page 31 PowerSeat PWRS-E uSInG thE dEvICE - PREPARInG to ASCEnd Install two ropes, Primary and Secondary, with separate anchorage points. Each rope must support at least 15 Install the Primary (or working) rope on the device as directed "Primary Rope Installation Procedure"...
-
Page 32: Ascent Procedure 1
PowerSeat PWRS-E WARNING! Keep your hands, feet and clothing etc away from the moving parts of the device. WARNING! During the ascent the motor cover could become hot. Handle the device with care to avoid injury. WARNING! During the use of the device any knots on the rope, if they are involved in the device circuit, may damage the device and cause dangerous conditions. - Page 33 PowerSeat PWRS-E 6. Connect the waist strop to the two side attachment points of the harness, passing it outside the front tube of the PowerSeat. 7. Connect the snap-hook provided with the device to the lower front attachment point of the harness.
-
Page 34: Ascent Procedure 2
PowerSeat PWRS-E uSInG thE dEvICE - ASCEnt PRoCEduRE 2 1. Install the primary rope on the device as indicated in the “Primary Rope Installation Procedure” paragraph. 2. Wire the Power Supply system as described in the "Wiring the Power Supply System" paragraph. - Page 35 PowerSeat PWRS-E uSInG thE dEvICE - uSInG PoWERSEAt WIth A fIXEd PoInt NOtE! To use the PowerSeat with a fixed point at least two operators are necessary. One operates the device and the second is connected by the primary rope to the device and to the secondary rope by the (EN353/2 approved) fall arrest device.
- Page 36 PowerSeat PWRS-E NOtE! Before using the PowerSeat places on the ground be sure that the cable or the stand of the accel- erator control are not under the device chassis. WARNING! To use the PowerSeat in the fixed point configuration the primary rope under load must leave the winch with a lateral and frontal angle of between ±...
-
Page 37: Descent Procedure 1
PowerSeat PWRS-E uSInG thE dEvICE - dESCEnt PRoCEduRE 1 1. With one hand grasp the rope leaving the 2. With the other hand, turn the control lever winch. clockwise to allow the rope to slip on the winch drum and permit a controlled descent. To adjust... -
Page 38: Descent Procedure 2
PowerSeat PWRS-E uSInG thE dEvICE - dESCEnt PRoCEduRE 2 1. With one hand grasp the rope leaving the 2. With the other hand, turn the control winch. lever clockwise to allow the rope to slip on the winch drum and permit a controlled descent. -
Page 39: Powerseat Pwrs-E.compact
PowerSeat PWRS-E.Compact dESCRIPtIon of CoMPACt vERSIon - GEnERAl The PowerSeat Compact version maintains every device key features described in the "Device Description" paragraph. This device version is designed to optimize the qualified operator's work when he works without seat or using the device with a fixed anchorage. -
Page 40: Dimension
PowerSeat PWRS-E.Compact dESCRIPtIon of CoMPACt vERSIon - dIMEnSIonS ENGLISH 01-30-14... -
Page 41: Using The Compact Version Device
PowerSeat PWRS-E.Compact uSInG thE CoMPACt vERSIon dEvICE - ChECkInG thE CoMPACt vERSIon dEvICE bEfoRE uSE Before and after using the PowerSeat Compact version follow the procedure described in the "Checking the Device Before Use" paragraph. uSInG thE CoMPACt vERSIon dEvICE - PRIMARy RoPE InStAllAtIon PRoCEduRE on CoMPACt vERSIon 1. - Page 42 PowerSeat PWRS-E.Compact 5. Pass the primary rope inside the pins. 6. Pass the rope round the pulley. 7. Make sure the rope has been fitted correctly 8. Wind the rope clockwise around the winch into its housing. drum. WARNING! Take at least two turns of the rope around the winch drum, and if it slips under load increase the number of turns to a maximum of four, taking care not to overlap the rope.
-
Page 43: Preparing To Ascent With The Compact Version
PowerSeat PWRS-E.Compact 9. Pass the rope over the stripper arm. 10. Fit the rope into the rope grab. Raise the cover to make this easier. 10. Position the rope inside the stopper. uSInG thE CoMPACt vERSIon dEvICE - PREPARInG to ASCEnt WIth thE CoMPACt vERSIon To use the PowerSeat Compact version follow the procedure described in "Preparing to Ascent"... -
Page 44: Using Compact Version Powerseat With A Fixed Anchorage
PowerSeat PWRS-E.Compact 7. Connect the snap-hook supplied with the device to the lower front attachment point of the harness. Fall Arrest Device Lower Front Attachment to PowerSea In ascent procedure 2 the Waist strop is not used 8. To ascent, push the accelerator lever to the first detent. - Page 45 PowerSeat PWRS-E.Compact 5. Connect the anchorage point on the front plate of the device with the fixed anchorage point on the ground. 6. Supply voltage to the motor by turning on the 48V Power Supply. 7. To ascent, push the accelerator lever to the first detent.
-
Page 46: Descent Procedure With The Compact Version
PowerSeat PWRS-E.Compact uSInG thE CoMPACt vERSIon dEvICE - dESCEnt PRoCEduRE WIth thE CoMPACt vERSIon 1. With one hand grasp the rope leaving the 2. With the other hand, turn the control winch. lever clockwise to allow the rope to slip on the winch drum and permit a controlled descent. - Page 47 PowerSeat PWRS-E.Compact 3. Remove the seat. 4. Pull open the clamp and slide the short tube into the housing. WARNING! Slide the front tube correctly into its housing until the red reference mark is no longer visible. 5. Remove the strop from upper anchorage 6.
-
Page 48: Maintenance
Before and after every use visually inspect the PowerSeat for traces of wear, damage or breakage. Refer to the “Checking the device before use” paragraph for more detail on this inspection. Every year, once a year send the device to the manufacturer or to an authorized Harken Service Center for a complete inspection. -
Page 49: Diagnosis And Fault Finding
- verify that the plug is correctly wired - fuse is blown - change the fuse (6,3x32 16AT) - Power supply fault - if the green switch light is on contact Harken Tech Service for more informations LED "Fault" on - serious Power Supply fault - contact Harken for more informations LED "Overcurrent"... -
Page 50: Maintenance Schedule
Maintenance Schedule Owner name Product name and Model Serial Number Engine Serial Number Year of manufacture Date of purchase Date of first use Maintenance interval Annual Maintenance Schedule Name and Signature of Date of Next Date of Service Description of Service Maintanance Operator Intervention ENGLISH... - Page 51 Maintenance Schedule Name and Signature of Date of Next Date of Service Description of Service Maintanance Operator Intervention 01-30-14 ENGLISH...
- Page 52 ENGLISH 01-30-14...
- Page 54 Refer to the Harken World Limited Warranty on the website at: http://www.harkenindustrial.com/technical-information/warranty/ The product warranty is accepted only if it has been maintained as specified in this Manual by Harken authorized personnel and is accompanied by Maintenance Schedule properly compiled...
Need help?
Do you have a question about the PowerSeat PWRS-E and is the answer not in the manual?
Questions and answers