Table of Contents
Advertisement
3-068-332-53 (1)
Digital
Video Camera
Recorder
Operating Instructions
Before operating the unit, please read this manual thoroughly, and retain
it for future reference.
Gebruiksaanwijzing
Lees, alvorens het apparaat in gebruik te nemen, de gebruiksaanwijzing
aandachtig door en bewaar deze voor eventuele naslag.
TM
SERIES
DCR-PC9E
DCR-PC6E/PC9E
©2001 Sony Corporation
Advertisement
Table of Contents

Related Manuals for Sony Handycam DCR-PC9E


Summary of Contents for Sony Handycam DCR-PC9E
-
Page 1: Digital Video Camera
Before operating the unit, please read this manual thoroughly, and retain it for future reference. Gebruiksaanwijzing Lees, alvorens het apparaat in gebruik te nemen, de gebruiksaanwijzing aandachtig door en bewaar deze voor eventuele naslag. SERIES DCR-PC9E DCR-PC6E/PC9E ©2001 Sony Corporation... - Page 2 English Welcome! Congratulations on your purchase of this Sony Digital Handycam camcorder. With your Digital Handycam you can capture life’s precious moments with superior picture and sound quality. Your Digital Handycam is loaded with advanced features, but at the same time it is very easy to use.
- Page 3 For the customers in Germany Directive: EMC Directive 89/336/EEC. 92/31/EEC This equipment complies with the EMC regulations when used under the following circumstances: •Residential area •Business district •Light-industry district (This equipment complies with the EMC standard regulations EN55022 Class B.)
-
Page 4: Main Features
Capturing images on your computer •Using with an analog video unit and your computer (DCR-PC9E only) (p. 113) •Viewing images recorded on “Memory Stick”s using the USB cable (DCR-PC9E only) (p. 189) Other uses Functions to adjust exposure in the recording mode •Back light (p. -
Page 5: Zero Set Memory Nulpunt-Terugkeer (Zie Blz. 89)
•Bewegende beelden vastleggen op een “Memory Stick” (alleen met de DCR-PC9E) (zie blz. 168) •Een stilstaand beeld op een “Memory Stick” bekijken (alleen met de DCR-PC9E) (zie blz. 183) •Bewegende beelden op een “Memory Stick” bekijken (alleen met de DCR-PC9E) (zie blz. 187) Beelden vastleggen met een personal computer •Gebruik in combinatie met een analoge video-eenheid en uw personal computer (alleen met de DCR-... -
Page 6: Table Of Contents
(DCR-PC9E only) ... 113 Recording video or TV programmes (DCR-PC9E only) ... 115 Inserting a scene from a VCR – Insert editing (DCR-PC9E only) ... 119 Audio dubbing ... 121 Superimposing a title ... 125 Making your own titles ... 129 Labelling a cassette ... - Page 7 Warning indicators and messages ... 214 Additional Information Usable cassettes ... 226 About the “InfoLITHIUM” battery pack . 229 About i.LINK ... 231 Using your camcorder abroad ... 233 Maintenance information and precautions ... 234 Specifications ... 242 Quick Reference Identifying the parts and controls ...
- Page 8 Geselecteerde bandopnamen kopiëren – Digitale programmamontage ... 101 Gebruik met analoge video-apparatuur en een PC – Signaalconversie (alleen met de DCR-PC9E) ... 113 Opnemen van video- of TV-programma’s (alleen met de DCR-PC9E) ... 115 Inlassen van beelden vanaf een videorecorder – Inlasmontage (alleen met de DCR-PC9E) ...
- Page 9 ... 224 Aanvullende informatie Geschikte videocassettes ... 226 Betreffende “InfoLITHIUM” batterijen ... 229 Betreffende de i.LINK aansluiting ... 231 Gebruik van uw camcorder in het buitenland ... 233 Onderhoud en voorzorgsmaatregelen ... 234 Technische gegevens ... 244 Compleet overzicht Plaats en functie van de bedieningsorganen ...
-
Page 10: Quick Start Guide
English Quick Start Guide Connecting the mains lead Use the battery pack when using your camcorder outdoors (p. 18). AC power adaptor (supplied) Inserting a cassette Slide OPEN/ZEJECT in the direction of the arrow and open the lid. This chapter introduces you to the basic features of your camcorder. - Page 11 When you purchase your camcorder, the clock setting is set to off. If you want to record the date and time for a picture, set the clock setting before recording (p. 25).
-
Page 12: Snelle Startgids
In dit hoofdstuk vindt u de eerste stappen voor het gebruik van uw camcorder kort beschreven. Zie voor nadere bijzonderheden de bladzijden waarnaar tussen haakjes ( ) wordt verwezen. Trek de handgreep omlaag om uw camcorder daaraan vast te houden zoals hier afgebeeld. - Page 13 (zie blz. 46) Druk het kleine groene knopje op de POWER schakelaar in en schuif de schakelaar in de “VCR” stand (bij de DCR-PC9E) of de “PLAYER” stand (bij de DCR-PC6E). POWER LOCK OPMERKING Til de camcorder nooit aan...
-
Page 14: Getting Started
Before you start reading this manual and operating your camcorder, check the model number by looking at the bottom of your camcorder. The DCR-PC9E is the model used for illustration purposes. Otherwise, the model name is indicated in the illustrations. - Page 15 Using this manual Note on Cassette Memory Your camcorder is based on the DV format. You can only use mini DV cassettes with your camcorder. We recommend that you use a tape with cassette memory The functions which require different operations...
-
Page 16: Precautions On Camcorder Care
LCD scherm, de beeldzoeker of de lens valt, kan er schade aan deze vitale onderdelen ontstaan. [c] •Pas op dat u de camcorder niet op de zon richt. Fel zonlicht kan storing in de werking van de camcorder veroorzaken. Alleen bij zonsondergang, als het licht niet meer zo fel is, mag u de zon in beeld nemen. -
Page 17: Checking Supplied Accessories
7 A/V connecting cable (1) (p. 53) 8 Lens cap (1) (p. 30) 9 CD-ROM (SPVD-004 USB Driver) (1) (p. 190) DCR-PC9E only q; Battery terminal cover (1) (p. 18) qa Cleaning cloth (1) (p. 235) qs 21-pin adaptor (1) (p. 54) -
Page 18: Step 1 Preparing The Power Supply
Step 1 Preparing the power supply Installing the battery pack (1) While sliding BATT (battery) release lever in the direction of the arrow 1, slide the battery terminal cover in the direction of the arrow (2) Insert the battery pack in the direction of the arrow until it clicks. -
Page 19: Charging The Battery Pack
(1) Open the DC IN jack cover and connect the AC power adaptor supplied with your camcorder to the DC IN jack with the plug’s v mark facing the Holding Grip. (2) Connect the mains lead to the AC power adaptor. - Page 20 Step 1 Preparing the power supply Note Prevent metallic objects from coming into contact with the metal parts of the DC plug of the AC power adaptor. This may cause a short-circuit, damaging the AC power adaptor. While charging the battery pack, the CHARGE lamp flashes in the following cases: –...
- Page 21 * Gebruiksduur bij benadering, bij ononderbroken opnemen bij een temperatuur van 25°C. Het batterijpak zal minder lang meegaan bij gebruik van de camcorder in een koude omgeving. **Gebruiksduur in minuten bij benadering, bij filmen met herhaaldelijk starten/stoppen van het opnemen, in/uit-zoomen en in/ uitschakelen van de stroom.
- Page 22 Step 1 Preparing the power supply Playing time/Beschikbare speelduur DCR-PC9E Battery pack/Batterijpak NP-FM30 (supplied)/ (bijgeleverd) NP-FM50 NP-FM70 NP-FM90 NP-FM91 DCR-PC6E Battery pack/Batterijpak NP-FM30 (supplied)/ (bijgeleverd) NP-FM50 NP-FM70 NP-FM90 NP-FM91 Approximate minutes when you use a fully charged battery. Approximate continuous playing time at 25 °C (77 °F).
- Page 23 “InfoLITHIUM” battery pack (M series). Your camcorder operates only with the “InfoLITHIUM” battery. “InfoLITHIUM” M series battery packs have the “InfoLITHIUM” is a trademark of Sony Corporation. Stap 1 Voorbereiden van de stroomvoorziening Als de stroom uitvalt terwijl er volgens de...
-
Page 24: Connecting To A Wall Socket
DC IN aansluiting, ook al zit de stekker van de netspanningsadapter niet in het stopcontact. Gebruik op stroom van een auto-accu Gebruik in de auto een Sony gelijkstroomadapter/batterij-lader (los verkijgbaar). -
Page 25: Step 2 Setting The Date And Time
“CLOCK SET” verschijnen telkens wanneer u de POWER schakelaar in de “CAMERA” stand (of de “MEMORY” stand, alleen voor de DCR-PC9E) zet, net zolang totdat u de datum en de tijd hebt ingesteld. Als u de camcorder ongeveer drie maanden lang... - Page 26 “– – – – – – – –” and “– –:– –:– –” are recorded on the data code of the tape and the “Memory Stick” (DCR-PC9E only). Note on the time indicator The internal clock of your camcorder operates on a 24-hour cycle.
-
Page 27: Step 3 Inserting A Cassette
Step 3 Inserting a cassette (1) Install the battery pack, or connect the AC power adaptor for the power supply (p. 18 to 24). (2) Slide OPEN/ZEJECT in the direction of the arrow and open the lid. The cassette compartment automatically lifts up and opens. -
Page 28: Step 4 Using The Touch Panel
(3) Druk het kleine groene knopje op de POWER schakelaar in en schuif de schakelaar in de “CAMERA” stand (voor opnemen/opname- pauzestand) of op “VCR” (DCR-PC9E) of “PLAYER” (DCR-PC6E) (voor afspelen). (4) Raak de FN toets aan. Dan verschijnen er enkele bedieningstoetsen op het LCD scherm. - Page 29 PAGE2 TITLE, DIG EFFT, PB ZOOM PAGE3 DATA CODE, V SPD PLAY, A DUB CTRL, REC CTRL See p. 151 for MEMORY (DCR-PC9E only) mode. Stap 4 Bediening via het aanraakpaneel Annuleren of verlaten van de instelstand Druk op de OFF toets om terug te keren naar het PAGE1/PAGE2/PAGE3 scherm.
-
Page 30: Recording - Basics
(4) Press OPEN to open the LCD panel. (5) Set the POWER switch to CAMERA while pressing the small green button. Your camcorder is set to the standby mode. (6) Press START/STOP. Your camcorder starts recording. The REC indicator appears. The camera recording lamp located on the front of your camcorder lights up. - Page 31 When you record a tape in the LP mode on your camcorder, we recommend playing the tape on your camcorder. Note on the LOCK switch (DCR-PC9E only) When you slide the LOCK switch to the left, the POWER switch can no longer be set to MEMORY accidentally.
- Page 32 Recording a picture If you leave your camcorder in the standby mode for 5 minutes while the cassette is inserted Your camcorder automatically turns off. This is to save battery power and to prevent battery and tape wear. To resume the standby mode, set the POWER switch to OFF (CHARGE), and to CAMERA again.
-
Page 33: Adjusting The Lcd Screen
180 degrees to the lens side. When closing the LCD panel, set it vertically, and swing it into the camcorder body. Note When using the LCD screen except in the mirror mode, the viewfinder automatically turns off. -
Page 34: Shooting With The Mirror Mode
The subject uses this feature to check his or her own image on the LCD screen while you look at the subject in the viewfinder. In CAMERA or MEMORY (DCR-PC9E only) mode. Pull out the viewfinder and rotate the LCD screen 180 degrees. -
Page 35: Adjusting The Brightness Of The Lcd Screen
Recording a picture Adjusting the brightness of the LCD screen (1) In CAMERA or MEMORY (DCR-PC9E only) mode, press FN and select PAGE2. In VCR (DCR-PC9E)/PLAYER (DCR-PC6E) mode, press FN to display PAGE1 (p. 29). (2) Press LCD BRT. The screen to adjust the brightness of the LCD screen appears. -
Page 36: Adjusting The Viewfinder
CAMERA stand of de MEMORY stand (alleen voor de DCR-PC9E) (zie blz. 82). Helderheid van het zoekerbeeld U kunt de lichtsterkte van het zoekerscherm aanpassen. Kies het onderdeel VF B.L. in het instelmenu, maar alleen bij gebruik op stroom van een batterijpak (zie blz. -
Page 37: Using The Zoom Feature
Recording a picture Using the zoom feature Move the power zoom lever a little for a slower zoom. Move it further for a faster zoom. Using the zoom function sparingly results in better-looking recordings. “T” side: for telephoto (subject appears closer) “W”... - Page 38 •Naarmate u verder naar de ”T” tele-kant inzoomt, zal de beeldkwaliteit afnemen. Met de POWER schakelaar in de “MEMORY” stand (alleen voor de DCR-PC9E) In deze stand kunt u de digitale zoomfunctie niet gebruiken. Aanduidingen in beeld tijdens het opnemen Deze aanduidingen worden niet mee op de band opgenomen.
- Page 39 De tijdcode geeft de opnameduur of weergave- speelduur aan als “0:00:00” (uren:minuten: seconden) in de “CAMERA” stand en als “0:00:00:00” (uren : minuten : seconden : beeldnummers) in de “VCR” (DCR-PC9E) of “PLAYER” (DCR-PC6E) stand. U kunt deze tijdcode niet afzonderlijk wijzigen. Resterende bandlengte-aanduiding...
-
Page 40: Shooting Backlit Subjects - Back Light
Press BACK LIGHT in CAMERA or MEMORY (DCR-PC9E only) mode. The . indicator appears on the screen. To cancel, press BACK LIGHT again. During back light function... -
Page 41: Shooting In The Dark - Nightshot/Super Nightshot
Zo kunt u bijvoorbeeld nachtdieren in hun natuurlijke omgeving observeren en opnemen. Zet de camcorder in de ”CAMERA” of “MEMORY” stand (alleen voor de DCR-PC9E) en schuif de NIGHTSHOT schakelaar in de “ON” stand. indicator en de “NIGHTSHOT” aanduiding knipperen op het scherm. Om de... - Page 42 – Kleurbalansinstelling – Belichtingsregeling – Spotmeter-functie Met de POWER schakelaar in de “MEMORY” stand (alleen voor de DCR-PC9E) De Super Nightshot functie zal nu niet werken. NightShot Light verlichting De stralen van de NightShot Light verlichting zijn infrarood en dus onzichtbaar. De maximale reikwijdte van de infrarode NightShot lichtstralen bedraagt ongeveer 3 meter.
-
Page 43: Self-Timer Recording
De zelfontspannerfunctie wordt automatisch uitgeschakeld, wanneer: – de zelfontspanner-opname beëindigd is; – de POWER schakelaar op “OFF (CHARGE)”, op “VCR” (DCR-PC9E) of “PLAYER” (DCR- PC6E) wordt gezet. Met de POWER schakelaar in de “MEMORY” stand (alleen voor de DCR-PC9E) In deze stand kunt u de zelfontspanner ook gebruiken om stilstaande beelden op te nemen op een “Memory Stick”... -
Page 44: Checking The Recording - End Search/ Editsearch/Rec Review
PAGE1 (p. 28). (2) Press END SCH. The last 5 seconds of the recorded section are played back and your camcorder returns to the standby mode. You can monitor the sound from the speaker or headphones. To return to FN Press EXIT. -
Page 45: Checking The Recording
. The section you have stopped most recently will be played back for a few seconds, and then your camcorder will return to the standby mode. You can monitor the sound from the speaker or headphones. End search function... -
Page 46: Playback - Basics
Commander supplied with your camcorder. (1) Install the power source and insert the recorded tape. (2) Press OPEN to open the LCD panel. (3) Set the POWER switch to VCR (DCR-PC9E)/ PLAYER (DCR-PC6E) while pressing the small green button. (4) Press to rewind the tape. - Page 47 Press When monitoring on the LCD screen You can turn the LCD panel over and move it back to the camcorder body with the LCD screen facing out. If you leave the power on for a long time Your camcorder gets warm. This is not a malfunction.
- Page 48 Opname-aanduidingen op het beeldscherm zien DISPLAY functie Druk op de DISPLAY/TOUCH PANEL toets van de camcorder of op de DISPLAY toets van de bij uw camcorder geleverde afstandsbediening. De opname-aanduidingen verdwijnen van het scherm. Om de beeldscherm-aanduidingen weer te laten verdwijnen, drukt u nogmaals op de DISPLAY/TOUCH PANEL toets of op de DISPLAY toets.
- Page 49 – A blank portion of the tape is being played back. – The tape is unreadable due to tape damage or noise. – The tape was recorded by a camcorder without the date and time set. Data code When you connect your camcorder to the TV, the data code also appears on the TV screen.
-
Page 50: Various Playback Modes
Playing back a tape Various playback modes To operate video control buttons, set the POWER switch to VCR (DCR-PC9E)/PLAYER (DCR-PC6E). When using the touch panel (1) Press FN and select PAGE3. (2) Press V SPD PLAY to display video control buttons. - Page 51 Press END SCH on PAGE1 in the stop mode. The last 5 seconds of the recorded section plays back and stops. Video control buttons Marks on your camcorder are different from those on the Remote Commander supplied with your camcorder. Your camcorder:...
- Page 52 Bij de vertraagde weergave Alle opgenomen beelden kunnen op deze camcorder zelf vertraagd worden weergegeven; dit geldt echter niet bij weergave van een videosignaal via de DV (DCR-PC9E)/DV OUT (DCR-PC6E) uitgangsaansluiting. Bij het terugwaarts weergeven Hierbij kunnen boven en onder in beeld ruisbalken verschijnen.
-
Page 53: Viewing The Recording On Tv
Viewing the recording on TV Connect your camcorder to your TV with the A/ V connecting cable supplied with your camcorder to watch the playback picture on the TV screen. You can operate the playback control buttons in the same way as when you monitor playback pictures on the LCD screen. -
Page 54: If Your Tv Or Vcr Is A Monaural Type
(video) plug of the A/V connecting cable. Connect the S video cable (optional) to the S video jacks on both your camcorder and the TV or the VCR. This connection produces higher quality DV format pictures. -
Page 55: Advanced Recording Operations
Besides the operation described here, your camcorder can record still images on “Memory Stick”s (p. 159) (DCR-PC9E only). (1) In the standby mode, keep pressing PHOTO lightly until a still image appears. The CAPTURE indicator appears. Recording does not start yet. - Page 56 Dan wordt er zeven seconden lang een stilstaand beeld opgenomen en daarna komt de camcorder in de opnamepauzestand. Voor heldere stilstaande beelden zonder flikkering (alleen voor de DCR-PC9E) Het is aan te raden stilstaande beelden op te nemen op een “Memory Stick”.
- Page 57 U kunt de zelfontspanner- fotobandopname niet met de afstandsbediening uitschakelen. Opmerking De zelfontspanner-fotobandopname wordt automatisch uitgeschakeld, wanneer: – de zelfontspanner-fotobandopname beëindigd – de POWER schakelaar op “OFF (CHARGE)”, op “VCR” (DCR-PC9E) of “PLAYER” (DCR- PC6E) wordt gezet.
-
Page 58: Printing The Still Image
U kunt een afdruk maken van een stilstaand beeld met behulp van een videoprinter (los verkrijgbaar). Sluit de videoprinter aan met het bij uw camcorder geleverde audio/video- aansluitsnoer. Sluit dit snoer aan op de A/V stekkerbus en sluit de gele stekker van het snoer aan op de video- ingang van de videoprinter. -
Page 59: Using The Wide Mode
– Old movie – Bounce During recording You cannot select or cancel the wide mode. When you cancel the wide mode, set your camcorder to the standby mode and then set 16:9WIDE to OFF in the menu settings. Breedbeeld- opnamefunctie... -
Page 60: Using The Fader Function
Using the fader function You can fade in or out to give your recording a professional appearance. NORM. FADER (fader)/ (normaal in/uitfaden) MOSC.FADER (mosaic)/ (mozaïekbeeld) 1)2) BOUNCE OVERLAP WIPE MONOTONE When fading in, the picture gradually changes from black-and-white to colour. When fading out the picture gradually changes from colour to black-and-white. - Page 61 FN beginscherm. De aanduiding voor de gekozen fader-functie gaat knipperen. (5) Druk op de START/STOP toets. Na afloop van het in- of uit-faden keert de camcorder automatisch terug naar de normale opnamefunctie. FADER MOSC.
- Page 62 20 of 120 is gezet – Bij de 16:9 breedbeeld-opnamefunctie – Bij de speciale beeld/kleureffecten – Bij de PROGRAM AE belichtingsprogramma’s Met de POWER schakelaar in de “MEMORY” stand (alleen voor de DCR-PC9E) De fader-functies zullen nu niet werken.
-
Page 63: Using Special Effects - Picture Effect
SOLARIZE [b] : De lichtintensiteit wordt PASTEL [c] : MOSAIC [d] : (1) Zet de camcorder in de “CAMERA” stand en druk op de FN toets zodat de PAGE1 aanraaktoetsen verschijnen. (2) Druk op de MENU toets en kies het gewenste... - Page 64 Using special effects – Picture effect To return to FN Press EXIT. To turn the picture effect function off Select OFF in P EFFECT in the menu settings. While using the picture effect function You cannot select the old movie mode with the digital effect function.
-
Page 65: Using Special Effects - Digital Effect
OLD MOVIE You can add an old movie type atmosphere to pictures. Your camcorder automatically sets the wide mode to ON, picture effect to SEPIA, and the appropriate shutter speed. Still image/... - Page 66 Press OFF to return to PAGE1. Speciale effecten – Digitale opname-effecten (1) Zet de camcorder in de “CAMERA” stand en druk op de FN toets zodat de PAGE1 aanraaktoetsen verschijnen. (2) Druk op de DIG EFFT aanraaktoets. Nu verschijnt er een scherm voor keuze van het digitale opname-effect.
- Page 67 Wanneer u de POWER schakelaar op “OFF (CHARGE)” zet De digitale opname-effecten worden automatisch uitgeschakeld. Bij opnemen met een langzame sluitertijd De automatische scherpstelling kan niet goed werken. Zet de camcorder zo mogelijk op een statief en stel handmatig scherp. 1/25 1/12 Sluitertijden Sluitertijdnummer...
-
Page 68: Using The Program Ae Function
Voor veraf gelegen onderwerpen (op meer dan 10 meter afstand), zoals vergezichten, berglandschappen of ook deels belemmerde onderwerpen achter vensterglas, vitrage of een hek, om te voorkomen dat de camcorder op de voorgrond scherpstelt. Duisternis-programma Voor het helder en duidelijk opnemen van een... - Page 69 Using the PROGRAM AE function (1) In CAMERA or MEMORY (DCR-PC9E only) mode, press FN to display PAGE1. (2) Press MENU, then select PROGRAM AE in in the menu settings to select a desired PROGRAM AE mode (p. 134). To return to FN Press EXIT.
- Page 70 – Wanneer de NIGHTSHOT nachtopnameschakelaar op “ON” staat. – Wanneer u beelden opneemt op een “Memory Stick” (alleen voor de DCR-PC9E) met de MEMORY MIX functie. •Tijdens opnemen in de “MEMORY” stand (alleen voor de DCR-PC9E) zullen de volgende programma’s niet werken.
-
Page 71: Adjusting The White Balance Manually
Normally white balance is automatically adjusted. (1) In CAMERA or MEMORY (DCR-PC9E only) mode, press FN to display PAGE1. (2) Press MENU, then select WHT BAL in the menu settings to select a desired white balance mode (p. - Page 72 Bij opnemen met de HOLD vasthoud-stand Zet de kleurbalans eerst even op “AUTO” en enkele seconden later terug in de “HOLD” vasthoud-stand, nadat: – u een ander PROGRAM AE belichtingsprogramma kiest; of – als u de camcorder van binnen naar buiten hebt gebracht of andersom.
-
Page 73: Adjusting The Exposure Manually
– To shoot the bright subject and dark background – To record dark pictures (e.g. night scenes) faithfully (1) In CAMERA or MEMORY (DCR-PC9E only) mode, press FN to display PAGE1. (2) Press EXPOSURE. The screen to adjust the exposure appears. -
Page 74: Using The Spot Light-Metering Mode - Flexible Spot Meter
– When there is strong contrast between the subject and background such as with a subject that is on stage and lighted by a spotlight. (1) In CAMERA or MEMORY (DCR-PC9E only) mode, press FN to display PAGE1. (2) Press SPOT METER. The SPOT METER screen appears. - Page 75 When using the Flexible Spot Meter function EXPOSURE is automatically set to MANUAL. Your camcorder automatically returns to the automatic exposure mode: – If you change the PROGRAM AE mode. – If you slide NIGHTSHOT to ON.
-
Page 76: Focusing Manually
•Shooting a stationary subject when using a tripod (1) Press FOCUS lightly in CAMERA or MEMORY (DCR-PC9E only) mode. The 9 indicator appears. (2) Turn the focus ring to sharpen focus. FOCUS To return to the autofocus mode Press FOCUS lightly to turn off 9, indicator. - Page 77 When you press FOCUS down firmly, the lens focuses on and indicator appears. When you release FOCUS, your camcorder returns to the manual focus mode. Use this mode when your camcorder focuses on near objects even though you are trying to shoot a distant object.
-
Page 78: Interval Recording
The time: 0.5SEC y 1SEC y 1.5SEC y 2SEC 5 Press RET. Interval-opname U kunt een serie interval-opnamen maken door de camcorder automatisch te laten opnemen en pauzeren. Dit geeft een bijzonder treffend effect met openspringende knoppen, verpoppende insecten, bloeiende bloemen enzovoort. Example/Voorbeeld 9 min 59 s... - Page 79 Interval recording CAMERA SET CAMERA SET (4) Set INT. REC to ON, then press EXEC. (5) Press EXIT to return to FN. The INTERVAL indicator flashes on the screen (6) Press START/STOP to start interval recording. The interval recording indicator lights up. Interval-opname EXIT CAMERA SET...
- Page 80 START/STOP again. The INTERVAL indicator stops flashing and lights up, and the recording time for interval recording is started. Note on interval recording (DCR-PC9E only) You cannot do interval recording in memory mode. On recording time There may be a discrepancy in recording time of up to +/–...
-
Page 81: Frame By Frame Recording - Cut Recording
Hierbij is het aanbevolen de camcorder op een statief te zetten en na stap 4 de camcorder te bedienen met de afstandsbediening. (1) Druk in de opnamepauzestand op de op de FN toets om het PAGE1 scherm te laten verschijnen. -
Page 82: Using The Viewfinder
When operating camera brightness and the fader (only in CAMERA mode) on the touchpanel using the viewfinder (1) In CAMERA or MEMORY (DCR-PC9E only) mode, pull out the viewfinder until it clicks, and then turn the LCD panel over and move it back to your camcorder body with the LCD screen facing out. - Page 83 LCD scherm. •In de “VCR” (DCR-PC9E) of “PLAYER” (DCR- PC6E) of de geheugen-weergavestand (alleen bij de DCR-PC9E) kunt u de camcorder niet via het LCD scherm bedienen met alleen weergave in de zoeker. Voor de bediening van punten die niet...
-
Page 84: Advanced Playback Operations
However, you can record images on a “Memory Stick” (DCR-PC9E only) (p. 164, 170), or on a VCR using your camcorder as a player. Pictures processed by the picture effect... -
Page 85: Playing Back A Tape With Digital Effects
“STILL” voor dubbelbeeld- weergave, “FLASH” voor interval-weergave, “LUMI.” voor helderheidssleutel-weergave en “TRAIL” voor nabeeld-weergave. (1) Druk in de “VCR” (DCR-PC9E) of “PLAYER” (DCR-PC6E) stand op de FN toets en laat het PAGE2 scherm verschijnen. (2) Druk op de DIG EFFT aanraaktoets. Nu verschijnt er een scherm voor keuze van het digitale beeldeffect. - Page 86 However, you can record images on a “Memory Stick” (DCR-PC9E only) (p. 164, 170), or on a VCR using your camcorder as a player. Pictures processed by the digital effect function •Pictures processed by the digital effect function...
-
Page 87: Enlarging Images Recorded On Tapes - Tape Pb Zoom
You can enlarge playback images recorded on tapes. Besides the operation described here, your camcorder can enlarge still images recorded on “Memory Stick”s (p. 196) (DCR-PC9E only). (1) In the playback or playback pause mode, press FN and select PAGE2. - Page 88 PB ZOOM function. However, you can record images on a “Memory Stick” (DCR-PC9E only) (p. 164, 170), or on a VCR using your camcorder as a player. The PB ZOOM function is automatically...
-
Page 89: Quickly Locating A Scene Using The Zero Set Memory Function
Snel opzoeken van een scène met de nulpunt-terugkeer U kunt de camcorder eenvoudig laten vooruit- of terugspoelen en stoppen bij een gewenste scène als u bij dat punt van tevoren de tellerstand op “0:00:00” heeft gezet. Hiervoor gebruikt u de afstandsbediening. -
Page 90: Searching The Boundaries Of Recorded Tape By Title - Title Search
Before operation Set CM SEARCH in to ON in the menu settings (p. 134). (The default setting is ON.) (1) Set the POWER switch to VCR (DCR-PC9E)/ PLAYER (DCR-PC6E). (2) Press SEARCH MODE on the Remote Commander repeatedly, until the TITLE SEARCH indicator appears. -
Page 91: Title Search
Searching the boundaries of recorded tape by title – Title search To stop searching Press x on the Remote Commander. If you use a tape without cassette memory You cannot superimpose or search a title. If a tape has a blank portion between recorded portions The title search function may not work correctly. -
Page 92: Searching A Recording By Date - Date Search
•Set CM SEARCH in settings (p. 134). (The default setting is ON.) (1) Set the POWER switch to VCR (DCR-PC9E)/ PLAYER (DCR-PC6E). (2) Press SEARCH MODE on the Remote Commander repeatedly, until the DATE SEARCH indicator appears. - Page 93 “Searching for the date without using cassette memory”. Searching for the date without using cassette memory (1) Set the POWER switch to VCR (DCR-PC9E)/ PLAYER (DCR-PC6E). (2) Press FN to display PAGE1. (3) Press MENU, then set CM SEARCH to OFF in in the menu settings (p.
-
Page 94: Searching For A Photo - Photo Search/Photo Scan
•Set CM SEARCH to ON in settings (p. 134). (The default setting is ON.) (1) Set the POWER switch to VCR (DCR-PC9E)/ PLAYER (DCR-PC6E). (2) Press SEARCH MODE on the Remote Commander repeatedly, until the photo search indicator appears. - Page 95 However, you can search 13 photos or more using the scanning photo function. Searching for a photo without using cassette memory (1) Set the POWER switch to VCR (DCR-PC9E)/ PLAYER (DCR-PC6E). (2) Press FN to display PAGE1. (3) Press MENU, then set CM SEARCH to OFF in in the menu settings (p.
-
Page 96: Photo Scan (P
Searching for a photo – Photo search/Photo scan Scanning photo (1) Set the POWER switch to VCR (DCR-PC9E)/ PLAYER (DCR-PC6E). (2) Press SEARCH MODE on the Remote Commander repeatedly, until the PHOTO SCAN indicator appears. The indicator changes as follows:... -
Page 97: Editing
(2) Prepare the VCR for recording, then set the input selector to LINE. Refer to the operating instructions of the VCR. (3) Set the POWER switch to VCR (DCR-PC9E)/ PLAYER (DCR-PC6E). (4) Play back the recorded tape on your camcorder. - Page 98 With this connection, you do not need to connect the yellow (video) plug of the A/V connecting cable. Connect an S video cable (optional) to the S video jacks of both your camcorder and the VCR. This connection produces higher quality DV format pictures. Video-opnamen overkopiëren U kunt video-opnamen kopiëren met de...
- Page 99 (2)Prepare the VCR for recording. Set the input selector to LINE. Refer to the operating instructions of the VCR. (3) Set the POWER switch to VCR (DCR-PC9E)/ PLAYER (DCR-PC6E). (4) Play back the recorded tape on your camcorder.
- Page 100 – Beeld/kleureffecten – Digitale beeldeffecten – PB ZOOM uitvergroting Als u het beeld in de weergavepauzestand overneemt via de DV (DCR-PC9E)/DV OUT (DCR-PC6E) aansluiting Het overgenomen beeld zal dan nogal grof en korrelig doorkomen. Bij weergave van een dergelijk beeld op andere video-apparatuur kan...
-
Page 101: Dubbing Only Desired Scenes - Digital Program Editing
Stap 1 Aansluiten van de videorecorder (zie blz. 102). Stap 2 De videorecorder instellen op kopiëren via een audio/video-aansluitsnoer (zie blz. 102, 107). Stap 3 Zorgen dat uw camcorder en de videorecorder synchroon lopen (zie blz. 108). Wanneer u nogmaals kopieert naar dezelfde videorecorder, kunt u stappen 2 en 3 achterwege laten. - Page 102 VCR. Set CONTROL to IR in the menu settings of your camcorder . •When editing digital video, the operation signals cannot be sent with LANC Step 1: Connecting the VCR You can connect either the A/V connecting cable or the i.LINK cable (DV connecting cable).
-
Page 103: Setting The Ir Setup Code
Dubbing only desired scenes – Digital program editing (1) Setting the IR SETUP code 1 Set the POWER switch to VCR (DCR-PC9E)/ PLAYER (DCR-PC6E) on your camcorder. 2 Turn the power of the connected VCR on, then set the input selector to LINE. - Page 104 Dubbing only desired scenes – Digital program editing About the IR SETUP code The IR SETUP code is stored in the memory of your camcorder. Be sure to set the correct code, depending on your VCR. Default setting is code number 3. Brand/...
- Page 105 – Select “PB” if the button to cancel recording pause is N. (3) Locate the infrared rays emitter of your camcorder and face it towards the remote sensor of the Set the devices about 30 cm (11 7/8 in.) apart, and remove any obstacles between the devices.
- Page 106 •After checking the code in “About the IR SETUP” code, set the IR SETUP or the PAUSEMODE again. •Place your camcorder at least 30 cm (11 7/8 in.) away from the VCR. •Refer to the operating instructions of your VCR.
-
Page 107: Dv Connecting Cable
When you connect using the i.LINK cable (DV connecting cable) (optional), follow the procedures below. (1) Set the POWER switch to VCR (DCR-PC9E)/ PLAYER (DCR-PC6E) on your camcorder. (2) Turn the power of the connected VCR on, then set the input selector to DV input. - Page 108 Alvorens deze instelling te maken, verwijdert u de cassette uit uw camcorder. (1) Zet de POWER schakelaar van de camcorder in de “VCR” (DCR-PC9E) of “PLAYER” (DCR-PC6E) stand. (2) Plaats een voor opnemen geschikte cassette in de videorecorder en zet de videorecorder in de opnamepauzestand.
- Page 109 Dubbing only desired scenes – Digital program editing EXIT OTHERS ED I T SET CONTROL RETURN ADJ TEST ”CUT - I N” EXECUTE ”CUT -OUT” I R SETUP PAUSEMODE I R TEST EXIT OTHERS ED I T SET EXEC RET. CONTROL ADJ TEST EXECUT I NG...
- Page 110 – Digital program editing Operation 1: Making the Programme (1) Insert the tape for playback into your camcorder, and insert a tape for recording into the VCR. (2) Press FN to display PAGE1. (3) Select VIDEO EDIT in settings (p. 134).
- Page 111 Dubbing only desired scenes – Digital program editing Erasing the programme you have set Erase OUT mark first, and then IN mark of the last programme. (1) Press UNDO. The last programme mark flashes on the LCD screen. (2) Press EXEC. The setting is cancelled. To cancel erasing Press CANCEL in step 2.
- Page 112 Operation 2: Performing a Digital program editing (Dubbing a tape) Make sure your camcorder and the VCR are connected, and that the VCR is set to recording pause. When you use an i.LINK cable (DV connecting cable) the following procedure is not necessary.
-
Page 113: Using With An Analog Video Unit And Your Computer - Signal Convert Function (Dcr-Pc9E Only)
: Signal flow/Signaalstroom Gebruik met analoge video-apparatuur en een PC – Signaalconversie – alleen met de DCR-PC9E U kunt beelden en geluid van analoge video- apparatuur overnemen op uw camcorder, door aansluiten van een personal computer die beschikt over een i.LINK (DV) aansluiting. - Page 114 •Als de toestand van de videosignalen niet optimaal is, kunnen de beelden niet altijd goed worden omgezet van analoge naar digitale vorm via uw camcorder. Afhankelijk van de analoge video-apparatuur kunnen de beelden wel eens storing en kleurverschuiving te zien geven.
-
Page 115: Recording Video Or Tv Programmes (Dcr-Pc9E Only)
VIDEO AUDIO : Signal flow/Signaalstroom Opnemen van video- of TV-programma’s – alleen met de DCR-PC9E Via het audio/video-aansluitsnoer Met deze camcorder kunt u video-opnamen kopiëren vanaf een gewone videorecorder of TV- uitzendingen opnemen vanaf een TV-toestel dat beschikt over audio/video-uitgangen. Gebruik uw camcorder hierbij als opname-apparaat. - Page 116 (video) plug of the A/V connecting cable. Connect an S video cable (optional) to the S video jacks of both your camcorder and the TV or VCR. This connection produces higher quality DV format pictures. Opnemen van video- of TV- programma’s...
-
Page 117: Using The I.link Cable (Dv Connecting Cable)
Using the i.LINK cable (DV connecting cable) Simply connect the i.LINK cable (DV connecting cable) (optional) to DV jack of your camcorder and to DV jack of the DV products. With digital- to-digital connection, video and audio signals are transmitted in digital form for high-quality editing. - Page 118 Recording video or TV programmes When you have finished dubbing a tape Press x on both your camcorder and the VCR. You can connect one VCR only using the i.LINK cable (DV connecting cable). When you dub a picture in digital form The colour of the display may be uneven.
-
Page 119: Inserting A Scene From A Vcr - Insert Editing (Dcr-Pc9E Only)
Inlassen van beelden vanaf een videorecorder – Inlasmontage – alleen met de DCR-PC9E Op een videocassette die reeds opnamen bevat kunt u nieuw beeldmateriaal vanaf een videorecorder inlassen door het gewenste opname-beginpunt en opname-eindpunt in te voeren. -
Page 120: Inserting A Scene From A Vcr – Insert Editing
If you insert scenes on the tape recorded with other camcorder (including other DCR-PC9E) The picture and sound may be distorted. We recommend that you insert scenes on a tape recorded with your camcorder. -
Page 121: Audio Dubbing
Audio dubbing You can record an audio sound to add to the original sound on a tape by connecting audio equipment or a microphone. If you connect the audio equipment, you can add sound to your recorded tape by specifying starting and ending points. - Page 122 LINE OUT AUDIO R Nieuwe geluidsopnamen inlassen Het audio/video-aansluitsnoer verbinden met de A/V aansluiting – alleen met de DCR-PC9E Geluid invoegen via de ingebouwde microfoons Hiervoor hoeft u niets op de camcorder aan te sluiten. Opmerkingen •Bij inlassen van geluid via de audio/video-...
-
Page 123: Adding An Audio Sound On A Recorded Tape
Adding an audio sound on a recorded tape (1) Insert your recorded tape into your camcorder. (2) Set the POWER switch to VCR (DCR-PC9E)/ PLAYER (DCR-PC6E). (3) Locate the recording start point. Press the /N button to start playing back. To pause playing back, press the at the recording start point. -
Page 124: Monitoring The New Recorded Sound
Inlassen van nieuwe geluidsopnamen op een videocassette die is opgenomen op een andere camcorder (ook al was dat een andere DCR-PC6E/PC9E) kan resulteren in een minder goede geluidskwaliteit. Als de videocassette is beveiligd met het wispreventienokje Dan kunt u op deze cassette niet opnemen. -
Page 125: Superimposing A Title
VACATION (1) Druk in de “CAMERA”, VCR” (DCR-PC9E) of “PLAYER” (DCR-PC6E) stand op de FN toets en laat het PAGE2 scherm verschijnen. (2) Druk op de TITLE toets. Dan verschijnen de titelkeuze-aanduidingen op het LCD scherm. - Page 126 If the tape has a blank portion in the middle of the recorded parts The title may not be displayed correctly. The titles superimposed with your camcorder •They are displayed by only the DV video equipment with index titler function.
- Page 127 Superimposing a title Not to display title Set TITLE DSPL to OFF in the menu settings (p. 134). Title setting •The title colour changes as follows: WHITE t YELLOW t VIOLET t RED t CYAN t GREEN t BLUE •The title size changes as follows: SMALL y LARGE You cannot input 13 characters or more in LARGE size.
- Page 128 Press CANCEL in step 5. Een titel in beeld opnemen Een titel wissen (1) Zet de POWER schakelaar in de “CAMERA” of “VCR” (DCR-PC9E) of “PLAYER” (DCR- PC6E) stand. (2) Druk op de FN toets zodat het PAGE1 scherm verschijnt.
-
Page 129: Making Your Own Titles
Elk van uw titels kan uit maximaal 20 lettertekens bestaan. (1) Zet de POWER schakelaar in de “CAMERA”, VCR” (DCR-PC9E) of “PLAYER” (DCR- PC6E) stand. (2) Druk op de FN toets en stel in op het PAGE2 bedieningsscherm. - Page 130 (CHARGE)” en dan weer op “CAMERA” en stel uw titel samen. Het is aanbevolen de POWER schakelaar op “VCR” (DCR-PC9E) of “PLAYER” (DCR-PC6E) te zetten of de cassette uit de camcorder te verwijderen, om te voorkomen dat de camcorder automatisch wordt uitgeschakeld terwijl u een titel invoert.
-
Page 131: Labelling A Cassette
10 characters and is stored in cassette memory. When you insert the labeled cassette and set the POWER switch to CAMERA or VCR (DCR-PC9E)/ PLAYER (DCR-PC6E), the label is displayed for about 5 seconds. (1) Insert the cassette you want to label. - Page 132 Labelling a cassette To return to FN Press EXIT. To erase the label you have made Select C in step 6. The last character is erased. To change the label you have made Insert the cassette to change the label, and operate in the same way to make a new label.
- Page 133 Desgewenst kunt u alle gegevens uit het cassettegeheugen in één keer wissen. (1) Zet de POWER schakelaar in de “CAMERA”, VCR” (DCR-PC9E) of “PLAYER” (DCR- PC6E) stand. (2) Druk op de FN toets en stel in op het PAGE1 bedieningsscherm.
-
Page 134: Customizing Your Camcorder
DCR-PC9E) EXEC RET. ”PLAYER” (DCR-PC6E) of de “MEMORY” stand (alleen voor de DCR-PC9E) op de FN toets zodat het PAGE1 scherm verschijnt. scherm te brengen. pictogram en druk dan op de EXEC uitvoertoets. onderdeel en druk weer op de EXEC uitvoertoets. -
Page 135: White Balance (P
Menu items are displayed as the following icons: MANUAL SET CAMERA SET VCR SET (DCR-PC9E) PLAYER SET (DCR-PC6E) LCD/VF SET MEMORY SET (DCR-PC9E only) CM SET TAPE SET SETUP MENU OTHERS English Selecting the mode setting of each item Menu items differ depending on the position of the POWER switch. - Page 136 —— VF B.L. z BRT NORMAL BRIGHT * DCR-PC9E only Note on NTSC PB When you play back a tape on a Multi System TV, select the best mode while viewing the picture on the TV. Notes on LCD B.L. and VF B.L.
- Page 137 320 REMAIN z AUTO * DCR-PC9E only If you select QUALITY (DCR-PC9E only) The number of images you can record matched to that image quality is displayed. Meaning Not to record continuously. To record 9 images continuously (p. 160).
- Page 138 •You cannot format the “Memory Stick” if the write-protect tab on the “Memory Stick” is set to LOCK. •Format the “Memory Stick” if “ Formatting erases all information on the “Memory Stick” (DCR-PC9E only) Check the contents of the “Memory Stick” before formatting.
- Page 139 When you play back the tape on other camcorders or VCRs, noise may occur in pictures or sound. •When you record in the LP mode, we recommend using a Sony Excellence/Master mini DV cassette so that you can get the most out of your camcorder.
-
Page 140: Digital Program Editing (P
If you press DISPLAY/TOUCH PANEL with “DISPLAY” set to “V-OUT/LCD” in the menu settings, the picture from a TV or VCR will not appear on the LCD screen even when your camcorder is connected to outputs on the TV or VCR. - Page 141 Voor nachtopnamen met de NightShot Light verlichting (zie blz. 41). Voor het uitschakelen van de NightShot Light verlichting. verschijnt. De camcorder zal nu niet (over)compenseren voor camera- POWER schakelaar CAMERA MEMORY VCR/PLAYER...
- Page 142 VF B.L. z BRT NORMAL BRIGHT * Alleen voor de DCR-PC9E Bij de NTSC PB keuze voor het afspelen van NTSC videocassettes Bij weergave op een multi-systeem TV-toestel kiest u de weergavestand die het beste beeld op het scherm oplevert.
- Page 143 320 REMAIN z AUTO * Alleen voor de DCR-PC9E Als u instelt op QUALITY (alleen voor de DCR-PC9E) Dan wordt het aantal beelden aangegeven dat u kunt opnemen met die beeldkwaliteit. Werking Om niet automatisch enkele stilstaande beelden achtereen op te nemen.
-
Page 144: Alleen Voor De Dcr-Pc9E
ERASE ALL —— * Alleen voor de DCR-PC9E Opmerkingen over het formatteren (alleen voor de DCR-PC9E) •De bij uw camcorder meegeleverde “Memory Stick” is bij aflevering vanaf de fabriek al geformatteerd. U hoeft deze niet meer met uw camcorder te formatteren. - Page 145 10 minuten nadat u de POWER schakelaar op “CAMERA” zet zonder dat er een cassette in de camcorder aanwezig is. Om de demonstratie uit te schakelen, plaatst u een cassette in de camcorder, zet u de POWER schakelaar in een andere stand dan “CAMERA”, of zet u de DEMO MODE menu-instelling in de “OFF”...
- Page 146 Als de REC LAMP instelling in de “ON” stand staat, kan het rode opname/batterijlampje vóór op de camcorder wel eens wat onnatuurlijk licht op een erg nabij onderwerp laten schijnen. In dat geval kunt u de REC LAMP instelling beter op “OFF” zetten.
-
Page 147: Memory Stick" Operations (Dcr-Pc9E Only)
— “Memory Stick” functies — Gebruik van de “Memory Stick” – inleiding – alleen voor de DCR-PC9E Op de “Memory Stick” die bij uw camcorder is bijgeleverd kunt u beelden opnemen om ze hiervanaf later weer te geven. Het weergeven, opnieuw opnemen en wissen van beelden gaat zeer eenvoudig. - Page 148 “Memory Stick”s formatted by a computer “Memory Stick”s formatted by Windows OS or Macintosh computers do not have a guaranteed compatibility with this camcorder. Gebruik van de “Memory Stick” – inleiding Gebruik van een “Memory Stick” Terminal/...
- Page 149 Rules for Camera File Systems universal standard established by the JEITA (Japan Electronics and Information Technology Industries Association). On your camcorder, you cannot play back still images recorded on other equipment (DCR- TRV890E/TRV900/TRV900E or DSC-D700/ D770) that does not conform to this universal standard.
- Page 150 MEMORY EJECT Wanneer het toegangslampje oplicht of knippert Schud niet aan de camcorder en zorg dat er niet tegenaan wordt gestoten, want de camcorder leest de gegevens van de “Memory Stick” of schrijft gegevens op de “Memory Stick” weg.
-
Page 151: Using A Touch Panel
Using a “Memory Stick” – introduction Using a touch panel Your camcorder has operation buttons on the LCD screen. Press the LCD panel directly to operate each function. (1) Set the POWER switch to MEMORY. Make sure that the LOCK is set to the right (unlock) position. - Page 152 Using a “Memory Stick” – introduction In the memory camera mode/ In de geheugen- opnamestand PAGE1 PAGE2 PAGE3 MENU PLAY INDEX EXPO– PAGE1 PAGE2 PAGE3 PLAY INDEX PAGE1 PAGE2 PAGE3 EXIT SELF PLAY INDEX TIMER To return to FN Press EXIT. To execute settings Press EXEC or To cancel settings...
- Page 153 Onderdelen die niet beschikbaar zijn Niet beschikbare onderdelen worden slechts vaag in grijs aangegeven. Aanraakpaneel-bediening U kunt de camcorder ook bedienen via het aanraakpaneel bij gebruik van de beeldzoeker (zie blz. 82). Druk op de FN toets om de volgende...
-
Page 154: Selecting Still Image Quality Mode
Using a “Memory Stick” – introduction Selecting still image quality mode You can select image quality mode in still image recording. The default setting is FINE. (1) Set the POWER switch to MEMORY or VCR. Make sure that the LOCK is set to the right (unlock) position. - Page 155 Using a “Memory Stick” – introduction Note In some cases, changing the image quality mode may not affect the image quality, depending on the types of images you are shooting. Differences in image quality mode Recorded images are compressed in JPEG format before being stored in memory.
- Page 156 Using a “Memory Stick” – introduction Selecting the size of a moving picture You can select 320 240 or 160 112 of the moving picture size. The default setting is 320 240. (1) Set the POWER switch to MEMORY. Make sure that the LOCK switch is set to the right (unlock) position.
- Page 157 Using a “Memory Stick” – introduction Image size settings/Beeldformaat-instellingen Setting/ Meaning/Werking Instelling Records 640 480 still images./ Opname van stilstaande beelden met 640 480 beeldpunten. Records 320 240 moving pictures./ Opname van bewegende beelden met 320 240 beeldpunten. Records 160 112 moving pictures./ Opname van bewegende beelden met 160 112 beeldpunten.
- Page 158 Using a “Memory Stick” – introduction Approximate time of moving pictures you can record on a “Memory Stick” The time of moving pictures you can record varies depending on which image size you select and the complexity of the subject. 4MB type (supplied)/4MB type (bijgeleverd): Picture size/Beeldformaat Recording time/Opnameduur...
-
Page 159: Recording Still Images On "Memory Stick" - Memory Photo Recording
Stick”. Recording is complete when the bar scroll indicator disappears. Stilstaande beelden opnemen op een “Memory Stick” – MEMORY foto-opnamefunctie – alleen met de DCR-PC9E Op een “Memory Stick” kunt u stilstaande beelden vastleggen. Desgewenst kunt u automatisch negen stilstaande beelden achtereen vastleggen (MULTI SCRN). -
Page 160: Memory Photo Recording
Multi screen mode Your camcorder shoots 9 still images at about 0.5 sec intervals and displays the images on a single page divided into 9 boxes. ( Indicator: Stilstaande beelden opnemen op een “Memory Stick”... - Page 161 Recording still images on “Memory Stick” – Memory photo recording (1) Set the POWER switch to MEMORY. Make sure that the LOCK is set to the right (unlock) position. (2) Press FN to display PAGE1. (3) Press MENU, then set PIC MODE in STILL SET to MULTI SCRN in settings.
-
Page 162: Self-Timer Memory Photo Recording
START/STOP toets. (self-timer) Uitschakelen van de zelfontspanner- opname Druk weer op de SELFTIMER toets, zodat de zelfontspanner-indicator van het schermd verdwijnt, met de camcorder in de opnamepauzestand. U kunt de zelfontspanner- opname niet uitschakelen met de afstandsbediening. zelfontspanner-indicator verschijnt op... - Page 163 Recording still images on “Memory Stick” – Memory photo recording Note The self-timer recording mode is automatically canceled when: – The self-timer recording is finished. – The POWER switch is set to OFF (CHARGE) or VCR. To check the image to be recorded You can check the image with pressing the PHOTO button lightly, then press it deeper to start the self-timer recording.
-
Page 164: Recording An Image From A Tape As A Still Image
Een scène van een cassette overnemen als stilstaand beeld – alleen met de DCR-PC9E Uw camcorder kan de gegevens van bewegende beelden opgenomen op een cassette lezen en deze vastleggen als stilstaand beeld op een “Memory Stick”. -
Page 165: Recording An Image From A Tape As A Still Image
Wanneer het toegangslampje oplicht of knippert Schud niet aan de camcorder en zorg dat er niet tegenaan wordt gestoten. Schakel het apparaat niet uit, verwijder niet het batterijpak en neem de “Memory Stick” niet uit de houder. Anders kunnen de gegevens beschadigd worden of verloren gaan. -
Page 166: Recording A Still Image From Other Equipment
With this connection, you do not need to connect the yellow (video) plug of the A/V connecting cable. Connect an S video cable (optional) to the S video jacks of both your camcorder and the TV or VCR. This connection produces higher quality DV format pictures. - Page 167 Recording an image from a tape as a still image Using the i.LINK cable (DV connecting cable) DV OUT : Signal flow/Signaalstroom Note The “ ” flashes in the following instances. If this happens, eject and insert “Memory Stick“ again, and record distortion-free images. –...
-
Page 168: Recording Moving Pictures On "Memory Stick"S - Mpeg Movie Recording
To stop recording Press START/STOP. Bewegende beelden opnemen op een “Memory Stick” – MPEG filmopname – alleen voor de DCR-PC9E U kunt bewegende beelden met geluid opnemen op een “Memory Stick”. Voor de bediening Plaats een voor opnemen geschikte “Memory Stick”... -
Page 169: Mpeg Filmopname
You can also use the Remote Commander for this operation (p. 48). During recording on “Memory Stick” Do not eject the cassette tape from your camcorder. During ejecting the tape, sound is not recorded on the “Memory Stick.” Bewegende beelden opnemen op een “Memory Stick”... -
Page 170: Recording A Picture From A Tape As A Moving Picture
Press START/STOP. Beelden van een cassette overnemen als bewegende beelden – alleen voor de DCR-PC9E Uw camcorder kan de gegevens van bewegende beelden die zijn opgenomen op een cassette hiervan aflezen en ze vastleggen als bewegende beelden op een “Memory Stick”. Bovendien kan... -
Page 171: Recording A Picture From A Tape As A Moving Picture
NTSC PB weergavefunctie. Wanneer het toegangslampje oplicht of knippert Schud niet aan de camcorder en zorg dat er niet tegenaan wordt gestoten. Schakel het apparaat niet uit, verwijder niet het batterijpak en neem de “Memory Stick” niet uit de houder. Anders kunnen de beeldgegevens beschadigd worden of verloren gaan. -
Page 172: Recording A Moving Picture From Other Equipment
(video) plug of the A/V connecting cable. Connect an S video cable (optional) to the S video jacks of both your camcorder and the TV or VCR. This connection produces higher quality DV format pictures. Beelden van een cassette... - Page 173 TV tuner unit is in use During recording on “Memory Stick” Do not eject the cassette tape from your camcorder. During ejecting the tape, sound is not recorded on the “Memory Stick.” Beelden van een cassette overnemen als bewegende beelden Via aansluiting met een i.LINK kabel...
-
Page 174: Superimposing A Still Image In A "Memory Stick" On A Moving Picture -Memory Mix
Een stilstaand beeld van een “Memory Stick” samenvoegen met bewegende beelden (MEMORY MIX) – alleen met de DCR-PC9E U kunt een stilstaand beeld dat werd opgeslagen op een “Memory Stick”, weergeven over de bewegende beelden die u met de camcorder opneemt. - Page 175 Superimposing a still image in a “Memory Stick” on a moving picture – MEMORY MIX Still image/ M. CHROM Stilstaand beeld M C A M C H R O M Blue/Blauw Still image/ M. LUMI Stilstaand beeld M C A M L U M I Still image/ C.
- Page 176 – MEMORY MIX Recording a superimposed image to tape Before operation •Insert a tape for recording into your camcorder. •Insert a “Memory Stick” recorded with still images into your camcorder. (1) Set the POWER switch to CAMERA. (2) In the standby mode, press FN and select PAGE2.
- Page 177 Superimposing a still image in a “Memory Stick” on a moving picture – MEMORY MIX Items to adjust M. CHROM The colour (blue) scheme of the area in the still image which is to be swapped with a moving picture M.
-
Page 178: Still Image
(MEMORY MIX) Samengestelde beelden opnemen op een “Memory Stick” als stilstaand beeld Alvorens de camcorder te bedienen Plaats een “Memory Stick” met stilstaande beelden in uw camcorder. (1) Zet de POWER schakelaar in de “MEMORY” stand. Zorg dat het LOCK vergrendelknopje naar rechts (in de vrije stand) is geschoven. - Page 179 Superimposing a still image in a “Memory Stick” on a moving picture – MEMORY MIX Items to adjust M. CHROM The colour (blue) scheme of the area in the still image which is to be swapped with a moving picture M.
- Page 180 Druk daarvoor eerst op de OFF toets om terug te keren naar het PAGE2 scherm. De “Memory Stick” die bij deze camcorder is bijgeleverd kan 20 stilstaande beelden bevatten. – Voor de M.CHROM functie: 18 beelden (voor omlijsting e.d.) 100-0001~100-0018 –...
-
Page 181: Copying Still Images From A Tape - Photo Save
MENU Stilstaande beelden van een cassette kopiëren – Foto-opslag – alleen met de DCR-PC9E Met de zoekfunctie kunt u automatisch alleen de stilstaande beelden van een cassette opzoeken, om deze automatisch in volgorde over te nemen op een “Memory Stick”. - Page 182 2. Wanneer het toegangslampje oplicht of knippert Schud niet aan de camcorder en zorg dat er niet tegenaan wordt gestoten. Schakel het apparaat niet uit, verwijder niet het batterijpak en neem de “Memory Stick” niet uit de houder. Anders kunnen de gegevens beschadigd worden of verloren gaan.
-
Page 183: Viewing A Still Image - Memory Photo Playback
Bekijken van een stilstaand beeld – MEMORY foto-weergave – alleen met de DCR-PC9E U kunt de stilstaande beelden die zijn vastgelegd op een “Memory Stick” met deze camcorder weergeven. Hierbij kunt u ook een overzicht van... - Page 184 Viewing a still image – Memory photo playback To play back recorded images on a TV screen •Connect your camcorder to the TV with the A/V connecting cable supplied with your camcorder before the operation. •When operating memory photo playback on a TV or on the LCD screen, the image quality may appear to have deteriorated.
- Page 185 Viewing a still image – Memory photo playback Playing back 6 recorded images at a time (index screen) You can play back 6 recorded images at a time. This function is especially useful when searching for a particular image. (1) Set the POWER switch to MEMORY. Make sure that the LOCK is set to the right (unlock) position.
- Page 186 Viewing a still image – Memory photo playback Note When displaying the index screen, the number appears above each image. This indicates the order in which images are recorded on the “Memory Stick”. These numbers are different from the data file names (p. 147). Image data modified with personal computers or shot with other equipment These files may not be displayed on the index...
-
Page 187: Viewing A Moving Picture - Mpeg Movie Playback
Press MPEG N X. Bewegende beelden bekijken – MPEG filmweergave – alleen met de DCR-PC9E U kunt de bewegende beelden die zijn vastgelegd op een “Memory Stick” met deze camcorder weergeven. Hierbij kunt u ook een overzicht zien van 6 beelden tegelijk, inclusief stilstaande beelden, door het indexscherm te kiezen. - Page 188 Viewing a moving picture – MPEG movie playback To play back recorded images on a TV screen •Connect your camcorder to the TV with the A/ V connecting cable supplied with your camcorder before operation. •Turn the audio volume of the TV down before operation, or noise (howling) may be output from the TV speakers.
-
Page 189: Viewing Images Using Your Computer
•Operations are not guaranteed for all the recommended computer environments mentioned above. Beelden bekijken met uw computer – alleen met de DCR-PC9E U kunt de gegevens die zijn opgenomen op een “Memory Stick” ook weergeven op het scherm van uw personal computer. Opmerkingen •... -
Page 190: Installing The Usb Driver
USB driver installation starts. (4) Follow the on-screen messages to install the USB driver. (5) Connect the USB jack on your camcorder with the USB connector on your computer using the supplied USB cable. (6) Insert a “Memory Stick” into your camcorder, connect the AC power adaptor and set the POWER switch to MEMORY. - Page 191 5 Stel in op “Andere apparatuur”. Stel in op het apparaat met een “?” vraagteken er voor en verwijder dit apparaat. Bijv.: (?) Sony Handycam 6 Zet de camcorder op “OFF (CHARGE)” en maak de USB-kabel los. 7 Start uw computer opnieuw op.
- Page 192 (5) Move the following 2 files from the window opened in step 3 to the System Folder icon in the window opened in step 4 (drag and drop). •Sony Camcorder USB Driver •Sony Camcorder USB Shim (6) When “Put these items into the Extensions folder?”...
-
Page 193: Viewing Images
(1) Turn on the power of your computer and allow Windows to load. (2) Connect one end of the USB cable to the USB jack on the camcorder and the other end to the USB connector on your computer. (3) Insert a “Memory Stick” into your camcorder, and connect the AC power adaptor to your camcorder and then to a wall socket. - Page 194 •“Memory Stick” operations on your camcorder cannot be assured if a “Memory Stick” formatted on your computer is used on your camcorder, or if the “Memory Stick” in your camcorder was formatted from your computer when the USB cable was connnected.
- Page 195 Viewing images using your computer Image file storage destinations and image files Image files recorded with your camcorder are grouped in folders by recording mode. The meanings of the file names are as follows. ssss stands for any number within the range from 0001 to 9999.
-
Page 196: Enlarging Still Images Recorded On "Memory Stick"S - Memory Pb Zoom
END. Vergroten van beelden op een “Memory Stick” – MEMORY PB ZOOM – alleen voor de DCR-PC9E U kunt de op een “Memory Stick” opgenomen stilstaande beelden bij weergave uitvergroten. Alvorens de camcorder te bedienen Plaats een “Memory Stick” in de camcorder. -
Page 197: Memory Pb Zoom
You cannot record images in the “Memory Stick” enlarged by the Memory PB ZOOM mode. Record the images on a VCR using your camcorder as a player. Pictures in the Memory PB ZOOM mode Pictures are not output through the DV jack. -
Page 198: Playing Back Images Continuously - Slide Show
START Weergeven van een doorlopende serie beelden – SLIDE SHOW – alleen met de DCR-PC9E U kunt automatisch een reeks stilstaande beelden achtereen laten weergeven. Deze functie kan bijzonder handig zijn voor het controleren van de opgenomen beelden of voor een presentatie. - Page 199 Select the desired image using –/+ buttons before step 4. To view the recorded images on TV Connect your camcorder to a TV with the A/V connecting cable supplied with your camcorder before operation. If you change the “Memory Stick” during operation The slide show does not operate.
-
Page 200: Preventing Accidental Erasure - Image Protection
LOCK You cannot carry out image protection. Beveiligen tegen per ongeluk wissen – Wispreventie – alleen met de DCR-PC9E Om te voorkomen dan belangrijke opnamen per ongeluk gewist zouden kunnen worden, kunt u afzonderlijke beelden beveiligen tegen wissen of overschrijven. -
Page 201: Deleting Images
If the write-protect tab on the “Memory Stick” is set to LOCK You cannot delete images. Wissen van beelden – alleen met de DCR-PC9E U kunt de beelden die zijn opgeslagen op een “Memory Stick” er ook vanaf wissen. Wissen van een enkel beeld Alvorens de camcorder te bedienen Plaats een “Memory Stick”... -
Page 202: Deleting Selected Images On The Index Screen
(1) Zet de POWER schakelaar in de “MEMORY“ stand. Zorg dat het LOCK vergrendelknopje naar rechts (in de vrije stand) is geschoven. (2) Druk op de INDEX toets van de camcorder om het indexscherm te laten verschijnen. (3) Druk op de DEL wistoets. Raak vervolgens elk beeld aan dat u wilt wissen. -
Page 203: Deleting All The Images
Deleting all the images You can delete all the unprotected images in a “Memory Stick”. Before operation Insert a “Memory Stick” into your camcorder. (1) Set the POWER switch to MEMORY. Make sure that the LOCK is set to the right (unlock) position. -
Page 204: Writing A Print Mark - Print Mark
4 again . The Markeren van af te drukken beelden – PRINT MARK – alleen met de DCR-PC9E U kunt de bestanden markeren van de stilstaande beelden die u later wilt afdrukken. Dan kunt u later de gemarkeerde bestanden van de af te drukken beelden gemakkelijk herkennen. -
Page 205: Writing A Print Mark
Writing a print mark – PRINT MARK If the write-protect tab on the “Memory Stick” is set to LOCK You cannot write print marks on still images. Moving pictures You cannot write print marks on moving pictures. Markeren van af te drukken beelden –... -
Page 206: Troubleshooting
If you run into any problem using your camcorder, use the following table to troubleshoot the problem. If the problem persists, disconnect the power source and contact your Sony dealer. If “C:ss:ss” appears on the screen, the self-diagnosis display function has worked. See page 213. - Page 207 • If 10 minutes elapse after you set the POWER switch to CAMERA or DEMO MODE is set to ON in the menu settings without a cassette inserted, your camcorder automatically starts the demonstration. c Insert a cassette or press the LCD screen. The demonstration stops.
- Page 208 Types of trouble and their solutions In the playback mode Symptom Playback is not possible. There are horizontal lines on the picture or the playback picture is not clear or does not appear. No sound or only a low sound is heard when playing back a tape.
- Page 209 Use a charged battery pack (p. 18, 19). • Moisture condensation has occurred. c Remove the cassette and leave your camcorder for at least 1 hour to acclimatize (p. 234). • The gold-plated connector of the tape is dirty or dusty.
- Page 210 Delete unnecessary images and record again (p. 201). • The “Memory Stick” formatted incorrectly is inserted. c Format the “Memory Stick” using your camcorder or use another “Memory Stick” (p. 138). • The write-protect tab on the “Memory Stick” is set to LOCK.
- Page 211 VCR and your camcorder (p. 97, 99). • The camcorder is connected to DV equipment of other than Sony using the i.LINK cable (DV connecting cable). c Set it to IR (p. 103). • Setting programme on a blank portion of the tape is attempted.
- Page 212 • The battery pack is not properly installed. c Install it properly (P. 18). • Something is wrong with the battery pack. c Please contact your Sony dealer or local authorized Sony service facility. • The DISPLAY/TOUCH PANEL button is pressed.
-
Page 213: Self-Diagnosis Display
After reconnecting the power source, operate your camcorder. • A malfunction that you cannot service has occurred. c Contact your Sony dealer or local authorized Sony service facility and inform them of the 5-digit code. (example: E:61:10) C:21:00... -
Page 214: Warning Indicators And Messages
•Moisture condensation has occurred (p. 234). •The tape has run out. •The self-diagnosis display function is activated (p. 213). - The image is protected* (DCR-PC9E only) Slow flashing: •The image is protected (p. 200). •The write-protect tab on the “Memory Stick” is set to LOCK (p. - Page 215 There is more than two same directories (p. 183). The tape has reached the end of the tape. Insert a cassette tape. You press the PHOTO button on your camcorder while deleting data in a “Memory Stick”. You press the PHOTO button on your camcorder while formatting a “Memory Stick”.
-
Page 216: Verhelpen Van Storingen
Als het probleem aan de hand hiervan niet te verhelpen is, neemt u dan a.u.b. contact op met uw Sony handelaar of een plaatselijke erkende Sony onderhoudsdienst. Als er een code van vijf letters en cijfers zoals “C:ss:ss” op het scherm verschijnt, dan is de zelfdiagnosefunctie in werking getreden. - Page 217 Oorzaak en/of oplossing • Ongeveer 10 minuten nadat u de POWER schakelaar op “CAMERA” zet, zonder een cassette in de camcorder, begint automatisch een demonstratie van de mogelijkheden; of wellicht is de DEMO MODE functie in het instelmenu in de “ON”...
- Page 218 Problemen oplossen In de weergavestand Probleem Het afspelen begint niet. Er zijn horizontale strepen in het beeld of de videoweergave is onduidelijk of helemaal niet te zien. Bij afspelen van een videocassette klinkt er niet of nauwelijks geluid. De opnamedatum wordt niet aangegeven of de datumzoekfunctie werkt niet.
- Page 219 Gebruik een opgeladen batterijpak of sluit de netspanningsadapter aan (zie blz. 18, 19). • Er is vocht uit de lucht in de camcorder gecondenseerd. c Verwijder de videocassette en laat uw camcorder ten minste 1 uur lang ongebruikt op temperatuur komen (zie blz. 234).
- Page 220 Problemen oplossen Bij gebruik van de “Memory Stick” – alleen voor de DCR-PC9E Probleem De “Memory Stick” werkt niet. Het opnemen op de “Memory Stick” lukt niet. Het gekozen beeld kan niet gewist worden. Het formatteren van de “Memory Stick” lukt niet.
- Page 221 (zie blz. 97, 99). • De camcorder is aangesloten op DV apparatuur van een ander merk dan Sony met behulp van een i.LINK kabel (DV aansluitsnoer) (zie blz. 103). c Zet de camcorder in de “IR” stand.
- Page 222 Zorg dat het batterijpak juist is aangesloten. • Er is iets mis met het batterijpak (zie blz. 18). c Neem contact op met uw Sony dealer of een plaatselijke erkende Sony onderhoudsdienst. • De DISPLAY/TOUCH PANEL toets is ingedrukt.
-
Page 223: Zelfdiagnose-Aanduidingen
C:21:ss C:22:ss C:31:ss C:32:ss E:61:ss E:62:ss Als het niet lukt een bepaald probleem te verhelpen, raadpleegt u dan a.u.b. uw Sony handelaar of een plaatselijke erkende Sony onderhoudsdienst. LCD scherm of zoekerbeeld Zelfdiagnose-aanduiding •C:ss:ss Dit probleem kunt u eenvoudig zelf verhelpen. -
Page 224: Waarschuwingsaanduidingen En Mededelingen
Zie voor nadere bijzonderheden de bladzijden die tussen haakjes “( )” staan vermeld. Waarschuwingsindicators 100-0001 Waarschuwing betreffende een bestand (alleen voor de DCR-PC9E) Langzaam knipperend: •Het bestand is aangetast. •Het bestand is onleesbaar. - Page 225 1) 2) (zie blz. 184). Er is geen “Memory Stick” in de camcorder geplaatst (zie blz. 150). U probeert op een “Memory Stick” beeld en geluid op te nemen dat niet door de camcorder kan worden opgenomen (zie blz. 171).
-
Page 226: Additional Information
8-mm of Digital8, VHS, VHS-C, S-VHS-C, Betamax of (Cassette opnemen door; camcorder in de “VCR” (DCR-PC9E)/ ”PLAYER” (DCR-PC6E) stand. teken op de videocassette teken bedraagt 4 kilobytes. Uw camcorder Dit is het mini-DV beeldmerk. Dit is het cassettegeheugen beeldmerk. Hi-8,... -
Page 227: Audio Mode
Bij opnemen (alleen met de DCR-PC9E) U kunt met deze camcorder geen beeldmateriaal opnemen dat beschermd is door een auteursrecht-beveiligingssignaal. De waarschuwing “COPY INHIBIT” zal op het... - Page 228 Main sound and sub sound STEREO Main sound Sub sound Deze camcorder is niet geschikt voor het opnemen van tweetalig geluid. Juiste omgang met ini-DV cassettes Een etiket op een mini-DV cassette plakken Plak een etiket alleen op de hieronder aangegeven plaats [a] op de cassette, om storing in de werking van de camcorder te vermijden.
-
Page 229: About The "Infolithium" Battery Pack
(NP-FM70/FM90/FM91, optional). •Be certain to turn the POWER switch to OFF (CHARGE) when not taking shots or playing back on your camcorder. The battery pack is also consumed when your camcorder is in the standby mode or playback is paused. - Page 230 •Soms kan de E batterij-leeg aanduiding gaan knipperen vanwege de omgevingstemperatuur of andere opname-omstandigheden, ook al kunt u de camcorder in feite nog vijf tot tien minuten langer gebruiken. Bewaren van het batterijpak •Om een batterijpak in goede staat te houden als...
-
Page 231: About I.link
About i.LINK The DV (DCR-PC9E) or DV OUT (DCR-PC6E) jack on this unit is an i.LINK-compliant DV OUT (DCR-PC6E) or DV IN/OUT (DCR-PC9E) jack. This section describes the i.LINK standard and its features. What is i.LINK? i.LINK is a digital serial interface for handling digital video, digital audio and other data in two directions between equipment having the i.LINK... - Page 232 Nadere aanwijzingen en voorzorgsmaatregelen bij het aansluiten van dit apparaat vindt u in de gebruiksaanwijzing van het aan te sluiten apparaat. Vereiste i.LINK aansluitkabel Gebruik de Sony i.LINK 4-pins naar 4-pins kabel (voor het DV kopiëren). i.LINK en het teken zijn handelsmerken.
-
Page 233: Using Your Camcorder Abroad
Using your camcorder abroad Using your camcorder abroad You can use your camcorder in any country or area with the AC adaptor supplied with your camcorder within 100 V to 240 V AC, 50/60 Hz. Your camcorder is a PAL system based camcorder. -
Page 234: Maintenance Information And Precautions
U kunt de camcorder weer gebruiken als bij het opnieuw inschakelen de % indicator niet verschijnt. Als er vocht uit de lucht in de camcorder begint te condenseren, kan de camcorder de condensatie nog niet onmiddellijk waarnemen. Dan kan de... - Page 235 If the above problem, [a], [b] or [c] occurs, clean the video heads for 10 seconds with the Sony DVM-12CLD cleaning cassette (optional). Check the picture and if the above problem persists, repeat cleaning.
- Page 236 It will be completely discharged in about 3 months if you do not use your camcorder at all. Even if the built-in rechargeable battery is not charged, it will not affect the camcorder operation.
- Page 237 (1) Set the POWER switch to OFF (CHARGE). (2) Eject the tape from your camcorder, then disconnect any connecting cable from your camcorder. (3) Set the POWER switch to VCR (DCR-PC9E)/ PLAYER (DCR-PC6E) while pressing DISPLAY/TOUCH PANEL on your camcorder, then keep pressing DISPLAY/ TOUCH PANEL for about five seconds.
- Page 238 •If any solid object or liquid get inside the casing, unplug your camcorder and have it checked by a Sony dealer before operating it any further. •Avoid rough handling or mechanical shock. Be particularly careful of the lens.
- Page 239 •Wanneer u de camcorder geruime tijd niet gebruikt en bij langdurige opslag dient u van tijd tot tijd even de camcorder in te schakelen, de “CAMERA” en de “VCR” (DCR-PC9E)/ ”PLAYER” (DCR-PC6E) functies te bedienen en ongeveer 3 minuten lang een videoband af te spelen.
-
Page 240: About Care And Storage Of The Lens
Om schimmelgroei te voorkomen, dient u het apparaat regelmatig te onderhouden. Het is aanbevolen uw camcorder minstens eens per maand een keer in te schakelen en even te gebruiken, dat is de beste manier om het apparaat in goede staat te houden. - Page 241 •If you touch the liquid, wash it off with water. •If the liquid get into your eyes, wash your eyes with a lot of water and then consult a doctor. If any problem occurs, unplug your camcorder and contact your nearest Sony dealer. Onderhoud en voorzorgsmaatregelen Betreffende gewone staafbatterijen...
-
Page 242: Specifications
When using the AC power adaptor: Approx. 1 min. and 45 seconds Viewfinder Electric viewfinder (colour) Total dot number: DCR-PC9E: 180 000 (800 225) DCR-PC6E: 113 578 (521 218) Image device 4.5 mm (1/4 type) CCD (Charge Coupled Device) Approx. 800 000 pixels... -
Page 243: Battery Pack
20.5 55.6 mm (1 9/16 13/16 2 1/4 in.) (w/h/d) Mass (approx.) 65 g (2.3 oz) Type Lithium ion “Memory Stick” (DCR-PC9E only) Memory Flash memory 4MB: MSA-4A Operating voltage 2.7-3.6V Power consumption Approx. 45mA in the operating mode Approx. 130µA in the standby mode Dimensions (approx.) -
Page 244: Technische Gegevens
Op stroom van de netspanningsadapter: Ca. 1 min. en 45 seconden Beeldzoeker Elektronische zoeker (kleur) Totaal aantal beeldpunten DCR-PC9E: 180.000 (800 225) DCR-PC6E: 113.578 (521 218) Beeldvormend orgaan 4,5 mm (1/4-inch) CCD (Charge Coupled Device) Ca. 800.000 beeldpunten (Effectief: Ca. 400.000 beeldpunten) - Page 245 Technische gegevens Batterijpak NP-FM30 Maximale uitgangsspanning 8,4 V gelijkstroom Uitgangsspanning 7,2 V gelijkstroom Capaciteit 5,0 Wh (700 mAh) Bedrijfstemperatuur 0 °C tot 40 °C Afmetingen (ca.) 38,2 20,5 55,6 mm (b/h/d) Gewicht (ca.) 65 g (gram) Type Lithium-ionenbatterij “Memory Stick” (alleen bij de DCR- PC9E) Type geheugen...
-
Page 246: Quick Reference
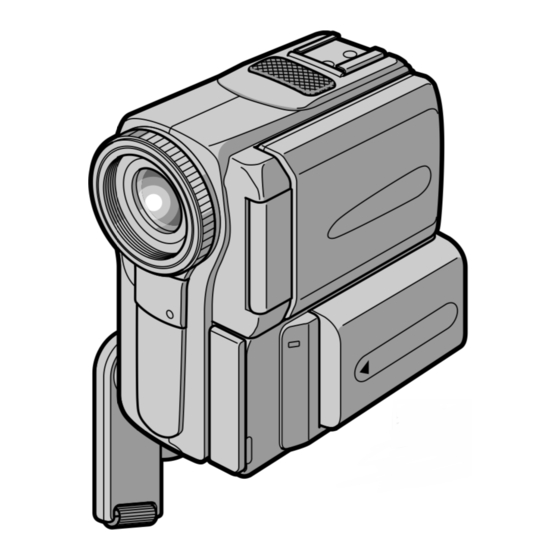
4 CHARGE lamp (p. 19) 5 Battery/Battery terminal cover (p. 18) 6 Eyecup 7 Viewfinder (p. 36) 8 LOCK (DCR-PC9E only) (p. 30) 9 POWER switch (p. 30) 0 START/STOP button (p. 30) qa BATT (battery) release lever (p. 18) - Page 247 This jack has the same function as the jack indicated as CONTROL L or REMOTE. qg FOCUS button (p. 76) qh S VIDEO jack (DCR-PC9E) /S VIDEO OUT jack (DCR-PC6E) (p. 53, 58, 97) qj Holding Grip About the Holding Grip Hold the Holding Grip firmly as illustrated.
- Page 248 Your camcorder is equipped with a Carl Zeiss lens which can reproduce a fine image. The lens for your camcorder was developed jointly by Carl Zeiss, in Germany, and Sony Corporation. It adopts the MTF* measurement system for video camera and offers a quality as the Carl Zeiss lens.
- Page 249 PHOTO button (p. 55, 159) ef Power zoom lever (p. 37) eg DISPLAY/TOUCH PANEL button (p. 48) eh RESET button (p. 212) ej Access lamp (DCR-PC9E only) (p. 150) ek Grip Strap Fastening the grip strap Fasten the grip strap firmly.
- Page 250 Plaats en functie van de bedieningsorganen el Insteekopening voor “Memory Stick” (alleen op de DCR-PC9E) (blz. 150) r; Zoekerlens-scherpstelknopje (blz. 36) ra Cassettehouderdeksel (blz. 27) rs Uitwerpknopje voor “Memory Stick” (MEMORY EJECT) (alleen op de DCR-PC9E) (blz.
-
Page 251: Remote Commander
Power zoom button (p. 37) Plaats en functie van de bedieningsorganen Afstandsbediening De toetsen op de afstandsbediening met hetzelfde opschrift als die op de camcorder zelf hebben ook dezelfde functie. RMT-814 1 Foto-opnametoets (PHOTO) (blz. 55, 159) 2 Beeldscherm-informatietoets (DISPLAY) (blz. - Page 252 VTR 2. Commander modes 1, 2 and 3 are used to distinguish your camcorder from other Sony VCRs to avoid remote control misoperation. If you use another Sony VCR in the Commander mode VTR 2, we recommend changing the commander mode or covering the sensor of the VCR with black paper.
-
Page 253: Operation Indicators
1 Cassette memory indicator (p. 226) 2 Remaining battery time indicator (p. 38) 3 Zoom indicator (p. 37)/Exposure indicator (p. 73)/Data file name indicator (DCR-PC9E only) (p. 147) 4 Digital effect indicator (p. 65)/MEMORY MIX indicator (DCR-PC9E only) (p. 174)/ FADER indicator (p. - Page 254 (DCR-PC9E only) (p. 184) w; ZERO SET MEMORY indicator (p. 89) wa END SEARCH indicator (p. 44) ws DV IN indicator (DCR-PC9E only) (p. 118)/A/ V t DV indicator (DCR-PC9E only) (p. 113) wd Audio mode indicator (p. 139) wf Data file name indicator (DCR-PC9E only) (p.
-
Page 255: Index
English Index A, B AC power adaptor ... 19 Adjusting viewfinder ... 36 Audio dubbing ... 121 AUDIO MIX ... 136 Audio Mode ... 127, 139 AUTO SHTR ... 135 A/V connecting cable ... 53, 97 BACK LIGHT ... 40 Battery pack ... -
Page 256: Index
FOCUS scherpstelschakelaar ... 76 Formatteren ... 144 Foto-bandopnamefunctie ... 55 Foto-opslagfunctie (PHOTO SAVE) ... 181 Fotoserie-presentatie (SLIDE SHOW) ... 198 Sony Corporation Printed in Japan Fotoserie-weergave ... 96 Foto-zoekfunctie ... 94 FRAME REC beeld-voor-beeld opname ... 81 G, H Geheugen-dubbelbeeldfunctie (MEMORY OVERLAP) ...