
Related Manuals for Logicube Falcon-NEO


Summary of Contents for Logicube Falcon-NEO
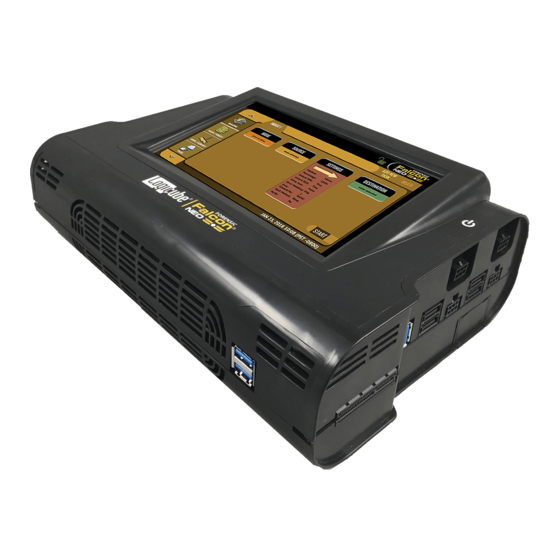
- Page 1 ® Falcon -NEO User’s Manual Logicube, Inc. Chatsworth, CA 91311 Phone: 818 700 8488 Fax: 818 700 8466 Version: 2.0 Date: 01/22/2019 MAN-FALCON-NEO ® -NEO User’s Manual Logicube Falcon...
-
Page 2: Limitation Of Liability And Warranty Information
LOGICUBE IS NOT LIABLE FOR ANY INCIDENTAL OR CONSEQUENTIAL DAMAGES, INCLUDING, BUT NOT LIMITED TO PROPERTY DAMAGE, LOSS OF TIME OR DATA FROM USE OF A LOGICUBE PRODUCT, OR ANY OTHER DAMAGES RESULTING FROM PRODUCT MALFUNCTION OR FAILURE OF (INCLUDING WITHOUT... - Page 3 MATERIALS BASIS. LIMITED WARRANTY FOR ONE YEAR FROM THE DATE OF SALE (THE “WARRANTY PERIOD”) LOGICUBE WARRANTS THAT THE PRODUCT (EXCLUDING CABLES, ADAPTERS, AND OTHER “CONSUMABLE” ITEMS) IS FREE FROM MANUFACTURING DEFECTS IN MATERIAL AND WORKMANSHIP. THIS LIMITED WARRANTY COVERS...
-
Page 4: Rohs Certificate Of Compliance
LEGAL RIGHTS, AND YOU MAY HAVE OTHER RIGHTS WHICH VARY FROM JURISDICTION TO JURISDICTION. RoHS Certificate of Compliance LOGICUBE PRODUCTS COMPLY WITH THE EUROPEAN UNION RESTRICTION OF THE USE OF CERTAIN HAZARDOUS SUBSTANCES IN ELECTRONIC EQUIPMENT, ROHS DIRECTIVE (2002/95/EC). THE ROHS DIRECTIVE PROHIBITS THE SALE OF CERTAIN ELECTRONIC EQUIPMENT CONTAINING SOME HAZARDOUS SUBSTANCES SUCH AS MERCURY, LEAD, CADMIUM, HEXAVALENT CHROMIUM AND CERTAIN FLAME-RETARDANTS IN THE EUROPEAN UNION. -
Page 5: Table Of Contents
........................... 13 OUCH CREEN 3: QUICK START ...................... 14 3.0 Q ..........................14 UICK TART UIDE 3.0.1 ATA Security Locked Drives ..................14 3.1 I ............................16 MAGING 3.1.1 Step-By-Step Instructions – Imaging ................17 ® -NEO User’s Manual Logicube Falcon... - Page 6 4.3.7 Verify Hash ......................... 46 4.3.8 Special Settings in File to File mode ................46 4.3.8.1 Root Directory ..................... 46 4.3.8.2 Output Format ....................46 4.3.8.3 Filter Settings ...................... 47 4.3.8.3.1 Path Filter ..........................48 ® -NEO User’s Manual Logicube Falcon...
- Page 7 5.6.2 Important Notes About Using the File Browser ............77 5.7 L ..............................77 5.8 S ............................78 TATISTICS 5.8.1 About Screen ......................78 5.8.2 Adv. Drive Statistics ....................79 5.8.3 Network Interface Stats ....................79 5.8.4 Debug Logs ......................... 79 ® -NEO User’s Manual Logicube Falcon...
- Page 8 ECRYPTING A ALCON NCRYPTED RIVE WITHOUT A ALCON 7.3.1 Which Decryption Software to Use? ................ 107 7.3.2 Decrypting Using VeraCrypt ..................107 7.3.3 Decrypting Using TrueCrypt ..................109 7.3.4 Decrypting using FreeOTFE ..................112 ® -NEO User’s Manual Logicube Falcon...
- Page 9 14: OPTIONS ......................138 14.0 O – I ........................ 138 PTIONS NTRODUCTION 14.1 T ™ 3/USB-C I/O C ....................138 HUNDERBOLT 14.1.1 Installing the Thunderbolt 3/USB-C I/O Card ............139 14.2 F .......................... 141 ODULE ® -NEO User’s Manual Logicube Falcon...
- Page 10 14.3 F -NEO SCSI M ......................143 ALCON ODULE 14.3.1 Connecting the SCSI Module to the Falcon-NEO ............ 144 14.3.2 Disconnecting Drives from the SCSI Module ............144 14.3.3 Disconnecting the SCSI Module ................145 14.4 USB 3.0 SATA A ......................
-
Page 11: 1: Introduction
The next-generation of our ground-breaking Falcon® forensic imager, the Falcon®-NEO has been engineered specifically for digital forensic investigations. Delivering high performance and advanced features, the Falcon-NEO is designed to meet the challenges of digital investigations head-on. Efficient and secure digital evidence collection is accomplished with a feature-set that provides sophisticated functionality with a goal to shorten acquisition time. - Page 12 Falcon-NEO. Users can view the drive’s partitions and contents and view text files, jpeg, PDF, XML, HTML files directly on the Falcon-NEO. Preview over a network via SMB or iSCSI (as an iSCSI target). 3rd party analysis tools can be used with SMB or iSCSI methods.
- Page 13 S.M.A.R.T. data. * The Forensic Falcon-NEO achieves speeds surpassing 50GB/min using solid state “suspect” drives that contain a freshly installed Windows “X” OS and random data. Settings used are e01/ex01 image format, with compression and with verify “on”. The specification and condition of the suspect hard drives as well as the mode, image format and settings used during the imaging process may affect the achieved speeds.
-
Page 14: In The Box
GETTING STARTED 1.2 In the Box The Falcon-NEO is shipped in a soft-sided carrying case that includes: The Logicube Falcon-NEO unit AC adapter/Power supply and US power cord QTY: 6 – SAS/SATA data & power cables QTY: 2 – CAT7 6FT network cables ... -
Page 15: Specifications
USB Power Cable. Eliminates the need for additional power supplies when using USB to SATA adapters connected to USB ports on the Falcon-NEO. Connect up to 3 USB to SATA adapters. Available as a kit bundled with 3 USB 3.0 to SATA adapters. -
Page 16: 2: Getting Started
2: Getting Started 2.0 Overview of the Falcon-NEO Special Icons – Throughout this manual, there are two icons that can be seen. Please pay close attention when any of these two icons are found. These icons highlight additional information or importa`nt warnings on specific topics. - Page 17 GETTING STARTED ® -Neo User’s Manual Logicube Falcon...
-
Page 18: Turning The Falcon-Neo On And Off
2.1 Turning the Falcon-NEO On and Off The Falcon-NEO has two DC IN ports located in the back of the device. Any of these two ports can be used. The second DC IN port is available for possible future increases in power requirements. -
Page 19: Connecting Destination Drives
Not labeled: Two 6-pin power ports for SAS_S1 and SAS_S2 that have lines corresponding to the proper data port. Not labeled: Two I/O ports for use with optional Logicube I/O expansion cards. The Falcon-NEO Source ports are hot swappable (including the PCIe ports). -
Page 20: Using Usb/Esata Drives Or Enclosures
Not labeled: Four 6-pin power ports for SAS_D1, SAS_D2, SATA_D3, and SATA_D4 that have lines corresponding to the proper data port. Not labeled: One I/O port for use with optional Logicube I/O expansion cards. Not shown: Two front USB 3.0 ports are available as Destination ports or input device ports for use with wired keyboards or mice. -
Page 21: Connecting M.2/Pcie/Mpcie Drives
NEO which includes M.2 adapters, a mini PCIe adapter, and a PCIe extender cable. 2.2.5 Connecting an External Optical Drive (CD/DVD/Blu-ray) An optical drive can be connected to the Source USB port. The Falcon-NEO can then image the contents of the CD, DVD, or Blu-ray disc. -
Page 22: Front And Rear Ports
H – Start icon 2.4 Front and Rear Ports The Falcon-NEO has two front USB 3.0 ports, an HDMI port, two 10GbE ports, and two DC IN power ports. 2.4.1 Front Ports The Falcon-NEO has two front USB 3.0 ports. These ports serve two purposes: As two additional USB 3.0 Destination ports (USB_D2 and USB_D3). -
Page 23: Hdmi
2.5 Touch Screen The Falcon-NEO features a 7” color LCD capacitive touch screen that allows the user to quickly input commands. The screen is bright, easy to read, and supports swipe gestures. -
Page 24: 3: Quick Start
Chapter 4: Imaging Chapter 5: Types of Operation. The Falcon-NEO can perform up to five (5) tasks per mode of operation (specifically Image, Hash, and/or Wipe). It is highly recommended to change the passwords for built-in accounts. Instructions on how to change the passwords to the... - Page 25 The drive will remain unlocked temporarily until the drive is disconnected or powered down. If the drive is disconnected then re-connected, it will be locked again. While the drive is unlocked, a Secure Erase wipe will permanently remove the lock password. ® -Neo User’s Manual Logicube Falcon...
-
Page 26: Imaging
EX01, or DMG. Compression is available for E01 and EX01 formats. File to File - (Targeted Imaging feature) – The Falcon-NEO can shorten acquisition time by creating a logical image by using pre-set filters, custom filters, files signatures filter, and/or keywords search function to select and acquire only the specific files needed. -
Page 27: Step-By-Step Instructions - Imaging
Info screen by entering a Case/File name. See Section 4.3.1 for more information. The Falcon-NEO will convert any non-POSIX portable characters used in Case/File Name field to underscores (_) when creating the log or file names. POSIX portable characters are: Uppercase A to Z Period (.) -
Page 28: Imaging Bitlocker Encrypted Drives
QUICK START For DD, E01, Ex01, and DMG, the Falcon-NEO must be used to format drives. If the Destination drive is not formatted by the Falcon-NEO, the Location will appear as “(NOT_MOUNTED)” and a format icon will appear in the Format column. Tap the (Format) icon to format the Destination drive. - Page 29 BitLocker password. You can also use the long recovery key by tapping Recovery Key then entering the BitLocker Recovery Key. When finished, tap the OK icon to continue. If the password is correct, the screen will go back to the ‘Select Partition’ screen. ® -Neo User’s Manual Logicube Falcon...
-
Page 30: Targeted/Logical Imaging
3.1.3 Targeted/Logical Imaging The Falcon-NEO has the capability to perform targeted or logical imaging using File to File mode. Using various filters, the Falcon-NEO can image only the files found within the ® -Neo User’s Manual... -
Page 31: Imaging To Or From A Network
3.1.4 Imaging To or From a Network A network repository or location must be set for the Falcon-NEO to be able to image to or from a network repository/location. Depending on the type of repository added (for example CIFS or iSCSI), the repository will appear as a Source, Destination, or both. -
Page 32: Parallel Imaging
3.1.6 Parallel Imaging Falcon-NEO can perform Parallel Imaging. A user can simultaneously perform multiple imaging tasks from the same source drive to multiple destinations using different imaging formats. For example, image to a network location or a destination drive using the E01 format while imaging to a different destination drive using native/mirror or DD format. -
Page 33: Drive Spanning
Destination drive: When the Destination drive is full and the remaining data to be will not fit, Falcon-NEO will prompt for another drive. -
Page 34: Blank Disk Check
QUICK START 3.1.8 Blank Disk Check The Falcon-NEO can check a drive to see if it has been wiped by the Falcon-NEO. This check will not be accurate if Secure Erase or Pattern Buffers was used to wipe the drive. -
Page 35: Step-By-Step Instructions - Drive Hash Or Case Verify
This mode is Logical Block Address (LBA) based and will hash drives based on the number of LBAs. If multiple drives are selected to be hashed, the Falcon-NEO will hash up to the LBA value of the smallest capacity drive. If drives with different capacities need to be hashed, it is recommended to start one task per drive. -
Page 36: Wipe/Format
(up to 7 passes) along with the type of data written for each pass. In addition, a 7-pass DoD wipe can be set with pre-selected pass values. The Falcon-NEO can verify each pass value through a setting. Any HPA, DCO, or ACS3 can also be wiped. -
Page 37: Push
Optional: Tap Case Info to set the Case/File Name, Case ID, Examiner, Evidence ID, or Case Notes. Tap the Start icon to start the wipe task. The Falcon-NEO will perform a Secure Erase first (if selected), then a Wipe Pattern (if selected), then finally a Format (if selected). -
Page 38: Step-By-Step Instructions - Push
ID, or Case Notes. Verify the settings then tap the OK icon to continue. Tap the Destination icon and select the destination or repository to push the images to. Tap the OK icon to continue. ® -Neo User’s Manual Logicube Falcon... -
Page 39: Task Macro
Select a macro (Macro 1 through Macro 5). Tap the Task icon to select up to nine (9) operations. Set up to 9 operations by tapping on each operation in order (Operation 1, Operation 2, etc.) ® -Neo User’s Manual Logicube Falcon... -
Page 40: File Browser
Falcon-NEO’s file browser. The Falcon-NEO will show the partitions and the contents of each partition. Note that only some files can be opened by the Falcon-NEO. Files opened by the file browser will not alter the drive in any way. For detailed information on how to use the file browser and important notes, Section 5.6.2... -
Page 41: Step-By-Step Instructions - Viewing Or Exporting Logs
The log files in the Destination drive are available in PDF, HTML, and XML formats. The log files may contain a “partial hash”. This hash is for Falcon-NEO’s internal purposes only and cannot be validated by any other means. The partial hash is a snapshot of the hash engine at the end of each segment file which the Falcon- NEO can use to catch transfer errors and re-try if possible. -
Page 42: Deleting Log Files
If a log file deletion password was created, a screen will appear prompting to enter the log file deletion password. Enter the log file deletion password. Tap the ® -Neo User’s Manual Logicube Falcon... -
Page 43: Accessing The Logs Over A Network
5.10.2. 3.7.4 Accessing the Logs Over a Network The log files can also be accessed through a network on a computer if the Falcon-NEO is connected on the same network. Open File Explorer or a similar window and browse to the hostname or the IP address found in the Statistics screen. -
Page 44: Statistics
3.8 Statistics This will display the following tabs: About, Adv. Drive Statistics, Network Interface Stats, Debug Logs, and Help. Details on the different Statistics screens can be found Section 5.8: Statistics. ® -Neo User’s Manual Logicube Falcon... -
Page 45: Manage Repositories
Additionally, a QR code can be found on this page. When the QR code is scanned on a device connected to the same network the Falcon-NEO is connected to, it will open a web browser to the Falcon-NEO’s IP address to access the web interface. -
Page 46: Network Settings
POWER OFF – The Falcon-NEO can be remotely turned off or restarted by going to this tab. Additionally the Falcon-NEO screen can be refreshed. DRIVE POWER – Inactive drives connected to the Falcon-NEO can be set to go to standby mode in this tab. The default is set to 0 minutes (OFF). -
Page 47: 4: Imaging
4.1 Mode Tap this icon to choose between the following imaging modes: Drive to File – Images the Source to any of the following image output file formats: DD, E01, EX01, or DMG. ® -NEO User’s Manual Logicube Falcon... -
Page 48: Source Or Case
BitLocker encrypted volume requires going through the Partition to File mode. Net Traffic to File – Falcon-Neo can capture network traffic data using the Net Traffic to File imaging mode. Network traffic that can be captured can include local network activity, internet activity, and VOIP activity. -
Page 49: Case Info
Case/File Name is set to TestCase, the log name and file name will be called TestCase. Subsequent Case/File Names that are the same will be identified with a dash, then the next image number, for example, TestCase-1, TestCase-2, etc. ® -Neo User’s Manual Logicube Falcon... -
Page 50: Hpa/Dco/Acs3/Trim
Source drive. For example, if the Source drive is a 128 GB drive and the Destination drive is a 6 TB drive, the Falcon-NEO will limit the Destination drive’s capacity to 128 GB to match the Source drive exactly. - Page 51 NO. Drive Trim only works with ATA drives connected to the SAS/SATA Destination ports. Drive trim will not work with SAS drives or drives connected to the USB, PCIe, or I/O ports. ® -Neo User’s Manual Logicube Falcon...
- Page 52 LBAS: Edit to at least 1 LBA PASSES: By default, this will have a value of 00 To set the LBA to 1, go to LBAS then tap the edit icon and enter the value: 1 ® -Neo User’s Manual Logicube Falcon...
-
Page 53: Error Handling
Skip, Falcon-NEO will write a zero on the corresponding sector or position in the Destination drive or file. In Drive to File and Partition to File, Falcon-NEO also has a setting for Error Granularity and Reverse Read: 4.3.3.1 Error Granularity In Drive to File and Partition to File bad sectors are skipped. -
Page 54: Hash/Verification Method
File to File Partition to File Net Traffic to File SHA-1+MD5 – Dual Hash. Uses both SHA-1 and MD5 algorithms to hash the Source. This is available when using the following modes: Drive to File ® -Neo User’s Manual Logicube Falcon... -
Page 55: File Image Method Settings
Destination (Target). For forensic purposes, this is typically set to 0%, or the beginning of the Destination (Target). The specific number of blocks can be set for each of the options by tapping the: icon. ® -Neo User’s Manual Logicube Falcon... -
Page 56: Verify Hash
For example, the fourth partition of the drive on SAS_S1 can be selected by tapping the folder icon. The folder icon is only selectable after a Source is selected. 4.3.8.2 Output Format The Output format screen shows the following selections: ® -Neo User’s Manual Logicube Falcon... -
Page 57: Filter Settings
For example, if only video files are selected in the Signature Based File Category filter, it will narrow down the results of the path filter to only video files within the results of the first filter. ® -Neo User’s Manual Logicube Falcon... -
Page 58: Path Filter
There are several websites with articles explaining the different expressions than can be used. Simply search the Internet for “POSIX Extended Regular Expressions.” Below are some examples of what can be entered in the Custom Filter: ® -Neo User’s Manual Logicube Falcon... -
Page 59: Date Filter
Using the example above (in example 3), you can use the following syntax: .*\.(pic)$ This will find all files with the “pic” extension and nothing afterwards. Using the examples above, it will find “filename.pic” but not “filename.pict”. 4.3.8.3.2 Date Filter ® -Neo User’s Manual Logicube Falcon... -
Page 60: File Signature
This is the second level of filtering and will narrow down the results of the first filter to only the selected file categories, if selected. 4.3.8.3.4 Keywords Allows the user to set specific keywords. The Falcon-NEO will search specific keywords within the results of the previous filters. ®... -
Page 61: Special Settings In Net Traffic To File Mode
2, two segment files that are up to 4 GB will be created. The options available are: 2, 4, 8, 16, or Whole Disk (Default). 4.3.9.3 Segment Ring Buffer This setting determines what the Falcon-NEO will do when it reaches the total number of segments on all selected repositories (Destination drives). -
Page 62: Chain Destinations
OFF – This is the default setting. When this is set to OFF, once the Falcon-NEO reaches the number of segments set and the last repository is filled, it will stop the task. 4.3.9.4 Chain Destinations This setting allows the user to span the Net Traffic to File images over two or more repositories (such as Destination drives) continuously. -
Page 63: Starting The Imaging Operation
“(NOT_MOUNTED)” and a format icon will appear in the Format column. Tap the (Format) icon the Destination drive. Drives encrypted by the Falcon-NEO will have the following icon: When formatting the drive from this screen, a prompt will appear to format the drive. - Page 64 Drive to File mode (DD, E01, EX01, or DMG). When the Destination drive is full and the remaining data to be imaged will not fit, Falcon-NEO will prompt for another drive. Information on Drive Spanning can be found in Section 3.1.7.
-
Page 65: 5: Types Of Operations
5.0 Types of Operations - Introduction There are thirteen (13) types of operation available on the Falcon-NEO. The left side of the screen shows the different operation types that can be set. Detailed information on all the different operations and their screens can be found in this section. - Page 66 Network users can then quickly preview data or copy data to a local drive or to any other directory on the network. The Falcon-NEO will create a log file for each push process.
- Page 67 TYPES OF OPERATIONS network the Falcon-NEO is connected to, it will open a web browser to the Falcon-NEO’s IP address to access the web interface. Advanced Drive Statistics – Shows raw S.M.A.R.T. data (if supported) on any drive connected to the Falcon-NEO.
-
Page 68: Imaging
– Turn the Falcon-NEO off or refresh the Graphical User Interface (GUI) and set a drive timeout, powering down drives when not in use. Two tabs are available: Power Off – The Falcon-NEO can be turned off on this screen. This can be useful when ... -
Page 69: Mode
Tap this icon to choose the mode. Drive Hash – Hash a drive (based on Logical Block Addresses (LBA) or Sectors). Case Verify – Verify the hash of a case (image) file. ® -Neo User’s Manual Logicube Falcon... -
Page 70: Drives
Tap the Hash Values icon to set the hash method (SHA-1, SHA-256, or MD5) and to set the expected hash value (if desired). Setting the expected hash value instructs the Falcon-NEO to hash the drive then verify the hash with the expected value set. -
Page 71: Hash Method
Falcon-NEO to hash the drive using the selected algorithm in the previous step. The Falcon-NEO will use the result as the expected value. If a value is entered, the Falcon-NEO will hash the selected drive and verify hash with the value entered/edited. -
Page 72: Lba
By default, the length is set to 100% (whole drive) and the starting percentage is set to 0% (start of the drive). When the Falcon-NEO finishes hashing the drive, the following screen will appear showing the task completed. Tap the... -
Page 73: Case Info
(up to 7 passes) along with the type of data written for each pass. In addition, a 7-pass DoD wipe can be set with pre-selected pass values. The Falcon-NEO can verify each pass value through a setting. Any HPA, DCO, or ACS3 can be unlocked and wiped in these settings. -
Page 74: Destination
For example, if Secure Erase is set to ON, a Wipe Pattern mode is specified, and Format is set to On, the Falcon-NEO will first secure erase the drive, then wipe the drive according to the mode specified, then format the drive. -
Page 75: Secure Erase
5.3.2.2.1 Mode Selecting Mode will open the Wipe Mode screen showing 3 options: NONE – Choosing this will instruct the Falcon- NEO not to perform a wipe using Wipe Mode. ® -Neo User’s Manual Logicube Falcon... -
Page 76: Hpa/Dco/Acs3
The default value for a custom pass is 00. Editing one or more of the passes in DOD or CUSTOM mode will bring up this screen: ® -Neo User’s Manual Logicube Falcon... -
Page 77: Format
TYPES OF OPERATIONS SKIP – Instructs the Falcon-NEO to skip the pass. RANDOM – Writes one random hexadecimal value (from 00 - FF) to all the selected Logical Block Addresses. RAND. BUFFER – The Falcon-NEO will create an ... -
Page 78: Case Info
Falcon-NEO prior to being used as a Destination for Imaging using either mode above. Tap this icon to set the Falcon-NEO to format the drive (with or without encryption). The following settings are available: Format – When set to ON, the Falcon-NEO will format the Destination drive with or without encryption. -
Page 79: Push
MD5 or SHA hash during the push process. Users can also select to verify the file transfer to ensure data integrity. The Falcon-NEO will create a log file for each push process. There are three selections when performing a push: Source ... -
Page 80: Settings
TYPES OF OPERATIONS The Push feature will only push files created by the Talon Ultimate, Falcon, Falcon-NEO, and ZXi Forensic. 5.4.2 Settings (Optional) Tap this icon to enter case info and to set the verify option. There are two verify settings available: Yes –... -
Page 81: Tasks
Tapping this icon allows the user to set specific tasks for each macro. The following window will appear: Tap Operation 1 to set the first operation in the macro. The following screen will appear allowing the user to choose the task. Tap the OK icon to continue. ® -Neo User’s Manual Logicube Falcon... - Page 82 X to the right of the operation. When finished, tap the OK icon. A summary of the macro will be seen: To start the macro and have the Falcon-NEO perform all the operations on the task list, tap the Start icon.
- Page 83 Drive to Drive Imaging task, select Image 1 then tap OK. 7. The screen should now show Wipe 1, Image 1 as the Tasks for Macro 1. ® -Neo User’s Manual Logicube Falcon...
-
Page 84: File Browser
.jpg, .png, .gif, .txt, .html, and .pdf. This method can be very useful when the Falcon-NEO is out on the field and there are no computers to analyze or triage the contents of drives. Using the Falcon-NEO’s touch screen, one drive at a time can be viewed. - Page 85 A – Home – Tap the Home icon to bring you to the top-level of the drive. B – Up One Level – Tap this icon to go up one level (one folder/directory). C – Path – Displays the current path to the folder/directory being viewed. ® -Neo User’s Manual Logicube Falcon...
-
Page 86: Viewing Files From The Web Interface
TYPES OF OPERATIONS The Falcon-NEO can open and preview certain files. Some of the files it can preview are: *.jpg, *.gif, *.png, *.txt, *.pdf, *.html If the Falcon-NEO cannot preview a file, a message will appear stating “File viewer cannot view file type:”... -
Page 87: Important Notes About Using The File Browser
Source drive connected to the Falcon-NEO. The Falcon-NEO file browser is not able to open every file to preview. When a file cannot be opened directly on the Falcon-NEO, the file can be saved on a computer by connecting to the Falcon-NEO’s web interface. -
Page 88: Statistics
This will display the following tabs: About, Adv. Drive Statistics, Network Interface Stats, Debug Logs, and Help. 5.8.1 About Screen The About screen will show information about the Falcon-NEO including the current software installed, host name, and IP address. There is a QR code that can be scanned on ®... -
Page 89: Adv. Drive Statistics
5.8.4 Debug Logs There may be times when Logicube Technical Support will ask for debug logs. This tab allows the user to export the debug logs to a USB flash drive (connected to one of the two front USB ports). -
Page 90: Manage Repositories
5.9.1 Add/Remove A list of repositories will be shown. The user has the option of adding or deleting a repository. This will include all drives attached to the Falcon-NEO (Destination ports) and any networked repository. ®... -
Page 91: Adding A Repository Using Cifs Or Smb
TYPES OF OPERATIONS If a repository location shows (NOT MOUNTED), it is because the drive attached is not formatted by the Falcon-NEO or the Falcon-NEO cannot connect to the shared network resource. In order for a repository to remain configured when the Falcon- NEO is turned off, the changes must be saved and loaded to a profile. - Page 92 For the Path, make sure the forward slash ( / ) is used and not the backslash symbol ( \ ). 5. Optional: Tap Role and input the role for this repository. Tap OK when finished. ® -Neo User’s Manual Logicube Falcon...
-
Page 93: Deleting/Removing A Repository
Once the iSCSI Target has been setup: Tap Add iSCSI Portal. The Add iSCSI Portal window should appear: Tap Network Settings and input the Portal (IP address or hostname), Username, and Password. Tap the OK icon when finished. ® -Neo User’s Manual Logicube Falcon... -
Page 94: Configuration
Tap OK when finished. The screen will go back to the Portals screen. In the Portals screen, tap the iSCSI portal to highlight it, then tap Connect. The Falcon-NEO will attempt to connect to the iSCSI target. If successful, a “connected” screen will appear. Tap OK to continue. -
Page 95: Profiles
This is the default profile of the Falcon-NEO and is used to reset the Falcon-NEO to the factory default settings. This screen shows all user profiles for the Falcon-NEO. There are three selections in this screen: New – Allows the user to create a new profile name. -
Page 96: Passwords
TYPES OF OPERATIONS For example, if the user wants the Falcon-NEO to always boot up with the default imaging mode to Drive to File with the setting of E01 with a segment size of 2GB: Turn the Falcon-NEO off then back on. This is an important step to help ensure only the changes desired will be the changes saved. -
Page 97: Setting Key Passwords
Key: Remote HTTP – A password can be set to lock remote HTTP access (through a web browser). If this password is set, the Falcon-NEO will prompt for a password before allowing access through a web browser. Key: Config Lock – The Falcon-NEO can be configured to lock out any ... -
Page 98: Config Lock Notes
5.10.2.1.1 Config Lock Notes A shortcut (and indicator) to the config lock can always be seen on the Falcon-NEO’s screen. It is located on the top-right of the screen, next to the Falcon-NEO logo. While in a locked state, the following operations will be affected as follows: Imaging –... -
Page 99: Forgotten Password For Any Keys
Config lock unlock key. Power Off – This entire section cannot be accessed without the Config lock unlock key. The Falcon-NEO can still be turned off without the unlock key by using the power button located on the top of the Falcon-NEO. -
Page 100: User Account Passwords
Successful”. 6. Type db list again and there should be an asterisk (*) on initial.db. 7. Turn the Falcon-NEO off using the power button, then close the Telnet/SSH application. 8. Turn the Falcon-NEO on. When the Falcon-NEO boots up, it will load the default configuration (INITIAL.DB). -
Page 101: Encryption
The Falcon-NEO can secure sensitive evidence data with whole disk drive encryption using the NIST recommended XTS-AES-256 cipher mode. Destination drives that are encrypted by the Falcon-NEO can be temporarily decrypted by using the Falcon-NEO or third-party software (VeraCrypt, TrueCrypt, or FreeOTFE). -
Page 102: Language/Time Zone
5.10.4 Language/Time Zone The Falcon-NEO’s menu system’s language can be changed. The available languages are English, Chinese (中文), Korean (한국어), and Japanese (日本語). This screen also allows the time zone to be set. -
Page 103: Time Zone
NTP and adjust the time as needed. The Falcon-NEO also has a time zone setting. Tap Time Zone to select the time zone region. Tap the OK icon to continue. After selecting the region, select the time zone where the Falcon-NEO is located. -
Page 104: Display
Each time the Falcon- NEO boots, the brightness will be reset to 80%. Stealth Mode – Stealth mode turns the Falcon-NEO’s screen off, allowing privacy so no one can see what the Falcon-NEO is doing. When Stealth mode is activated, currently running operations continue to run. -
Page 105: Network Settings
1. Tap End of Task to configure the notifications. 2. Select None or Sound for when the Falcon-NEO has a successful task or if the task has an error. 3. Tap the OK icon when finished. -
Page 106: Enabling/Disabling Network Services
5.11.1.2 Enabling/Disabling Network Services Network Services are enabled by default. To enable or disable specific network services, go to the Edit Network Interface Configuration Screen and tap Network Services Setting. The Network Services screen will appear: ® -Neo User’s Manual Logicube Falcon... -
Page 107: Http Proxy
5.11.2 HTTP Proxy If the network the Falcon-NEO is connected to uses an HTTP proxy server to access the Internet, proxy settings may need to be set for the Falcon-NEO to be able to update software from a network (over the internet). -
Page 108: Power Off
POWER OFF – The Falcon-NEO can be remotely turned off by going to this tab. Additionally, the Graphical User Interface (GUI) can be refreshed. DRIVE POWER – Inactive drives connected to the Falcon-NEO can be set to go to standby mode in this tab. The default is set to 0 minutes (Off/Disabled). -
Page 109: 6: Previewing Drives
Drive Drive Drives Drives Software File Browser Computer + File Very Limited Browser iSCSI Files must be downloaded from the Falcon-Neo to the computer one file at a time before it can be analyzed ® -NEO User’s Manual Logicube Falcon... -
Page 110: File Browser
The Falcon-NEO can be accessed from a computer (through a direct network cable connection or through a network). Using a computer with the Falcon-NEO’s file browser allows more files to be previewed by using the computer’s Operating System and installed software. Connecting the two devices directly together with a network cable or onto a network and using the Falcon-NEO’s web interface (See... -
Page 111: Smb
PREVIEWING DRIVES 6.3 SMB The Falcon-NEO can be accessed from a computer (through a direct network cable connection or through a network). One of the ways to access Source or Destination drives over the network is to use the SMB protocol. - Page 112 PREVIEWING DRIVES Section 10.2 for details on how to view Source drives over the network using iSCSI. ® -Neo User’s Manual Logicube Falcon...
-
Page 113: 7: Drive Encryption And Decryption
Falcon-NEO or third-party software (VeraCrypt, TrueCrypt, or FreeOTFE). In the System Settings screen, there is an Encryption tab used to configure the Falcon-NEO for encryption. There are up to four (4) parameters that must be configured before encryption can be used. -
Page 114: Step-By-Step Instructions
Select the desired File System (EXT4, NTFS, exFAT, or FAT32). Set Encryption to ON. When finished, tap the OK icon. Tap the Start icon to start the wipe task. The Falcon-NEO will format the selected drive(s) with encryption. 7.1.2 Using Previously Encrypted Destination Drives... -
Page 115: Decrypting A Falcon-Neo Encrypted Drive With A Falcon-Neo
2 through 9. 7.2 Decrypting a Falcon-NEO Encrypted Drive with a Falcon-NEO Falcon-NEO can decrypt a Destination drive encrypted by the Falcon-NEO. To decrypt the drive using a Falcon-NEO, follow these steps: Make sure the previously encrypted Destination drive is not connected, then turn the Falcon-NEO From the main menu, select System Settings from the types of operations on the left side. -
Page 116: Decrypting A Falcon-Neo Encrypted Drive Without A Falcon-Neo
NEO, then double-check the encryption settings and repeated steps 2 through 7. Once the Falcon-NEO decrypts the destination drive, the drive can be accessed using SMB. See Section 10.1 for details on how to view Source or Destination drives over the network using SMB. -
Page 117: Which Decryption Software To Use
NEO must be used to decrypt the drive. 7.3.2 Decrypting Using VeraCrypt Requirements: VeraCrypt installed. A drive encrypted by the Falcon-NEO using the VCRYPT cipher mode connected to the computer with VeraCrypt. Once the drive is connected to the computer, Open VeraCrypt. ®... - Page 118 DRIVE ENCRYPTION & DECRYPTION Click Select Device and choose the partition of the connected drive then click Click Mount. ® -Neo User’s Manual Logicube Falcon...
-
Page 119: Decrypting Using Truecrypt
10. Type the encryption password in the Password field then click OK. 11. The drive should now be mounted and assigned a drive letter. 12. The drive should now be accessible in Windows. 7.3.3 Decrypting Using TrueCrypt Requirements: TrueCrypt properly installed. ® -Neo User’s Manual Logicube Falcon... - Page 120 DRIVE ENCRYPTION & DECRYPTION A drive encrypted by the Falcon-NEO using the TC-XTS cipher mode connected to the computer with TrueCrypt. Once the drive is connected to the computer, open TrueCrypt. Click Select Device and choose the partition of the connected drive then click ®...
- Page 121 This setting can be found by clicking Mount Options… A hardware write-block device may be used instead, if needed. The drive should now be mounted and assigned a drive letter. ® -Neo User’s Manual Logicube Falcon...
-
Page 122: Decrypting Using Freeotfe
7.3.4 Decrypting using FreeOTFE Requirements: FreeOTFE properly installed. A drive encrypted by the Falcon-NEO using the CBC cipher mode connected to the computer with FreeOTFE. Open FreeOTFE. In the main window, click File then Linux volume then Mount partition…... - Page 123 Entire disk option. FreeOTFE cannot read the partition table on the drive since it is encrypted at this time. In the Key tab, enter the Key (password) and make sure the Hash is set to RIPEMD-160. ® -Neo User’s Manual Logicube Falcon...
- Page 124 In the Encryption tab, set the Cipher to AES (256 bit CBC). Set the Initialization Vector (IV) generation method to match what was used in the IV Generation on the Falcon-NEO. In this example, “plain64’ was used. In the ‘Sector zero location’, choose Start of encrypted data.
- Page 125 FreeOTFE will mount the drive and assign a drive letter. Click the OK button to continue. The drive should appear in the FreeOTFE window. The Destination drive should now be accessible in Windows. ® -Neo User’s Manual Logicube Falcon...
-
Page 126: 8: Updating/Loading/Re-Loading Software
Before starting the software update process: If updating From Network: Wait at least 5 minutes after turning the Falcon-NEO on or connecting the network cable before starting the software update. Make sure all drives and drive adapters are disconnected. -
Page 127: From Network (Over The Internet)
8.2.2 From USB Drive (Through a Software File Download) Aside from the network option, the latest software can also be downloaded from Logicube’s website and be placed onto a USB flash drive to perform the update/re-install. It is recommended to use an empty USB flash drive. -
Page 128: Firmware Loading Instructions
“FIRMWARE UPDATE COULD TAKE UP TO A FEW MINUTES TO COMPLETE; PLEASE DO NOT INTERRUPT POWER DURING THIS TIME. ON COMPLETION THE UNIT WILL AUTO- RESTART AND CONFIRM THE UPDATE.” Tap the OK icon to start the firmware update process. ® -Neo User’s Manual Logicube Falcon... - Page 129 FIRMWARE UPGRADE NOT AVAILABLE – This message will appear if the device does not require a firmware update. No further action is necessary if this message appears. ® -Neo User’s Manual Logicube Falcon...
-
Page 130: 9: Remote Operation
9.1 Web Interface Using a web browser, go to the IP address or the name of the Falcon-NEO with its serial number. Both IP address and serial number can be found by going to the Statistics screen on the Falcon-NEO. For example, browse to http://192.168.1.100 or http://falcon-XXXXXX where XXXXXX is the 6-digit serial... -
Page 131: Command Line Interface (Cli)
9.2 Command Line Interface (CLI) The Falcon-NEO also has a CLI, or Command Line Interface. This interface has no graphical content and is all command line (text) based and is for advanced users who have knowledge of command line functions. -
Page 132: Zero Configuration Networking (Zeroconf)
Profiles can be copied from one Falcon-Neo to another using the Command Line Interface (CLI). The Falcon-NEO units must be on the same network and all Profiles will be copied. Instead of configuring each Falcon-Neo one at a time, all Falcon-Neo units can have the same profiles with a few simple commands. - Page 133 When the process is finished, the CLI prompt will appear. The Falcon- NEO unit where the profiles were copied to will refresh its screen. 8. The profiles should now be copied to the other Falcon-NEO unit. Repeat step 7 to copy the profiles to other Falcon-NEO units.
-
Page 134: 10: Viewing Source And Destination Drives Over A Network
10: Viewing Source and Destination Drives over a Network 10.0 Viewing Drives Over a Network – Overview The contents of drives connected to any Source or Destination position on the Falcon-NEO can be viewed over a network. Contents of Source and Destination drives viewed over a network are write-protected. - Page 135 NEO. Enter the following information: User name: it b. Password: it A folder called bays will be shown in Windows Explorer. Go into the bays folder and select the connected Destination drive. For example, SAS_D1. ® -Neo User’s Manual Logicube Falcon...
-
Page 136: Viewing Source Drives Over The Network Using Iscsi
IT administrator. 10.2.1 Configuring the iSCSI Initiator Open the iSCSI initiator. In the Target tab, enter the Falcon-NEO’s host name or IP address in the Target field. Click the Quick Connect button to continue. ®... - Page 137 VIEWING DRIVES The Quick Connect window will appear and any drives connected to the Source ports of the Falcon-NEO will appear on the list of discovered targets. Highlight the drive to view, then click Connect. The selected drive status will change to Connected.
-
Page 138: 11: Net Traffic Imaging
11: Net Traffic Imaging 11.0 Net Traffic Introduction The Falcon-Neo can capture network traffic data using the Net Traffic to File imaging mode. Network traffic that can be captured can include local network activity, internet activity, and VOIP activity. The data is saved and stored to a *.pcanpg file format. - Page 139 OFF – When this is set to OFF, once the Falcon-NEO reaches the number of segments set ...
-
Page 140: Net Traffic Imaging Notes
The Number of Segments determines how many segment files (how many pcapng files) will be written. When the Ring Buffer setting is set to ON, the Falcon-NEO will complete the Number of Segments set, then delete the first segment and continue capturing network traffic. When Ring Buffer is set to ON, the user will continue to capture network traffic until the task is aborted by the user. -
Page 141: 12: Usb Boot Client
Here are the steps to create the USB Boot Client with the software necessary to be bootable, and when used to boot a computer, will allow the Falcon-NEO to use the computer’s drive as a Source drive. For steps 1 and 2 of this section, please use Chrome or Firefox to download the files. - Page 142 6. Click the folder icon to select a disk image. 7. In the folder where the files were downloaded (in step 2), select the USB Boot Client *.img file and click the Open icon. ® -Neo User’s Manual Logicube Falcon...
- Page 143 If it is the correct drive letter, click Yes to continue. If it is showing the wrong drive letter, click No. This will take you back to the previous screen where you can select the correct drive letter (back to step 9). ® -Neo User’s Manual Logicube Falcon...
-
Page 144: Using The Usb Boot Client
USB Boot Client is used to boot computer. The USB Boot Client is set to DHCP. 1. Make sure the Falcon-NEO is connected to the same network the USB Boot Client will be used on (or directly connected to the computer using a network cable). Boot the computer with the bootable flash drive. - Page 145 SDB, SDC, etc. For example, if there is one drive connected, it will show as: I:5.16/SDA. From here you can image using the Falcon-NEO using the normal imaging steps. When using the USB Boot Client, imaging speeds may vary depending on network performance.
-
Page 146: 13: Printing
CLI using a Telnet or SSH client). Local printers will need to be connected to the Falcon-NEO through an available USB port on the front of the Falcon-NEO. Networked printers will be seen by the Falcon-NEO when connected to the same network. - Page 147 Telnet or SSH can be found in Section 9.2. Once logged in to the Falcon-NEO via CLI, type command, then press the enter key. Type config then press the enter key. Type printer search then press the enter key. This will instruct the Falcon-NEO to search for all local and networked printers.
-
Page 148: 14: Options
USB 3.0 to SATA adapter & power cable SCSI Module To purchase one or more of these options or adapters, please contact Logicube Sales department via email at sales@logicube.com. 14.1 Thunderbolt™ 3/USB-C I/O Card The Falcon-NEO Thunderbolt 3/USB-C I/O card (part# F-FNEO-IO-TBT) provides Thunderbolt 3/USB-C interface support. -
Page 149: Installing The Thunderbolt 3/Usb-C I/O Card
PRINTING 14.1.1 Installing the Thunderbolt 3/USB-C I/O Card Turn the Falcon-NEO OFF and disconnect the AC adapter/power supply from the back of the Falcon-NEO. Turn the Falcon-NEO upside-down and use the included screwdriver to remove the desired I/O port door: The open I/O port should look like this: ®... - Page 150 Repeat steps 2 through 5 to install other Thunderbolt/USB-C I/O cards to any of the other available I/O ports. Once all the Thunderbolt/USB-C I/O cards have been properly installed, the Falcon-NEO can now be used with Thunderbolt/USB-C external drives and storage enclosures. Any connected Thunderbolt/USB-C external drive and enclosure should appear like any other drive.
-
Page 151: Firewire Module
14.2 FireWire Module A FireWire module (part# F-FW-MODULE-OPT) is available for the Falcon-NEO. This module provides a FireWire interface (one Source or one Destination) support and connects to the PCIe port of the Falcon- NEO. -
Page 152: Connecting/Disconnecting The Firewire Module
Turn the Falcon-NEO OFF. Connect or disconnect the FireWire Module to one of the PCIe ports on the Falcon-NEO (PCIE_S or PCIE_D). Repeat this step if a second FireWire module needs to be connected or disconnected. Once the FireWire module is connected to the Falcon-NEO, the Falcon-NEO can now be used with FireWire drives, enclosures, or Mac®... -
Page 153: Disconnecting The Firewire Module
The FireWire Module connector cable can be stored underneath the FireWire Module: 14.3 Falcon-NEO SCSI Module The optional Falcon-NEO SCSI Module expands the capability of the Falcon-NEO by providing support for imaging from and to SCSI hard drives. The SCSI module can connect to 68-pin SCSI drives natively. -
Page 154: Connecting The Scsi Module To The Falcon-Neo
Falcon-NEO off before connecting or disconnecting the Falcon-NEO SCSI Module or connecting/disconnecting SCSI drives. With the Falcon-NEO turned off, connect the SCSI Module to one of the PCIe ports on the Falcon-NEO (PCIE_S or PCIE_D). Connect the 68-pin data cable and drive power cable to the SCSI Module. If an 80-to-68 pin adapter or 50-to-68 pin adapter is used, connect the adapter to the cable(s). -
Page 155: Disconnecting The Scsi Module
PRINTING 14.3.3 Disconnecting the SCSI Module When disconnecting the SCSI Module from the Falcon-NEO, pull the cable from the connector. Do not pull the cable itself. The SCSI Module connector cable can be stored underneath the SCSI Module: ® -Neo User’s Manual... -
Page 156: Usb 3.0 To Sata Adapter
PRINTING 14.4 USB 3.0 to SATA Adapter Logicube has qualified a USB 3.0 to SATA Adapter for use with the Falcon-NEO This adapter provides the capability to connect SATA drives to any of the USB 3.0 ports. The USB 3.0 to SATA adapter (part number F-ADP-USB2SATAU) can be purchased individually, or as a part of a kit that includes three USB 3.0 to SATA adapters and a USB Power Cable (part number F-CBL-... -
Page 157: Usb 3.0 To Sata Kit
PRINTING Connected in-between the AC adapter/power supply and the Falcon-NEO: 14.4.2 USB 3.0 to SATA Kit The USB 3.0 to SATA kit (part number F-CBL-USBSAT-KT) includes three USB 3.0 to SATA adapters and one USB Power Cable. ® -Neo User’s Manual... -
Page 158: 15: Frequently Asked Questions
Q. Do Destination drives need to be wiped or formatted using the Falcon? A. For Drive to File, File to File, Partition to File, and Net Traffic to File mode, the Falcon-NEO must be used to format Destination drives. This helps ensure that the images and data are written properly to the Destination drive(s). - Page 159 A. Yes, each operation/task produces a log file. The log file is viewable on the Falcon-NEO screen (or remotely on a PC) in an HTML format. The log files can be exported to a thumb drive (the Falcon-NEO will export in XML, HTML and PDF). XML log files can be customized using XML editors. The log files are stored on the internal hard drive within Falcon-NEO and are accessible by pressing the log file icon from the left-side navigation bar on the Falcon-NEO screen.
- Page 160 FAQs are stored on the internal drive within Falcon-NEO and are accessible by pressing the log file icon from the left-side navigation bar on the Falcon-NEO screen. Q. Can I remove the internal drive (that contains the Operating System) for secure locations or SCIFs? A.
-
Page 161: 16: Index
PCIe, 11 Encryption Settings, 91 Previewing Drives, 99 Error Handling, 43 Profiles, 85 EU, EUROPEAN UNION, III Proxy Settings, 97 Falcon-NEO, 1 Push, 27, 69 FAQs, 147 Quick Start, 14 Features, 1 Remote Operation, 119 File Browser, 30, 74, 100... - Page 162 VeraCrypt, 106 System Settings, 35, 84 Warranty, Parts and Labor, I, III Targeted Imaging, 16, 38, 55 Website, Logicube, III Technical Support, Logicube, III, 151 Wipe, 26, 27, 63 Thunderbolt 3/USB-C I/O Card, 137 Wipe Patterns, 63, 65 Time Zone, 92...
Need help?
Do you have a question about the Falcon-NEO and is the answer not in the manual?
Questions and answers