Advertisement
Assembly Instructions for Model: VM2
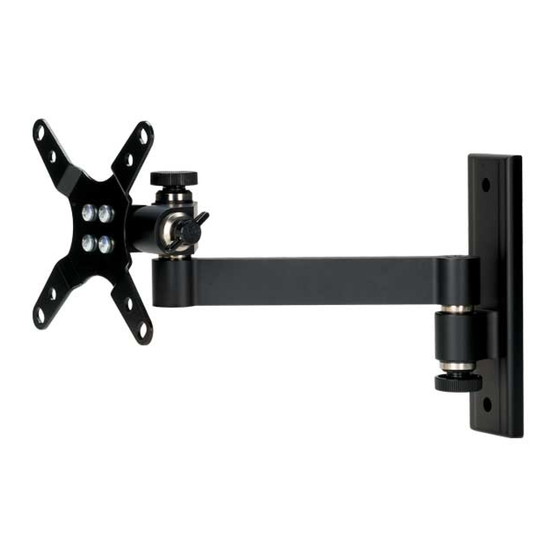
Thank you for choosing Sanus Systems Vision Mount. This product is designed to
mount VESA 75/100 compatible LCD televisions up to 30 pounds onto a vertical wall.
It allows you to effortlessly tilt and swivel your new television up to 15° in either
direction as well as extend it up to 9" away from the wall without the use of tools.
Check carefully to make sure there are no missing or defective parts. Never use defec-
tive parts. Improper installation may cause damage or serious injury. If you do not
understand these directions, or have any doubts about the safety of the installation,
please call a qualified contractor or contact Sanus at 800.359.5520 or www.sanus.com.
We can quickly assist you with installation questions and missing or damaged parts.
Replacement parts for Sanus products purchased through authorized dealers will be
shipped directly to you.
Required Tools: Drill with 3/16" bit, 5/16" drill bit, Phillips screw driver
Parts and Hardware: *Not shown as actual size
(1) Allen Key - b
(1) Monitor Mount - a*
(1) Wall Plate - c*
(2) Lag Bolt - d
(4) M4 x 10 Bolt - e
(4) Knob Replacement Bolt - f
(2) 3/4" Furniture Bolts - g
(2) 1 1/8" Furniture Bolt - h
(2) Cabinet Mount Insert - i
(1) Cap - k
(1) Small Washer - l
(1) Large Washer - j
(1) Knob - m
Step 1 - Attaching to the Television: Attach the Monitor Mount (a) to the back of your LCD television using the M4 x 10 Bolt (e) as shown in Diagram 1. Place 4 bolts through the
Monitor Mount and tighten snugly into the VESA bolt mounting pattern on the back of the television. Make sure the large side of the tapered hole on the Monitor Mount faces toward
the bottom of the television.
Step 2a - Attaching under a cabinet: Use the Wall Plate (c) as a template to mark the desired location of the two mounting holes under the cabinet. Pre-drill the two holes with a
5/16" drill bit. Place the Cabinet Mount Inserts (i) down through the mounting surface as shown in Diagram 2a. Attach the Wall Plate using either Cabinet Mount Bolt (g or h) depending
on the thickness of the surface. Tighten bolts with the Allen Key (b) until they are snug. See Diagram 2a for assistance.
Sanus Systems 2221 Hwy 36 West, Saint Paul, MN 55113 6.24.05
Customer Service: 800.359.5520. See complementary Sanus products at www.sanus.com
Advertisement
Table of Contents

Related Manuals for Sanus Systems VM2


Summary of Contents for Sanus Systems VM2
- Page 1 Assembly Instructions for Model: VM2 Thank you for choosing Sanus Systems Vision Mount. This product is designed to mount VESA 75/100 compatible LCD televisions up to 30 pounds onto a vertical wall. It allows you to effortlessly tilt and swivel your new television up to 15° in either direction as well as extend it up to 9”...
- Page 2 Note: For institutional or heavy load applications a Knob Replacement bolt (f) may be used in place of each Knob and tightened with the Allen Key provided. This will allow you to get greater tension while still being able to adjust the position of your TV. Sanus Systems 2221 Hwy 36 West, Saint Paul, MN 55113 6.24.05 Customer Service: 800.359.5520. See complementary Sanus products at www.sanus.com...
Need help?
Do you have a question about the VM2 and is the answer not in the manual?
Questions and answers