Page 1
Effective April 2018 Installation manual 3A3695 Supersedes February 2018 
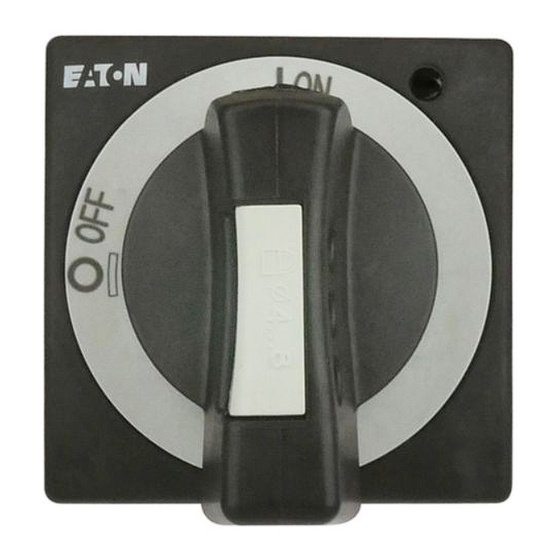
CCP2-H4X-_ selector and pistol handles for use with 8 mm shafts Counterclockwise selector handle: Clockwise selector handle: • CCP2-H4X-B1L • CCP2-H4X-B1 • CCP2-H4X-R1L • CCP2-H4X-R1 Clockwise pistol handle: Counterclockwise pistol handle: •...
Page 2
40 mm knockout punch or hole saw • 8 mm drill bit for metal • (1) Handle backer plate with removable depth gauge and Drill (1) Switch handle • shaft centering jig Utility knife • Hacksaw • Metal file • Center punch • Hammer • Eaton.com/bussmannseries...
Page 3
The information in this document does not relieve the user from exercising good judgment, nor from using sound safety practices. Note: Because Eaton has a policy of continuous product improvement, we reserve the right to change design specifications without notice. Should a conflict arise between the general information in this document and the contents of drawings or supplementary material, or both, the latter shall take precedence.
Page 4
Using needle nose pliers, break off the retaining stop on the switch handle bezel as shown. • • And either shaft catalog numbers: Place handle back onto the handle base and tighten the setscrew. • CCP2-SH1-290 • CCP2-SH1-490 • Eaton.com/bussmannseries...
Page 5
Note: To ensure proper fit, make a square cut on the shaft. as shown and fully seat backer plate into the hole. Align backer plate horizontally and vertically with the door and mark the centers for the four mounting holes as shown. Eaton.com/bussmannseries...
Page 6
Step 11: Close and latch door. Check switch for proper operation in all modes. If not operating correctly, revisit these installation steps for remedial action. Step 9: Prepare the handle backer plate for mounting by removing the depth gauge as shown. Eaton.com/bussmannseries...
Page 7
Using needle nose pliers, break off the retaining stop on the switch handle bezel as shown. • CCD2S-(pole)-60 • Place handle back onto the handle base and tighten the setscrew. • CCD2S-(pole)-100 • And either shaft catalog numbers: CCP2-SH1-290 • CCP2-SH1-490 • Eaton.com/bussmannseries...
Page 8
File off any burrs on the cut end as shown. holes as shown. Note: To ensure proper fit, make a square cut on the shaft. Eaton.com/bussmannseries...
Page 9
If preventing access to the enclosure’s interior is desired Step 9: Prepare the handle backer plate for mounting by removing or required by the application, use a locking door latch or install a suitable hasp to accept a lock. the depth gauge as shown. Eaton.com/bussmannseries...
Page 10
To lock the switch, simply rotate the handle to the desired switch state (ON or OFF), depress the switch locking mechanism and insert up to three 1/4” locks. CCD2SL-(pole)-30 • CCD2SL-(pole)-60 • CCD2SL-(pole)-100 • And either shaft catalog numbers: CCP2-SH1-290 • CCP2-SH1-490 • Eaton.com/bussmannseries...
Page 11
File off any burrs on the cut end as shown. holes as shown. Note: To ensure proper fit, make a square cut on the shaft. Eaton.com/bussmannseries...
Page 12
Eaton 1000 Eaton Boulevard Eaton and Bussmann are valuable trademarks Cleveland, OH 44122 of Eaton in the U.S. and other countries. You Eaton.com are not permitted to use the Eaton trademarks without prior written consent of Eaton. Bussmann Division...