Advertisement
Quick Links
Advertisement

Related Manuals for aero-naut Marina


Summary of Contents for aero-naut Marina
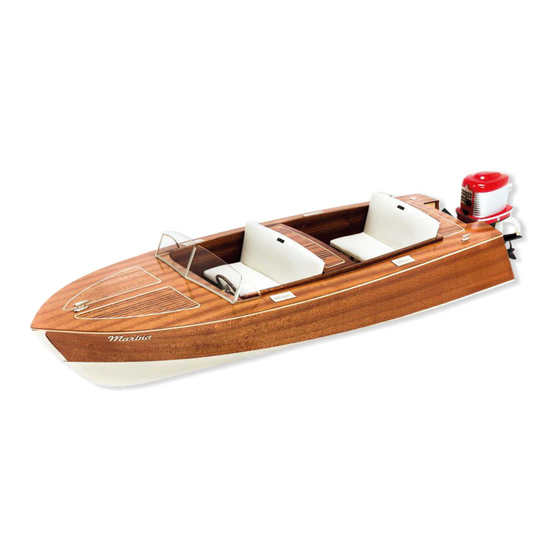
- Page 1 Marina Order-No. 3084/00...
-
Page 2: Recommended Equipment
Be careful when handling untreated wood, especially mahogany. To avoid specks of glue, which might damage the surface of the wood, treat all parts with wood filler (aero-naut Order-No. 7666/02) and sand with 320 grade paper before you glue. Also, before you operate the boat on your local lake or river, make sure you waterproof the model with several coats of a good clear varnish (inside and outside). - Page 3 Place the jig on an even building board and secure with tape. Insert formers 1 to 9 into jig. Insert keel 10 into formers and jig, then glue keel to formers. Insert stringers 11 into notches in building tabs and bevel keel and formers so that stringers have a good contact for gluing.
- Page 4 Fit stringers 12 to lower end of notch in keel, then glue in place on keel and along the sides of the formers. Secure with clamps until glue has dried. Fit stringers 13 to upper end of notch in keel, then glue in place on keel and along the bottom of the formers.
- Page 5 Glue formers 15 to the rear of formers 1 and 2. Fit transom frames 16 to stringers and formers 15, then glue in place. Bevel the front edge of the obechi veneer on the inside of hull sides 17 for a perfect fit when the sides are glued to the front of the keel.
- Page 6 Insert the hull sides into doublers 14 at the front of the keel and slide them down into the notches of the formers‘ building tabs. Note: Make sure, hull sides are fully seated in notches of building tabs. Check if hull sides have good contact with the frames, then glue hull sides to frames, keel and stringers.
- Page 7 Slightly bevel the inner edge of parts 18 where they come into contact on the keel. Glue in place one part 18 and align precisely with the centre line of the keel. Secure with clamps and tape until glue has dried. Fit and glue the remaining part 18 in place and secure with tape until dry.
- Page 8 Remove hull from jig, cut off building taps with a razor saw and carefully sand he contact surfaces of the frames where the deck will rest. Now seal the interior of the hull with wood filler or thinned epoxy to protect the wood against moisture. Fit and glue parts 22 to either side between formers 2 and 3.
- Page 9 Fit and glue cover 25 between formers 1 and 2 as shown. Carefully fit mahohgany panels 26, 27 and 28 in place, then glue. Note: The markings on part 27 indicate the steering linkage positions. for directional control of the outboard motor. Carefully fit and glue mahogany panels 30 and 31 in place.
- Page 10 Glue deck panels 34, 37 and 39 into respective frames. As an assembly, glue parts 36/37 into frame 35. Glue deck panels into main deck 32. Parts 35, 36, 37 will be added at a later building stage to the separation between front and rear seats.
- Page 11 Bevel the front ends of trims 61, then glue trims to hull sides beneath deck. Insert side panels 41 into cockpit and position cockpit flooor 40 flush with rear end of panels. Make sure, cockpit floor 40 is resting on formers. Glue together side panels 41 and cockpit floor 40.
- Page 12 Carefully remove the cockpit from the hull. Fit and glue front panel 45 and instrument panel 46 into cockpit. Glue deck 35 onto separating panels of cockpit. Glue supports 54 and 55 onto markings in cockpit floor. Position seats 56 and 58 on supports (but do not glue!), then glue back rests 57 and 59 to seats, to get the correct reclining angle for the back...
-
Page 13: Seat Covers
30 Seat Covers The covering material for the seats is artificial leather with a certain degree of elasticity. The foam cushions already have the exact dimensions of seats and back rests. The covering material needs to be cut out oversize in a simple rectangular shape. - Page 14 Cut out covering material for the back rest in a rectangular Glue foam cushion for back rest to covering material and shape and place face down on seat. back rest. Pull covering material around top of back rest, glue centre Pull left and right ends of covering material around back section to back rest and secure with pins.
- Page 15 Protect the edges of the cockpit opening with cling film and slide cockpit into hulll. Glue mahogany strips 73 and 74 around cockpit as shown. When glue has dried, remove cockpit from hull and round off edges of Glue mahogany rings 51 to photo etched steering wheel 50, then round off the rings with sandpaper.
- Page 16 Locate windscreen frame 67 in set of photo etched parts and carefully fold along etched lines. Fold down the tabs on the frame and fit into slots in deck. Do not glue! Remove windscreen frame from deck and glue panes 76 in place. Then glue frame tabs into slots in deck. Install servo in servo tray 60 and install connectors 71 to servo arm.
- Page 17 45 Adjusting Outboard Motor Install outboard motor to transom so that the centre of the prop hub is on one level with the bottom of the hull. The mounting screws should be located in the middle of the slots on the motor mount, so that the height of the outboard motor can be adjusted in either direction.
-
Page 18: Parts List
Parts list Description Material Dimensions Pieces Plate Type Derpon 3 mm laser cut former birch ply 3 mm laser cut keel birch ply 1,5 mm laser cut stringer birch ply 1,5 mm laser cut stringer birch ply 1,5 mm laser cut stringer birch ply 1,5 mm... - Page 19 Vivak laser cut cushion foam laser cut covering material for seat artificial leather cut part Is this your next aero-naut model? JULE Fishing boat Order-No. 3045/00 Length 800 mm Beam 251 mm Scale 1:25 Displacement 6.500 - 7.500g Jule is a typical fishing boat which sports a wealth of deatils.
- Page 20 ... and here are some more models from our range Spitfire 3052/00 Jenny 3055/00 Bellissima 3012/00 Victoria 3082/00 Pilot 3046/00 aero naut aero-naut Modellbau Find out more at www.aero-naut.de Stuttgarter Strasse 18-22 D-72766 Reutlingen www.aero-naut.de...
Need help?
Do you have a question about the Marina and is the answer not in the manual?
Questions and answers