Advertisement
Quick Links
Advertisement

Related Manuals for aero-naut Santorini


Summary of Contents for aero-naut Santorini
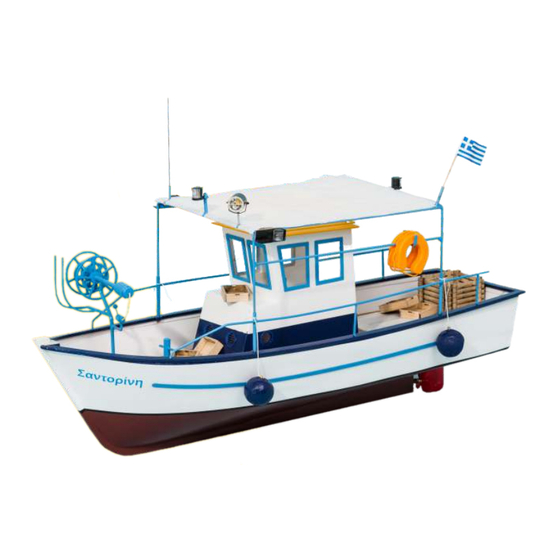
- Page 1 Trawler Santorini Order no. 3074/00...
-
Page 2: Tips And Hints
Trawler Santorini The wooden parts of the kit are provided with laser-cut and part numbers. The accompanying cuts can Tips & Hints be clearly assigned by using the parts list on the last pages. To solve the laser parts from the material carriers, you cut the lands from which the laser parts are held in the material carrier, with a sharp craft knife. - Page 3 Part 10 stick to part fourteenth Parts 11, 12 and 13 fitting exactly stick to parts 15th The marker should be placed on part 15 on the respective outer side. 2 + 3 The shaft tube 16 between the parts 11 and 12 adhere. The shaft tube must survive mm at the rear of the 10th The rudder trunk 26 glue so that 4 mm it protrudes downward.
- Page 4 Now part 14 stick to part 10 and 15 on the parts 11,12 and 13, to complete part to the keel. Solder the capacitor between the two terminals and one cable per connection. 35.1 34.1 The motor 34 with the screws 35 and washers 34.2 34.2 35.1 Screw on frame 5th...
- Page 5 Xieren the top frame 1 on a flat building board fi and the frames 2 attach to. 8 The keel to the frames and front stuck in the top frame. 1 The keel throughout The keel to the frames and front stuck in the top frame. 1 The keel throughout slide in the recess of the top frame, so that the frames are correctly aligned.
- Page 6 The false edges 15.1 and 15.2 glue on both sides of the keel 15th The lines at the keel must remain visible. Note: The part numbers on the parts 15.1 and 15.2 must be upside down. The Kimmleiste 18 put forward in the Kiel 15th Part 18 sticking into the keel 15 and in the joists and secured with staples.
- Page 7 The bottom 19 ay fl on the frames, align the rear of the keel and the rudder trunk and secure to frame 8 with a clamp. Secure the bottom of frame 4 with a needle so that it does not slip. Press the ground with staples down on the frames and secure with masking tape at the bending bar 18 and the frame first...
- Page 8 stuck the shaft of the propeller 28 through the shaft tube. Assemble the motor shaft and the shaft with the hose 30th The shafts must be in alignment. The shaft 28 with the propeller and the hose 30 is again removed.
- Page 9 Glue the bow 10 in the keel and secure with a clamp. The side panels 20 front insert into the bow 10 and get back with a clamp. If everything fits, stick part 20 and secure with masking tape. See next stage of construction.
- Page 10 If the bond has dried, the stick mirror 21 from the rear. Glue the cockpit rim of the parts 39 and 40th...
- Page 11 20.1 parts of glue on the inside with UHU adhesive to the hull sides. With clips or tape backup so that they rest on the parts 20 altogether. Tip: Deck 25 can be temporarily used for secure positioning of the parts 20.1. After that Glue part 21.1.
- Page 12 The Au fl agen 36, 37 and 38 to paint and glue in the hull. paint The strips 41 to the outer upper edge of the ledges 42 at the inner edge. They yield the substructure for the handrail. Prime the whole body inside and out with sealer.
- Page 13 paint Paint the handrail 43 and stick.
- Page 14 Adjust the deck 25 before the gluing and ensure that it fully ying fl on deck frame first The deck 2 times prime, then paint with clear varnish and glue. Cover 44 of painting and stick. Skirting board 27 paint and glue to the fuselage. Note: The rounded end of the skirting board facing forward.
- Page 15 46.1 The construction of the wheelhouse of the parts 45 - Are stuck together 47th stick 50 - the parts of the 48th...
- Page 16 The frame 51 + 52 and the bottom 53 below the bottom stick 45th paint the building, the window frames 54-56 paint and glue. The discs 54.1 - Glue 56.1.
- Page 17 In the roof 57 the handrail from the parts 58 + 59 glue and paint. The roof only stick on the control house, after the equipment 61 to 65 are mounted.
- Page 18 46.1 stick to the steering wheel 61 part 62nd The axis 60 of the rear glue in the steering wheel and the axis 60 in part 46.1. The Instsrumentengehäuse 63 bend, cut out the valves (on Glue the fan trays 66th the last page), waterproof paint, and glue.
- Page 19 In part 67 on both sides of the position lamps turn as shown. The sunroof of the parts 67 - to solder 70th Watch out no solder may get into the groove of part 67 to the position lamp.
- Page 20 The cross beams 71-74 öten fl. The pipe 79 for the flagpole obliquely rearward soldering part on 68th The tubes 75, 76, 78 and the bulb holder 77 öten fl. The position lamps downward turn.
- Page 21 110 mm The tubes stuck in the holes of the handrail 43 82, these are provided on the underside about 2 mm above. Below the handrail 43, the tubes are slightly squashed 82 so that the wires 83 have a stroke. The holder 81 turn for the rescue rings and öten fl on the cross strut 80th The cross-bar 80 attach to the wires 83rd...
- Page 22 The roof on the wires 83 fl öten. The tubes 82 adhere to the handrail 43rd The wire 85 turn on the railing. The stanchions 84 slide on the wire and glue in the handrail 43rd The wire 85 with the tubes 82 solder.
- Page 23 Glue the position lights from the parts 86 + 87 in the bracket to the roof. The lamps of the parts 86, 88 + 89 sticking together and glue the front and rear to the frame of the sunroof.
- Page 24 94 95 96 90 91 The foot 90 turn for the spotlight and solder the axis 91st Cut the axis 91 so that the left and right side each about 1.5 mm remain on the inside. Drill into the housing right + left a hole of 1 mm.
- Page 25 104 105 The pipe 106 part 101 slide all the way up and glue. The pipe 107 is later glued into the cover as a plug-in device for the winch. The bending and solder stencil out of the 3 parts 101102 glue together the 100th The wires 105 bend in the bending device.
- Page 26 In the motor housing 114 mm Ø hole 3 In part 117, a hole in the middle with and 6 mm drill depth. Glue the axis two drill mm. glue together the switch 113th Around the motor housing 114 from the parts 116 -117. bend the sheet 115 and stick.
- Page 27 134 135 131 132 glue together the anchor of the parts 126 + 127th Through part 130 is a hole with 2 mm holes for the passage of part 131 and stick the bollard on the deck with the rosette 132nd 107 glue the pipe with the rosette 129 into the cover, in this case the net winch is then inserted.
- Page 28 32 31 The carrier 136 glue for the conductors, insert the wire 137 and the stage 138 together by the holders 136 and glue. Rudder stick 29 from below into the rudder trunk 26th stuck on the rudder shaft washer 33 and screwed on far at the helm, the lock nut 31, the rudder that can still be easily moved.
- Page 29 Stick the nameplate 139 and plug the power winch into the pipe 107th We hope you enjoy your fishing boat.
- Page 30 pt0 Description P t0 Description piece material laser disk comment piece material laser disk shape Dimensions shape Dimensions 50 Front wheelhouse Poplar plywood 3 mm 1 cover frame (Helling) Poplar plywood laser part 3 mm laser part 2 frame 51 frames Poplar plywood Poplar plywood laser part...
- Page 31 P t0 Beschreibung Bemerkung Stück Material Laserplatte Form Maße P t0 Beschreibung Stück Material Laserplatte Form Maße 104 Winde Lager 4/3x17 mm 138 Sprossen für Leiter Messingrohr Zuschnitt Birken-Sperrholz Laserteil 1,5 mm 105 Winde Netzführung Messingdraht Zuschnitt 1,5x78 mm zuschneiden aus Pos. Z2 139 Anlenkung Ruder 1 mm Stahldraht...
- Page 32 Lasercut-Bausatz aus ABS mit großem Ätzteilesatz, Beleuchtungsfunktionen. und viele Möglichkeiten für einen weiteren Ausbau. aero Maßstab ca. 1:25 ca. 715 naut Länge mm ca. 200 Breite mm ca. 3 kg Gewicht aero-naut Modellbau Stuttgarter Strasse 18-22 D-72766 Reutlingen und viele mehr auf www.aero-naut.de www.aero-naut.de...
Need help?
Do you have a question about the Santorini and is the answer not in the manual?
Questions and answers