Gilson GX-271 User Manual
Liquid handler
Hide thumbs
Also See for GX-271:
- User manual (127 pages) ,
- Setup instructions (5 pages) ,
- Installation qualification procedures (5 pages)
Table of Contents
Advertisement
Quick Links
See also:
User Manual
GX-271 Liquid Handler
User's Guide
Gilson, Inc.
| PO Box 620027 | Middleton, WI 53562-0027 | Tel: 608-836-1551 OR 800-445-7661 | Fax: 608-831-4451
Gilson S.A.S.
| 19, avenue des Entrepreneurs | BP 145, F-95400 Villiers-le-bel, FRANCE
www.gilson.com
| sales@gilson.com | service@gilson.com | training@gilson.com
LT350012-04
Advertisement
Table of Contents
Troubleshooting

Subscribe to Our Youtube Channel
Related Manuals for Gilson GX-271


Summary of Contents for Gilson GX-271
- Page 1 GX-271 Liquid Handler User’s Guide Gilson, Inc. | PO Box 620027 | Middleton, WI 53562-0027 | Tel: 608-836-1551 OR 800-445-7661 | Fax: 608-831-4451 Gilson S.A.S. | 19, avenue des Entrepreneurs | BP 145, F-95400 Villiers-le-bel, FRANCE www.gilson.com | sales@gilson.com | service@gilson.com | training@gilson.com LT350012-04...
-
Page 3: Table Of Contents
GX-271 Liquid Handler with VERITY® Syringe Pump . . . . . . . . . . . . . . . . . - Page 4 Solvent Bottle Rack Installation . . . . . . . . . . . . . . . . . . . . . . . . . . . . . . . . . . . . . . . . . . . . . . . . . 51 Table of Contents GX-271 Liquid Handler...
- Page 5 Transporting the Instrument . . . . . . . . . . . . . . . . . . . . . . . . . . . . . . . . . . . . . . . . . . . . . . . . . . . . . . . 66 GX-271 Liquid Handler...
- Page 6 Unit ID . . . . . . . . . . . . . . . . . . . . . . . . . . . . . . . . . . . . . . . . . . . . . . . . . . . . . . . . . . . . . . . . . . . . . . . . 83 Table of Contents GX-271 Liquid Handler...
- Page 7 Installation . . . . . . . . . . . . . . . . . . . . . . . . . . . . . . . . . . . . . . . . . . . . . . . . . . . . . . . . . . . . . . . . . . . . . . . 106 GX-271 Liquid Handler...
- Page 8 Liquid Contact Materials . . . . . . . . . . . . . . . . . . . . . . . . . . . . . . . . . . . . . . . . . . . . . . . . . . . . . . . . . . 123 Table of Contents GX-271 Liquid Handler...
- Page 9 Failure to comply with these precautions or with warnings described in the user’s guide violates safety standards of design, manufacture, and intended use of the instrument. Gilson assumes no liability for customers failing to comply with these requirements.
-
Page 10: Safety
Attention, risque de choc électrique Vorsicht, Elektroschockgefahr Caution, hot surface Attention, surface chaude Vorsicht, heiße Oberfläche Fuse Fusible Sicherung Keep hands clear of probe Garder les mains éloignees de l’aiguille Halten Sie Hände fein von der Nadel GX-271 Liquid Handler Safety... -
Page 11: Safety Notices
Refer to the Material Safety Data Sheet (MSDS) for each solvent before use. Replacement Parts Only use the replacement parts mentioned in this user’s guide. GX-271 Liquid Handler User’s Guide... -
Page 13: Sécurité
Le non-respect de ces précautions ou des avertissements spécifiques mentionnés dans ce guide compromet les normes de sécurité de conception, de fabrication et d’utilisation prévue de l’instrument. Gilson décline toute responsabilité en cas d’incapacité du client à se conformer à ces exigences. -
Page 14: Symboles Électroniques Et De Dangers
Attention, risque de choc électrique Vorsicht, Elektroschockgefahr Caution, hot surface Attention, surface chaude Vorsicht, heiße Oberfläche Fuse Fusible Sicherung Keep hands clear of probe Garder les mains éloignees de l’aiguille Halten Sie Hände fein von der Nadel GX-271 Liquid Handler Sécurité... -
Page 15: Notes De Sécurité
Sécurité relatives aux solvants avant toute utilisation. Pièces Détachées S’assurer d’utiliser seulement les pièces détachées mentionnées dans le guide utilisateur. S’il est nécessaire de changer des pièces non listées, merci de contacter votre représentant Gilson local. GX-271 Liquid Handler User’s Guide... - Page 17 This chapter provides information on the following topics: ● Description on page 18 ● Unpacking on page 20 ● Customer Service on page 23 ● Trademarks on page 23 ● Technical Specifications on page 24 GX-271 Liquid Handler User’s Guide...
-
Page 18: Introduction
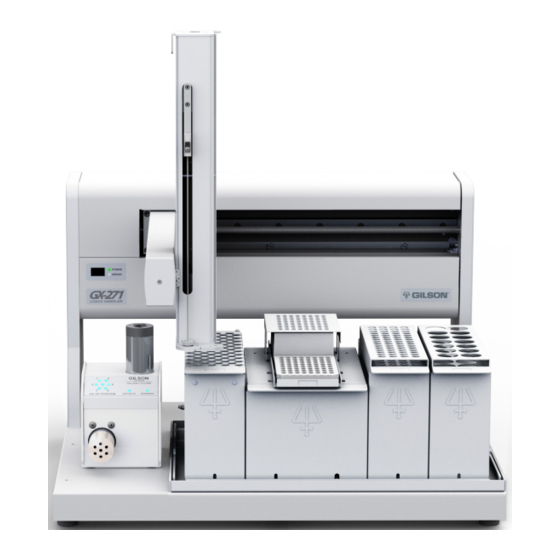
GX-271 Liquid Handler. For plumbing instructions, refer page 95 its appendix. Tray Insert Locator Plate Figure 1: System Overview and Description of the GX-271 Liquid Handler with GX Solvent System GX-271 Liquid Handler Introduction... -
Page 19: Gx-271 Liquid Handler With Verity® Syringe Pump
For installation instructions, refer to page 101 of its appendix. Figure 2: System Overview and Description of the GX-271 Liquid Handler with VERITY® Syringe Pump GX-271 Liquid Handler User’s Guide... -
Page 20: Unpacking
It is recommended that two people lift the unit out of the box. Do not attempt to lift the instrument from the Y-arm (the horizontal arm). 4. Remove the plastic wrap covering the liquid handler. Lift Here Figure 3: Unpacking the GX-271 Liquid Handler (Bottom View) GX-271 Liquid Handler Introduction... -
Page 21: Standard Equipment
Standard Equipment The following items are considered standard equipment and are provided with the GX-271 Liquid Handler: ● Locator Pan ● Z-Arm ○ Isolator Probe Holder ● Accessory Package ○ Allen Wrenches (2.5, 3, and 4 mm) ○ Ethernet Cable ○... -
Page 22: Accessories
● Hazardous Materials Declaration (China RoHS) ● Installation Qualification (IQ) Procedure ● GX-271/GX-274 Liquid Handlers Documentation CD, which includes this user’s guide, the GX-274 Liquid Handler User's Guide, and IQ procedure documents. ● GX-27X Offset Utility Kit CD, which includes an instruction document ●... -
Page 23: Customer Service
Customer Service Gilson, Inc. and its worldwide network of representatives provide customers with the following types of assistance: sales, technical support, applications, and instrument repair. If you need assistance, please contact your local Gilson representative. Detailed contact information can be found at www.gilson.com. To help us serve you quickly and efficiently, refer to Before Calling Us page 72. -
Page 24: Technical Specifications
Technical Specifications Please be aware of the following before operating the instrument. Changes or modifications to the instrument not expressly approved by Gilson could void the NOTE factory-authorized warranty. This instrument complies with part 15 of the FCC Rules. Operation is subject to the following two conditions: (1) this instrument may not cause harmful interference, and (2) this instrument must accept any interference received, including interference that may cause undesired operation. - Page 25 *Refer to the Materials appendix for Probe Guide more details. Probe 316L Stainless Steel Rinse Station PEEK Transfer Port PTFE 316L Stainless Steel Tubing (Drain) Tygon® GX-271 Liquid Handler Technical Specifications (continued on page 26) GX-271 Liquid Handler User’s Guide...
- Page 26 GX-271 Liquid Handler Technical Specification Definition Liquid Level Detection Capacitive liquid level detection is supported when using tubes in aluminum racks. (LLD) Locator Plate Capacity Code 33X/34X racks Up to five of these racks can be placed on the tray insert.
-
Page 27: Installation
Installation Chapter Two The GX-271 Liquid Handler and its components should be set up and installed in the order shown below. Complete instructions for each step are included in this chapter: ● Locator Pan Installation and Setup ● Z-Arm Setup ●... -
Page 28: Locator Pan Installation And Setup
Locator Pan Installation and Setup This section takes you through the steps for installing the locator pan on the locator plate of the GX-271 Liquid Handler along with the tray insert and rinse stations. GX Direct Injection Module Cable Support Rod... -
Page 29: Locator Pan Installation
● For a static rinse, install the plug in the bottom hole and the drain in the top hole. ● For a flowing rinse, install the plug in the top hole and the drain in the bottom hole. Inside Probe Rinse The inside probe rinse station can also function as a drain. GX-271 Liquid Handler User’s Guide... -
Page 30: Rinse Station Locations
Inside Probe Rinse Install the inside probe rinse station in the rear position on the tray insert. Inside Rinse OR Drain Station Outside Static Rinse Outside Flowing Rinse Figure 6: Installing the Rinse Stations on the Tray Insert GX-271 Liquid Handler Installation... -
Page 31: Rinse Station Installation On The Tray Insert
Phillips screwdriver. 4. Repeat steps 1 through 3 for all other rinse stations. Hex Nut Rinse Station Support Tray Insert Flat-Head Screw Figure 7: Installing the Rinse Station on the Tray Insert GX-271 Liquid Handler User’s Guide... -
Page 32: Tray Insert Installation
2. Place the tray insert in the locator pan of the instrument. The holes on the tray insert should line up with the posts on the locator pan. Tray Insert Pre-Installed Locator Rinse Stations Figure 8: Installing the Tray Insert GX-271 Liquid Handler Installation... -
Page 33: Z-Arm Setup
The Z-arm and its components should be assembled and installed in the following order: 1. Isolator Probe Holder Installation 2. Guide Foot Installation 3. Z-Arm Installation 4. Probe Installation 5. Liquid Level Detection (LLD) Cable Installation 6. Z Travel Height Adjustment GX-271 Liquid Handler User’s Guide... -
Page 34: Isolator Probe Holder Installation
5. Place the screw removed in Step 1 up through the bottom of the isolator probe holder and into the isolator mounting block. Tighten using the 3 mm Allen wrench. Isolator Mounting LLD Cable Block Connector Isolator Probe Holder 3 mm Allen Wrench Figure 10: Z-Arm Components GX-271 Liquid Handler Installation... -
Page 35: Guide Foot Installation And Setup
1.5 mm 2604612 1.8 mm 2604613 2.3 mm Z-Foot 2604614 2.7 mm Guide Foot Figure 11: Guide Foot Installed on Z-Foot Probe Guide Indentations Insert Guide Foot Phillips Screws Figure 12: Guide Foot Assembly (Exploded View) GX-271 Liquid Handler User’s Guide... -
Page 36: Z-Arm Installation
The Z-arm will be set to its proper height as the final step of the installation. Refer to Z-Arm Height Adjustment on page 38. Z-Arm Y-Arm Mounting Screw Figure 13: Z-Arm Mounted on GX-271 Liquid Handler GX-271 Liquid Handler Installation... -
Page 37: Adjusting The Z Travel Height
NOTE adjacent hole on the right side of the Z-arm. The tip of the stop pin is visible on the right side of the Z-arm. Figure 14: S1 and S2 Positions GX-271 Liquid Handler User’s Guide... -
Page 38: Z-Arm Height Adjustment
Z-arm until it Bracket lightly rests on the adjustment tool. 5. Tighten the mounting screw on the Z-arm Z-Height Adjustment mounting bracket to secure the Z-arm. Tool 6. Remove the adjustment tool. Figure 16: Z-Arm Height Adjustment GX-271 Liquid Handler Installation... -
Page 39: Probe Installation
Z-arm. Polypropylene racks, Teflon®-coated probes, and NOTE microplates are not compatible with liquid level detection. Isolator Probe Port Holder Figure 17: Installing the Liquid Level Detection Cable on the Z-Arm GX-271 Liquid Handler User’s Guide... -
Page 40: Plumbing Connections
VERITY® Syringe Pump or GX Solvent System and then finger tighten. 2. Connect the other end of the transfer tubing with fittings to the top of the isolator probe holder. Firmly tighten this fitting, since it holds the probe in place. GX-271 Liquid Handler Installation... -
Page 41: Rinse Station Plumbing
2. Connect the drain tubing to the barbed union on the rinse station. 3. If you are using a GX Rinse Pump for a flowing rinse, refer to Plumbing Connections on page 102. Outside Probe Rinse Inside Probe Rinse Static Rinse Flowing Rinse Figure 19: Rinse Station Configurations GX-271 Liquid Handler User’s Guide... -
Page 42: Rear Panel Connections
The following section provides detailed information on making rear panel connections. For information about making rear panel connections for optional accessories, refer to its appendix. Rear Panel Diagram Refer to the diagrams below when making the connections to the GX-271 Liquid Handler. GSIOC POWER... -
Page 43: Ethernet
GSIOC communication, refer to NOTE Ethernet is the only Gilson software supported configuration. To make the Ethernet connection to the instrument, a router (ordered separately) and Ethernet cables are required. Follow the steps below to make the Ethernet connection: 1. - Page 44 RS-232 cable (part number 36083129, included in the accessory package). Connecting an RS-232 Cable to the GX-271 Liquid Handler 1. Attach the male end of the RS-232 cable to the RS-232 port located on the rear panel of the liquid handler.
-
Page 45: Gsioc
RS-232 communication, refer to page NOTE Ethernet is the only Gilson software supported communication configuration. Connection Setup A 508 or 506C System Interface Module is required for communication between the liquid handler and the computer. Use the GSIOC cable (part number 36078143, included in the accessory package) to connect the liquid handler to the interface module. - Page 46 GSIOC GSIOC Cable Figure 24: GSIOC Cable Connection from the GX-271 Liquid Handler to the 508 Interface Module Connecting the Interface Module to the Computer 1. Locate the RS-232 cable provided with the interface module. Attach the male end of the RS-232 cable to the RS-232 port located on the rear panel of the interface module.
- Page 47 (Connect to GSIOC Module) Figure 25: 6-Pin to 9-Pin GSIOC Cable Connecting a 6-pin to 9-pin GSIOC Cable to the GX-271 Liquid Handler 1. Attach the male connector of the 6-pin to 9-pin GSIOC cable to one of the GSIOC ACCESSORIES ports located on the rear panel of the liquid handler.
- Page 48 GSIOC cable currently attached to the GSIOC module. Tighten the retaining screws. Repeat step 3 for each additional module. RS-232 Cable To Computer GSIOC Module GSIOC Liquid Handler GSIOC Module GSIOC Cable GSIOC Cables Figure 27: Connecting to Multiple GSIOC Modules GX-271 Liquid Handler Installation...
-
Page 49: Z-Arm Connection
At the factory, the unit ID on the liquid handler is set to 20. There is no need to change this number, unless it has been assigned to another Gilson instrument that is also connected along the GSIOC. To change the unit ID: 1. -
Page 50: Power
7. Label each cable to identify the purpose of the connection. Power Locate the appropriate power cord for your line voltage, and then connect the power cord to the power receptacle on the GX-271 Liquid Handler and then to a grounded power outlet. GX-271 Liquid Handler Installation... -
Page 51: Rack Installation
Rack Installation The GX-271 Liquid Handler is equipped to locate up to five Code 33X/34X-series. Refer to the Parts and Accessories appendix for a list of racks available for the instrument. Code 33X/34X-Series Rack Installation 1. Orient the rack so that the code number is facing forward. -
Page 52: Final Z-Arm Adjustments
If not, adjust the cable in the clip until it can move freely. Ensure that the GX-271 Liquid Handler is unplugged before manually moving the CAUTION Z-arm. GX-271 Liquid Handler... - Page 53 Install TRILUTION® LC v3.0 or TRILUTION® LH v3.0 (or higher) software according to the installation guide included with the software. These software packages provide control of the GX-271 Liquid Handler. For more information about TRILUTION LC or TRILUTION LH software, refer to the respective user’s guide and documentation supplied with the software.
-
Page 54: Operation
1. Make sure the instrument is connected to a grounded power source. 2. Power on the PC first, the router next, and then the GX-271 Liquid Handler. 3. Power on the syringe pump (if applicable). 4. Start TRILUTION® LC or TRILUTION® LH software. -
Page 55: Gx-27X Series Offset Utility
● GX-27X Series Offset Utility Kit Instructions Install the GX-27X Series Offset Utility Pre-Installation Checklist Before beginning the installation: ˆ Log on as a Windows® Administrator ˆ Close all running applications ˆ Temporarily disable antivirus software ˆ Temporarily disable firewall GX-271 Liquid Handler User’s Guide... -
Page 56: Prepare To Run The Gx-27X Series Offset Utility
To start the GX-27X Series Offset Utility, click Start > All Programs > Gilson Applications > GX-27X Series > GX-27X Series Offset Utility. If any Windows® Security Alerts appear with Gilson, Inc. as the Publisher, click Unblock (Windows® XP) or Allow Access (Windows® 7). -
Page 57: Use The Gx-27X Series Offset Utility
● GSIOC and RS-232-controlled instruments will display the Unit ID (ID=) 2. Select the instrument and then click Connect. 3. Select the Clamp Height and the Offset Tool and then click Set. Step 1: Scan Step 2: Connect Step 3: Set GX-271 Liquid Handler User’s Guide... - Page 58 If a message appears indicating that the minimum or maximum offset NOTE value has been reached, contact your local Gilson representative for assistance. 6. When the probe is centered, click Set to save the X and Y Offsets. Steps 2 through 6: Moving and...
- Page 59 If a message appears indicating that the minimum or maximum offset NOTE value has been reached, contact Step 2: Move to Target your local Gilson representative for assistance. 5. When the probe is aligned, click Set to save the Z offset. View Log Click View Log to view the offset history for the connected instruments.
- Page 61 This chapter contains some general guidelines for maintaining the liquid handler. ● Helpful Hints on page 62 ● Cleaning on page 62 ● Part Replacement on page 64 ● Transporting the Instrument on page 66 GX-271 Liquid Handler User’s Guide...
-
Page 62: Maintenance
Helpful Hints To keep the system at peak performance, Gilson recommends doing the following: ● Change or clean the tubing regularly to maintain maximum performance. ● Flush the probe and rinse stations daily with appropriate solvents. ● Check periodically to ensure that all fittings are tight. - Page 63 3. Flush the fluid path using the bleach solution. 4. Pause the priming sequence. 5. After 30 minutes, resume priming the fluid path using distilled or deionized water to pump the remaining bleach solution from the tubing into a waste container. GX-271 Liquid Handler User’s Guide...
-
Page 64: Part Replacement
Fittings Probe Probe Remove the Z-Arm from the GX-271 Liquid Handler. 1. Using a 3 mm Allen wrench, loosen the mounting screw on the Z-arm mounting bracket. 2. Partially pull out the bracket. Do not remove Isolator completely. - Page 65 6. Install the new probe by pushing it through the top of the isolator probe holder. Make sure the tip of the probe sits inside the center hole of the probe guide insert. 7. Replace and tighten the fitting. GX-271 Liquid Handler User’s Guide...
-
Page 66: Fuse
Transporting the Instrument When moving the instrument to another location or when sending it back to the factory, NOTICE do not use the Y-arm as a handle. Always lift the instrument from the base. GX-271 Liquid Handler Maintenance... - Page 67 This section provides information on the following topics: ● Error Messages on page ● Mechanical Troubleshooting on page 71 ● Electrical Troubleshooting on page 71 ● Communication Troubleshooting on page 72 ● Repair and Return Policies on page 72 GX-271 Liquid Handler User’s Guide...
-
Page 68: Troubleshooting
2-digit, front panel display. For assistance with resolving an error, contact your local Gilson representative. When an instrument error occurs on the GX-271 Liquid Handler, the error number appears on the 2-digit, front panel display. Refer to the table below for the error text. - Page 69 Solution A command was sent to set the XY position outside of the valid range. Send a Home command using the Gilson Ethernet Utility XY target out of range to clear the error. Correct the error in the program controlling the instrument.
- Page 70 Attempt to move to a Z location while Z is still in motion. Send a Home command using the Gilson Ethernet Utility to clear Z move while busy the error. Correct the error in the program controlling the instrument.
-
Page 71: Mechanical Troubleshooting
● Make sure power is turned on and that the unit is plugged in. ● Check AC power cord connections. ● Try different AC outlet. ● Check fuses, and replace if necessary. Unit Blows Fuses ● Contact your local Gilson representative. GX-271 Liquid Handler User’s Guide... -
Page 72: Communication Troubleshooting
● Serial number and model number of the instruments involved. ○ The serial number is located under the Y-arm near the rear of the GX-271 Liquid Handler. ○ The serial number is located on the back side, at the top of the Z-arm. -
Page 73: Return Procedure
Contact your local Gilson representative to obtain authorization before returning any Gilson equipment. To return a piece of equipment: ● Carefully pack the unit to prevent damage in transit. Check with your local Gilson representative regarding proper method of shipment. No responsibility is assumed by Gilson or your local Gilson representative for damage caused by improperly packaged instruments. - Page 75 This chapter provides information on the following topics: ● Technical Specifications on page 76 ● Installation on page 77 ● Operation on page 78 ● Plumbing Connections on page 79 ● Rear Panel Connections on page 82 GX-271 Liquid Handler User’s Guide...
-
Page 76: Technical Specifications
Technical Specifications Please be aware of the following before operating the instrument. Changes or modifications to the instrument not expressly approved by Gilson could NOTICE void the factory-authorized warranty. This instrument complies with part 15 of the FCC Rules. Operation is subject to the following two conditions: (1) this instrument may not cause harmful interference, and (2) this instrument must accept any interference received, including interference that may cause undesired operation. -
Page 77: Installation
Installation The GX Solvent System is installed next to the left support on the GX-271 Liquid Handler. Two locator pins are included with the solvent system, but are not used with the NOTE liquid handler. Rinse Stations Locator Pan with... -
Page 78: Operation
To Well 1. The selection valve switches to reservoir (positions 2–6). 2. The solvent system starts moving, dispensing From fluid to the well. The fluid is aspirated from Reservoir reservoir. Figure 40: Dispense Sequence GX-271 Liquid Handler GX Solvent System... -
Page 79: Plumbing Connections
P-331 nut, 1/8", 1/4-28 PEEK 49041027 P-359 ferrule, 1/8" and one of the following, ordered separately: 499424013 Transfer tubing 1.1 mL 499471112 Transfer tubing 5.5 mL 499474103 Transfer tubing 10.5 mL 499483602 Transfer tubing 30 mL GX-271 Liquid Handler User’s Guide... -
Page 80: Connection Diagrams
Connection Diagrams Figure 41: GX Solvent System Plumbing Connection Diagram with Close Up of Valves GX-271 Liquid Handler GX Solvent System... -
Page 81: Port Connections And Plumbing
(0.062" ID x 1/8" OD) 30 mL transfer tubing Connect one end to the probe and the other end to (part number 499483602) port B on the pump. 360 inches of Teflon tubing (0.085" ID x 1/8" OD) GX-271 Liquid Handler User’s Guide... -
Page 82: Rear Panel Connections
2. Connect the power cable (part number 26035455) to the FROM GSIOC ACCY port on the solvent system. 3. Connect the other end of the power cable to one of the GSIOC ACCESSORIES ports on the rear panel of the GX-271 Liquid Handler. Power... -
Page 83: Unit Id
At the factory, the unit ID on the GX Solvent System is set to 0. Refer to the table below for the correct setting, which is dependent on the type of communication to be used. Unit ID Communication Diagram UNIT ID Ethernet UNIT ID RS-232 UNIT ID GSIOC GX-271 Liquid Handler User’s Guide... - Page 85 Fraction Collection Valve Appendix B This appendix provides information on the following topics: ● Technical Specifications on page 86 ● Installation on page 87 ● Plumbing Connections on page 88 GX-271 Liquid Handler User’s Guide...
-
Page 86: Technical Specifications
Technical Specifications Please be aware of the following before operating the instrument. Changes or modifications to the instrument not expressly approved by Gilson could NOTICE void the factory-authorized warranty. This instrument complies with part 15 of the FCC Rules. Operation is subject to the following two conditions: (1) this instrument may not cause harmful interference, and (2) this instrument must accept any interference received, including interference that may cause undesired operation. -
Page 87: Installation
Z-arm for the stop pin. 4. Fully tighten the stop pin. The tip of the stop pin should be visible on the right side of the Z-arm. S2 Stop Pin Figure 42: Installing the Tubing Routing Strip GX-271 Liquid Handler User’s Guide... -
Page 88: Plumbing Connections
● For the 1/16" OD Teflon probe (part number 25077423): 1. Cut a piece of the supplied 1/16" OD tubing to approximately 70 mm. 2. Insert the supplied nut and ferrule onto the tubing. GX-271 Liquid Handler Fraction Collection Valve... -
Page 89: Installing The Collection Probes
Figure 43: Close Up of Fraction Collection Valve Tubing Routed Through the Tube and Wire Routing Notches The 1/8" tubing uses the larger guide hole and the 1/16" tubing uses the smaller guide hole. GX-271 Liquid Handler User’s Guide... -
Page 90: Valve Connections And Description
P-300 ferrule (1/8") on one end of the tubing. Route that end of the tubing down through DIVERT Position (part number 490032) the tube and wire routing strip and then connect it to the DIVERT port of the valve. GX-271 Liquid Handler Fraction Collection Valve... - Page 91 GX Direct Injection Module Appendix C This appendix provides information on the following topics: ● Technical Specifications on page 92 ● Installation on page 94 ● Plumbing Connections on page 95 ● Rear Panel Connections on page 97 GX-271 Liquid Handler User’s Guide...
-
Page 92: Technical Specifications
Technical Specifications Please be aware of the following before operating the instrument. Changes or modifications to the instrument not expressly approved by Gilson could NOTICE void the factory-authorized warranty. This instrument complies with part 15 of the FCC Rules. Operation is subject to the following two conditions: (1) this instrument may not cause harmful interference, and (2) this instrument must accept any interference received, including interference that may cause undesired operation. - Page 93 Technical Specification Definition Injection Reproducibility* CV < 0.7% • Stainless steel and PEEK valves and ports *Contact Gilson, Inc. to learn what methods and Analytical (1/16") conditions were used to obtain the values. • 20 µL loop • Total loop overfill CV <0.9%...
-
Page 94: Installation
NOTE used with the GX-271 Liquid Handler. Injection Module with Riser Block Holes Used for Use the GX-271 Direct Inject Riser Block Installation (part number 26035458, ordered separately) when collecting fractions to tubes 150 mm and taller, or when using the Code 33X/34X-series racks. -
Page 95: Plumbing Connections
Before making the tubing connections, locate the plumbing package for the GX Direct Injection Module (part number 26035470) which contains the following: Part Number Description Quantity 4903180411 1/16" Nut, PEEK, (MZN1PK) 4903180511 1/16" Ferrule, PEEK, (ZF1PK) 495033 Teflon tubing, 0.020" ID x 1/16" OD, 10 ft/pk GX-271 Liquid Handler User’s Guide... -
Page 96: Port Connections And Tubing
Port 4 on the valve. Port 5 to Pump Not supplied. Application specific. Use a 1/16" Nut, PEEK, (MZN1PK) (part number 4903180411) and a ZF1PK 1/16" Ferrule (part number 4903180511) to connect the tubing to Port 5 on the valve. GX-271 Liquid Handler GX Direct Injection Module... -
Page 97: Rear Panel Connections
To make connections between the GX Direct Injection Module and the liquid handler refer to the diagram and instructions below. 1. Ensure that the power is turned off to the GX-271 Liquid Handler. Any time the injection module will be disconnected from the liquid handler ensure NOTICE that the power is turned off to the liquid handler. -
Page 98: Unit Id
To change the unit ID: 1. Gently insert a small flat-blade screwdriver into the selector on the rear panel and turn it. 2. Align the white dot with one of the indicated numbers. GX-271 Liquid Handler GX Direct Injection Module... - Page 99 GX Rinse Pump Appendix D This chapter provides information on the following topics: ● Technical Specifications on page 100 ● Installation on page 101 ● Plumbing Connections on page 102 ● Rear Panel Connections on page 103 GX-271 Liquid Handler User’s Guide...
-
Page 100: Technical Specifications
Technical Specifications Please be aware of the following before operating the instrument. Changes or modifications to the instrument not expressly approved by Gilson could NOTICE void the factory-authorized warranty. This instrument complies with part 15 of the FCC Rules. Operation is subject to the following two conditions: (1) this instrument may not cause harmful interference, and (2) this instrument must accept any interference received, including interference that may cause undesired operation. -
Page 101: Installation
Installation Position the GX Rinse Pump near the rinse stations on the locator plate of the GX-271 Liquid Handler. NOTE Two thumbscrews are included with the rinse pump, but are not used with the liquid handler. GX Direct GX Solvent... -
Page 102: Plumbing Connections
7. Repeat steps 5 and 6 for the bottom set of fittings. To Waste Figure 53: Making the Plumbing Connections to the GX Rinse Pump GX-271 Liquid Handler GX Rinse Pump... -
Page 103: Rear Panel Connections
Rear Panel Connections To make connections between the GX Rinse Pump and the GX-271 Liquid Handler refer to the diagram and instructions below. 1. Ensure that the power is turned off to the GX-271 Liquid Handler. 2. Locate the GX Rinse Pump cable connector (part number 26035256). This assembly contains two prewired terminal block connectors. -
Page 105: E Safety Shield
Safety Shield Appendix E This chapter provides information on the following topics: ● Installation on page 106 GX-271 Liquid Handler User’s Guide... -
Page 106: Installation
7. Place a washer and then a screw over each of the pivot pins and then tighten each screw using a Phillips screwdriver. Pivot Pins Shield Washers Screws Left Support Figure 55: Shield Installation Diagram GX-271 Liquid Handler Safety Shield... -
Page 107: Liquid Handler
GX-271 Liquid Handler (VERITY® Syringe Pump, ordered separately) 2614107 GX-271 Preparative Liquid Handler (includes GX Solvent System) Probes The following are commonly used probes. Contact your local Gilson representative for information about probe choices for other applications. 125 mm Description... - Page 108 221 x 1.5 x 0.8 (2.1 x 1.5 x 0.8 Tip) Beveled 27067383 Septum Piercing, Beveled Stainless Steel 221 x 1.5 x 0.4 Grooved, Septum Piercing, Teflon® Coated 270673831 221 x 1.5 x 0.4 Beveled Stainless Steel GX-271 Liquid Handler Parts and Accessories...
- Page 109 Stainless Steel 269 x 1.3 x 0.8 atmosphere inside a sealed vessel. Includes a probe holder and guide kit. 26017050 Septum Piercing, Beveled Stainless Steel 269 x 2 x 0.8 (1.5 OD x 0.8 Tip) GX-271 Liquid Handler User’s Guide...
-
Page 110: Probe Guide Assemblies
2.7 mm guide foot assembly (Includes the guide foot, probe guide insert, and six screws) Isolator Probe Holder Part Number Description 2604615 Isolator probe holder, single probe (GX-271 Liquid Handler) Probe Guide Inserts Part Number Description 26046214 1.3 mm probe guide insert 26046215 1.5 mm probe guide insert... -
Page 111: Rinse Stations
Terminal block connector, 6-pin 638308512 Terminal block connector, 8-pin Miscellaneous Part Number Description 25051095 175/185 mm Z-height adjustment tool 25051094 125 mm Z-height adjustment tool 470331206 Rinse station drain tubing 2604706 Shield kit, GX-271 Liquid Handler GX-271 Liquid Handler User’s Guide... -
Page 112: Gx Solvent System
499484021 Solvent inlet tubing 49948122 Solvent valve to pump tubing 490032 Waste tubing, 0.063 (ID) x 0.125 (OD), PTFE (15 ft) 490410332 P-331 nut, 1/8", 1/4-28 PEEK 49041027 P-359 ferrule, 1/8" 26035455 Power cable GX-271 Liquid Handler Parts and Accessories... -
Page 113: Gx Rinse Pump
10 mL stainless steel sample loop (1/8" OD) for Valco® valves 49440020 20 mL stainless steel sample loop (1/8" OD) for Valco® valves 49440025 25 mL stainless steel sample loop (1/8" OD) for Valco® valves GX-271 Liquid Handler User’s Guide... - Page 114 1 mL stainless steel sample loop (1/16" OD) for Valco® valves 49440002 2 mL stainless steel sample loop (1/16" OD) for Valco® valves 49440005 5 mL stainless steel sample loop (1/16" OD) for Valco® valves GX-271 Liquid Handler Parts and Accessories...
-
Page 115: Injection Ports
Injection port seal for 1.5 mm OD probes Accessories Part Number Description 26035458 GX Direct Injection Module riser block assembly (GX-271 Liquid Handler) 26035470 Plumbing package for the GX Direct Injection Module 495033 Teflon tubing, 0.023" ID x 0.062" (1/16") OD (package of 10 ft) 490318041 Valco MZN1PK PEEK nut (0.062"... -
Page 116: Fraction Collection Valve
Description 25077422 Collection tube, 1/8" TFE 25077423 Collection tube, 1/16" TFE 26037270 Plumbing package for the fraction collection valve (GX-271 Liquid Handler) 26036123 Tube & wire routing strip, Z drive 49041011 Upchurch P-200R ferrule, flangeless, 1/16", TEFZEL® (ETFE), red 49041012 Upchurch P-201 nut, flangeless, 1/16", 1/4-28, DELRIN®... -
Page 117: Racks
Racks The GX-271 Liquid Handler can be configured with a variety of rack types and sizes. The following pages describe the racks that can be purchased for use on the GX-271 Liquid Handler. Refer to Rack Installation page 51 for rack installation procedures. - Page 118 (HDPE) for Bottom 60 Vials 260440031 Aluminum 12 x 32 mm (2 mL) 44 Tubes 260440079 Aluminum 18 x 150 mm (25 mL) 14 Scintillation Vials 260440036 Aluminum 25 x 50 mm (20 mL) GX-271 Liquid Handler Parts and Accessories...
- Page 119 14 Scintillation Vials 260440081 Aluminum 40 mL 48 WISP Vials 260440083 Aluminum 15 x 45 mm (4 mL) Two Microplates 260440094 Aluminum 96-well microplates (shallow or deep) Four Microplates 260440095 Aluminum 96-well microplates (shallow or deep) GX-271 Liquid Handler User’s Guide...
- Page 120 Part Number Code Rack Code Material Vessels 64 Vials 260440106 Aluminum 12 x 32 mm (2 mL) 108 Tubes 260440039 Aluminum 10 x 75 mm 80 Tubes 260440025 Aluminum 13 x 100 mm GX-271 Liquid Handler Parts and Accessories...
-
Page 121: Rack Heighteners
Aluminum 16 x 100 mm (15 mL) Rack Heighteners Part Number Description 25045514 RH1 rack heightener assembly 27595513 RH2 rack heightener assembly Tray Insert Part Number Description 26041033 Tray insert for up to 5 Code-20 series racks GX-271 Liquid Handler User’s Guide... -
Page 123: Liquid Contact Materials
LDPE. High Density Polyethylene is also somewhat harder and more opaque and it can withstand rather higher temperatures (120° C for short periods, 110° C continuously). Liquid Contact Materials (Continued on page 124) GX-271 Liquid Handler User’s Guide... - Page 124 HDPE description provided by Dynalab Corporation (www.dynalon.com) 316 Stainless Steel, FEP, Nitronic 60, PAEK, PEEK, PTFE, PVDF, and Valcon H descriptions provided by Valco Instruments Company Inc (www.vici.com). Ekonol description provided by Saint-Gobain Coating Solutions (www.coatingsolutions.saint-gobain.com) GX-271 Liquid Handler Materials...
Need help?
Do you have a question about the GX-271 and is the answer not in the manual?
Questions and answers