Table of Contents
Advertisement
Quick Links
Advertisement
Table of Contents

Related Manuals for Kemppi A3 MIG


Summary of Contents for Kemppi A3 MIG
- Page 1 A7 MIG Welder A3 MIG Welder...
-
Page 2: Table Of Contents
..................© Kemppi Oy 2018... -
Page 3: Introduction
Read these sections carefully and follow their This operating manual contains important information instructions. on the use, maintenance and safety of your Kemppi prod- uct. The technical specifications of the equipment can be Note: Gives the user a useful piece of information. -
Page 4: Installation
Detailed installation instructions and the technical information that is out of the scope of this manual are found in the A3 MIG Welder Integration guide. Operating environment Positioning the machines... -
Page 5: System Overview
SYSTEM OVERVIEW A3 MIG Welder system 3.1 Power Source A3 MIG Welder is a welding system for welding automa- tion that includes all welding devices needed in robot A3 MIG Power Source 400 welding. A3 Power Source 400 Figure 3.1 A3 MIG Welder system... -
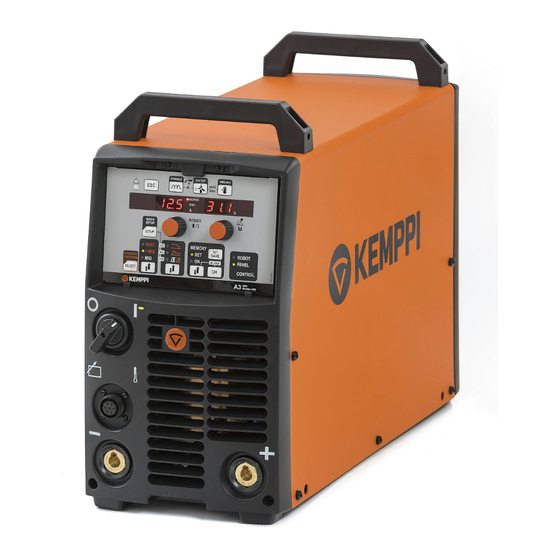
Page 6: Control Panel
The displays and indicators reflect the operating modes of the machine. Figure 3.4 Control panel layout Miscellaneous functions Displays System and welding setup Synergic program selection Welding process selection Welding program setup Memory channel setup Robot control indicator Control knobs © Kemppi Oy 2018 A3 MIG Welder 1826... -
Page 7: Dip Switches
Figure 3.6: Quick guide for DIP switch configuration Baud rate Mac ID Voltage 125 kbps 50 V 250 kbps 80 V 500 kbps 110 V (Reserved) 200 V Figure 3.5 DIP switches in the power source © Kemppi Oy 2018 A3 MIG Welder 1826... -
Page 8: Wire Feeder
Gas outlet Euro connector PowerPin connector with welding cable joint Wire feeder control cable connector Wire feeder control cable connector Wire liner connector Wire liner connector Welding cable connector Gas inlet Gas inlet © Kemppi Oy 2018 A3 MIG Welder 1826... - Page 9 Present the filler wire tip to the back of the wire feed rolls and press the wire inch button on the wire feed front panel. Feed the wire to the gun contact tip and prepare to weld. © Kemppi Oy 2018 A3 MIG Welder...
- Page 10 SP007538 Mount the lower feed roll, ensuring that the pin on the shaft fits in the cut on the feed roll. 1.4 – SP007458 SP007469 SP007539 SP007459 SP007470 SP007540 SP007460 SP007471 SP007541 © Kemppi Oy 2018 A3 MIG Welder 1826...
-
Page 11: Using The Welder
Right selection/adjustment knob System setup button Synergic program selection button Welding process selection button Synergic feature setup button Memory channel edit mode selection button 10. Memory channel selection button 11. Memory channel save button © Kemppi Oy 2018 A3 MIG Welder 1826... - Page 12 The value 0 is the recommended basic setting. Use values -1...-9 if you want a softer arc and less spatter. © Kemppi Oy 2018 A3 MIG Welder 1826...
- Page 13 To use the feature, press but- tons 3 and 4 simultaneously. © Kemppi Oy 2018 A3 MIG Welder 1826...
-
Page 14: Standard Mig Features
4.3 Standard MIG features Crater fill (CrL) The standard A3 MIG Welder delivery includes three MIG features that facilitate welding and improve weld quality. These features are creep start, hot start and crater fill. Welding Level To use a MIG feature, press the feature selector button 8. -
Page 15: Optional Mig Features
ESC. To use the optional features, enter a machine-specific activation code in the machine's control panel as shown below. To acquire an activation code, contact a Kemppi rep- resentative. If the code entry failed, the control panel display will show an error code. For more information on error codes, see "Troubleshooting". -
Page 16: Memory Channels
Press the MEMORY button (9) twice. The ON indicator light will turn on and the welding parameters you selected are activated. Start welding. Select the memory channel you want from the robot. Start welding. © Kemppi Oy 2018 A3 MIG Welder 1826... -
Page 17: Synergic 1-Mig, Wisethin, And Wiseroot Welding
Please note with the aluminium and special alloy programs that the A3 MIG Welder control panel. The welder controls the welding by adjusting the welding power and arc system doesn’t support push-pull guns. - Page 18 Ar+2% CO₂ SS-309 Ar+30%He+1%O₂ CuSi 3 Ar+2% CO₂ SS-309 Ar+30%He+1%O₂ CuSi 3 Ar+2% CO₂ SS-309 Ar+30%He+1%O₂ CuAl 8 SS-309 Ar+30%He+1%O₂ CuAl 8 FC-316 Ar+18%-25%CO₂ CuAl 8 FC-316 Ar+18%-25%CO₂ FC-316 CO₂ FC-309L Ar+18%-25%CO₂ © Kemppi Oy 2018 A3 MIG Welder 1826...
- Page 19 SS-316 Ar+2%CO₂ SS-316 Ar+2%CO₂ SS-316 Ar+2%CO₂ SS-316 Ar+2%CO₂ SS-316 Ar+30%He+1%O₂ SS-316 Ar+2%CO₂ SS-316 Ar+30%He+1%O₂ SS-316 Ar+2%CO₂ SS-316 Ar+30%He+1%O₂ WiseThin, SPE group Program number Wire, mm Material Shielding gas CuSi 3 CuAl 8 © Kemppi Oy 2018 A3 MIG Welder 1826...
-
Page 20: Welding And System Setup
Hot start time 0 ... 9.9 s 1.2 s The duration of the hot start in seconds. The tables below show the features available in this welding machine and their possible values. © Kemppi Oy 2018 A3 MIG Welder 1826... - Page 21 Crater fill Crater fill 90 % The welding power at the beginning of start level end level … the crater fill stage as a percentage of 250 % the welding power pre-set value. © Kemppi Oy 2018 A3 MIG Welder 1826...
- Page 22 10 … 60 % 25 % Percentage of WiseFusion level (only Level in synergic processes). (N/A) N/A = no license. WiseRoot, WiseThin and WiseFusion are optional features. To acquire activation codes, contact a Kemppi representative. © Kemppi Oy 2018 A3 MIG Welder 1826...
-
Page 23: Touch Sensor (Seam Search)
DIP switches, and it is controlled by Fieldbus / Digital robot interface the welding robot via the digital robot interface. Peripheral connector Touch tool (welding wire or gas nozzle) Touch detection Welding minus (touch sensor ground) © Kemppi Oy 2018 A3 MIG Welder 1826... - Page 24 200 V supply drops down under the 113 V level when loaded by a 5.6 kΩ resistor which is the nominal DC resistance of the human body. In some cases, voltage levels above 113 V can still cause minor harm, such as pain, to a person. © Kemppi Oy 2018 A3 MIG Welder 1826...
-
Page 25: Collision Sensor
In the A3 MIG Welder the collision sensor signal is read by the power source, and the information is passed to the ro- bot by the welding system. -
Page 26: Troubleshooting
• Check mains plug is connected correctly situations that may present during normal environmental • Check mains power distribution is switched on use when using the MIG/MAG process with the A3 MIG • Check the mains fuse and/or circuit breaker Welder. -
Page 27: Error Codes
Specify a welding curve for the memory channel. An activated memory channel has not been configured properly. OTHER ERROR CODES Switch off and restart the power source. Contact the maintenance service if the error is not resolved. © Kemppi Oy 2018 A3 MIG Welder 1826... -
Page 28: Operation Disturbances
The machine is designed If the machine malfunction cannot be corrected with to withstand 3 x 440 V voltage continuously. Ensure that these measures, contact your Kemppi maintenance ser- voltage is kept within this permissible limit, especially vice workshop. -
Page 29: Maintenance
Do not use pressure washing devices. Software loading Only an authorized trained electrician should carry Kemppi Service Workshops can also test and load firm- out repairs to Kemppi machines. ware and welding software. © Kemppi Oy 2018 A3 MIG Welder... -
Page 30: Disposal
The owner of the equipment is obliged to deliver a de- commissioned unit to a regional collection center, as per the instructions of local authorities or a Kemppi repre- sentative. By applying this European Directive you will improve the environment and human health. -
Page 31: Technical Data
Operating temperature range -20 °C … +40 °C Storage temperature range -40 °C … +60 °C External dimensions LxWxH 590 x 230 x 500 mm Weight 36 kg Degree of protection IP21S EMC class © Kemppi Oy 2018 A3 MIG Welder 1826... - Page 32 And you know. userdoc.kemppi.com Declarations of Conformity – Overensstemmelseserklæringer – Konformitätserklärungen – Declaraciones de conformidad – Vaatimustenmukaisuusvakuutuksia – Déclarations de conformité – Dichiarazioni di conformità – Verklaringen van overeenstemming – Samsvarserklæringer – Deklaracje zgodności – Declarações de conformidade – Заявления о соответствии – Försäkran om överensstämmelse – 符合性声明...
Need help?
Do you have a question about the A3 MIG and is the answer not in the manual?
Questions and answers