Table of Contents
Advertisement
Advertisement
Table of Contents

Summary of Contents for L3 Mobile-Vision BWX-100
- Page 1 ’ ’...
- Page 2 Before charging your BWX-100, always inspect the device to ensure that there are no signs of damage, deformity, or battery expansion/swelling. If you observe one of these conditions, do not attempt to charge the device.
-
Page 3: Table Of Contents
Attaching the Magnet Mount to Your Camera ..........8 Part 1: Detach the Two Magnets ............8 Part 2: Connect the B Plate to the Back of the BWX-100 ....9 Attaching the Camera to Your Clothing via the Magnet Mount ....10 Detaching the Magnet Mount from the Camera ......... - Page 4 Existing DEP, DEA Precinct, or DEF Customers ..........31 DEV Customers ....................32 Configuring the LAN port on your BWX-100 PC for DHCP ......32 Configuring BWX-100 to Work with DES ............. 34 Configuring a New BWX-100 DVR in DES ............37 Selecting the BWX-100 Download Options ..........
-
Page 5: Introduction
Introduction Introduction BWX-100 is a body worn digital video recorder that can be used to capture high definition video with audio. After recording video, you upload it to DES by placing the device in a docking station connected to your DES server. -
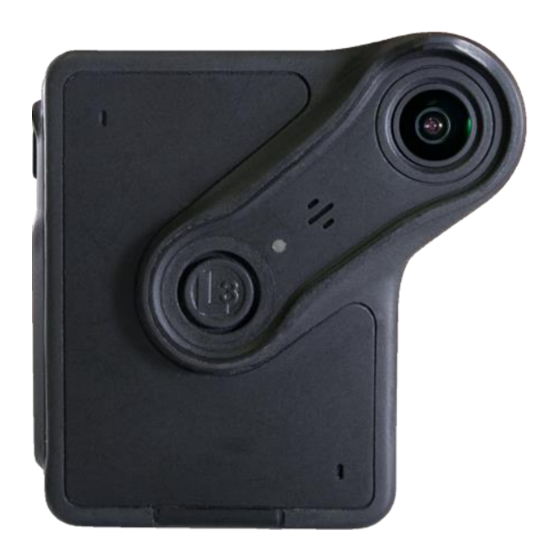
Page 6: Bwx-100 Components & Controls
BWX-100 Components & Controls BWX-100 Components & Controls Power/Record LED Microphone 1 LCD menu Camera lens Speaker Record button Docking Station port Recording-in-progress LED FRONT BOTTOM Microphone 2 SIDE Navigation buttons for LCD menu Select button for LCD menu Snap/Trace... -
Page 7: Docking Station
The green light indicates that the BWX-100 has a gigabit connection to the network The amber light indicates that the BWX-100 has a 100 megabit connection to the network. Also displays when a docked BWX-100 is turned off, so... - Page 8 HINT: After 45 seconds of inactivity, the LCD menu will automatically return to the READY screen. Therefore, try not to pause for too long between menu selections, or you might have to start over from the beginning! BWX-100 User’s Guide P a g e L3 Mobile-Vision 5.8.2018...
-
Page 9: Mount Options
Mount Options Mount Options To attach a BWX-100 to your clothing, first determine which type of mount will work best for you: alligator clip or magnetic mount. If you are using the alligator clip, examine the clip on the back of the device to make sure it’s facing in the direction you want: left, right, or down. -
Page 10: Attaching The Alligator Clip To Your Camera
WARNING: Do not subject tab to excessive use of pressure. 2 Place the mount plate in the round slot on the back of the BWX-100 with the tab in the 11:00 position for a downward facing clip, 8:00 position for a left facing clip, or 2:00 position for a right facing clip. -
Page 11: Detaching The Alligator Clip From Your Camera
1 Press the release button down with one thumb while you rotate the alligator clip counter clockwise with another finger. 2 Pull the clip up and off the camera. BWX-100 User’s Guide P a g e 7 L3 Mobile-Vision 5.8.2018... -
Page 12: Magnetic Mount
Part 1: Detach the Two Magnets 1 Using your thumbs, slide the A plate to the right or left so that it is half on/half off the B plate. This requires firm pressure. BWX-100 User’s Guide P a g e L3 Mobile-Vision 5.8.2018... -
Page 13: Part 2: Connect The B Plate To The Back Of The Bwx-100
3 Slide the A plate off the B plate. Part 2: Connect the B Plate to the Back of the BWX-100 1 Hold the BWX-100 in one hand and the B plate in the other hand. The arrow on the release tab should face up. -
Page 14: Attaching The Camera To Your Clothing Via The Magnet Mount
When you’re ready to remove the camera, simply hold the camera with one hand Removing the Camera while you use the other hand to reach behind your clothing and slide the A plate to the right or left. BWX-100 User’s Guide P a g e L3 Mobile-Vision 5.8.2018... -
Page 15: Detaching The Magnet Mount From The Camera
Operating Procedures Detaching the Magnet Mount from the Camera 1 Place the BWX-100 in one hand while you stabilize the B plate with your thumb. 2 Press the release button down with one thumb while you rotate the B plate counter- clockwise with another finger. -
Page 16: Turning The Device On
Operating Procedures Turning the Device On To turn your BWX-100 on, simultaneously press the Snap/Trace and Mute buttons until the device vibrates. Next, release the buttons and wait for the device to boot. This will take approximate- ly 30 seconds. During this time, the LCD screen may be blank for several seconds. -
Page 17: Stopping A Recording
DES. If the device chirps three times, it indicates that your device is either low on battery power or storage space. BWX-100 User’s Guide P a g e 13 L3 Mobile-Vision 5.8.2018... -
Page 18: Capturing A Snapshot And/Or Inserting A Tracepoint
2 Login to your DEP, DEA Precinct, DEV, or DEF server application as an Admin user. Next, display the BWX-100’s Edit DVR screen. (For detailed instructions, see “Changing a BWX-100 DVR Record” on page 39.) Finally, select a value from the Snapshot/Tracepoint drop-down list and click Save. -
Page 19: Turning 'Covert' Mode On/Off
Operating Procedures Turning ‘Covert’ Mode On/Off Your BWX-100 includes a feature called “covert” mode. In this mode, the device’s lights and audible sounds are disabled, allowing you to record discreetly when necessary. You can activate this feature any time the device is on, whether you’re recording or not. -
Page 20: Checking Remaining Record Time
Operating Procedures Checking Remaining Record Time To determine how much recording time you have left on your BWX-100, first examine the Micro SD Card icon located in the upper right corner of the LCD screen. Remaining space on internal micro SD card. In this example, the storage card is FULL The more black fill on this icon, the less storage space there is. -
Page 21: Turning Audio Mute On/Off
Turning Audio Mute On/Off If desired, you can activate the mute feature so that your BWX-100 will not capture any audio during a current or future recording. You can activate this feature any time the device is on, whether you’re recording or not. -
Page 22: Uploading Videos To Des
DEP, DEA Precinct, DEF, or DEV. This section describes how to upload your video files to these applications. 1 If your agency already has a BWX-100 Uplink Station set up, skip to step 3 on page 21. Otherwise proceed to the next step. - Page 23 DES storage server. (Continued on page 21) Figure 1: Uplink Station with Optional Power Adapters Single power Adapter Server Docking stations Ethernet cables DEV customers connect to a PC BWX-100 User’s Guide P a g e 19 L3 Mobile-Vision 5.8.2018...
- Page 24 Server DEV customers connect to a PC Ethernet cables Docking stations Figure 3: Uplink Station with Power-Over-Ethernet Docking stations Server DEV customers connect to a PC Ethernet cables BWX-100 User’s Guide P a g e L3 Mobile-Vision 5.8.2018...
- Page 25 Operating Procedures 3 Make sure your BWX-100 is powered on, then place it into one of the docking stations at your agency’s Uplink Station. Once the device successfully connects to your storage server, the words DES CONNECTED display on the LCD screen, as well as the network symbol.
-
Page 26: Charging The Bwx-100
When you return to your precinct after a recording session, proceed to your agency’s Uplink Station and place the BWX-100 in one of the available docking stations. While your device is charging, the LCD screen displays the word CHARGING followed by the current battery charge. -
Page 27: Charging Via A Stand-Alone Docking Station
Operating Procedures Charging via a Stand-Alone Docking Station The docking station that is included with your BWX-100 can be used to charge your device regardless of whether it’s currently connected to an Uplink Station. Just make sure that the docking station is connected to a power source. -
Page 28: Viewing Officer Information
Viewing Officer Information This section describes how to view information on the officer to whom a particular BWX-100 is currently assigned in DES, including the officer’s name and assigned car number. 1 Hold the BWX-100 so that the LCD menu is visible. - Page 29 Operating Procedures BWX-100 User’s Guide P a g e 25 L3 Mobile-Vision 5.8.2018...
- Page 30 5 When you’re finished viewing a particular setting, press the button to return to the previous menu. 6 To exit the DEVICE INFO menu, press the button until the word BACK displays, then press BWX-100 User’s Guide P a g e L3 Mobile-Vision 5.8.2018...
-
Page 31: Viewing Your Bwx-100'S Ip Address
Operating Procedures Viewing Your BWX-100’s IP Address This section describes how to view your BWX-100’s IP address. This is a numerical label that is required in order for the BWX-100 to communicate with your storage server. You may occasionally be asked to provide this number to your Agency Ad- ministrator or an L3 Mobile-Vision Service professional. -
Page 32: Remotely Triggering A Recording
(i.e., not recording), your BWX-100 will automatically start recording. NOTE: When remote triggering is disabled, the BWX-100 will not be able to broadcast or receive remote record trigger messages. For instructions on how to update your BWX-100’s DES record, see “Changing a BWX-100 DVR Record on page 39. -
Page 33: Performing A Self-Test
Operating Procedures Performing a Self-Test The SELF TEST feature performs a series of system checks on your BWX-100. Perform this procedure when instructed to do so by an L3 Mobile-Vision Service professional. 1 Hold the BWX-100 so that the LCD menu is visible. -
Page 34: Turning The Device Off
Mute buttons Getting Started This section describes how to get up and running with BWX-100. The following is an overview of the steps involved in setting up the BWX-100 with your DES software. The specific procedures involved in each of these steps are referenced in various sections throughout this document. -
Page 35: Assigning Ip Addresses To Your Bwx-100 Devices
If none of these conditions apply to you, you need to select a method for the system to “discover” each BWX-100 device and assign it an IP address. An IP Address is a numerical label that is required in order for the BWX-100 to communicate with your DES storage server. -
Page 36: Dev Customers
Configuring the LAN port on your BWX-100 PC for DHCP If you are a DEV customer who has only one BWX-100, use this procedure to configure your PC’s LAN port so that it will automatically assign an IP address to the BWX-100. - Page 37 5 Right-click on the DVR network and select Properties from the popup menu. 6 Click on Internet Protocol Version 4 (TCP/IPv4) to highlight it, then click the Properties button. BWX-100 User’s Guide P a g e 33 L3 Mobile-Vision 5.8.2018...
-
Page 38: Configuring Bwx-100 To Work With Des
BWX-100 device. If you are familiar with this procedure, do not use it again unless instructed to do so by an L3 Mobile-Vision Service professional! Doing so could interfere with DVR-to-server communication, making it impossible for you to upload your videos to the server. - Page 39 Configuring BWX-100 to Work with DES BWX-100 User’s Guide P a g e 35 L3 Mobile-Vision 5.8.2018...
- Page 40 NOTE: If you are a DEA Agency user, you will not have access to these functions. Your DEA Precinct administrators will have to configure all BWX-100 devices. Proceed to the next section for further instructions. BWX-100 User’s Guide P a g e L3 Mobile-Vision ...
-
Page 41: Configuring A New Bwx-100 Dvr In Des
Select the appropriate BWX-100 download options. Perform this step after you’ve purchased your first BWX-100 device(s) but before you begin using the device(s). For instructions, see “Selecting the BWX-100 Download Options” below. Update the new BWX-100 DVR record. For instructions, see “Changing a BWX-100 DVR”... - Page 42 Configuring BWX-100 to Work with DES 4 Click the Download Options tab. 5 Go to the Action column and click Edit. The Download Options popup displays. BWX-100 User’s Guide P a g e L3 Mobile-Vision 5.8.2018...
-
Page 43: Changing A Bwx-100 Dvr Record
Configuring BWX-100 to Work with DES Required BWX-100 settings The settings for Body Worn DVRs are on the bottom of this popup. 6 Make sure that all the BWX-100 settings match those pictured above. 7 Click Save. Proceed to “Changing a BWX-100 DVR Record” below. -
Page 44: Changing A Bwx-100 Dvr When Fleet Management Is On
Configuring BWX-100 to Work with DES Changing a BWX-100 DVR When Fleet Management is On This section describes how to update a BWX-100 record when the Fleet Management feature is enabled. If you’re not sure if your agency is using Fleet Management, exam- ine the Enable Fleet Management for DVRs checkbox on the Download Options tab, as pictured on the previous page. - Page 45 6 Proceed to the DVR Officer Name field. Using the drop-down list provided, select the name of the officer to whom you plan to assign this device. 7 To assign this DVR to a pre-defined BWX-100 DVR Group, select a value from the Group Name drop-down list. Otherwise proceed to the next step.
- Page 46 If this device will be recording in a region that does not observe daylight savings time, deselect the Daylight Savings Time checkbox. 11 If your agency plans to use the BWX-100’s Snap/Trace button to capture a “snap- shot” still image and insert a “tracepoint” place marker in a recording (default), proceed to the next step.
- Page 47 “720p.” 1920 x 1080 (default) Full high definition video with a full field of view. This is the highest resolution available for BWX-100 video and the most resource intensive. Also referred to as “1080p.” System default. BWX-100 User’s Guide P a g e 43 L3 Mobile-Vision ...
- Page 48 Configuring BWX-100 to Work with DES 15 Select a new value from the Resolution drop-down list. 16 To record both audio and video (default), proceed to the next step. – OR – To record video only, select 1 from the Audio/Video Mode drop-down list.
- Page 49 22 Enter the appropriate IP addresses in the Ethernet IP, Ethernet Mask, and Ethernet Gateway IP fields. 23 If this BWX-100’s Uplink Station is connected to the same network as your DES server (default), proceed to the next step. – OR –...
-
Page 50: Changing A Bwx-100 Dvr When Fleet Management Is Off
Administration and click Mobile Devices. The Mobile Devices page displays. 2 If the BWX-100 record you wish to update displays on-screen, click on it. Skip to step 5. – OR – If the BWX-100 record you wish to update does not display on-screen, proceed to the next step. - Page 51 Configuring BWX-100 to Work with DES 5 Go to the Action column and click Edit Configuration. The Edit Device popup displays. 6 Enter a name for this device in the DVR Name field. 7 If your agency is using the Officer Dispatch feature (default), skip to step 9.
- Page 52 Configuring BWX-100 to Work with DES 9 If your agency plans to use the BWX-100’s Snap/Trace button to capture a “snap- shot” still image and insert a “tracepoint” place marker in a recording (default), proceed to the next step. – OR –...
- Page 53 12 Enter the appropriate IP addresses in the Ethernet IP, Ethernet Mask, and Ethernet Gateway IP fields. 13 If this BWX-100’s Uplink Station is connected to the same network as your DES server (default), proceed to the next step. – OR –...
-
Page 54: Replacing A Bwx-100
DVR record’s settings and videos to the new DVR record, then remove the old DVR record from the system. 1 Write down the serial number for both the old BWX-100 and the new one. You can find this number on the sticker located on the back of the device. - Page 55 6 Go to the Action column and click Replace. The Replace DVR popup displays. 7 Using the drop-down list provided, select the name of the new BWX-100. To identify this record, look for the letters FBBW2 followed by the new BWX-100’s serial number.
-
Page 56: Bwx-100 Dimensions
Connect the equipment into an outlet on a circuit different from that to which the receiver is connected. Consult the dealer or an experienced radio/TV technician for help. FCC ID: 2AOSO1M01831 BWX-100 User’s Guide P a g e L3 Mobile-Vision 5.8.2018... -
Page 57: Contact Information
The transmitters within this device must not be co-located or operating in conjunction with any other antenna or transmitter. Contact Information Phone: 800-336-8475; Fax: 973-316-9509 Email: service.MVI@L3T.com Address: L3 Mobile-Vision, Inc. 400 Commons Way, Suite F Rockaway, NJ 07866 BWX-100 User’s Guide P a g e 53 L3 Mobile-Vision 5.8.2018... -
Page 58: Audio/Visual Indicators
Audio/Visual Indicators Audio/Visual Indicators The following table lists the various audio/visual indicators that you will see/hear/feel when you perform various actions with your BWX-100. Action Audio/Visual Indicator(s) Turn device on Start of boot: Vibrate 1x End of boot: Vibrate 1x / Chirp 1x / READY... -
Page 59: Index
Index Index Activating RECORD, 12 Alligator clip, 5 Assigning a category to a video, 13 Assigning an IP address to your BWX-100, 30 Attaching the BWX-100 to your shirt, 5 Audio mute, 18 Battery Charge indicator, 4 Charging, 22, 23... - Page 60 Stealth mode. See Covert mode Still image, capturing, 14 Stopping a recording, 13 Storage space remaining on device, 4, 16, 25 Swapping an old BWX-100 for a new device, 48 Tagging a video, 13 Technical support, 51 Time device is set to, 25...
- Page 61 Index Turning the BWX-100 on, 12 Uplink station, 19, 20 Uploading videos to server, 18, 19, 20 USB port, 2 Version Firmware, 25 Hardware, 25 Vibrations, description of, 52 Video Capturing a still image from, 14 Covert mode, 15 Inserting a tracepoint in, 14...
Need help?
Do you have a question about the BWX-100 and is the answer not in the manual?
Questions and answers