Table of Contents
Advertisement
Quick Links
3. Use the Right Scroll
key to navigate to the Time Format choice list.
4. Use the Up/Down Scroll
keys to highlight the date/time format to use.
5. Press the Enter
key to complete the selection.
6. Press the ESC
key to return to the setup sub-menu, press again to return to the main viewing screen.
7. Set the Storage Options
The default drive for the vCam MX is USB. If no USB drive is inserted the system will record to the SD drive. If neither SD nor
USB is present the system will not record.
SD Backup – When the SD Backup option is active the SD card will automatically backup the USB drive.
Any pictures or videos created on the USB drive will automatically be copied onto the SD card. This allows the SD card to be
used as a solid state hard drive keeping copies of the files.
Activate the SD Backup option by:
1. Press the Setup
key to bring up the setup sub-menu.
2. Press the Storage
key
3. Press the key corresponding to SD Card Backup.
4. The USB with SD backup onscreen switch will change from white (off) to yellow (on).
USB with SD backup
ON
5. Press the ESC
key to return to the setup sub-menu, press again to return to the main viewing screen.
8. Set the Sonde Frequency
he vCamMX contains a choice of three sonde frequencies. The user can activate any number of the three frequencies or
T
turn off all three. The system has two low frequencies of 512Hz and 640Hz and one high frequency of 33 kHz.
To activate and select the frequencies:
1. Press the Setup
key to bring up the sub-menu.
2. Press the Features
key to enter the features sub-menu.
3. Press the key corresponding to the desired sonde frequency to use. When the key is pressed it will change the choice
from white (off) to yellow (on)..
ON
OFF
ON
ON
512Hz
640Hz
33kHz
OSD
4. Press the ESC
key to return to the setup sub-menu, press again to return to the main viewing screen.
9. Set the OSD (on screen display) Options
The OSD can be set to appear at the bottom or top of the screen or can be turned off. While active, the OSD information will
appear in all recorded videos and JPEG pictures.
1. Press the Setup
key to bring up the sub-menu.
2. Press the Features
key to enter the features sub-menu.
3. Press the key corresponding to the OSD. When the key is pressed it will change the choice from white (off) to yellow (on).
ON
OFF
ON
ON
512Hz
640Hz
33kHz
OSD
4. Press the ESC
key to return to the setup sub-menu, press again to return to the main viewing screen.
10. Set the File Rename Option
With the File Rename option the system can be set to use the system default naming scheme of MMDD_HRMMSS (month,
day, hour, minute, seconds) or prompt to manually name the file.
Page 2
Rename
Rename
™
1. Press the Setup
key to bring up the sub-menu.
2. Press the Features
key to enter the features sub-menu.
3. Press the key corresponding to Rename to bring up the rename sub-menu.
4. Select the choices of on or off for renaming either the video files or picture files.
5. Press the key corresponding to Video or Pictures. When the key is pressed it will change the choice from white (off)
to yellow (on).
ON
ON
Videos
Pictures
6. Press the ESC
key to return to the Setup sub-menu, press again to return to the main viewing screen
11. Set the SD Card Backup Option.
By default the system records to the USB drive. When the SD Backup is active, when a picture is taken or video recording
completed a copy of the file will automatically be written to the SD card. This allows the SD card to be used as a solid
state hard drive keeping copies of the files.
1. Press the Setup
key to bring up the sub-menu.
2. Press the Storage
key to enter the storage sub-menu.
3. Press the key corresponding to SD Card Backup. When the key is pressed it will change the choice from white (off)
to yellow (on).
4. Press the ESC
key to return to the setup sub-menu, press again to return to the main viewing screen
12. Set up Wi-fi and Hotspots
The built in Wi-fi option allows the vCamMX to connect to a wireless network or act as a Wi-fi Hotspot.
1. Press the Setup
key to bring up the sub-menu.
2. Press the Features
key to enter the features sub-menu.
3. Press the key corresponding to Wi-fi to bring up the Wi-fi sub-menu.
4. Press the ESC
key to return to the setup sub-menu, press again to return to the main viewing screen
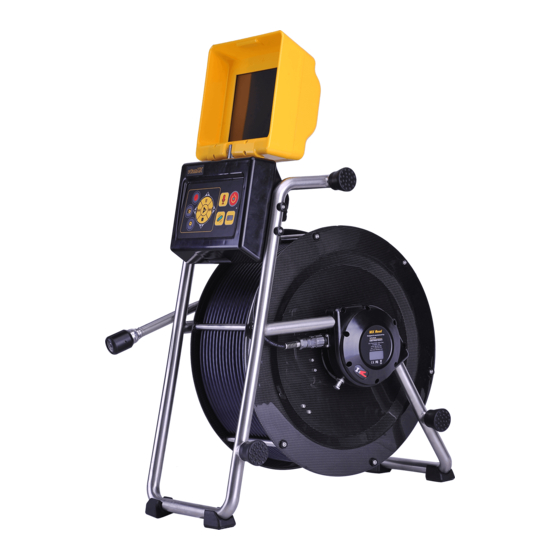
Reels
The vCamMX system comes as a complete system with control module attached or with just the MX reel only and used
with other vCam series control modules. When the unit ships as a reel only, an interconnect cable which plugs into other
vCam series control modules is provided.
Insertion Sleeve – The Insertion Sleeve is inserted into the mouth of pipe to prevent the pushrod from making direct
contact with the pipe when deploying. This prevents chafing of the pushrod jacket and the end result will be prolonged life
of the pushrod.
vCamMX System
MX Reel
Insertion Sleeve
™
Page 3
Advertisement
Table of Contents

Related Manuals for Vivax Metrotech vCamMX


Summary of Contents for Vivax Metrotech vCamMX
- Page 1 (off) to yellow (on).. The vCamMX system comes as a complete system with control module attached or with just the MX reel only and used with other vCam series control modules. When the unit ships as a reel only, an interconnect cable which plugs into other...
- Page 2 Quick Setup Guide V1.0 1. Brake and Cable Guide Unlock the brake by moving the lever to the right. Lock the drum by Settings moving the lever to the left. 1. Install the Fuse Install the 10 Amp - 250 Volt fuse (included) in the fuse compartment (3) on the side of the control box. The system will operate without a fuse when using AC or DC power but the battery will not charge and the unit will turn off when the power source is removed.
Need help?
Do you have a question about the vCamMX and is the answer not in the manual?
Questions and answers