Table of Contents
Advertisement
Quick Links
Advertisement
Table of Contents

Related Manuals for Vivax Metrotech vCamLSR


Summary of Contents for Vivax Metrotech vCamLSR
- Page 1 User Handbook (English Edition) Version 1.4 P/N: 4.04.000066...
-
Page 3: Table Of Contents
General Safety & Care Information Table of Content 1. General Safety Instructions.................................1 Before using for the first time, please read the following carefully..................1 Care of Equipment................................1 Health and Safety................................1 2. Service & Support..................................3 Distributors and Service Centers Closest to You......................3 3. - Page 4 Using a vCam-5 Control Module ™...
-
Page 5: General Safety Instructions
1. General Safety Instructions 1.1 Before using for the first time, please read the following carefully: In general, the vCamLSR can be used indoors and outdoors. (Do not operate with a mains input in wet conditions.) • • To ensure safety and reliable operation – do not subject this unit to extreme temperatures, shock or impact. - Page 6 General Safety & Care Information • Keep all electrical connections dry and off the ground, • Be aware of your surroundings at all times. Cone off open manholes and follow traffic control regulations. • Use personal protection such as eyewear, rubber gloves and non-skid safety shoes. •...
-
Page 7: Service & Support
Service & Support 2. Service & Support 2.1 Distributors and Service Centers Closest to You: World Headquarters, United State of America China Vivax-Metrotech Corporation Leidi Utility Supply (Shanghai) Ltd. 3251 Olcott Street, No. 780, Tianshan Rd, Santa Clara, CA 95054, USA Shanghai, China 200051 Website : www.vivax-metrotech.com T/Free : 4008-206-719 Sales &... -
Page 8: Introduction
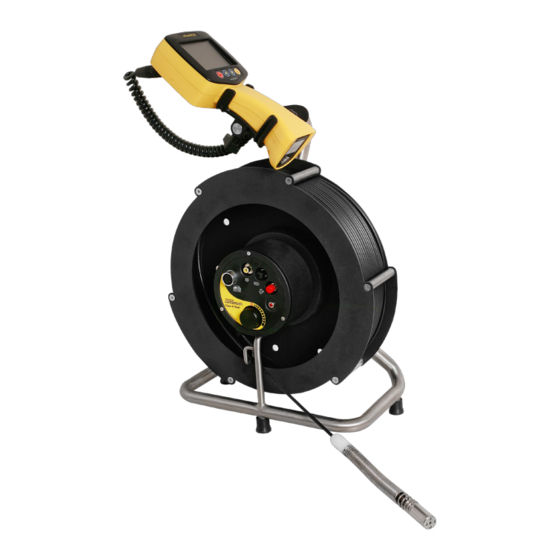
Introduction 3. Introduction 3.1 Description The vCamLSR camera system can be used for visual inspection of small pipes, ducts, cabling systems, process plants, machinery, behind dry walls, in ceilings and any other similar structures. 3.2 System Components The basic system is supplied with:... -
Page 9: Model And Serial Numbers
Introduction 3.3 Model and Serial Numbers For service and support purposes, each vCamLSR system has its own model and serial numbers at the back of the hand-held and also one on the cable reel assembly. Viewer Reel D18-D Camera D25-D Camera 3.4 Hand-Held Viewer Overview The features, functions and controls of the hand-held viewer: ™... -
Page 10: Reel Overview
Introduction 3.5 Reel Overview ™ Page 6 of 15... -
Page 11: Setup
Setup 4. Setup 4.1 Installing Batteries in the Viewer The hand-held viewer has an auxiliary alkaline battery pack that is used to power the unit when it is not connected to the cable reel. It is not necessary to install batteries in the viewer, the viewer will draw its power from the reel when connected. To install the batteries: Turn the thumb-screw counter-clockwise to open the battery compartment lid. -
Page 12: Installing And Removing The Pushrod Camera Heads
Setup 4.3 Installing and Removing the Pushrod Camera Heads There are two camera heads that can be used with the Type-S reel. Both camera heads can be changed by the user in the field. Both camera heads are screw on types so no tools are needed. To remove a camera head: •... -
Page 13: Using The System
Using the System 5. Using the System 5.1 Charging the Reel The reel contains Ni-MH rechargeable batteries. To charge the batteries: • Connect a 100-240V AC power source. The charge cycle for discharged batteries is three hours; • Alternatively the unit can be powered from an optional 12V DC source. 5.2 Adjusting the Hand Held Viewer Display The viewer’s display can be adjusted for use in different lighting situations. -
Page 14: Focus The Camera
Using the System Screen Contrast Setting Press pushbutton three times to enter the "Contrast" setting menu. Press the left/right buttons as needed to raise and lower the screen contrast on a scale of 0 to 100. Contrast Brightness LED Light Screen Saturation Setting Press pushbutton four times to enter "Saturation"... -
Page 15: Deploying The Camera
Using the System 5.4 Deploying the Camera Unlock the cable drum and feed the pushrod through the cable guide. Insert the camera head into pipe to be inspected and adjust lighting as needed. Push the camera in the pipe until level. Now press the distance reset to reset the distance counter at "0". Continue to push the rod into the pipe until the point of interest is reached. - Page 16 Using the System Turn on the Sonde transmitter by pressing the red Sonde button on the side of the rod assembly. Note that when the Sonde is active the LCD screen on the viewer will not show the video feed from the camera. When the Sonde is active the viewer will display a blue screen with the active Sonde frequency being used and the distance counter.
-
Page 17: Using A Vcam-5 Control Module
Using a vCam-5 Control Module 6. Using a vCam-5 Control Module 6.1 Using a Control Module The Type-S Cable Reel can be used with the vCam-5 Control Module. When used with the vCam-5 Control Module additional features include; JPEG picture capture, video recording in avi format and text and audio commenting on videos and pictures. 6.1.1 Connect the Control Module and Reel To bring the video onto the screen, plug the reel’s interconnect cable into the control module. - Page 18 Using a vCam-5 Control Module Default Storage Format Distance Counter Date/Time Type-CP Sonde 512|640 Wi-Fi Video Out Type-M&M2 Language Restore Type-C Reel Settings Update Type-P About Type-S Setup File NOTE: The distance counter is for reference only. It is important that you verify the actual position and depth with a Sonde Locator or Pipe &...
- Page 19 Using a vCam-5 Control Module Notes: Disclaimer: Product and accessory specification and availability information is subject to change without prior notice. Illustrations used in the preparation of this manual will inevitably show some resemblance to similar illustrations from other Manufacturers-some manufacturers have given permission for the use of their graphics (Vivax-Metrotech & Seba) is given credit for such use.
Need help?
Do you have a question about the vCamLSR and is the answer not in the manual?
Questions and answers