
Related Manuals for Sartorius BA 210 S


Summary of Contents for Sartorius BA 210 S
- Page 1 98648-002-63 Sartorius Basic Electronic Analytical and precision Balances Installation and Operating Instructions...
- Page 2 BA 210 S, BA 160 P, BA 110 S...
- Page 3 BA 310 S, BA 310 P...
- Page 4 BA 110...
- Page 5 BA 210...
- Page 6 BA 4100 S, BA 3100 P, BA 2100 S, BA 610; BA 6100, BA 4100, BA 2100...
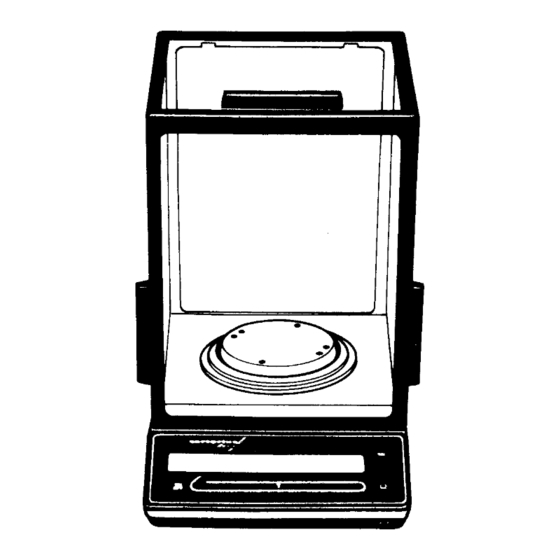
- Page 7 1 Weighing pan 12 Weight display 2 Compensating ring (depends on type of model) 13 CAL key 3 Pan support (depends on type of model) 14 Print key (for data output) 4 Protective ring (depends on type of model) 15 Tare control 5 Protective bushing (depends on type of model) 16 ON/OFF key 6 Weighing chamber base plate...
-
Page 8: Table Of Contents
Contents Page Page Warranty ————————————————————— Storage and Shipping Conditions Special Functions/Operating Parameters: Equipment Supplied Balance Operating Menu Installation Instructions Ambient Conditions Weighing Mode: Adaption to Ambient Conditions Startup Stability Range Mounting the Analytical Draft Tare Parameters Shield Chamber Auto Zero Function Connecting the Balance to AC Power Weight Units Voltage Selection... -
Page 9: Warranty
With this Sartorius Balance, you have acquired a high-quality elec- tronic weighing instrument that will ease your daily work load. Please read these installation and operating instructions carefully be- fore operating your new balance. Warranty Do not miss out on the benefits of our full warranty. -
Page 10: Equipment Supplied
Equipment Supplied BA 210 S, BA 160 P, BA 310 S, BA 110, BA 4100 S, BA 3100 P, BA 110 S, BA 61 BA 310 P BA 2100 S, BA 610, BA 210, BA 6100, BA 4100, BA 2100 —... -
Page 11: Installation Instructions
Installation Instructions Ambient Conditions The Sartorius Basic Balance is designed to provide reliable weighing results under normal conditions in the laboratory and in industry. When choosing the area to Setup your balance, avoid exposing it to the ambient conditions listed in the following so that you will be able to... -
Page 12: Startup
Startup Mounting the Analytical Draft Shield Chamber on the BA 210 S, BA 160 P, BA 110 S and BA 61 Remove plastic, adhesive Strips and foam packaging When you handle the draft shield chamber, make sure it is always... - Page 13 Installing Components in the Weighing Chamber Install the components in the following order: protective bushing (5) protective ring (4) pan support (3) compensating ring (2) weighing pan (1) Starting Up the BA 310 S and BA 310 P Place the draft shield base plate (22) on the balance and turn it clockwise until it locks in place Install the following parts on the balance in this order: pan support (3)
-
Page 14: Connecting The Balance To Ac Power
Standard you use, please contact your Sarto- rius dealer or Office. Important Note Only use original Sartorius AC adapters identified by the Sartorius la- bel. Use of AC adapters from other manufacturers, even if these units have a registered approval rating from a national testing laboratory, requires the consent of a certified Sartorius technician. -
Page 15: Voltage Selection
Plug the cord of the AC adapter into the jack on the balance. Now plug the AC adapter into a wall outlet. Voltage Selection You can select the voltage only if you use our portable power supply (69 71172) that has a European-type plug (rounded prongs). Safety Precautions The power supply or AC adapter rated to Class 2 can be plugged into a wall outlet without taking any additional safety precautions. -
Page 16: Information On Weighing Electro Statically Charged Samples
Information on Weighing Electro statically Charged Samples lf you are using a balance with a 0.1 mg readability and electro stati- cally charged glass or plastic Containers with a diameter larger than the weighing pan, you should utilize our antistatic pan (Ø... -
Page 17: How To Operate The Balance
How to Operate the Balance After you have initially plugged your balance into a wall outlet (or after a relatively long power outage), allow for at least 30 min- utes' warmup The weight display shows the following messages for your informa- tion: (OFF) The balance was disconnected from AC power (power failure or out-... -
Page 18: Weighing
Weighing Turning the Display On and Off (Standby Mode) Press the ON/OFF key (16) to turn the display on or off. Self-Test After the balance is turned on, an automatic self-test of the scale's electronic circuitry is performed. This self-test ends with the readout "0.0 g/0.00 g/0.000 g or 0.0000 g" depending on the balance model. -
Page 19: Calibration
Calibration During calibration, the balance is adapted to changes in ambient con- ditions. Calibrate your new balance at the point of use – after warmup and be- fore the first measurement. Recalibrate your balance each time you move it to a different location and whenever ambient conditions (especially the temperature) change considerably. -
Page 20: Data Interface
Data Interface lf you wish to document your weighing data with the Sartorius Data Printer, connect the printer's interface connector to the in- terface port (17) on the balance. You do not need to change any settings! To do this, remove the protective cap from the data interface port. -
Page 21: Below-Balance Weighing
Below-Balance Weighing A port for below-balance weighing is available on the bottom of the balance (not on models BA 160 P, BA110 S, BA61, BA110, BA 210 or BA 2100). To fasten an attachment or hanger, open the below-balance port by removing the two screws on the bottom of the balance and detach the closing plate. -
Page 22: Balance Operating Menu
Balance Operating Menu The balance operating menu enables you to adapt the balance to your requirements. At the factory, we have set the codes for the balance operating program so that you normally will not need to make any changes. lf you have special operating conditions, change the codes in the balance operating program to meet your individual requirements. -
Page 23: Weight Units
Weight Units You can select any of the following weight units: Symbol Code Changes 1 7 2 Grams 1 7 3 Kilograms Carats 1 7 4 Pounds 1 7 5 Ounces 1 7 6 Troy ounces 1 7 7 Hong Kong taels 1 7 8 Singapore taels 1 7 9... -
Page 24: Additional Functions
Additional functions: Beep Tone (Acoustic Signal) If you desire, you can turn off the beep tone – also called an acoustic signal. Acoustic signal Code Changes 8 2 1 8 2 2 Universal Switch An external switch can be connected via the interface port – you can change the setting in the menu code to alter the function of this switch Funktionen Code... -
Page 25: Utilities For Printouts Or Data Transfer
Sartorius Balances come Standard with an interface. You can plug a Sartorius Printer or a Computer into this interface port to print data on hard copy or transfer them to your Computer. Moreover, you can choose to Output data from your balance to this on-line device either automatically or by pressing the print key on the balance. -
Page 26: Changing Settings In The Balance Operating Menu
Changing Settings in the Balance Operating Menu Select the appropriate code to change settings for certain functions. There are three Steps to changing a code: access the menu set the code confirm and store this code The following keys have special functions when setting a code: CAL (13) = in crease displayed digit (once you have run through all numbers, the series will start again... - Page 27 press the CAL key until "8" appears press the key until the third digit of the code appears (here, the current code setting always appears) use the CAL key to change the right-hand number to "2" confirm the code setting You must press the tare control (15) to confirm the code you have just set (this is indicated by "o"...
-
Page 28: How To Undo All Menu Code Changes: Reset Function
In the balance operating program, each code setting is indicated by "o" behind the last number. When you access the menu of the bal- ance operating program and move to the right-hand number, the cur- rent code setting is displayed. This makes it easy to check the codes you have set. -
Page 29: Troubleshooting Guide
Troubleshooting Guide Problem ... Causes ... Remedy No segments appear in the weight - No AC power available - Check AC power supply display (12)? - The AC adapter is not plugged in - Plug in AC adapter The weight display shows "H"? - Sample exceeds the capacity of - Unload the balance the balance... -
Page 30: Care And Maintenance
AC adapter has been stored for relatively long periods un- der unfavorable conditions In this case, notify your nearest Sartorius Service Center or the Inter- national Service Support Department in Goettingen, Germany. Only service technicians who have access to the required maintenance manuals are allowed to perform maintenance and repair work on the equipment. -
Page 31: Safety Certificate
The duration and number of measurements should be determined by a qualified Sartorius service technician according to the particular am- bient and operational conditions for the AC adapter. However, such inspections should be done at least once a year, Pursuant to the German Directive for the Implementation of Regulations for Prevention of Accidents "Elektrische Anla-... -
Page 32: Accessories (Options)
Accessories (Options) Data printer YDP 02-0DV1 with date/time and statistics functions Print speed approx. lines/sec. Printer housing (B x T x H) in mm 150 x 138 x 43 Remote display (can be plugged into the interface port of the balance) —... - Page 33 BA 110 S, BA 160 P, BA 110 1 x 100 BA 210 1 x 100 YCW 5148 YCW 5228 BA 210 S 1 x 200 YCW 5238 BA 310 P, BA 310 S 1 x 200 YCW 5548 BA 610...
- Page 34 — program description — interface cable — adapter (25-position to 9-position) Specific gravity determination set for BA 210 S, BA 160 P and BA 110 S YDK 01 Antistatic weighing pan for balances with 0.1 mg readability YWP 01 BA...
-
Page 35: Specifications
Specifications Model BA 210 S BA 160 P BA 110 S BA 61 Weighing range structure SuperRange PolyRange SuperRange Weighing range/capacity 30/60/110/160 0,0001 0,0001/0,0002/ 0,0001 0,0001 Readability 0,0005/0,001 Tare range (by subtraction) -210 -160 -110 Reproducibility ≤±0,0001 ≤±0,0001/0,0002/ ≤±0,0001 ≤±0,0001... - Page 36 Specifications Model BA 310 S BA 310 P BA 110 Weighing range structure SuperRange PolyRange Weighing range/capacity 60/120/310 Readability 0,001 0,001/0,002/0,005 0,0001 Tare range (by subtraction) -310 -310 -110 Reproducibility ≤±0,001 ≤±0,001/0,001/0,003 ≤±0,001 (standard deviation) Linearity ≤±0,002 ≤±0,002/0,002/0,005 ≤±0,001 Response time (typical) ≤...
- Page 37 Specifications Model BA 4100 S BA 3100 P BA 2100 S BA 610 Weighing range structure SuperRange PolyRange SuperRange Weighing range/capacity 4100 600/1200/3100 2100 Readability 0,01 0,01/0,02/0,05 0,01 0,01 Tare range (by subtraction) -4100 -3100 -2100 -610 Reproducibility ≤±0,01 ≤±0,01/0,01/0,03 ≤±0,01 ≤±0,005 (standard deviation)
- Page 38 Specifications Model BA 210 BA 6100 BA 4100 BA 2100 6100 Weighing range/capacity 4100 2100 Weighing range/capacity 0,01 Tare range (by subtraction) -210 -6100 -4100 -2100 Reproducibility ≤±0,005 ≤±0,05 ≤±0,05 ≤±0,05 (standard deviation) Linearity ≤±0,01 ≤±0,1 ≤±0,1 ≤±0,1 ← → Response time (typical) ≤...
-
Page 39: Dimensions (Scale Drawings)
Dimensions (Scale Drawings) Note: All dimensions are given in millimeters. - Page 40 Dimensions (Scale Drawings) Note: All dimensions are given in millimeters.
- Page 41 Dimensions (Scale Drawings) Note: All dimensions are given in millimeters.
- Page 42 All rights reserved. No part of this publication may be printed or translated in any form or by any means without the prior written permission of Sartorius AG. Sartorius AG reserves the right to make change to the technology, features, specification and design of the equipment without notice.
Need help?
Do you have a question about the BA 210 S and is the answer not in the manual?
Questions and answers