
Related Manuals for Viega Visign


Summary of Contents for Viega Visign
- Page 1 Visign for More 104 equipment set Instructions for Use for Viega urinal flushing system Visign installation set Model Year built: 8354.2 from 09/2007 en_INT...
- Page 2 Visign for More 104 equipment set 2 from 12...
-
Page 3: Table Of Contents
Required material and tools Assembly 3.2.1 Insert cartridge valve 3.2.2 Mounting the basic panel 3.2.3 Mounting the flush plate Faults, faults and remedy Care and maintenance 3.4.1 Maintenance tips 3.4.2 Cleaning cartridge valve Disposal Visign for More 104 equipment set 3 from 12... -
Page 4: About These Instructions For Use
This restriction does not extend to possible operating instructions. The installation of Viega products must take place in accordance with the general rules of engineering and the Viega instructions for use. -
Page 5: About This Translated Version
German/European directives specified in this manual: The information herein is not binding for other countries and regions; as said above, they should be understood as a recommendation. Visign for More 104 equipment set 5 from 12... -
Page 6: Product Information
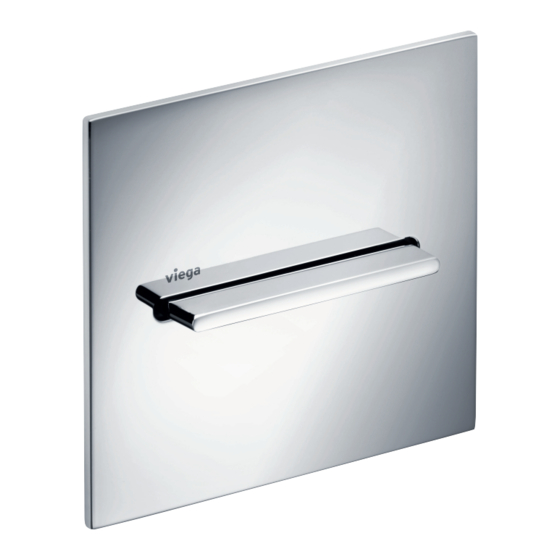
Ä Chapter 3.4.2 „Cleaning cartridge valve“ on page 11 Product description 2.3.1 Overview Fig. 1: Component overview 1 - flush plate 2 - fixing screws 3 - basic panel 4 - cartridge valve Visign for More 104 equipment set 6 from 12... -
Page 7: Technical Data
0.05–0.5 MPa (0.5–5 bar) Ä „Regulations Flush flow, see 0.3–0.7 l/s from section: Technical data“ on page 6 Ä „Regulations Noise class, see Class 2 from section: Technical data“ on page 6 Visign for More 104 equipment set 7 from 12... -
Page 8: Handling
Open the shut-off with a screw driver for a few seconds to rinse the pipeline. Re-close shut-off. Remove seal (SW 17). Visign for More 104 equipment set 8 from 12... -
Page 9: Mounting The Basic Panel
In the next step, the basic panel of the flush plate must be mounted. Requirements: The installation duct is ready for installation. The cartridge valve is mounted and set. Screw on basic panel loosely. Align basic panel horizontally and tighten screws. Visign for More 104 equipment set 9 from 12... -
Page 10: Mounting The Flush Plate
Shorten the actuating rod with a saw. Turn the actuating rod into the cartridge and counter with the threaded nut. Place the flush plate onto the basic panel. INFO! Figure shows model 8351.2 as an example. Visign for More 104 equipment set 10 from 12... -
Page 11: Faults, Faults And Remedy
3.4.2 Cleaning cartridge valve The cartridge valve may be cleaned, if necessary. Proceed as follows: Remove the flush plate from the basic panel. INFO! Figure shows model 8351.2 as an example. Visign for More 104 equipment set 11 from 12... -
Page 12: Disposal
10 . Disposal Separate the product and packaging materials (e. g. paper, metal, plastic or non-ferrous metals) and dispose of in accordance with valid national legal requirements. Visign for More 104 equipment set 12 from 12...
Need help?
Do you have a question about the Visign and is the answer not in the manual?
Questions and answers