Peco PRO2B+ 28120901 Operator's Manual
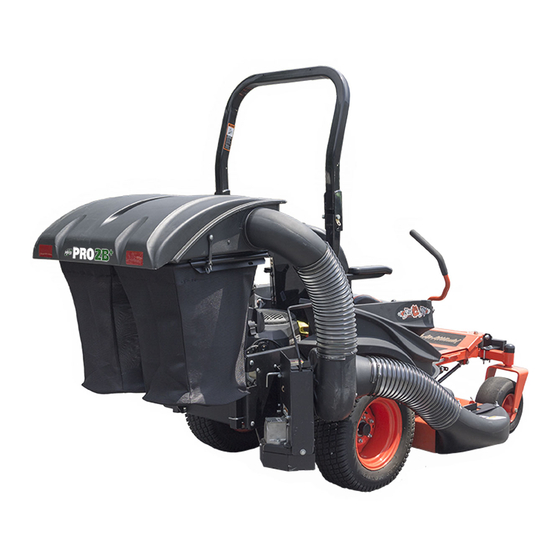
Pto driven - grass collection system
Hide thumbs
Also See for PRO2B+ 28120901:
- Operator's manual (34 pages) ,
- Operator's manual (30 pages) ,
- Operator's manual (24 pages)
Advertisement
Quick Links
Download this manual
See also:
Operator's Manual
P P P P P P
P P
P
P P
PECO
PECO
PECO
PECO
PECO
MANUAL PART#: Q0493
R
R R
MODEL YEAR:
2015-16
OPERATOR'S MANUAL
PTO DRIVEN - GRASS
COLLECTION SYSTEM
Model# 28120901
Kubota Kommander
48" & 54" DECKS
ASSEMBLY
Advertisement

Related Manuals for Peco PRO2B+ 28120901


Summary of Contents for Peco PRO2B+ 28120901
- Page 1 P P P P P P PTO DRIVEN - GRASS PECO PECO PECO PECO PECO COLLECTION SYSTEM Model# 28120901 Kubota Kommander MODEL YEAR: 2015-16 48” & 54” DECKS OPERATOR’S MANUAL ASSEMBLY MANUAL PART#: Q0493...
-
Page 2: Preparation Of Mower
Preparation of Mower Please refer to the Operation and Maintenance Manual Page 6 for detailed instructions on PTO pulley installation. Mount Plate and Mount Tube Assembly Item # Part # Desc. Qty. B0939 Lower Mount Tube / 27" B0902 Rear Mount Plate B0905 Right Frame Plate B0904... - Page 3 5/16” U-Bolt Rear Mount Plate Installation Attach Rear Mount Plate P#(B0902) to rear of mower using (2) 3/8-16 x 3-1/2” U-Bolts P#(K0407) and (4) 3/8”-16 Ny- Flange Locknuts P#(K2038). Next, attach to the top lip of the Mount Plate using (2) 5/16”-18 x 2” x 2-1/2” U-Bolts P#(K1098) and (4) 5/16”-18 Ny-Flange Locknuts P#(K2516).
- Page 4 Lower Frame Tube Installation Attach both Lower Frame Tubes P#(B0752) using (4) 5/16”-18 x 2.5” U-Bolts P#(K1098) and (8) 5/16”-18 Ny-Flange Locknuts P#(K2516). Tighten U-Bolt nuts from Right Frame Plate installation on previous page. PTO Assembly Installation Insert the PTO Assembly P#(A1842) into the slots on the PTO Mount Plate assembly.
- Page 5 Installation of Boot Fasten Boot Plate P#(B0906) onto top of Boot and the Boot Plate Fastener P#(B0910) on the inside of Boot P#(V0048) using (3) P#(K1144) 5/16”-18 x 1” Carriage Bolts and (3) P#(K2516) 5/16”-18 Ny-Flange Locknuts. Align holes with the corresponding holes marked on the top plate.
- Page 6 2. Fasten the 2 Front Baffle Plates together using (2) Install the Front Baffle Plate 2 using the (2) existing 5/16”-18 x 3/4” carriage bolts with (2) Ny-flange carriage bolts and Ny-flange locknuts. Fully tighten locknuts. Fully tighten both fasteners. both fasteners.
- Page 7 Safety Interlock Installation following the fuel line and through the rubber grommet used by the fuel line. Secure using Your PECO bagging system is equipped with a the zip ties provided. Once through the fuel Safety Interlocking system designed to disengage line grommet, feed the harness downward and the blower if the operator is not seated.
- Page 8 Fuel Line and Grommet Wire Harness Mower’s Safety Switch Lapbar Disconnect Mower’s Safety Switch here and connect Safety Interlock Harness Between.
-
Page 9: Weight Kit Installation
Weight Kit Installation Item # Part # Desc. Qty. B0704 Large Weight Bar K0289 1/2"-13 x 4-5/16" x 2-3/4" U-Bolt K2012 1/2"-13 Ny-Flange Lock Nut B0941 Weight Bracket K1142 5/16"-18 x 3/4" CARRIAGE BOLT K2516 5/16"-18 Ny-Flange Lock Nut... - Page 11 Notes:...
- Page 12 P P P P P P PECO PECO PECO PECO PECO New PECO, Inc. 10 Walden Dr | Arden, North Carolina 28704 Phone: 1-800-438-5823 | 828-684-1234 Fax: 828-684-0858 Email: peco@lawnvac.com Website: www.lawnvac.com...
Need help?
Do you have a question about the PRO2B+ 28120901 and is the answer not in the manual?
Questions and answers