Brooks MT3809G Installation And Operation Manual
Metal tube variable area flowmeters
Hide thumbs
Also See for MT3809G:
- Supplemental manual (52 pages) ,
- Installation & operation manual (72 pages)
Table of Contents
Advertisement
Installation and Operation Manual
X-VA-MT3809G-MT3810G-eng
Part Number: 541B182AAG
July, 2018
Brooks
Models MT3809G and MT3810G
®
Metal Tube Variable Area Flowmeters
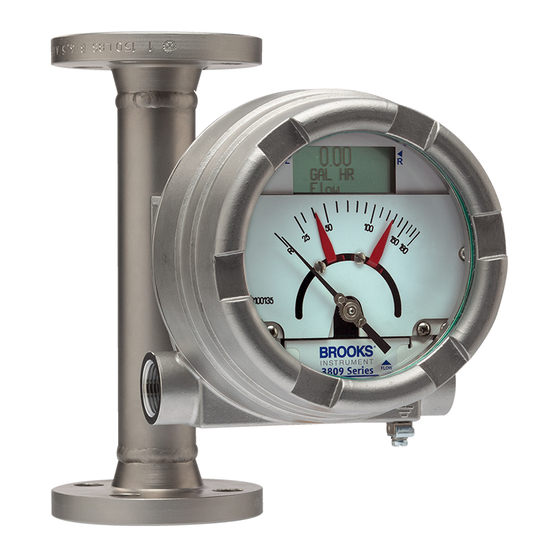
Model MT3809G, Flanged Connections,
Explosion Proof Housing
Model MT3809G, FNPT Connections,
General Purpose Stainless Steel Housing
Models MT3809G & MT3810G
Model MT3809G, Flanged Connections,
Intrinsically Safe Housing
Advertisement
Table of Contents

Related Manuals for Brooks MT3809G


Summary of Contents for Brooks MT3809G
- Page 1 Installation and Operation Manual X-VA-MT3809G-MT3810G-eng Part Number: 541B182AAG Models MT3809G & MT3810G July, 2018 Brooks Models MT3809G and MT3810G ® Metal Tube Variable Area Flowmeters Model MT3809G, FNPT Connections, General Purpose Stainless Steel Housing Model MT3809G, Flanged Connections, Model MT3809G, Flanged Connections,...
- Page 2 Read before proceeding! Brooks Instrument designs, manufactures and tests its products to meet many national and international standards. These products must be properly installed, operated and maintained to ensure they continue to operate within their normal specifications. The following instructions must be adhered to and integrated into your safety program when installing, operating and maintaining Brooks Instrument products.
- Page 3 We appreciate this opportunity to service your flow measurement and control requirements with a Brooks Instrument device. Every day, flow customers all over the world turn to Brooks Instrument for solutions to their gas and liquid low-flow applications. Brooks provides an array of flow measurement and control products for various industries from biopharmaceuticals, oil and gas, fuel cell research and chemicals, to medical devices, analytical instrumentation, semiconductor manufacturing, and more.
-
Page 4: Table Of Contents
Installation and Operation Manual X-VA-MT3809G-MT3810G-eng Part Number: 541B182AAG Models MT3809G & MT3810G July, 2018 Section 1 Introduction Introduction .............................1-1 Design Features..........................1-1 Overview of Meter Specifications....................1-1 Pressure Ratings ..........................1-4 Temperature Ratings........................1-7 Outline and Dimensions ........................1-7 Optional Valves and Flow Controllers .....................1-11 Optional Electronic Features......................1-11... - Page 5 Exploded View, Model MT3809G and MT3810G - Gas Service ............ 4-5 Exploded View, Model MT3809G and MT3810G - Liquid Service ..........4-6 Exploded View, Model MT3809G, Size 15 (Gas or Liquid Service) ..........4-7 Exploded View, Model MT3809G, Size 16 (Liquid Service Only) ..........4-7...
- Page 6 Installation and Operation Manual X-VA-MT3809G-MT3810G-eng Part Number: 541B182AAG Models MT3809G & MT3810G July, 2018 Tables Table Number 1-1a Meter Specifications ..........................1-2 1-1b ELF Body/Float Stop/Float/Metering Tube Material Restrictions ............1-2 Flow Capacities, Pressure Drop and Viscosity Immunity Ceiling Values ..........1-3 Model MT3809/MT3810 Pressure Ratings, Flanged ................1-4 Model MT3809/MT3810 Pressure Ratings, NPT Female ..............1-5...
-
Page 7: Introduction
1-1 Design Features The Brooks Model MT3809 has been the “go to” meter for several years and the choice of Engineering Contractor customers (EPC). Brooks is proud to raise the performance of the standard meter by adding these new features and options: •... -
Page 8: B Elf Body/Float Stop/Float/Metering Tube Material Restrictions
Installation and Operation Manual X-VA-MT3809G-MT3810G-eng Part Number: 541B182AAG Models MT3809G & MT3810G July, 2018 Table 1-1a Meter Specifications MT3809 MT3809 ELF MT3810 TFE Lined Measuring See Capacity Tables Range Rangeability 10:1 (most sizes) Tefzel® Lined 316/316L (dual certified Metering Tube Standard... -
Page 9: Flow Capacities, Pressure Drop And Viscosity Immunity Ceiling Values
Installation and Operation Manual X-VA-MT3809G-MT3810G-eng Part Number: 541B182AAG Models MT3809G & MT3810G July, 2018 Table 1-2 Flow Capacities, Pressure Drop and Viscosity Immunity Ceiling Values water Pressure Pressure drop volume mass volume volume Meter Meter Float Float drop inches visc. -
Page 10: Pressure Ratings
Installation and Operation Manual X-VA-MT3809G-MT3810G-eng Part Number: 541B182AAG Models MT3809G & MT3810G July, 2018 1-3 Pressure Ratings Please reference Tables 1-3, 1-4 and 1-5. Table 1-3 Model MT3809/MT3810 Pressure Ratings, Flanged... -
Page 11: Model Mt3809/Mt3810 Pressure Ratings, Npt Female
Installation and Operation Manual X-VA-MT3809G-MT3810G-eng Part Number: 541B182AAG Models MT3809G & MT3810G July, 2018 Table 1-4 Model MT3809/MT3810 Pressure Ratings, NPT Female... -
Page 12: Model Mt3809/Mt3810 Pressure Ratings, Npt Male
Installation and Operation Manual X-VA-MT3809G-MT3810G-eng Part Number: 541B182AAG Models MT3809G & MT3810G July, 2018 Table 1-5 Model MT3809/MT3810 Pressure Ratings, NPT Male... -
Page 13: Temperature Ratings
Installation and Operation Manual X-VA-MT3809G-MT3810G-eng Part Number: 541B182AAG Models MT3809G & MT3810G July, 2018 1-4 Temperature Ratings Please reference Table 1-6. Table 1-6 Temperature Cut-off Tables 1-5 Outline and Dimensions Please reference Figures 1-1, 1-2 and 1-3 on the following pages. -
Page 14: Model Mt3809 And Mt3810 Dimensional Drawings (Mm/In) And Weights (Kg/Lbs) - General Purpose Housing
Installation and Operation Manual X-VA-MT3809G-MT3810G-eng Part Number: 541B182AAG Models MT3809G & MT3810G July, 2018 Model 3809 & 3810 General Purpose Indicator Housing with Model 3809 & 3810 General Purpose Indicator Housing with Threaded Female St'd Connections mm [inches] Threaded Female Connections mm [inches] 141 5.57... -
Page 15: Model Mt3809 And Mt3810 Dimensional Drawings (Mm/In) And Weights (Kg/Lbs) - Intrinsically Safe Housing
Installation and Operation Manual X-VA-MT3809G-MT3810G-eng Part Number: 541B182AAG Models MT3809G & MT3810G July, 2018 Model 3809 Intrinsically Safe Indicator Housing with Model 3809 Intrinsically Safe Indicator Housing with Threaded Female St'd Connections mm [inches] Threaded Female Connections mm [inches] 160 6.29 A 1.5[1/16]... -
Page 16: Model Mt3809 And Mt3810 Dimensional Drawings (Mm/In) And Weights (Kg/Lbs) - Explosion Proof Housing
Installation and Operation Manual X-VA-MT3809G-MT3810G-eng Part Number: 541B182AAG Models MT3809G & MT3810G July, 2018 Model 3809 Explosion Proof Indicator Housing with Model 3809 Explosion Proof Indicator Housing with Threaded Female Connections mm [inches] Threaded Female St'd Connections mm [inches] A 1.5[1/16] 172 6.75... -
Page 17: Optional Valves And Flow Controllers
Installation and Operation Manual X-VA-MT3809G-MT3810G-eng Part Number: 541B182AAG Models MT3809G & MT3810G July, 2018 1-6 Optional Valves and Flow Controllers Needle valves and flow controllers may be externally piped into the inlet or outlet side of the instrument. Needle valves can be supplied up to size 12 1-1/2"... -
Page 18: Current Loop 4-20 Ma With Hart Transmitter, With Alarms, Display And Pulse Output
It is programmable with easy-to-use hand held configurators. Prior to shipment, commonly used default values are programmed by Brooks to ensure ease of operation and quick startup. However, parameters may be reprogrammed by the user if needed. -
Page 19: F Fieldbus Transmitter Description Table
Installation and Operation Manual X-VA-MT3809G-MT3810G-eng Part Number: 541B182AAG Models MT3809G & MT3810G July, 2018 1-7-2 F Fieldbus Transmitter, with Alarms and Pulse Output oundation Design Features • F Fieldbus digital communication network interface oundation • Ease of wiring and installation with a single 2-wire bus connection •... -
Page 20: Inductive Alarms
Installation and Operation Manual X-VA-MT3809G-MT3810G-eng Part Number: 541B182AAG Models MT3809G & MT3810G July, 2018 1-7-3 Inductive Alarms Design Features • 1 or 2 normally open inductive limit switches • Optional intrinsically safe power supply/amplifier/relay unit • For low or high limit signaling/switching •... -
Page 21: Product Approvals Overview
Installation and Operation Manual X-VA-MT3809G-MT3810G-eng Part Number: 541B182AAG Models MT3809G & MT3810G July, 2018 1-8 Product Approvals Overview Table 1-10 Product Approvals Meter Options Declarations Mark Standards/Directives/Marking Declaration/Certificate EU Declaration of EMC Directive (2014/30/EU) Declaration Conformity RoHS Directive (2011/65/EU) Declaration... - Page 22 Installation and Operation Manual X-VA-MT3809G-MT3810G-eng Part Number: 541B182AAG Models MT3809G & MT3810G July, 2018 Table 1-10 Product Approvals (Continued) Meter Options Declarations Mark Standards/Directives/Marking Declaration/Certificate Explosion safety ATEX DEKRA 13ATEX0086X "Intrinsic Safety (ia)" IECEx DEK13.0027X "Non-sparking (nA)" "Enclosure Dust (tc)"...
- Page 23 Installation and Operation Manual X-VA-MT3809G-MT3810G-eng Part Number: 541B182AAG Models MT3809G & MT3810G July, 2018 Table 1-10 Product Approvals (Continued) Meter Options Declarations Mark Standards/Directives/Marking Status/Certificate Class I, Division 1, Groups A, B, C, and D; Class II, Division 1, Groups E, Explosion safety F, and G;...
-
Page 24: Pro
Installation and Operation Manual X-VA-MT3809G-MT3810G-eng Part Number: 541B182AAG Models MT3809G & MT3810G July, 2018 Table 1-11 Process and Ambient Temperature Limits Maximum Process Temperature (°C) Temperature Class Approval Ambient Meter type type Temperature (°C) -40 to 32.5 300* 420* Flanged and... - Page 25 Installation and Operation Manual X-VA-MT3809G-MT3810G-eng Part Number: 541B182AAG Models MT3809G & MT3810G July, 2018 Table 1-11 Process and Ambient Temperature Limits (continued) Maximum Process Temperature (°C) Meter Option Without Digital Display With or without Digital Display Temperature Class Without With or without...
-
Page 26: Electrical Data: Intrinsic Safety
Installation and Operation Manual X-VA-MT3809G-MT3810G-eng Part Number: 541B182AAG Models MT3809G & MT3810G July, 2018 Table 1-12 Electrical Data Intrinsic Safety Electronics Function / signal Ui,V Ii, mA Pi, mW Ci, nF Li, H Recommended Barrier # configuration Signal 4-20mA 0.365... -
Page 27: Electrical Entries
Installation and Operation Manual X-VA-MT3809G-MT3810G-eng Part Number: 541B182AAGJ Models MT3809G & MT3810G July, 2018 Table 1-13 Electrical Entries ATEX/IECEx Ex ia, Ex ic Ex ia, Ex ic Ex Protection Concept Ex db/Ex tb Ex db/Ex tb Ex nA, Ex tc... -
Page 28: General
2-3 Recommended Storage Practices If intermediate or long-term storage is required for equipment, as supplied by Brooks Instrument, it is recommended that the equipment be stored in accordance with the following: a. Within the original shipping container. b. Stored in a sheltered area, preferably a warm, dry, heated warehouse. -
Page 29: Installation Of Flowmeter
Installation and Operation Manual X-VA-MT3809G-MT3810G-eng Part Number: 541B182AAG Models MT3809G & MT3810G July, 2018 2-5 Installation of Flowmeter Recommended installation for Models MT3809 and MT3810 is as follows: a. Carefully remove the covers from each end of the flowmeter. The float may be fixed to avoid damage during transport. -
Page 30: Typical Bypass Installation
Installation and Operation Manual X-VA-MT3809G-MT3810G-eng Part Number: 541B182AAG Models MT3809G & MT3810G July, 2018 flow path. Loose pieces can cause obstruction inside the measurement section of the meter, and potentially even blockage of the measurement float within the measurement tube. -
Page 31: How To Remove And Reinstall Gp Housing Indicator Covers
Installation and Operation Manual X-VA-MT3809G-MT3810G-eng Part Number: 541B182AAG Models MT3809G & MT3810G July, 2018 2-5-1 How to Remove and Reinstall GP Housing Indicator Covers Directions to remove and reinstall the GP Housing Cover and adjust the Pointer: 1. To begin, make sure the float is at rest and there isn’t flow going through the meter. -
Page 32: How To Remove And Reinstall Is Housing Indicator Covers
Installation and Operation Manual X-VA-MT3809G-MT3810G-eng Part Number: 541B182AAG Models MT3809G & MT3810G July, 2018 2-5-2 How to Remove and Reinstall IS Housing Indicator Covers Directions to remove and reinstall the IS Housing Indicator Cover, adjust Alarms and the Pointer: 1. To begin make sure the float is at rest and there isn’t flow going through the meter. -
Page 33: How To Remove And Reinstall Xp Housing Indicator Covers
Installation and Operation Manual X-VA-MT3809G-MT3810G-eng Part Number: 541B182AAG Models MT3809G & MT3810G July, 2018 2-5-3 How to Remove and Reinstall XP Housing Indicator Covers Directions to remove and reinstall the XP Housing Indicator Cover, adjust Alarms and the Pointer: 1. To begin make sure the float is at rest and there isn’t flow going through the meter. -
Page 34: Electrical Connections To Mt3809 With 4-20 Ma/Hart Transmitter, Alarms And Pulse Output
Installation and Operation Manual X-VA-MT3809G-MT3810G-eng Part Number: 541B182AAG Models MT3809G & MT3810G July, 2017 2-6 Electrical Connections to MT3809 with 4-20 mA/HART Transmitter, Alarms and Pulse Output a) Before electrical connection, install the meter into the pipeline as described in previous Section 2.5. - Page 35 Section 1. e) Common transmitter parameters are set during manufacturing at Brooks Instrument based on order information, meter configuration or defaults inherent to the transmitter. Further detailed configurations as well as on-line monitoring can be done through standard HART or ™...
-
Page 36: Mechanical Indicator Zero
Installation and Operation Manual X-VA-MT3809G-MT3810G-eng Part Number: 541B182AAG Models MT3809G & MT3810G July, 2018 The float is constructed with an integral magnet that activates a magnetic sensor that is part of the transmitter. This same float magnet also drives the mechanical pointer. The flow rate is scaleable by setting independent high and low range parameters. -
Page 37: Transmitter Indicator Zero
Installation and Operation Manual X-VA-MT3809G-MT3810G-eng Part Number: 541B182AAG Models MT3809G & MT3810G July, 2018 iii. Then, zero the transmitter shorting the two pins at the terminal block. Reference Figure 2-4 below. Figure 2-4 Transmitter Indicator Zero Note: The zero function may be activated as part of a periodical maintenance check. -
Page 38: Ma/Hart Transmitter Intrinsically Safe Installation
Figure 2-5a/2-5b. Alternatively, the optional intrinsically safe power supply available from Brooks may be used. Cable parameters for inductance and capacitance still apply. Note: To ensure full EMC protection the ferrite core included with the... -
Page 39: B Wiring Diagram, Model Mt3809, Transmitter 4-20 Ma (Continued)
Installation and Operation Manual X-VA-MT3809G-MT3810G-eng Part Number: 541B182AAG Models MT3809G & MT3810G July, 2018 (Continued from previous page) Figure 2-5b Wiring Diagram, Model MT3809 Transmitter, 4-20 mA (continued) -
Page 40: A Wiring Diagram, Model Mt3809, 4-20 Ma Transmitter, One Or Two Optical Alarms And Ppu
Installation and Operation Manual X-VA-MT3809G-MT3810G-eng Part Number: 541B182AAG Models MT3809G & MT3810G July, 2018 (Continued on next page) Figure 2-6a Wiring Diagram, Model MT3809, 4-20 mA Transmitter, One or Two Optical Alarms and PPU... -
Page 41: B Wiring Diagram, Model Mt3809, 4-20 Ma Transmitter, One Or Two Optical Alarms And Ppu (Continued)
Installation and Operation Manual X-VA-MT3809G-MT3810G-eng Part Number: 541B182AAG Models MT3809G & MT3810G July, 2018 (Continued from previous page) Figure 2-6b Wiring Diagram, Model MT3809, 4-20 mA Transmitter, One or Two Optical Alarms and PPU (continued) -
Page 42: A Wiring Diagram, Model Mt3809, One Or Two Inductive Alarms
Installation and Operation Manual X-VA-MT3809G-MT3810G-eng Part Number: 541B182AAG Models MT3809G & MT3810G July, 2018 (Continued on next page) Figure 2-7a Wiring Diagram, Model MT3809, One or Two Inductive Alarms... -
Page 43: B Wiring Diagram, Model Mt3809, One Or Two Inductive Alarms (Continued)
Installation and Operation Manual X-VA-MT3809G-MT3810G-eng Part Number: 541B182AAG Models MT3809G & MT3810G July, 2018 (Continued from previous page) Figure 2-7b Wiring Diagram, Model MT3809, One or Two Inductive Alarms (continued) -
Page 44: A Wiring Diagram, Model Mt3809, 4-20 Ma Transmitter, One Or Two Inductive Alarms
Installation and Operation Manual X-VA-MT3809G-MT3810G-eng Part Number: 541B182AAG Models MT3809G & MT3810G July, 2018 (Continued on next page) Figure 2-8a Wiring Diagram, Model MT3809, 4-20 mA Transmitter, One or Two Inductive Alarms... - Page 45 Installation and Operation Manual X-VA-MT3809G-MT3810G-eng Part Number: 541B182AAG Models MT3809G & MT3810G July, 2018 (Continued from previous page) Figure 2-8b Wiring Diagram, Model MT3809, 4-20 mA Transmitter, One or Two Inductive Alarms (continued)
-
Page 46: Ma/Hart Transmitter Division 2 Installation
Installation and Operation Manual X-VA-MT3809G-MT3810G-eng Part Number: 541B182AAG Models MT3809G & MT3810G July, 2018 2-6-2 4-20 mA/HART Transmitter Division 2 Installation If the area classification is Division 2, a barrier is not required and cable parameters are not applicable. The electrical code will require the use of conduit for wire protection. -
Page 47: Wiring Diagram, Model Mt3809 Explosion Proof With Transmitter And/Or Inductive Alarm
Installation and Operation Manual X-VA-MT3809G-MT3810G-eng Part Number: 541B182AAG Models MT3809G & MT3810G July, 2018 Figure 2-9 Wiring Diagram, Model MT3809 Explosion Proof with Transmitter and/or Inductive Alarm... -
Page 48: Electrical Connection To Mt3809 With F Oundation Fieldbus Transmitter, Alarms And Pulse Output
Installation and Operation Manual X-VA-MT3809G-MT3810G-eng Part Number: 541B182AAG Models MT3809G & MT3810G July, 2018 2-7 Electrical Connections to MT3809 with F Fieldbus Transmitter, Alarms and Pulse Output oundation a) Before electrical connection, install the meter into the pipeline as described in previous Section 2-5. -
Page 49: Mechanical Indicator Zero
Models MT3809G & MT3810G July, 2018 f) Common transmitter parameters are set during manufacturing at Brooks Instrument based on order information, meter configuration or defaults inherent to the transmitter. Further detailed configurations as well as on-line monitoring can be done through the F... -
Page 50: F Fieldbus Transmitter Indicator Zero
Installation and Operation Manual X-VA-MT3809G-MT3810G-eng Part Number: 541B182AAG Models MT3809G & MT3810G July, 2018 Figure 2-11 F Fieldbus Transmitter Indicator Zero oundation iii. Then, zero the transmitter shorting the two pins at the terminal block, See Figure 2-11. Note: The zero function may be activated as part of a periodical maintenance check. -
Page 51: F Oundation Fieldbus Transmitter Intrinsically Safe Installation
Installation and Operation Manual X-VA-MT3809G-MT3810G-eng Part Number: 541B182AAG Models MT3809G & MT3810G July, 2018 Refer to Figures 2-5a/2-5b and 2-8a/2-8b. iii. For flameproof installation the optional explosion proof enclosure is required and explosion proof installation methods must be followed. Refer to Figure 2-9. -
Page 52: Wiring Diagram, Model Mt3809, F
Installation and Operation Manual X-VA-MT3809G-MT3810G-eng Part Number: 541B182AAG Models MT3809G & MT3810G July, 2018 Figure 2-12 Wiring Diagram, Model MT3809, Foundation Fieldbus - FISCO Concept - Transmitter... - Page 53 Installation and Operation Manual X-VA-MT3809G-MT3810G-eng Part Number: 541B182AAG Models MT3809G & MT3810G July, 2018 Figure 2-13 Wiring Diagram, Model MT3809, Foundation Fieldbus - Entity Concept - Transmitter...
- Page 54 Installation and Operation Manual X-VA-MT3809G-MT3810G-eng Part Number: 541B182AAG Models MT3809G & MT3810G July, 2018 Figure 2-14 Wiring Diagram, Model MT3809, Foundation Fieldbus - Entity Concept - Transmitter - Pulse - Alarm Contacts...
- Page 55 Installation and Operation Manual X-VA-MT3809G-MT3810G-eng Part Number: 541B182AAG Models MT3809G & MT3810G July, 2018 Figure 2-15 Wiring Diagram, Model MT3809, Foundation Fieldbus - Entity Concept - Transmitter - Inductive Alarms...
-
Page 56: Installation Of The Model Mt3809 Flowmeter With Inductive Alarms (1 Or 2 Switches)
Installation and Operation Manual X-VA-MT3809G-MT3810G-eng Part Number: 541B182AAG Models MT3809G & MT3810G July, 2018 2-8 Installation of the Model MT3809 Flowmeter with Inductive Alarms (1 or 2 switches) a. Install the meter as described in Section 2-5 b. Install the inductive alarms (1 or 2 switches) following the wiring instructions given in Section 2-6 or 2-7, depending on the configuration (with or without HART or FOUNDATION™... - Page 57 Installation and Operation Manual X-VA-MT3809G-MT3810G-eng Part Number: 541B182AAG Models MT3809G & MT3810G July, 2018 Using a flat blade screwdriver with a 1/8" blade, hold the pointer and turn the screw to align with the “R” on the scale. It may take a few adjustments to get the pointer on the “R”.
-
Page 58: Operation
Installation and Operation Manual X-VA-MT3809G-MT3810G-eng Part Number: 541B182AAG Models MT3809G & MT3810G July, 2018 3 Operation 3-1 Start-up and Operation of Flowmeter a. After the flowmeter has been properly installed in the process, it is ready for operation. When initiating flow, slowly open the valve to avoid a flow surge. -
Page 59: Operation Of The Model Mt3809 Flowmeter With A Transmitter With Or Without Optional Alarms And Pulse Output For Totalization
If preferred, the meter with transmitter may be returned for recalibration at the Brooks service department for a fee. * Basic transmitter setup parameters These are meter identification parameters set prior to shipment of the meter. -
Page 60: Communication With Hart Transmitter Using Device Descriptor
Installation and Operation Manual X-VA-MT3809G-MT3810G-eng Part Number: 541B182AAG Models MT3809G & MT3810G July, 2018 3-3-1 Communication with HART Transmitter using Device Descriptor The structure of the device descriptor for the HART transmitter is given in Figures 3-1 and 3-2. The alarms may be set at the minimum and maximum flow rate or at any... -
Page 61: Model Mt3809 Electronics Detailed Setup Menu Tree
Installation and Operation Manual X-VA-MT3809G-MT3810G-eng Part Number: 541B182AAG Models MT3809G & MT3810G July, 2018 Figure 3-2 Model MT3809 Electronics Detailed Setup Menu Tree... - Page 62 Installation and Operation Manual X-VA-MT3809G-MT3810G-eng Part Number: 541B182AAG Models MT3809G & MT3810G July, 2018 other preferred high and low limits. The units of measure of the alarm limits are the same units of measure as the process variable itself. Computations: Totalization Totalizers are available in both resettable and inventory options.
-
Page 63: Communication With F Oundation Fieldbus Transmitter
Fieldbus Transmitter oundation For details on the Foundation Fieldbus interface, refer to the supplemental manual (X-DPT-FF-MT3809G-Alarms-eng), also available on BrooksInstrument.com/Documentation 3-3-3 Communication with Transmitter using Local Operator Interface with LCD Display The LCD display is a three line liquid crystal display. It can easily be programmed to provide basic information such as flow rates and product totalization. -
Page 64: Model Mt3809 Electronics Loi Chart Menu
Installation and Operation Manual X-VA-MT3809G-MT3810G-eng Part Number: 541B182AAG Models MT3809G & MT3810G July, 2018 Left LOI button = Scroll through options. Right LOI button = Activate option. Figure 3-4 Model MT3809 Electronics LOI Chart Menu... -
Page 65: General Service Information
Installation and Operation Manual X-VA-MT3809G-MT3810G-eng Part Number: 541B182AAG Models MT3809G & MT3810G July, 2018 4-1 General Service Information There is no routine maintenance required for the Models MT3809 and MT3810 flowmeters. However should it become necessary to replace, adjust or remove components of the flowmeter, specific recommendations must be followed. -
Page 66: Meter Float Cleaning (Mt3809 & Mt3810)
Installation and Operation Manual X-VA-MT3809G-MT3810G-eng Part Number: 541B182AAG Models MT3809G & MT3810G July, 2018 4-2 Meter Float Cleaning (MT3809 & MT3810) Float replacement procedures are dependent on the meter size, connection type and fluid (gas vs. liquid) application. Please refer to the appropriate section below for instructions along with Figures 4-1 thru 4-4. - Page 67 Installation and Operation Manual X-VA-MT3809G-MT3810G-eng Part Number: 541B182AAG Models MT3809G & MT3810G July, 2018 5. To clean the gas damper, unscrew the cylinder head. Then remove the bolt and carefully take out the small piston so as to not damage the critical surfaces.
- Page 68 Installation and Operation Manual X-VA-MT3809G-MT3810G-eng Part Number: 541B182AAG Models MT3809G & MT3810G July, 2018 a. Size 0 to 5 (½") threaded, liquid or gas service 1. It is NOT recommended to disassemble these meters. Contact Service for repair. b. Size 7 (½") Threaded, liquid or gas service 1. Remove the meter from the process line and lay the meter horizontal on a table.
-
Page 69: Exploded View, Model Mt3809G And Mt3810G - Gas Service
Installation and Operation Manual X-VA-MT3809G-MT3810G-eng Part Number: 541B182AAG Models MT3809G & MT3810G July, 2018 Figure 4-1 Exploded View, Model MT3809G and MT3810G - Gas Service... -
Page 70: Exploded View, Model Mt3809G And Mt3810G - Liquid Service
Installation and Operation Manual X-VA-MT3809G-MT3810G-eng Part Number: 541B182AAG Models MT3809G & MT3810G July, 2018 Figure 4-2 Exploded View, Model MT3809G and MT3810G - Liquid Service... -
Page 71: Meter Float Cleaning (Mt3809 Etfe Option)
Installation and Operation Manual X-VA-MT3809G-MT3810G-eng Part Number: 541B182AAG Models MT3809G & MT3810G July, 2018 Figure 4-3 Exploded View, Model MT3809G, Size 15 Figure 4-4 Exploded View, Model MT3809G, Size 16 (Gas or Liquid Service) (Liquid Service Only) 4-3 Meter Float Cleaning (MT3809 ETFE Option) Flanged connections, all sizes, liquid or gas. -
Page 72: Inductive Alarm Replacement
The transmitter is a self contained unit matched specifically to the associated flowmeter. If there is a need to replace, please contact your nearest authorized Brooks service representative. However, the inductive alarms may be replaced according to the procedure in Section 4.6... - Page 73 Installation and Operation Manual X-VA-MT3809G-MT3810G-eng Part Number: 541B182AAG Models MT3809G & MT3810G July, 2018 Bulgarian Brooks Instrument Brooks Instrument. Brooks Instrument : (1) . (2) Brooks Instrument (PED) 0,5 bar (g) 25 mm 1" (inch), (PED). „ ” 2014/34/EU. Brooks Instrument 25 mm 1"...
- Page 74 P ed instalací si p e t te následující instrukce! Spole nost Brooks Instrument konstruuje, vyrábí a testuje tento produkt tak, aby splnil mnoho národních a mezinárodních standard . P ístroje musí být ádn nainstalovány, používány a udržovány tak, aby byl zajišt n jejich nep etržitý provoz v rámci normálních technických specifikací. Musíte dodržovat následující...
- Page 75 Om kvalitet af signalkabler, kabeltilslutninger og koblinger: Brooks tilbyder kabler af højest kvalitet, som er tilpasset CEE kvalificeringens forskrifter. Hvis man vælger at bruge egne kabler, skal man vælge et kabel som har den nødvendige afskærmning for at sikre 100 % mod udefra kommende støj.
- Page 76 Lees ze voordat u verder gaat! Brooks Instrument ontwerpt, produceert en test haar producten zodanig dat ze voldoen aan vele nationale en internationale normen. Deze producten moeten correct worden geïnstalleerd, bediend en onderhouden zodat ze binnen hun normale specificaties blijven werken.
- Page 77 Olulised juhised Enne kasutamist lugege hoolikalt läbi! Brooks Instrument konstrueerib, valmistab ja katsetab oma tooteid selliselt, et need vastaksid paljudele riiklikele ja rahvusvahelistele standarditele. Ainult nõuetekohane paigaldamine, kasutamine ja hooldamine tagab toodete katkematu talitluse tavaspetsifikatsiooni raames. Brooks Instrumenti toodete paigaldamisel, kasutamisel ja hooldamisel tuleb täita alljärgnevaid juhiseid ja integreerida need asjakohasesse ohutusprogrammi.
- Page 78 PED direktiiviä koskevat määräykset löytyvät käyttöoppaan ’’Tekniset tiedot” -luvusta. Käyttöoppaassa kuvatut tuotteet ovat 2014/34/EU EU-direktiivin mukaisia. Kaikki Brooks Instrumentin virtausmittarit kuuluvat ryhmään 1. Laitteet, jotka ovat suurempia, kuin 25 mm tai 1 tuuma, ovat PED I, II, III kategorien mukaisia.
- Page 79 AVERTISSEMENT: n’utilisez pas cet instrument au-delà des spécifications énumérées dans le manuel d’utilisation. Le non-respect de cet avertissement peut entraîner de graves blessures et / ou endommager l’équipement. • Si vous ne comprenez pas l’une des instructions, prenez contact avec un représentant de Brooks Instrument pour obtenir des explications. •...
- Page 80 Wichtige Anweisungen Bitte zuerst lesen! Brooks Instrument entwickelt, produziert und testet seine Produkte derart, dass sie viele nationale und internationale Standar ds erfüllen. Nur bei korrektem Einbau sowie richtiger Bedienung und Wartung dieser Produkte ist ein Betrieb unter Einhaltung der Standardvorgaben sichergestellt.
- Page 81 Installation and Operation Manual X-VA-MT3809G-MT3810G-eng Part Number: 541B182AAG Models MT3809G & MT3810G July, 2018 Greek Brooks Instrument Brooks Instrument. ’ Brooks Instrument. : (1) . (2) Brooks Instrument. (PED) 0,5 bar (g) 25 mm (PED). PED. 2014/34/EU. Brooks Instrument 25 mm PED.
- Page 82 üzemeltetni és karbantartani ahhoz, hogy mindenképpen a normál m ködési tartományuknak megfelel en üzemelhessenek. Az alábbi utasításokat be kell tartani, és be kell építeni a munkavédelmi programba a Brooks Instrument termékeinek telepítése, üzemeltetése és karbantartása során.
- Page 83 Direttiva europea relativa alla compatibilità elettromagnetica (EMC) Le apparecchiature (elettriche/elettroniche) Brooks Instrument dispongono del marchio CE ed hanno superato positivamente i test per i requisiti di compatibilità elettromagnetica (Direttiva EMC 2014/30/EU). In ogni caso bisogna prestare particolare attenzione alla scelta dei cavi di segnale utilizzati per le apparecchiature con marchio CE.
- Page 84 Lai nodrošin tu šo izstr d jumu turpm ku darb bu atbilstoši noteiktajiem parametriem, tie ir pareizi j uzst da, j lieto un j apkopj. Uzst dot, lietojot „Brooks Instrument” izstr d jumus un veicot to apkopi, ir j iev ro šie nor d jumi un j iek auj tie j su droš bas programm .
- Page 85 SP JIMAS: nenaudokite šio prietaiso viršydami instrukcijoje ir eksploatacijos vadove nurodytus techninius duomenis. Nesilaikydami šio sp jimo galite sunkiai susižeisti ir (arba) sugadinti rang . Jei nesuprantate koki nors nurodym , kreipkit s „Brooks Instrument“ atstov , kad paaiškint . Paisykite vis sp jim , persp jim ir nurodym , pažym t ant gaminio arba pateikt su juo.
- Page 86 Produkty o wielko ci 25 mm lub 1 cala lub mniejsze podlegaj zaleceniom „Uznanej Praktyki In ynierskiej” (SEP). Europejska dyrektywa dotycz ca kompatybilno ci elektromagnetycznej (EMC) Urz dzenia elektryczne / elektroniczne firmy Brooks Instrument posiadaj ce oznaczenie CE, przesz y pozytywnie testy pod k tem spe niania przez nich wymogów kompatybilno ci elektromagnetycznej (Dyrektywa EMC 2014/30/EU).
- Page 87 Ler antes de proceder! A Brooks Instrument projecta, fabrica e testa os seus produtos de forma a satisfazer numerosas normas nacionais e internacionais. Estes equipamentos devem ser instalados, utilizados e mantidos de forma adequada, e devem funcionar dentro da sua gama de utilização. As instruções seguintes devem ser, durante a instalação, uso e/ou manutenção dos equipamentos da Brooks Instrument, apreendidas e integradas no plano de...
- Page 88 În m sura în care indica iile c r ii ma inii nu sunt suficient de l muritoare, lua i leg tura cu reprezentantul Brooks Instrument pentru clarificarea problemei.
- Page 89 Pre íta pred inštaláciou! Brooks Instrument svoje výrobky projektuje, vyrába a testuje takým spôsobom, aby tieto vyhoveli domácim aj medzinárodným normám. Tieto zariadenia je potrebné predpísaným spôsobom inštalova , prevádzkova a udržiava , na zabezpe enie ich spo ahlivej a normálnej prevádzky v celom pracovnom rozsahu.
- Page 90 Pred servisom morate odstraniti tlak v obdelovalni liniji. e potrebujete rezervne dele, zagotovite, da usposobljeno osebje uporablja rezervne dele, ki jih je odobrila družba Brooks Instrument. Neodobreni deli in postopki lahko vplivajo na u inkovitost delovanja izdelka ali ogrozijo varno upravljanje postopka.
- Page 91 ¡Léalos primero! El Brooks Instrument proyecta, fabrica y prueba sus productos de manera que éstos respondan a numerosas normas nacionales e internacionales. Dichas instalaciones deben ser emplazadas, operadas y mantenidas adecuadamente, para que puedan marchar de todas formas en conformidad con el alcance normal de funcionamiento.
- Page 92 Läs detta innan du fortsätter! Brooks Instrument konstruerar, tillverkar och testar sina produkter med syfte att uppfylla alla nationella och internationella standarder. Dessa produkter måste installeras på rätt sätt, handhas och underhållas för att de skall fungera kontinuerligt enligt deras normala specifikation. De följande anvisningarna bör följas och integreras till Ert säkerhetsprogram varje gång när Brooks Instruments produkter installeras, handhas och underhålls.
- Page 93 BROOKS SERVICE AND SUPPORT Brooks is committed to assuring all of our customers receive the ideal flow solution for their application, along with outstanding service and support to back it up. We operate first class repair facilities located around the world to provide rapid response and support.
Need help?
Do you have a question about the MT3809G and is the answer not in the manual?
Questions and answers