Table of Contents
Advertisement
Advertisement
Table of Contents

Summary of Contents for HomeSecure HS-PRO-01
-
Page 2: Table Of Contents
Keypad Lock System Trouble (System Error) Event Log Operation using Call Operation using SMS 8 Operation using the App Setting up the HomeSecure 2014 App App User Manual 9 Alerting Alerting Call in case of Alarm SMS in case of Alarm... - Page 3 HomeSecure HS-PRO-01 Manual: 22-08-2014 13 Communication Preferences 14 Other Options 15 CMS-Settings 16 Resetting 17 Appendix Copyright © 2015 HomeSecure...
-
Page 4: Introduction
SMS and call and the built-in siren will sound with 85dB. The HomeSecure PRO alarm introduces a series of new and advanced functions to the HomeSecure selection. It is possible to create four user access codes, as well as temporary code, duress code, etc. - Page 5 HomeSecure HS-PRO-01 Manual: 22-08-2014 Copyright © 2015 HomeSecure...
-
Page 6: Installation
HomeSecure HS-PRO-01 Manual: 22-08-2014 Quick Guide Follow this procedure to get started quickly with your HomeSecure PRO alarm system. Prepare the Alarm Panel Connect backup Connect power Insert SIM card Attach wired devices battery supply Start up and Registering Sensors and Remote Controls... -
Page 7: Prepare The Alarm Panel
HomeSecure HS-PRO-01 Manual: 22-08-2014 Prepare the Alarm Panel 3.1 Open the Alarm Panel and Insert SIM card Press down on the two lock on the top side of the panel and pull the front and back parts apart. You must insert a SIM card in order for the GSM and SMS functions to work. AC power and battery must both be disconnected for secure operation. -
Page 8: Connect Wired Devices
HomeSecure HS-PRO-01 Manual: 22-08-2014 3.2 Connect Wired Devices If you have any wired devices you wish to connect to the alarm panel, they must be connected to the green cable joints inside the alarm panel. See below for an overview of the two cable joints. -
Page 9: Connect Backup Battery
HomeSecure HS-PRO-01 Manual: 22-08-2014 3.3 Connect Backup Battery Connect the wire coming out from the battery to the white plug on the circuit board. Make sure to press it all the way down, but avoid using too much pressure. 3.4 Connect Power Supply... -
Page 10: Start Up And Registration Of Sensors
HomeSecure HS-PRO-01 Manual: 22-08-2014 Start up and Register Devices 4.1 Start Up After connecting power supply and backup battery, the alarm panel will automatically turn on. The siren will beep and the voice guide says: ”Welcome to intelligent alarm system”. First you must set date and time: The alarm system will keep track of time as long as it is connected to a power supply. -
Page 11: Register Sensors To The Alarm Panel
HomeSecure HS-PRO-01 Manual: 22-08-2014 Before the alarm panel can react to sensors, the sensors must be registered on the alarm panel. The sensors send a wireless signal when they are triggered. This wireless signal must be registered on the alarm panel for it to recognize it. - Page 12 HomeSecure HS-PRO-01 Manual: 22-08-2014 Motion Detector: Insert all batteries and put the sensor back in the box. Wait 10-15 minutes and take the sensor out of the box to trigger and register. Note, the motion detector has a so-called detection interval of 5 minutes, read more about it in [5.5 Install Motion Detector].
-
Page 13: Zone Types
HomeSecure HS-PRO-01 Manual: 22-08-2014 4.3 Zone Types You must set a zone type for each registered sensor. The zone type will define different parameters for the sensor. See the table below for an overview. There are eight zone types: Activity zone, perimeter zone, panic zone, fire zone, gas zone, tamper zone... -
Page 14: Register Remote Controls
HomeSecure HS-PRO-01 Manual: 22-08-2014 4.3.1 Set Zone Type Follow the procedure below to set zone type for each sensor. Remember to set zone type for ALL sensors! If you do not set zone type for all sensors, the alarm system will not function optimally. -
Page 15: Test And Installation
HomeSecure HS-PRO-01 Manual: 22-08-2014 Test and Installation It is important to carry out the tests described in this section before installing the alarm panel and sensors permanently. Follow these procedures to test the placement of the alarm panel and the sensors and then install all units. -
Page 16: Signal Test
HomeSecure HS-PRO-01 Manual: 22-08-2014 5.3 Signal Test Before installing the sensors permanently, it is important to make sure that they can communicate with the alarm panel. Distance and walls will weaken the wireless signal reach. In normal houses, the reach is about 30 meters, but make sure using the signal test before installing. -
Page 17: Install Door/Window Sensor
HomeSecure HS-PRO-01 Manual: 22-08-2014 5.4 Install Door/window sensor Place the double sided tape here Magnet Self-supervision – hold this button down while the battery is inserted to turn status signal on/off. Battery lid LED indicator Reed relay (inside, registers the magnetic field) Base and magnet should be installed maximum 5 mm apart. -
Page 18: Install Motion Sensor
HomeSecure HS-PRO-01 Manual: 22-08-2014 5.5 Install Motion Sensor: Tamper switch. If the back panel is removed, the switch triggers alarm. Self-supervision – hold this button down while the battery is inserted to turn status signal on/off. Detection interval: TEST: Sensor triggers with no interval 5MIN: The sensor ”rests”... -
Page 19: Walk Test
HomeSecure HS-PRO-01 Manual: 22-08-2014 The motion detector should be installed at 1.8 to 2.2 meters height and point slightly downwards. Pet immune sensors should be installed at 1.8 meters height. Use the 5MIN detection interval described on the last page to save battery. If the sensor detects movement, it takes 5 minutes before it can detect movement again. -
Page 20: Phone Numbers And Access Codes
HomeSecure HS-PRO-01 Manual: 22-08-2014 Phone Numbers and Access Codes 6.1 Set Access Codes We highly recommend that you change all access codes from the standard ones once the installation is complete. There are five types of access codes: Master code, installation code, duress code, temporary code and user code (x4). -
Page 21: Set Phone Numbers
HomeSecure HS-PRO-01 Manual: 22-08-2014 Input the new code at followed by [#]. The code must be between 4 and 6 numbers. Same procedure is used for all codes, simply choose the code to edit/create in . All codes can be named in the same way as sensors. - Page 22 HomeSecure HS-PRO-01 Manual: 22-08-2014 6.2.2 Administrator SMS Number Under SMS Center it is possible to create two extra SMS numbers that can be set individually. We recommend that you save your own phone number here and set it up to receive SMS for System Trouble (low battery on sensors, power failure, zone loss, etc.), and when the alarm is armed and disarmed.
- Page 23 HomeSecure HS-PRO-01 Manual: 22-08-2014 6.2.4 SMS Phone Numbers In the same way as for call phone numbers, you can setup up to 4 phone numbers that the alarm system will send an SMS to when the alarm is triggered. Input the phone numbers for each [SMS Phone 1-4].
- Page 24 HomeSecure HS-PRO-01 Manual: 22-08-2014 Copyright © 2015 HomeSecure...
-
Page 25: Operation
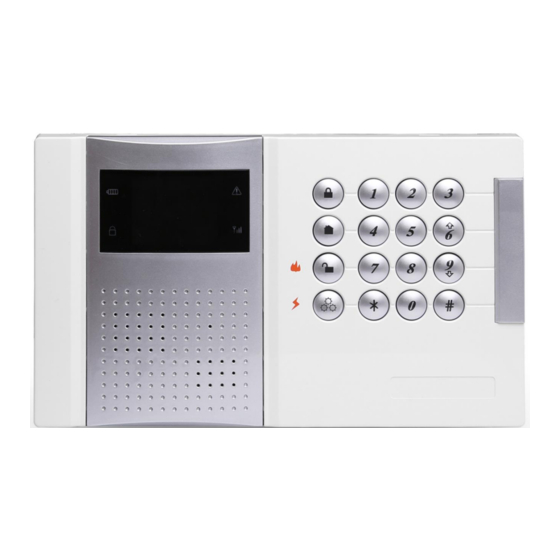
HomeSecure HS-PRO-01 Manual: 22-08-2014 Operating the Alarm System 7.1 Alarm Panel Front Layout Power LED: Red means AC power is Alarm LED: Red when alarm is triggered. disconnected. Green means power supply Slow blink means CMS call. Off during is normal. -
Page 26: Enabling/Disabling With The Keypad Or Remote Control
HomeSecure HS-PRO-01 Manual: 22-08-2014 7.2 Arm/Disarm with Keypad or Remote Control The alarm system can be armed, disarmed, arm stayed and panic triggered on the keypad or remote control. Note! You can only use the master code, user codes and temporary code to arm and disarm the alarm system. -
Page 27: Reminder By Open Doors And Windows
HomeSecure HS-PRO-01 Manual: 22-08-2014 7.2.4 Alarm Log Alarm events are shown in the main menu of the display. Use navigation buttons to move through the alarm events and press [#] to see details for each alarm event. Press [*] to exit. -
Page 28: Keypad Lock
HomeSecure HS-PRO-01 Manual: 22-08-2014 7.3.1 Arm with Open Doors If you want to arm the alarm system in spite of having open doors or windows, you must set this function to ON (standard). If the function [Arm With Open Doors] is set to [OFF], it will not be possible to arm the alarm system before all doors and windows have been closed. -
Page 29: System Trouble (System Error)
HomeSecure HS-PRO-01 Manual: 22-08-2014 7.5 System Trouble If the alarm system encounters operational issues (called System Trouble), such as sensor low battery, no GSM signal, etc., it will be displayed on the alarm panel as shown below: System Trouble is indicated Details for Zone Trouble. -
Page 30: Event Log
HomeSecure HS-PRO-01 Manual: 22-08-2014 7.6 Event Log The alarm system saves the latest 255 events in the event log. Events refers to alarm events but also all operation of the alarm panel. When the event log is full, it will start deleting from the oldest events. -
Page 31: Operation Using Sms
HomeSecure HS-PRO-01 Manual: 22-08-2014 7.8 Remote Control with SMS You can arm, disarm, home arm and request status SMS by sending an SMS to the alarm panel. Below examples uses the master code 0808 (you can use master code, temporary code and user codes) and panel ID is 1234. -
Page 32: Operation Using The App
8.1 Setup of the HomeSecure 2014 App Download our App [HomeSecure 2014] from Apple’s App Store or from Google Play and install it on your iPhone or Android phone. Follow below instructions to setup the app to communicate with your alarm... -
Page 33: App User Manual
HomeSecure HS-PRO-01 Manual: 22-08-2014 8.2 App Guide Main screen General settings Go to [General Set built-in siren Set system SMS Disarm settings] ON/OFF ON/OFF Go to [Zone Set wired siren Get System Arm away settings] ON/OFF Status. Go to [PGM... -
Page 34: Alerting
HomeSecure HS-PRO-01 Manual: 22-08-2014 Alarming 9.1 Alarming There are two types of alarm: Immediate alarm and delayed alarm. When the 24-hour zone is triggered, the alarm immediate triggers. 24-hour zones includes: Fire zone, Gas zone, Panic zone, Emergency zone and Tamper zone. -
Page 35: Call In Case Of Alarm
HomeSecure HS-PRO-01 Manual: 22-08-2014 9.2 Calls when the alarm goes off By alarm, the alert system will call the specified phone numbers. 5 sec. after the phone is answered there a voice guidance will be played which is repeated 5 times at 5 sec. intervals. Before the voice guidance stops, you can program the alarm system with the phone. -
Page 36: Stop Communication
HomeSecure HS-PRO-01 Manual: 22-08-2014 SMS message when operating: User refers to the user who has operated the alarm system. If the alarm panel is operated with the code, and you have named the code, then the name will be displayed in the SMS. -
Page 37: Settings
HomeSecure HS-PRO-01 Manual: 22-08-2014 Copyright © 2015 HomeSecure... -
Page 38: Zone Settings
HomeSecure HS-PRO-01 Manual: 22-08-2014 Zone settings 10.1 Wireless zone monitoring The wireless devices emits a tracking signal to the alarm panel at specific intervals. If the system does not receive this signal the device will be considered as "lost" (loss). -
Page 39: Zone Bypass
HomeSecure HS-PRO-01 Manual: 22-08-2014 10.2 Zone Bypass If a zone is bypassed, it is ignored by the alarm system and will not trigger the alarm. You can bypass any or all zones. In order to bypass the one after the other: •... -
Page 40: Siren And Sound Settings
HomeSecure HS-PRO-01 Manual: 22-08-2014 Siren- og Sound settings 11.1 Activate/Deactivate the Siren The siren (the built-in, external wired and wireless sirens) can be turned on or off. At section 5, choose the siren you wish to activate/deactivate. 11.2 Zone Siren Function Here it is possible to enable or disable the siren for each zone. -
Page 41: Siren Test
HomeSecure HS-PRO-01 Manual: 22-08-2014 11.3 Siren Duration Here you can determine how long time the siren should make a noise when the alarm is triggered. It can be set between 0 and 30 minutes. 11.4 Siren Confirmation This feature allows the siren to “beep” when the alarm system is activated or deactivated to confirm the operation. -
Page 42: Volume Settings
HomeSecure HS-PRO-01 Manual: 22-08-2014 11.6 Chime Zone (Chime function) If a sensor with the chime feature is triggered while the alarm system is off (disarm), the control panel will make a "ding dong" sound. You will know if someone enters the house while you are away. This... -
Page 43: Delay Settings
HomeSecure HS-PRO-01 Manual: 22-08-2014 Delay Settings 12.1 Entry Delay Entry Delay is the period from when you step into a sensor area to the alarm system is triggered. This means, when you walk in through the door, you have this time to deactivate the alarm before it is released. -
Page 44: Copyright © 2015 Homesecure
HomeSecure HS-PRO-01 Manual: 22-08-2014 12.4 Line Loss Delay If the fixed line loses its connection, there will be send a message to the CMS. There can be set up delay for this message. If the connection to the fixed network is restored within this delay period, then no messages will be sent to the CMS. - Page 45 HomeSecure HS-PRO-01 Manual: 22-08-2014 Communication Preferences 13.1 Call Attempts It is possible to determine how many times the alarm system should attempt to call a phone, before continuing to the next number on the list. It does not try again, if the number of attempts is exceeded.
-
Page 46: Sms Remote Control
HomeSecure HS-PRO-01 Manual: 22-08-2014 13.3 SMS Remote Control Turn off if you do not want it possible to control the alarm system with SMS and App. 13.4 SMS Confirmation Turn off if you do not want to receive SMS confirmations from the alarm system. Eg. to save money on the SIM card. -
Page 47: Other Options
HomeSecure HS-PRO-01 Manual: 22-08-2014 Other Options 14.1 PGM output settings Here you determine which parameters to trigger the PGM compound, which is made under [3.2 Connect Corded Devices] on page 8. Below is a list of the parameters you choose. It is also possible to use SMS/App to manually trigger the PGM output. - Page 48 HomeSecure HS-PRO-01 Manual: 22-08-2014 By most parameters the PGM is turned off by deactivating or PGM Cut-off. PGM Cut-off is a time limit to set for how long the PGM max. must be released. PGM cut-off can be set to the max. 300 seconds.
- Page 49 HomeSecure HS-PRO-01 Manual: 22-08-2014 14.3 Automatic activation/deactivation The alarm system can be set to be activated/deactivated at specified times. It is possible to set up 3 intervals for automatic activation/deactivation, all of which will be set on or off together.
- Page 50 HomeSecure HS-PRO-01 Manual: 22-08-2014 CMS-Settings This alarm system can be hooked up to a CMS, which means Central Monitor Station. This is often a security company, which in case of alarm will send out guards. If you do not have a contract with a security firm on this, then ignore this section.
- Page 51 HomeSecure HS-PRO-01 Manual: 22-08-2014 15.3 Cancel Alarm It is possible to cancel the alarm if an error occurs or unexpected alarm. The alarm system will then send an alarm cancellation to the CMS. 15.4 SMS Center number The SMS center (distributed by provider) upload event log through the GSM network. It includes, as the CMS, alarm, activation, deactivation, system trouble and service events.
- Page 52 HomeSecure HS-PRO-01 Manual: 22-08-2014 15.6 Panel ID The ID for the alarm panel can be changed, this allows the CMS to identify the alarm panel. Different alarm panels must have different ID numbers. ID number consists of 4-8 digits, by default it is set to 1234.
- Page 53 HomeSecure HS-PRO-01 Manual: 22-08-2014 15.8 First Test This function sets the time of the first periodic test. 15.9 CMS Cooperation When this feature is enabled, the alarm system will only send information to one CMS. If it is off, the alarm system may send messages to two CSM.
- Page 54 HomeSecure HS-PRO-01 Manual: 22-08-2014 Resetting Here you will find different options to reset either the entire system or various aspects, such as codes, zones, etc. 16.1 Reset All This function erases all settings and restore the factory settings. This resets the Alarm Panel ID, all telephone numbers and registered wireless devices.
- Page 55 HomeSecure HS-PRO-01 Manual: 22-08-2014 16.4 Clear codes through the hardware The codes can also be deleted using the jumpers on the alarm panel main board (see [17.4.1 Main Board] at page 59). If the codes have been lost, the jumper is moved to default while power is off. The alarm system is started up again, and then turned off and the jumper is moved back again.
-
Page 56: Specifications
HomeSecure HS-PRO-01 Manual: 22-08-2014 Appendix 17.1 Specifications General Specifications Wireless Zones Wired Zones EOL resistance 2,2K Wireless Frequency 868MHz Wireless Transmission ≥100 meters Distance without obstacles PSTN DTMF Communication Protocol Contact ID Dimensions 250x150x45mm The GSM Module Electric Parameters GSM operating... -
Page 57: Frequently Asked Questions
HomeSecure HS-PRO-01 Manual: 22-08-2014 17.2 Frequently asked questions Problem Potential cause Solution In standby, the display shows "System View [7.5 System Trouble (System Error) View [7.5 System Trouble (System Trouble". on page 30. Error) on page 30. Entered wrong phone number. - Page 58 HomeSecure HS-PRO-01 Manual: 22-08-2014 17.4 Hardware structure The aim of this section is to acquaint you with the various circuit boards the alarm system consists of. 17.4.1 Main Board The Main Board is the alarm system's “brain”. It’s here all device interfaces are located, such as the threaded zones, the wired siren, PGM output, AUX power output, external siren and telephone interface.
- Page 59 HomeSecure HS-PRO-01 Manual: 22-08-2014 17.4.2 The Power Supply Plate Providing power to both the main board and GSM module. Main board cable. Provides the mainboard with power. GSM module cable. Provides the GSM module with Power. Backup battery. Backup battery connection.
- Page 60 HomeSecure HS-PRO-01 Manual: 22-08-2014 17.5 The alarm system factory settings Page Setting Item Parameters Factory setting Master Code 4-6 digits 0808 Installation Code 4-6 digits 1234 Emergency Code 4-6 digits 0809 Zone bypass Wired zones 21&22 SMS sending Only for the alarm...
- Page 61 HomeSecure HS-PRO-01 Manual: 22-08-2014 17.6 Menu Structure Copyright © 2015 HomeSecure...
- Page 62 HomeSecure HS-PRO-01 Manual: 22-08-2014 Copyright © 2015 HomeSecure...
- Page 63 HomeSecure HS-PRO-01 Manual: 22-08-2014 17.7 Communication protocol and codes 17.7.1 Contact ID Event Codes CID Code Definition Panic alarm Fire alarm Emergency alarm Perimeter alarm Active alarm Entry/exit alarm Alarm panel Anti tamper alarm or tamper zone alarm Gas alarm...
Need help?
Do you have a question about the HS-PRO-01 and is the answer not in the manual?
Questions and answers