
Related Manuals for Haivision Makito


Summary of Contents for Haivision Makito
- Page 1 ™ Makito Decoder Compact HD H.264 Video Decoder User’s Guide Version 1.3 HVS-ID-UG-MAKD-130 Issue 01...
- Page 2 Trademarks The Haivision logo, Haivision, and certain other marks used herein are trademarks of Haivision. All other brand or product names identified in this document are trademarks or registered trademarks of their respective companies or organizations. HDMI, the HDMI logo and High-Definition Multimedia Interface are trademarks or regis-...
-
Page 3: Safety Guidelines
Do not touch or push the fan blade with fingers or other objects. Doing so may damage the fan and/or fan bearings, which can result in a noise problem as well as accelerated failure of the mechanical part. Makito Decoder User’s Guide, v1.3, Issue 01... -
Page 4: Table Of Contents
Safety First ........................25 Connecting the Decoder to the Network and a Computer ............26 Serial Interface Setup ...................... 27 Connecting the Decoder to A/V Displays................29 Modifying the RCA-Terminal Dongle for Balanced Audio ........... 30 Makito Decoder User’s Guide, v1.3, Issue 01... - Page 5 Managing the COM Port........................62 Configuring Network Settings ....................64 Network Settings ......................65 Viewing System Status Information ..................67 Rebooting the Decoder ....................68 Taking a System Snapshot ....................69 Saving and Loading Configurations ..................71 Makito Decoder User’s Guide, v1.3, Issue 01...
- Page 6 ....................100 haiversion ..................... 102 ....................103 ipconfig nmcfg ........................... 105 ....................110 package passwd ....................111 reboot ....................112 service ....................113 ....................114 stream temperature .......................... 119 viddec ........................... 120 Makito Decoder User’s Guide, v1.3, Issue 01...
- Page 7 Regulatory/Compliance ....................... 131 Appendix C: Open Source Software Credits Open Source Software Credits....................132 Appendix D: Warranty Information Haivision One (1) Year Limited Warranty ................133 Haivision End User Software License Agreement ............... 135 Index ........................141 Makito Decoder User’s Guide, v1.3, Issue 01...
-
Page 8: About This Guide
Welcome to the user’s guide for the Makito Compact HD H.264 Video Decoder, Version 1.3. This user’s guide describes how to install, configure, and manage the Makito to receive audio, video, and data over an Ethernet-based IP network. To access the online help, open the web interface and click from the menu bar. -
Page 9: About Haivision
About Haivision About Haivision Haivision is a global leader in delivering advanced video networking, digital signage, and IP video distribution solutions. Haivision offers complete end-to-end technology for video, graphics, and metadata to help customers to build, manage, and distribute their media content to users throughout an organization or across the Internet. -
Page 10: Related Documents
• Makito X2 User’s Guide Service Support Haivision is committed to providing the service support and training needed to install, manage, and maintain your Haivision equipment. For more information regarding service programs, training courses, or for assistance with your support requirements, contact Haivision Technical Support via our Support Portal on our website at: http://www.haivision.com/support/. -
Page 11: Safety Information
The definitions and symbols for CAUTION and WARNING comply with ANSI Z535.2, American National Standard for Environmental and Facility Safety Signs, and ANSI Z535.4, Product Safety Signs and Labels, issued by the American National Standards Institute. Makito Decoder User’s Guide, v1.3, Issue 01... -
Page 12: New Features In Version 1.3
• iPerf may be used to determine characteristics (such as bitrate, network latency, and jitter) of the link between two end-points such as a Makito Encoder and Makito Decoder. iPerf is used by Haivision Technical Support to debug field issues. In order... - Page 13 New Features in Version 1.3 Closed Captioning: CC608 and CC708 Re-insertion into an SDI Interface The Makito Decoder now supports streams that contain Closed Captioning (CC) coded as defined in ATSC A/72 (for 608 and 708 captions) and ATSC A/65 (for 708 captions). The Decoder will extract the CC information and re-insert it into the SDI interface (not HDMI) as a ANC packet formatted as defined in SMPTE 334-1 and 334-2.
-
Page 14: Part I: Installation And Setup
Part I: Installation and Setup... - Page 15 1: Introduction HAPTER This chapter provides a brief overview of Haivision’s Makito Decoder, along with a description of the main hardware components and key features. Topics In This Chapter Product Overview ..........16 Chassis Styles .
-
Page 16: Chapter 1: Introduction
Product Overview Product Overview The Makito Compact HD H.264 Video Decoder is an IP video appliance designed to be paired with the Makito Encoder. The Makito Decoder delivers SDI and HDMI digital video with embedded digital and separate analog audio. Both SDI and HDMI interfaces support all SD, HD and 3G standards up to 1080p60. -
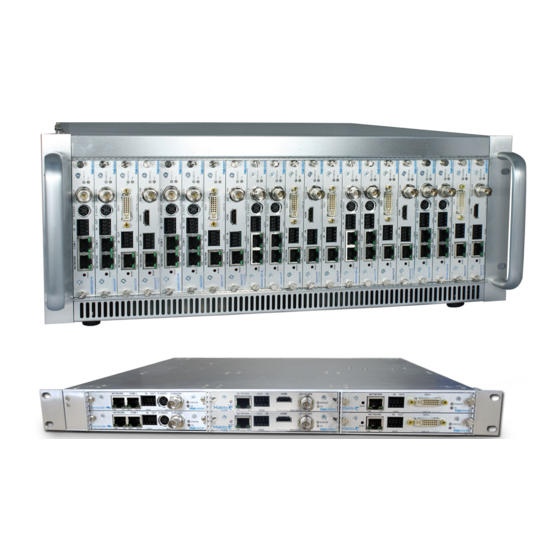
Page 17: Chassis Styles
• as an ultra compact appliance for single channel decoding (shown in previous section), • within a 4U high density chassis (MB21) that can contain up to 21 Makito encoders and/or decoders, and • within a 1U chassis (MB6) that can contain up to six Makito encoders and/or decoders. -
Page 18: Applications
“MB6 (Six-Slot) Chassis” on page 37. The Makito Decoder Dual Height Blade provides a serial port and may be used in either the MB21 or MB6 chassis (occupying two adjacent slots). Applications Typical examples of Makito Decoder applications include: •... -
Page 19: Physical Description
(RJ45). Figure 1-5 Ethernet Connection (Makito Decoder #B-290D) On the Makito Decoder Dual Height Blade, a computer can be connected to the COM1 serial port through its DB9 connector. Figure 1-6 Serial Connection (Makito Decoder Dual Height Blade #B-290D-S) -
Page 20: Audio/Video Interfaces (Rear Panel)
SDI and HDMI digital video. Video Out The Makito Decoder video interface consists of one BNC and one HDMI connector (face- plate shown below). • The BNC connector is used for the SD/HD/3G-SDI video signals. A 75 coaxial cable connects from Video Out to a video monitor. -
Page 21: Audio Out
Introduction Physical Description Audio Out The Makito Decoder audio interface consists of a single 8-pin terminal block connector and one HDMI connector (faceplate shown in Figure 1-7 on page 20). • The 8-pin terminal block connector is used for two-channel balanced/unbalanced analog audio output (one stereo pair) and a mono audio input (future release). -
Page 22: Led Status Indicators (Rear Panel)
Physical Description LED Status Indicators (Rear Panel) The LED colors and flashing (blinking) speed indicate the status (operational state) of the Makito Decoder. Figure 1-9 LED Status Indicators (sample view, Makito Decoder #B-290D) Table 1-1 LED Status Indicators Function Color... - Page 23 GREEN Intermittent Little activity (e.g., management). The LED should be lit when there is activity GREEN Solid Intense Activity (e.g., transmitting video traffic) Related Topics • “Powering Up the Unit” on page 33 Makito Decoder User’s Guide, v1.3, Issue 01...
-
Page 24: Chapter 2: Installing The Decoder
2: Installing the Decoder HAPTER This chapter explains how to set up and connect the Makito Decoder. It also includes the instructions for factory reset. Topics In This Chapter Setting Up the Decoder ......... . . 25 Safety First . -
Page 25: Setting Up The Decoder
Please choose a suitable location for operating the decoder(s). By doing so you will preserve long lifesaving and stability of the unit(s). Set up the decoder on a reliable and flat surface when using the single Makito chassis, or mount in a rack, when using the 1U or 4U chassis. -
Page 26: Connecting The Decoder To The Network And A Computer
(Optional) Connect the COM1 port to the serial port of a computer using the DB9 connector and a null modem serial cable. This will allow you to communicate directly from your computer to the Makito using a serial communication application such as HyperTerminal or other serial communica- tion application. -
Page 27: Serial Interface Setup
The serial interface is available on the Makito Decoder Dual Height Blade. Prior to logging in to the Makito for the first time, you may wish to change the unit’s default network settings to match the network in which it will be used. You can do so by connecting directly to the Makito’s serial COM1 port from your computer using HyperTerminal (or... -
Page 28: Com1 Serial Port Db9 Pinout (Makito Decoder Dual Height Blade)
Connecting the Decoder to the Network and a Computer COM1 Serial Port DB9 Pinout (Makito Decoder Dual Height Blade) On the Makito Decoder Dual Height Blade, the COM1 serial port uses a DB9 connector which has the following pinout: Table 2-1... -
Page 29: Connecting The Decoder To A/V Displays
Figure 2-4). • For balanced audio, see “Modifying the RCA-Terminal Dongle for Balanced Au- dio” on page 30. Figure 2-3 Decoder Output Connectors Analog Audio Out Video/Audio Out HDMI Video/Audio Out Makito Decoder User’s Guide, v1.3, Issue 01... -
Page 30: Modifying The Rca-Terminal Dongle For Balanced Audio
Prepare your new audio wires by removing about .150 inch of the wire’s insulation. Insert the new wires by pressing the tension clamp and then removing the screw driver to release the tension clamp. Refer to “Audio Terminal Block Connector Pinout” for the balanced/unbalanced audio pinout. Makito Decoder User’s Guide, v1.3, Issue 01... -
Page 31: Audio Terminal Block Connector Pinout
Installing the Decoder Connecting the Decoder to A/V Displays Audio Terminal Block Connector Pinout The Makito 8-pin audio terminal block connector has the following pinouts: Figure 2-5 Balanced and Unbalanced Audio Connector Pinouts Related Topics • For more information on the audio connections, see “Audio/Video Interfaces (Rear... -
Page 32: Hdmi Audio/Video Output Connector Pinout
TMDS Data1+ TMDS Data1 Shield TMDS Data1– TMDS Data0+ TMDS Data0 Shield TMDS Data0– TMDS Clock+ TMDS Clock Shield TMDS Clock– Reserved (N.C. on device) DDC/CEC Ground +5 V Power Hot Plug Detect Makito Decoder User’s Guide, v1.3, Issue 01... -
Page 33: Powering Up The Unit
Installing the Decoder Powering Up the Unit Powering Up the Unit Once all the cables are in place, the Makito is ready to be powered up. Single Blade Chassis Figure 2-7 Rear Panel (Single Chassis) showing Locking Power Connector Connect power supply here... - Page 34 To power up the Single Blade Chassis: Insert the locking cylindrical connector on the 5V power supply into the Power input jack at the rear of the Makito. To prevent damage to the decoder and/or power supply, be sure to connect CAUTION the power supply to the chassis first and then to the AC source.
-
Page 35: Mb21 (Twenty-One Slot) Chassis
Since there are two power inlets on the MB21 chassis, the cards in the chassis can operate with only one powered; however, the chassis would not be fully redundant. • The loss of one or two PSUs of the four PSUs in the MB21 chassis in any combination. Makito Decoder User’s Guide, v1.3, Issue 01... - Page 36 The PSU Status LED will turn green indicating that the chassis is powered up (only if all four Power On/Off switches are On). In the front of the chassis, the Makito Status LEDs will start blinking green, indicating that the decoders are booting up.
-
Page 37: Mb6 (Six-Slot) Chassis
The MB6-AC chassis has more than one power supply cord. Be sure to disconnect both (2) power supply cords before servicing to avoid electric shock. Makito Decoder User’s Guide, v1.3, Issue 01... - Page 38 On the MB6-AC, the PSU Status LEDs will turn green indicating that the chassis is powered up. In the front of either chassis, the Makito Status LEDs will start blinking green, indicat- ing that the encoders are booting up. Wait until the Status LEDs stay solid green, indicating that the encoders are ready for operation.
- Page 39 Installing the Decoder Powering Up the Unit In the front of the chassis, the Makito Status LEDs will start blinking green, indicating that the encoders are booting up. Wait until the Status LEDs stay solid green, indicating that the encoders are ready for operation.
-
Page 40: Resetting The Decoder
To reset the Makito to its factory default settings, press the micro switch (you will feel the button depress) and hold for five (5) seconds. The Makito will reboot on its own. As soon as the lights stop blinking and the Status LED is solid green, the decoder is ready. -
Page 41: Default Network Settings
Installing the Decoder Resetting the Decoder Default Network Settings After a factory reset, the Network settings are reset to: IP Address Subnet Mask Gateway 10.5.1.2 255.255.0.0 10.5.0.1 Makito Decoder User’s Guide, v1.3, Issue 01... -
Page 42: Part Ii: Session Configuration And Management
II: Session Configuration and Management... -
Page 43: Chapter 3: Managing The Decoder
3: Managing the Decoder HAPTER This chapter begins with a management overview of the Makito Decoder, followed by system access control information. It then explains how to set up video decoding, as well as manage the decoder using the Web interface. - Page 44 ........... . 79 Makito Decoder User’s Guide, v1.3, Issue 01...
-
Page 45: Management Overview
All Makito Decoder interfaces and applications such as Audio/Video services and IP links may be configured, managed, and monitored through the Web Interface, the Command Line Interface (CLI), or an SNMP server. All methods require access to the Makito through its Ethernet LAN port or (if applicable) the Serial Management port. -
Page 46: Accessing The Decoder
NOTE shipment, the decoder’s IP Address is set by default to: 10.5.1.2. To be able to log in to the Makito Decoder Web interface, your computer has to be in the same IP Address range (subnet). You may have to temporarily change your computer’s IP Address to be in the same subnet as the decoder. -
Page 47: Access Control
Managing the Decoder Accessing the Decoder Access Control The Makito Decoder provides the following pre-defined user groups with different privilege levels. • user account provides read-only access to the system. • operator account provides all rights to configure A/V and stream settings and reboot the system. -
Page 48: Logging In To The Web Interface
Logging In to the Web Interface To log in to the Makito Decoder configuration Web page: From your Web browser, type the Makito Decoder’s IP Address into the address field and press Enter. The browser will display the Login page for the Web configuration interface. -
Page 49: Exploring The Web User Interface
After logging in to the Web configuration interface, you will have access to the decoder configuration settings. All of the settings can be adjusted via the Web browser. Navigational Menus You can access the Makito Decoder configuration settings by selecting any of the following: Either... -
Page 50: Apply And Save
ETWORK provide options. Save ERVICES ONFIG You can save the current configuration (including the current IDEO UDIO settings) from the page. See “Saving and Loading >C TREAM DMINISTRATION ONFIG Configurations” on page 71. Makito Decoder User’s Guide, v1.3, Issue 01... -
Page 51: Online Help
Managing the Decoder Exploring the Web User Interface Online Help Selecting from the menu bar will launch the online help for the Makito Decoder. The Help figure below shows a sample Welcome page. Navigation pane Content pane Makito Decoder User’s Guide, v1.3, Issue 01... -
Page 52: Configuring The Video Settings
The changes will take effect immediately but will not be saved and will be lost after a reboot To save the current configuration, open the page. See >C DMINISTRATION ONFIG “Saving and Loading Configurations” on page 71. Makito Decoder User’s Guide, v1.3, Issue 01... -
Page 53: Video Settings
Values set which are impossible to implement will be treated as Auto. Reasons for not supporting the selection can range from “Display does not support the frame rate” or “Frame rate is undefined for the detected input resolution”. Makito Decoder User’s Guide, v1.3, Issue 01... - Page 54 • Decodes packets without comparing Fixed: the packet timestamp to synchronize video and audio. This may result in A/V sync issues, but may be required in circumstances where network performance hinders synchronization. Makito Decoder User’s Guide, v1.3, Issue 01...
-
Page 55: Makito X2 Interoperability
Makito X2 Interoperability The Makito Decoder does not support B frames in the video elementary stream. This affects interoperability between the Makito Decoder and the Makito X2 encoder. The following video encoder settings are recommended when configuring the Makito X2 to interoperate with the Makito Decoder. -
Page 56: Managing The Audio Settings
>A YSTEM ECODER UDIO menus. page opens, displaying the current audio encoding settings, as shown in the UDIO following example. For details, see “Audio Settings” on page 57. Makito Decoder User’s Guide, v1.3, Issue 01... -
Page 57: Audio Settings
This is auto-detected by the system and cannot be changed. Output Interface (read-only) The type of audio output connector for the Decoder: Both Analog Audio and Embedded NOTE: Digital Audio are active. Makito Decoder User’s Guide, v1.3, Issue 01... -
Page 58: Configuring The Stream Settings
To view stream details or add an decoder stream, click a line in the table to open the page. TREAM To change the Action status for an existing stream, click (under --Select-- Actions and select either Stop or Stop, or Delete. Makito Decoder User’s Guide, v1.3, Issue 01... -
Page 59: Streams Page
Click a number to create or display a stream copy or instance Select or enter the new value(s) in the appropriate field(s). See “Stream Settings” page 60. To apply your changes, click Apply Makito Decoder User’s Guide, v1.3, Issue 01... -
Page 60: Stream Settings
Select the Encapsulation Protocol type for the TS over UDP decoded stream. • Direct-RTP: RFC3984 • UDP: MPEG transport stream over TS over UDP (no RTP header) • RTP: MPEG2 transport stream TS over over RTP Makito Decoder User’s Guide, v1.3, Issue 01... - Page 61 Enable Forward TS over UDP Error Correction (FEC). Select either: • (None) • The VF FEC is a proprietary FEC and NOTE: is not interoperable with devices outside of the Haivision family. Makito Decoder User’s Guide, v1.3, Issue 01...
-
Page 62: Managing The Com Port
Managing the Decoder Managing the COM Port Managing the COM Port The Makito Decoder Dual Height Blade provides a serial interface which you can use to connect to a computer for management of the decoder. The page displays the COM P settings for the COM port. - Page 63 The COM Port stopbits: Flow Control The COM Port flow control: None None For information on connecting a computer to the COM1 port, see “Connecting the Decoder to the Network and a Computer” on page 26. Makito Decoder User’s Guide, v1.3, Issue 01...
-
Page 64: Configuring Network Settings
65. To save your changes, click Save You must reboot the system for the changes to take effect. The Reboot button appears after you click Save To apply your saved changes, click Reboot Makito Decoder User’s Guide, v1.3, Issue 01... -
Page 65: Network Settings
Address from a DHCP server on the network. When it is disabled, you must manually enter the decoder’s IP Address, Netmask & Gateway Address. Displays the IP Address for the Makito Decoder. This is a IP Address unique address that identifies the unit in the IP network. - Page 66 Network Setting Description/Values (Cont.) Netmask Displays the Subnet Mask for the Makito. This is a 32- bitmask used to divide an IP address into subnets and specify the network’s available hosts. If DHCP is disabled, you may enter a Netmask in NOTE: dotted-decimal format.
-
Page 67: Viewing System Status Information
Viewing System Status Information Viewing System Status Information From the page, you can view status information about the Makito Decoder, such TATUS as the operating system up time, along with information about the hardware and software components. The page displays a “snapshot” of the decoder faceplate that shows the A/V interface. -
Page 68: Rebooting The Decoder
Reboot The decoder will reboot and you will be returned to the Login page. Any active stream- ing sessions will be momentarily disrupted. You can also reboot the decoder from the page. ETWORK Makito Decoder User’s Guide, v1.3, Issue 01... -
Page 69: Taking A System Snapshot
Taking a System Snapshot Taking a system snapshot can be useful for troubleshooting and may be forwarded to Haivision Technical Support if you are requesting technical support. The system snapshot lists information such as component versions, network settings, loaded modules, running processes, system traces, configured streams and stream status... - Page 70 Current Temperature: 46 Celsius measured 1s ago Maximum Temperature: 47 Celsius measured 24m36s ago Minimum Temperature: 46 Celsius measured 24m32s ago -------------------------------------------------------------------------------- Component Versions: -------------------------------------------------------------------------------- Card Type : "Makito Decoder" Part Number : B-290D-HD Makito Decoder User’s Guide, v1.3, Issue 01...
-
Page 71: Saving And Loading Configurations
Saving and Loading Configurations Configuration Management Each Makito Decoder is configured by users’ selecting and setting values of applicable system settings, such as Decoder settings and the stream source. Although these configura- tion settings are not automatically saved, you can save a list of text-based configuration directives in a file which is stored in the decoder’s flash memory. -
Page 72: Viewing Configuration File Details
From the page, click the configuration file to view. ONFIG Click to display a list of the current configuration settings in a new window, as View shown in the example on the following page: Makito Decoder User’s Guide, v1.3, Issue 01... - Page 73 FrameRate=0 SyncMode=STC Buffering=Adaptive DisplayCaption=Hide DisplayTimecode=Hide AspectRatioMode=Auto StillImageType=Freeze StillImageDelay=3 [Audio Decoder 0] AudioLevel=6 AutoStart=Yes [STREAM_1] ID=1 Name=zixi42 Contents=3 VideoSource=0 AudioSource=0 TOS=184 MTU=1496 TTL=64 Port=2077 Address=IPV4:10.6.210.110 Encapsulation=TS-ZIXI RTCPEnabled=No AutoStart=Yes Encrypted=Yes Key= 5A553F0EF872784C7C14181DE5767E5179140011F5647E6B735D2011E2 687E4D FEC=No Mode=Broadcast Makito Decoder User’s Guide, v1.3, Issue 01...
-
Page 74: Installing Firmware Upgrades
Managing the Decoder Installing Firmware Upgrades Installing Firmware Upgrades When you first receive the Makito Decoder, the necessary firmware is pre-installed on it. Upgrades of the firmware are issued through Haivision’s Download Center on our website at: http://www.haivision.com/download-center/. Please note that you may download the latest firmware and documentation by registering via the Haivision Support Portal. - Page 75 Wait for the file to be uploaded. Remain on this page and do not click IMPORTANT anything else in the Makito Web interface during the upload. When the file is uploaded, you will see a confirmation page listing the package con- tents and release date and files.
-
Page 76: Enabling And Disabling Network Services
Enabling and Disabling Network Services For security purposes, you may need to stop one or more network services from accessing the Makito Decoder. From the Services page, you can enable and disable the following network services: HTTP, SNMP, SSH, Telnet, and VF. - Page 77 Any Furnace servers that may be communicating with the decoder. Note that VF Pilot provides access to decoder configuration settings. To save your changes, click Save The service(s) will be stopped or started immediately. Makito Decoder User’s Guide, v1.3, Issue 01...
-
Page 78: Configuring Auto Logout
Systems that are left logged on may represent a security risk for an organization. Therefore, you can configure the Makito Decoder to automatically log the user out after a period of idle time. If the user has been inactive for too long, then the user is automatically logged out and redirected to the Login page. -
Page 79: Logging Out
Managing the Decoder Logging Out Logging Out After you finish using the Makito Decoder, be sure to log out. To do so, select from OGOUT the Main Menu. Logging out prevents misuse and unauthorized access to the decoder. Makito Decoder User’s Guide, v1.3, Issue 01... -
Page 80: Chapter 4: Configuring A/V Services Using Snmp
4: Configuring A/V Services HAPTER Using SNMP This chapter provides information required to manage the Makito Decoder through the Simple Network Management Protocol (SNMP). SNMP-based management uses Network Management Stations (NMSs) to collect data or configure devices (SNMP agents) across an IP network. -
Page 81: Overview
The Makito Decoder uses Net-SNMP Version 5.5 and supports SNMP v1, v2c, and NOTE The Makito Decoder supports a number of SNMP commands used to set or get Manage- ment Information Base (MIB) objects on the local host or on other SNMP agents reachable over the IP networks. -
Page 82: Supported Mibs
Configuring A/V Services Using SNMP Supported MIBs Supported MIBs The Makito Decoder SNMP agent supports the MIB-II (RFC 1213) standard and its updates, SNMPv3 MIBs, as well as the Haivision proprietary Enterprise MIB. The following table lists the supported MIBs:... -
Page 83: Snmp Agent Components
VACM (View-based Access Control Model) views modeling the privilege levels of the Makito Decoder user groups: admins, operators, and users. These groups can be used for v1/v2c communities and v3 USM users. -
Page 84: Nmcfg
Traps are SNMP messages that the SNMP agent sends to management stations when events, alarms or faults occur in the system or on the network. The Makito Decoder generates trap messages and sends them to active management stations that are identified trapcommunity snmpd.conf... - Page 85 <community> [{<group>|ro|rw} [<host>]] nmcfg system help nmcfg system define <param> "<value>" nmcfg system delete <param> nmcfg user help nmcfg user define <uname> [{MD5|SHA} "<apwd>" [{DES|AES} ["<ppwd>"]]] nmcfg user delete <uname> Makito Decoder User’s Guide, v1.3, Issue 01...
- Page 86 Configuring A/V Services Using SNMP SNMP Agent Components Related Topics • “nmcfg” on page 105 (in Appendix A: “CLI Command Reference”) Makito Decoder User’s Guide, v1.3, Issue 01...
-
Page 87: Snmpv3
The following line is added by the above command in the snmpd.conf configuration file: rwuser johndoe auth To assign Makito Decoder user group privileges instead of the read-only or read-write permissions (to the whole MIB), the parameter of the nmcfg access command can be replaced by the access group admins, operators, or users. - Page 88 # snmpset -v3 -u johndoe -a SHA -A "password" -x AES -X "pass phrase" -l authPriv localhost haiAvtStreamEncapsulation.1 i directRtp HAI-AVT-STREAM-MIB::haiAvtStreamEncapsulation.1 = INTEGER: directRtp(1) Makito Decoder User’s Guide, v1.3, Issue 01...
-
Page 89: Snmp Utilities
The retrieval of a complete subtree is referred to as NOTE: “walking the MIB.” /usr/bin The SNMP utilities are located in the directory --help For more information on an SNMP command, enter the command with the argument. Makito Decoder User’s Guide, v1.3, Issue 01... -
Page 90: Snmp Syntax For Setting Up Streams
Configuring A/V Services Using SNMP SNMP Syntax for Setting Up Streams SNMP Syntax for Setting Up Streams The Haivision Audio/Video Transport Stream MIB (HAI-AVT-STREAM-MIB) is composed of multiple tables described below. Table Index Description haiAvtStreamNewID.0 none Next available stream ID... - Page 91 The example below, using CLI commands on the Makito Decoder, creates a streaming session with IP Multicast Address 233.252.0.106 on port 2000, and starts streaming immediately. The Stream ID haiAvtStreamTable index) is used to create a stream;...
-
Page 92: Part Iii: Reference
III: Reference... -
Page 93: Appendix A: Cli Command Reference
A: CLI Command Reference PPENDIX This alphabetical command reference lists and describes the available Makito Decoder Command Line Interface (CLI) commands and their parameters. Commands In This Appendix Syntax Conventions ..........94 CLI Access Control . -
Page 94: Syntax Conventions
[ x { y | z } ] Vertical bars and braces within square brackets indicate a required choice within an optional element. Parameter names and enumerated values are case-insensitive and can be abbreviated. Makito Decoder User’s Guide, v1.3, Issue 01... -
Page 95: Cli Access Control
“status” only temperature “get” only reboot passwd “operator” “user” password password only only Telnet from Decoder ping traceroute For an overview of system access control on the Makito Decoder, see “Access Control” page 47. Makito Decoder User’s Guide, v1.3, Issue 01... -
Page 96: Auddec
Clears the decoder’s audio statistics. help auddec Displays usage information for the command. AUDDEC ARAMETERS Parameter Default Description/Values level The maximum analog Audio Output level from +5dBU up to +20dBU. Only applies to Analog Audio Input. NOTE: Makito Decoder User’s Guide, v1.3, Issue 01... - Page 97 Decoded Frames : 24,921,006 Decoded Bytes : 4,211,402,592 Decoder Errors Audio Algorithm : MPEG2-ADTS Audio Channels Audio Samplerate : 48 Kbps Bits Per Sample : 16 • Managing the Audio Settings on page 56 Makito Decoder User’s Guide, v1.3, Issue 01...
-
Page 98: Config
[cfgname] config list ESCRIPTION config command is used to manage configurations on the Makito Decoder. This includes saving the current configuration, loading a saved configuration, and specifying the configuration file to load at startup. All configuration files are stored in... - Page 99 “Class200” and sets it to be the startup configuration # config load Class200 Loads a previously saved configuration identified by the name “Class200” (located in the active (local) directory). • Saving and Loading Configurations on page 71 Makito Decoder User’s Guide, v1.3, Issue 01...
-
Page 100: Ethercfg
Ethernet configu- ration parameters. When the Makito Decoder boots up, it automatically initializes and configures the Ethernet interface to match the settings on the Ethernet switch to which it is connecting. However, you may need to disable autonegotiation, and manually force settings such as the Ethernet interface line rate and duplex mode. - Page 101 CLI Command Reference ethercfg • Configuring Network Settings on page 64 Makito Decoder User’s Guide, v1.3, Issue 01...
-
Page 102: Haiversion
ESCRIPTION haiversion command is used to display the Firmware Build ID and Build Time on the Makito Decoder. It also displays the serial number for the unit. HAIVERSION XAMPLE # haiversion Displays the Build ID, Build Time, and Serial Number for the unit, such as. -
Page 103: Ipconfig
Makito Decoder, including the IP settings, hostname, and DNS.It may also be used to configure the Network Time Protocol (NTP) server settings. As shown in the following example, when you enter the... - Page 104 Makito Decoder. prompts you for information about the current location, and saves the configured time zone information when the system is set up for NTP. • Configuring Network Settings on page 64 Makito Decoder User’s Guide, v1.3, Issue 01...
-
Page 105: Nmcfg
<uname> ESCRIPTION nmcfg (Network Management Configuration) command is used by system adminis- trators or GUI/Web Interface applications in the configuration of SNMP for the Makito Decoder. The nmcfg script reads and edits the standard SNMP configuration files, and then... - Page 106 Displays usage information for the command, or if specified, the option. nmcfg settings persist after reboots, unlike other Makito Decoder settings NOTE which are lost when the unit is rebooted unless saved as a configuration. Makito Decoder User’s Guide, v1.3, Issue 01...
- Page 107 XAMPLE REATE AN USER Two commands are required to create a USM (v3) user and define its access: # nmcfg user define johnsmith SHA “arfds23dsjs” AES “2394urscxkvn” # nmcfg access usm johnsmith operators Makito Decoder User’s Guide, v1.3, Issue 01...
- Page 108 ----------------- ------------------------------------ engineid 0x80001f88802054a68b4b75388e contact "joe net <jnet@example.org>" location "Media Lab" model perm/group level user/community source --------------- -------------- ------ ---------------------- --------- users auth guest admins priv joenet operators priv johnsmith Makito Decoder User’s Guide, v1.3, Issue 01...
- Page 109 CLI Command Reference nmcfg auth protocol priv protocol user ---------------------- --------------- ----------- nopriv guest joenet johnsmith • “nmcfg” on page 84 (in “SNMP Agent Components”) Makito Decoder User’s Guide, v1.3, Issue 01...
-
Page 110: Package
You can specify the package file or cancel Cancels installation of a package scheduled for the next reboot. PACKAGE XAMPLES # package info haios_v1_2_0.hai Displays information about the package # package install haios_v1_2_0.hai Installs the package Makito Decoder User’s Guide, v1.3, Issue 01... -
Page 111: Passwd
Note that you must be logged in as change the password for an account other than your current account. • Access Control on page 47 Makito Decoder User’s Guide, v1.3, Issue 01... -
Page 112: Reboot
YNOPSIS reboot ESCRIPTION reboot command is used to is used to halt and restart the Makito Decoder. Any unsaved configurations will be lost. The decoder will restart with the saved startup config- uration. XAMPLE # reboot Reboots the Makito Decoder. -
Page 113: Service
XAMPLES # service telnet stop Stops telnet connection to the Makito Decoder. # service all stop Stops all network connections to the Makito Decoder. • Enabling and Disabling Network Services on page 76 Makito Decoder User’s Guide, v1.3, Issue 01... -
Page 114: Stream
Displays stream information. See stream Parameters below. You can specify to display the stream configuration, statistics, or clear Clears all active sessions on the decoder. help stream Displays usage information for the command. Makito Decoder User’s Guide, v1.3, Issue 01... - Page 115 You can enter a command later. videosrc id/name (Optional) The video source. videosrc id must be 0. audiosrc id/name (Optional) The audio source. audiosrc id must be 0. datasrc (Reserved for future use) The data source. Makito Decoder User’s Guide, v1.3, Issue 01...
- Page 116 IMPORTANT 224.0.0.0 224.0.0.255 Multicast addresses from are reserved for multicast maintenance protocols and should not be used by streaming sessions. We recommend that you use a multicast address from the Organization-Local scope (239.192.0.0/14). Makito Decoder User’s Guide, v1.3, Issue 01...
- Page 117 Audio PID : 36 PCR PID : 34 PMT PID : 32 Transport Stream ID : 0 Program Number Received Packets : 7,460,566 Received Bytes : 739,969,420 Bitrate : 12,638 kbps RTCP : Off Makito Decoder User’s Guide, v1.3, Issue 01...
- Page 118 CLI Command Reference stream # stream 1 del Deletes Stream #1. • Configuring the Stream Settings on page 58 Makito Decoder User’s Guide, v1.3, Issue 01...
-
Page 119: Temperature
Displays the current temperature for the unit, see example below: Temperature Status: Current Temperature : 35 Celsius measured 2s ago Maximum Temperature : 36 Celsius measured 5d2h9m2s ago Minimum Temperature : 32 Celsius measured 5d5h34m2s ago Makito Decoder User’s Guide, v1.3, Issue 01... -
Page 120: Viddec
Displays decoder video status information. config stats You can specify to display the configuration ( , or clear Clears the decoder’s statistics. reset Resets the decoder. help viddec Displays usage information for the command. Makito Decoder User’s Guide, v1.3, Issue 01... - Page 121 The FDB also directly affects the end-to-end latency; for example, 15ms of FDB will increase the end-to-end latency by an extra 15ms. delay 0 ms The delay in ms when using STC syncmode 0..1000 with Fixed buffering. ms delay Makito Decoder User’s Guide, v1.3, Issue 01...
- Page 122 IDR frame and will re-start the display with that IDR frame. stilldelay 3 seconds The delay in seconds before the still image 2...60 (stillimage) will be displayed. Makito Decoder User’s Guide, v1.3, Issue 01...
- Page 123 : 21h45m3s Input Format : 1920x1080i30 Output Format : 1920x1080i30 Video Bitrate : 1,471 kbps Decoded Frames : 745,808 Decoded NALs : 745,808 Decoder Errors • Configuring the Video Settings on page 52 Makito Decoder User’s Guide, v1.3, Issue 01...
- Page 124 B: Technical Specifications PPENDIX This appendix lists the technical specifications for the Makito Decoder. Topics In This Appendix Video Decoding ..........125 Audio Decoding .
-
Page 125: Appendix B: Technical Specifications
720x576p 50 Hz 640x480 75/60 Hz Video Bitrates (bps) 150k to 15M Compression Standard MPEG-4 Part 10 (H.264 AVC) The Makito Decoder does not support B frames NOTE: in the video elementary stream. See “Makito X2 Interoperability” on page 55. -
Page 126: Audio Decoding
2 per video channel Audio Bitrates 32 to 448 kbps per audio pair Frequency Response 20 Hz to 22 kHz Sampling Rate 48kHz, 32kHz Compression Standards MPEG-2 AAC-LC ISO/IEC 13818-7 MPEG-4 AAC-LC ISO/IEC 14496-3 Makito Decoder User’s Guide, v1.3, Issue 01... -
Page 127: Audio/Video Interfaces
Audio (Output) 2 audio channels (analog or digital) Available through Terminal Block connector: • Balanced Stereo Analog Audio • Unbalanced Stereo Analog Audio Digital Embedded Audio • SD-SDI: SMPTE-272M • HD-SDI: SMPTE-299M • HDMI Makito Decoder User’s Guide, v1.3, Issue 01... -
Page 128: Network And Management Interfaces
QuickTime Stream (RFC 3984 video encapsulation and RFC 3640 AAC-LC audio payload) Connector RJ45 MANAGEMENT INTERFACES Management Protocols HTTP (Web browser) Command line over Telnet, SSH or RS-232 serial line FTP/TFTP Client/Server SNMP Furnace (VF Command & Control) Makito Decoder User’s Guide, v1.3, Issue 01... -
Page 129: Chassis Options
Technical Specifications Chassis Options Chassis Options Single Blade Appliance Makito Decoder - Single Blade Appliance (S-290D) Dimensions (H x W x D) 24mm H x 149mm W x 202mm D [0.92” x 5.85” x 8.0”] Weight Approximately 1.13 kg [2.5 Ibs.]... -
Page 130: Mb21B - 21 Blade Chassis
Single Internal Power Supply: • 90-132V and 180-240VAC 47Hz-63Hz • 400 Watt max. Temperature Operating: 0° to 50°C (32° to 122°F) Non-operating: -40° to 70°C (-40° to 158° F) Relative Humidity Up to 95% without condensation Makito Decoder User’s Guide, v1.3, Issue 01... -
Page 131: Regulatory/Compliance
EN 55022: 2006 A1: 2007 (emissions), CLASS A EN 55024:1998+A2:2003 (immunity) FCC part 15: 2009, subpart B, CLASS A ICES-003 Issue 4, Class A EN 61000-3-2: 2006, CLASS A EN 61000-3-3: 2008 AS/ NZS3548 Makito Decoder User’s Guide, v1.3, Issue 01... -
Page 132: Open Source Software Credits
C: Open Source Software PPENDIX Credits This appendix lists the Open Source software packages used in the Makito haiOS: Open Source Software Credits Haivision is grateful to the following organizations for making available their Open Source software packages: Package Version... -
Page 133: Appendix D: Warranty Information
Warranty Period, at its option and to the extent permitted by law, Haivision will either (1) repair the hardware defect at no charge, or (2) exchange the product with a product that is new or equivalent to new in performance and reliability and is at least func- tionally equivalent to the original product. - Page 134 The Authorized Reseller or Haivision will help determine whether your product requires service and, if it does, will inform you how Haivision will provide it. You must assist in diagnosing issues with your product and follow Haivision’s warranty processes.
-
Page 135: Haivision End User Software License Agreement
Software and which add minor new functions to the Licensed Software, but none so significant as to warrant classification as an Upgrade, which may be provided by Haivision to fix critical or non-critical problems in the Licensed Software on a scheduled, general release basis. Updates to the Licensed Software (“Version”) are denoted by number changes to the right of the decimal point for a version and revision number (for example going from 2.0.0 to 2.1.3). - Page 136 Ownership. The Licensed Software is conditionally licensed and not sold. As between the parties, Haivision and/or its licensors owns and shall retain all right, title and interest in and to all of the Licensed Software, including all copyrights, patents, trade secret rights, trademarks and other intellectual property rights therein, and nothing in this Agreement shall be deemed to transfer to You any ownership or title to the Licensed Software.
- Page 137 Haivision. All non-proprietary Hardware, if any, is sold “AS IS”; however, to the extent that Haivision has the legal right to do so, Haivision hereby transfers to You any and all warranties made by Haivision's vendors to Haivision with respect to such non-proprietary Hardware which was sold by Haivision or the Reseller to...
- Page 138 Agreement, or (ii) relating to or arising out of any negligence or wilful misconduct on the part of Haivision or any breach by Haivision of the terms of this Agreement or any Maintenance and Support Agreement, or applicable law.
- Page 139 (whether by operation of law or otherwise) without the prior written consent of Haivision. Any unauthorized assignment, transfer or delegation by You shall be null and void. No other Person shall have or acquire any right under or by virtue of this Agreement.
- Page 140 During an event of force majeure, the affected party shall exercise reasonable effort to mitigate the effect of the event of force majeure. If you have questions, please contact Haivision Systems Inc., 4445 Garand, Montréal, Québec, H4R 2H9 Canada.
-
Page 141: Index
COM Port Settings page 62 viewing from the CLI 97 default Bitrate, Incoming Video IP Address 46 Video Settings page 53 username and password 48 Buffering default configuration Video Settings page 55 See startup config Makito Decoder User’s Guide, v1.3, Issue 01... - Page 142 MAC Address viewing from the Web interface 66 Makito Decoder chassis options 17 default IP Address 46 haiversion powering up 34 CLI command 102 managing configurations hardware installation 25–39 from the CLI 98 Makito Decoder User’s Guide, v1.3, Issue 01...
- Page 143 Stream Settings page 60 COM Port Settings page 63 stream CLI command 114 configurable CLI parameters 115 reboot Stream IP (destination) CLI command 112 managing streams from the CLI 115 rebooting the decoder 68 Makito Decoder User’s Guide, v1.3, Issue 01...
- Page 144 CLI command option 122 Video Settings page 53 Video Frame Rate, Output Video Settings page 53 Video Resolution, Incoming Video Settings page 53 Video Resolution, Output Video Settings page 53 Video Settings page 52 Makito Decoder User’s Guide, v1.3, Issue 01...
Need help?
Do you have a question about the Makito and is the answer not in the manual?
Questions and answers