Keysight N1911A Installation Manual
P-series power meter
Hide thumbs
Also See for N1911A:
- Programming manual (771 pages) ,
- Configuration manual (6 pages) ,
- User manual (287 pages)
Table of Contents
Advertisement
Quick Links
Advertisement
Table of Contents

Related Manuals for Keysight N1911A


Summary of Contents for Keysight N1911A
- Page 1 Keysight N1911A and N1912A P-Series Power Meters Installation Guide...
-
Page 2: Safety Information
Conformity. understood and met. where in the EULA. Keysight shall be under no obligation to update, revise or otherwise modify the Software. With WARNING respect to any technical data as defined by FAR 2.101, pursuant to FAR... -
Page 3: General
Keysight shall not be liable for errors or for incidental or consequential damages in connection with the furnishing, use, or performance of this document or any information contained herein. -
Page 4: Cooling, Cleaning, And Usage Requirements
WARNING the same type and line rating (250V, F3.15A, 20mm fast blow fuse with high breaking capacity, Keysight part number 2110-0957). The use of other fuses or materials is prohibited. No operator serviceable parts inside. Refer servicing to qualified personnel. - Page 5 This instrument is designed for use in Installation Category II and Pollution CAUTION Degree 2 per IEC61010 and 60664 respectively. Keysight N1911A and N1912A Installation Guide...
-
Page 6: Safety Symbols
‘Stand-by’ mode. Note, the instrument is NOT isolated from the mains when the switch is pressed. To Three-phase alternating current. isolate the instrument, the mains coupler (mains input cord) should be removed from the power supply. Equipotentiality. Keysight N1911A and N1912A Installation Guide... -
Page 7: Safety Considerations
REMOVE POWER and do not use the product until safe operation can be verified by service-trained personnel. If necessary, return the product to a Keysight Sales and Service Office for service and repair to ensure the safety features are maintained. - Page 8 DO NOT substitute parts or modify equipment: Because of the danger of introducing additional hazards, do not install substitute parts or perform any unauthorized modification to the product. Return the product to a Keysight Sales and Service Office for service and repair to ensure the safety features are maintained.
-
Page 9: Regulatory Information
This statement is provided to comply with the requirements of the German Sound DIN 45635 T. 19 (Typprufung). – Sound Pressure LpA < 70 dB. – At operator position. – Normal operation. – According to ISO 7779 (Type Test). Keysight N1911A and N1912A Installation Guide... -
Page 10: Regulatory Markings
This affixed product label leak or deteriorate during normal use. indicates that you must not discard Forty years is the expected useful life this electrical or electronic product in of the product. domestic household waste. Keysight N1911A and N1912A Installation Guide... -
Page 11: Waste Electrical And Electronic Equipment (Weee) Directive 2002/96/ Ec
To return this unwanted instrument, contact your nearest Keysight Service Center, or visit http://about.keysight.com/en/companyinfo/environment/takeback.shtml for more information. Sales and Technical Support To contact Keysight for sales and technical support, refer to the support links on the following Keysight websites: – www.keysight.com/find/powermeter (product-specific information and support, software and documentation updates) –... -
Page 12: Compliance And Markings
Use, and has been supplied in a safe condition. The instruction documentation contains information and warnings which must be followed by the user to ensure safe operation and to maintain the instrument in a safe condition. Keysight N1911A and N1912A Installation Guide... -
Page 13: Table Of Contents
........9 Keysight N1911A and N1912A Installation Guide... - Page 14 Rack mounting two meters together (using the Option 909 rack mount kit) ..... 37 Characteristics and Specifications Keysight N1911A and N1912A Installation Guide...
-
Page 15: Keysight N1911A And N1912A Installation Guide
Typical manual entry LAN network interface ..30 Figure 1-6 Typical GPIB remote interface ....33 Keysight N1911A and N1912A Installation Guide... - Page 16 THIS PAGE HAS BEEN INTENTIONALLY LEFT BLANK. Keysight N1911A and N1912A Installation Guide...
-
Page 17: Getting Started
Keysight N1911A and N1912A P-Series Power Meters Installation Guide Getting Started Welcome Documentation Information For more detailed operating information, refer to the P-Series power meter user’s guide and programming guide. -
Page 18: Welcome
If there is mechanical damage, notify the nearest Keysight Technologies office. Keep the damaged shipping materials (if any) for inspection by the carrier and a Keysight representative. If required, you can find the “Sales and Technical Support”... -
Page 19: Documentation Information
This guide is only part of the information supplied. The documentation consists of: – The installation guide (this book) - Shows you how to check your power meter, switch it on and connect it to a Keysight power sensor. This information is presented in English and Japanese. -
Page 20: Conventions Used In This Guide
This is used to represent a parameter, value, or title. This user’s guide describes the operation for both the single channel and the dual channel power meter. To identify channels on a dual channel meter a Channel softkey on an N1911A meter becomes Channel A Channel B “Channel”... -
Page 21: Power Meter And Sensor Capability
Falling Edge Trigger [a] Not applicable for N8480 Series power sensors with Option CFT. Specifications For the characteristics and specifications of the N1911A and N1912A P-Series Power Meters, refer to the datasheet at http://literature.cdn.keysight.com/litweb/pdf/5989-2471EN.pdf Keysight N1911A and N1912A Installation Guide... -
Page 22: Adjusting The Carrying Handle
Pull the handle outwards, rotate it to the required position and release it into one of the three locks. If you want to remove the handle, refer to “Rack Mounting the Power Meter” page 34. Keysight N1911A and N1912A Installation Guide... -
Page 23: Turning The Power Meter On
The instrument has an autoranging power supply. Ensure the supply voltage is within the range 100 V to 240 V and 50 Hz to 60 Hz and 440 Hz. 1 Connect the power cord. 2 Check that the background LED is red. Keysight N1911A and N1912A Installation Guide... - Page 24 Single channel Dual channel If the meter has been stored in extremely cold conditions, beyond its normal NOTE operating range, the display may require a few minutes to warm up and operate normally. Keysight N1911A and N1912A Installation Guide...
-
Page 25: What Can Go Wrong
If there are any self-test failures the meter is defective. Contact your Fails sel f test(s) nearest Keysight Service Center (Refer to “Sales and Technical Support” on page 11). 5 Line input fuse and spare. In-line fuse Spare fuse Keysight N1911A and N1912A Installation Guide... -
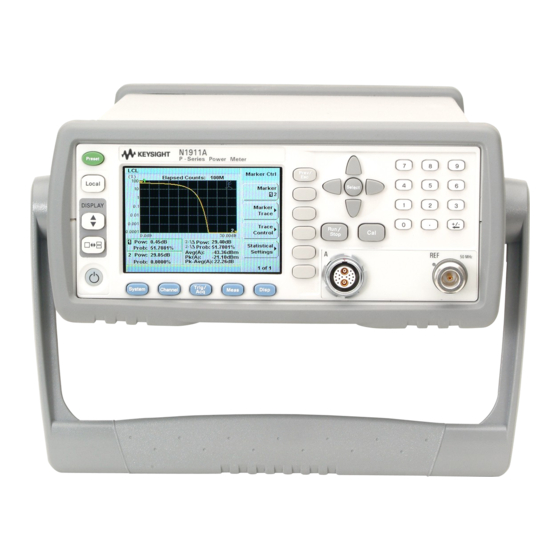
Page 26: Front Panel Keys And Connections
Press this key to switch the meter between on and standby. When power is supplied, the background LED is red. Pressing the key, switches the power meter on and the background LED is green. Keysight N1911A and N1912A Installation Guide... - Page 27 Use this key to configure the selected measurement. Press this key to access the measurement display menu. You can choose the displayed measurement resolution, units and display format. Use this key together with to configure measurement displays. Keysight N1911A and N1912A Installation Guide...
- Page 28 For example, a 1 of 2 is displayed beside the key indicating the first page of a two page menu. Press the key to access the next page or second page. (A 2 of 2 is displayed). Keysight N1911A and N1912A Installation Guide...
- Page 29 Refer to the user’s guide for more information. Press these keys to enter numeric values in the pop-up fields, for example, the offset values. To complete the entry use the softkey. Refer to the user’s guide for more information. Keysight N1911A and N1912A Installation Guide...
- Page 30 The green LED beside the connector is lit when the calibrator is turned on. The sensor input connectors (N1912A shown, the N1911A has one input). If the meter is configured with Option 003, the connectors are fitted to the rear panel.
-
Page 31: Connecting A Power Sensor
Ensure you line up the red dots on the sensor cable and power meter’s connector 2 Confirm a reading sensor pop-up message appears briefly. 3 Confirm the display has changed to a measurement reading. Dual channel Keysight N1911A and N1912A Installation Guide... -
Page 32: E-Series, 8480 And N8480 Series Sensor Models
E-Series, 8480 and N8480 Series sensor models Using the N1917A/B/C/D cable, any Keysight 8480, N8480 Series or E-Series power sensor can be connected to the N1911A or N1912A power meters. The following shows the procedure for single channel meters configured with front panel mounted POWER REF and CHANNEL connectors. - Page 33 8480 Series power sensor. 4 Confirm the display has changed to a measurement reading. Diagram shows display with an E-Series E9320 power sensor connected. Single channel 5 Connect the sensor to the POWER REF connector. Keysight N1911A and N1912A Installation Guide...
- Page 34 Zero + Cal A Zero + Cal B The Zeroing pop-up is displayed during the zeroing process, the Calibrating pop-up during calibration. The meter-sensor measurement path is calibrated when the Calibrating pop-up disappears. Keysight N1911A and N1912A Installation Guide...
-
Page 35: Rear Panel Connections
Getting Started Rear Panel Connections The following connections are available on the rear panel. To setup the remote interfaces, refer to “Remote Interface Configurations” on page 23. 1 GPIB 2 LAN 3 USB Keysight N1911A and N1912A Installation Guide... - Page 36 Getting Started 4 Trigger Input and Output connections are made via BNC connectors 5 Recorder output (two outputs are fitted to dual channel meters) connections are made via BNC connectors. Keysight N1911A and N1912A Installation Guide...
-
Page 37: Remote Interface Configurations
To connect the power meter to your PC, configure and verify your connection, NOTE you can use the Keysight IO Libraries Suite, the E2094M Keysight IO Libraries for Windows, or an equivalent. – Keysight IO Libraries Suite for Windows 98/2000/ME/XP. For information and to install, use the Automation-Ready CD with Keysight IO Libraries Suite which is shipped with the power meter. -
Page 38: Figure 1-1 Example Of Initial Connection Windows
“Remote Interface Configurations” on page 23 for information about the Keysight IO Libraries software. If you have installed other I/O software, refer to documentation that accompanies the software. 1 After I/O software is installed on your computer, connect your P-Series power meter to your PC using the supplied Type A - Mini 5 pin USB cable. -
Page 39: Figure 1-2 Usb Configuration Complete
5 You can use Connection Expert in the IO Libraries Suite to check instrument identification. 6 Now you can use various programming environments to control the power meter. For an overview about programming the power meter via USB, refer to the connectivity guide and the programming guide. Keysight N1911A and N1912A Installation Guide... -
Page 40: Lan
LAN-enabled instruments are not connected to a site LAN. Select the LAN network type you will use to connect the power meter to your computer. Then follow the procedure that corresponds to your selected LAN network type. Keysight N1911A and N1912A Installation Guide... -
Page 41: Figure 1-3 Typical Lan Remote Interface
To enable DHCP operation using the arrow and Select keys to highlight and check DHCP is checked. Figure 1-3 Typical LAN remote interface If your LAN does not support DHCP, refer to the connectivity guide. NOTE Keysight N1911A and N1912A Installation Guide... -
Page 42: Figure 1-4 Lan Network Restart Pop-Up
If you have installed other I/O software, refer to documentation that NOTE accompanies the software. 9 You can use various programming environments to control the power meter. For an overview about programming instruments via LAN, refer to the connectivity guide. Keysight N1911A and N1912A Installation Guide... - Page 43 If you have installed other I/O software, refer to documentation that NOTE accompanies the software. 9 You can use various programming environments to control the power meter. For an overview about programming instruments via LAN, refer to the connectivity guide. Keysight N1911A and N1912A Installation Guide...
-
Page 44: Figure 1-5 Typical Manual Entry Lan Network Interface
The values can range between 0.0.0.0 and 255.255.255.255. Figure 1-5 Typical manual entry LAN network interface 4 Press , to return to the Remote Interface display. 5 Press Restart Network Keysight N1911A and N1912A Installation Guide... - Page 45 For an overview about programming instruments via LAN, refer to the connectivity guide. Configuring the LAN remotely To automatically configure the LAN settings enable DHCP operation using the SYSTem:COMMunicate:LAN:DHCP[:STATe] command. To individually specify the settings use the SYSTem:COMMuniucate:LAN:ADDRess, SYSTem:COMMunicate:LAN:SMASk, SYSTem:COMMunicate:LAN:DGATeway, SYSTem:COMMunicate:LAN:AIP[:STATe], and SYSTem:COMMunicate:LAN:RESTart commands. Keysight N1911A and N1912A Installation Guide...
- Page 46 6 You can use various programming environments to control the power meter. For further information, refer to your GPIB card vendor’s guide. Refer to the refer to the connectivity guide and the programming guide for an overview about programming the power meter. Keysight N1911A and N1912A Installation Guide...
-
Page 47: Figure 1-6 Typical Gpib Remote Interface
GPIB address in the Pop-up. 4 Press the Enter key To change the address remotely. You can set/query the GPIB address remotely using the following command SYSTem:COMMunicate:GPIB:ADDRess. Keysight N1911A and N1912A Installation Guide... -
Page 48: Rack Mounting The Power Meter
When installing the power meter in a cabinet, the convection into and out of the power meter must not be restricted. If the total power dissipated in the cabinet is greater than 800 Watts, then forced convection must be used. Keysight N1911A and N1912A Installation Guide... -
Page 49: Rack Mounting One Meter (Using The Option 908 Rack Mount Kit)
Getting Started Rack mounting one meter (using the Option 908 rack mount kit) 1 Remove the carrying handle. 2 Remove the front and rear rubber bumpers. Keysight N1911A and N1912A Installation Guide... - Page 50 Getting Started 3 Fit the rack mount flanges. (Parts available separately: 5063-9240). 4 Ready for installation. Keysight N1911A and N1912A Installation Guide...
-
Page 51: Rack Mounting Two Meters Together (Using The Option 909 Rack Mount Kit)
Getting Started Rack mounting two meters together (using the Option 909 rack mount kit) 1 Remove the carrying handle. 2 Remove the front and rear rubber bumpers. 3 Hardware required to link meters together. Keysight N1911A and N1912A Installation Guide... - Page 52 4 Fit one small rack mounting flange to opposite sides of each power meter. (Parts available separately: 5061-9694 and 5063-9212). 5 Fit two front linking plates to each power meter. 6 Engage the linking plates at the front of the power meters. Keysight N1911A and N1912A Installation Guide...
- Page 53 Getting Started 7 Attach the rear linking brackets. Ready for installation. Keysight N1911A and N1912A Installation Guide...
- Page 54 Getting Started THIS PAGE HAS BEEN INTENTIONALLY LEFT BLANK. Keysight N1911A and N1912A Installation Guide...
- Page 55 Keysight N1911A and N1912A P-Series Power Meters Installation Guide Characteristics and Specifications For the characteristics and specifications of the N1911A and N1912A P-Series Power Meters, refer to the datasheet at http://literature.cdn.keysight.com/litweb/pdf/5989-2471EN.pdf.
- Page 56 Characteristics and Specifications THIS PAGE HAS BEEN INTENTIONALLY LEFT BLANK. Keysight N1911A and N1912A Installation Guide...
- Page 57 This information is subject to change without notice. Always refer to the English version at the Keysight website for the latest revision. © Keysight Technologies 2005-2017 Edition 9, September 8, 2017 Printed in Malaysia *N1912-90009* N1912-90009 www.keysight.com...
Need help?
Do you have a question about the N1911A and is the answer not in the manual?
Questions and answers