Minelab EQUINOX 600 Instruction Manual
Hide thumbs
Also See for EQUINOX 600:
- Getting started manual (2 pages) ,
- Getting started manual (2 pages)
Table of Contents
Advertisement
Quick Links
Advertisement
Table of Contents

Related Manuals for Minelab EQUINOX 600


Summary of Contents for Minelab EQUINOX 600
- Page 1 Instruction Manual...
-
Page 2: Code Of Ethics
By getting to know your EQUINOX detector you can become one of the many who find coins, treasure, artefacts, gold nuggets and more on a regular basis. Metal Detecting The EQUINOX is a high-performance detector incorporating Minelab’s new Multi-IQ Code of Ethics technology. With the assistance of this Instruction Manual, and the accompanying Getting Started Guide, you will quickly learn how to set up your detector for the best results. -
Page 3: Table Of Contents
Contents Target Tone Assembly & Getting Started Detect Screen Functions Selecting the Number of Target Tones Tone Pitch (Advanced Setting) Carton Contents Frequency Adjusting Tone Pitch: 1, 2, or 5 Tones Changing the Frequency Assembly Adjusting Tone Pitch: 50 Tones Single Frequency Operation Frequencies and Detect Modes Assembled Detector... - Page 4 Contents Assembly & Getting Started This section will show you how to assemble your EQUINOX Series detector, charge the battery, and will introduce you to the control panel.
-
Page 5: Carton Contents
The EQUINOX 800 comes with additional accessories for even greater versatility. For a list of the main accessories that are compatible with your detector, read 'EQUINOX Accessories' on page 60. Go online to see the full range at www.minelab.com/equinox-accessories. Armrest Armrest strap EQX 11 Double-D smart coil... -
Page 6: Assembly
Contents Assembly | 6 Assembly Follow these easy steps to assemble your EQUINOX Series detector. Attach coil to lower shaft 1. Insert the two yoke washers into the holes on either side of the yoke. 2. Slide the yoke into the yoke bracket on top of the coil. Ensure that the spring loaded pin in the lower shaft is underneath. -
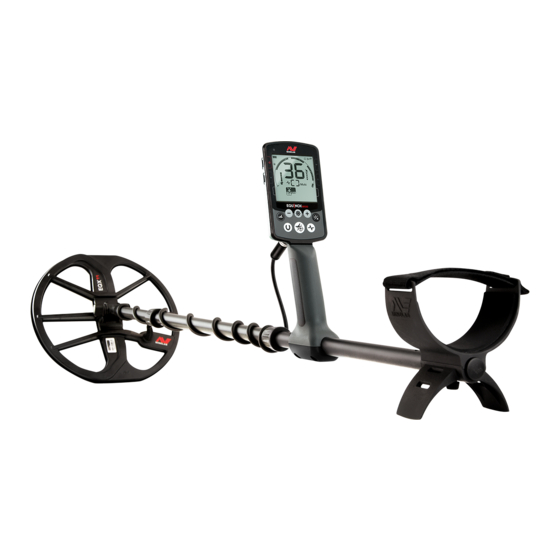
Page 7: Assembled Detector
Contents Assembled Detector | 7 Assembled Detector Once you have assembled your EQUINOX it should look like the below. The major parts listed are referred to throughout this Instruction Manual. Armrest Stand Armrest strap Attachment points Upper shaft Handle (With internal Lithium-ion Control unit (rear view) rechargeable battery) Side buttons... -
Page 8: Detector Battery
Contents Detector Battery | 8 Detector Battery The EQUINOX detector is powered by an internal Lithium-ion battery. Read 'Battery Charging Recommendations' on page 62 for important safety information. For instructions on how to charge the WM 08 Wireless Audio Module read page 55. -
Page 9: Control Panel
Contents Control Panel | 9 Control Panel The EQUINOX control panel has a large monochrome LCD with a backlight, a keypad, and side buttons. These display and control all of the detector functions. Charge Status LED LCD Screen Wireless Audio Button Shows the charge status of the detector Large monochrome LCD with backlight. -
Page 10: Lcd Icons
Contents LCD Icons | 10 LCD Icons All of the information you need to see during detecting and when adjusting your detector settings is displayed on the large LCD in the control panel. Battery Status Indicator Beach Overload Indicator Pinpoint Audio Connectivity Displays the charge level of the Indicates an automatically... -
Page 11: Quick Start
Contents Quick Start | 11 Quick Start EQUINOX is so easy to use, even a beginner can successfully begin detecting right out of the box! There are just 4 easy steps to get started. Before first use, it is recommended that you fully charge the battery for 4 hours (page 8). Turn On Press the Power button on the side of the control panel. -
Page 12: Global And Local Settings
Contents Global and Local Settings | 12 Global and Local Settings When you are adjusting Settings and Advanced Settings, the icons of affected Detect Modes will appear on the LCD. Global Settings Global and Local Settings Reference Adjustments to some Settings Frequency Local and Advanced Settings are... -
Page 13: Detecting Basics
Contents Detecting Basics This section contains great information for both new and experienced detectorists. It explains basic detecting principles and techniques. You can learn how to set up your detector for maximum comfort and ease of use. -
Page 14: How Detectors Work
The detector’s search coil senses this receive signal and alerts the user by producing a target response. Minelab metal detectors are also capable of discriminating (or differentiating) between different target types and can be set to ignore unwanted targets. -
Page 15: Key Detecting Concepts
EQUINOX has different Detect Modes (Park, Field, Beach, Gold*) to information. cope with typical ground conditions. Find out more about the EQUINOX Multi-IQ technology on Minelab Treasure Talk blog. A Ground Balance setting is also available, read 'Ground Balance' on page 40 for further information. -
Page 16: Detecting Technique
Contents Detecting Technique | 16 Detecting Technique Correct detecting technique is important to get the most out of your detector. The techniques described will give you the best chance of success. Though the coil assembly is rigid and durable, sudden jolts or Holding the Detector bangs may cause random signals and inaccurate Target IDs, as well Insert your arm through the armrest and... -
Page 17: Detector Sounds
Contents Detector Sounds | 17 Detector Sounds The EQUINOX produces a variety of different sounds for target and environmental signals and various detector functions. EMI can also be received from other metal detectors operating Targets nearby. Always detect a minimum of 15 metres (45-feet) away from A target signal is the sound produced by the detector when any other detectors. -
Page 18: Simple Detecting Exercise
Contents Simple Detecting Exercise | 18 Simple Detecting Exercise Before attempting to find real targets, it is important to understand how to interpret the audio and visual signals of the detector. 1. Gather a collection of different metal objects, e.g. various coins, gold and silver jewellery, a nail, a pull-tab, a brass button and aluminium foil. -
Page 19: Pinpointing Technique
Contents Pinpointing Technique | 19 Pinpointing Technique A good pinpointing technique helps you to quickly narrow down the location of a buried target, allowing you to determine its exact location before digging. Pinpointing a Target Manually By combining a good pinpointing technique with the EQUINOX Pinpoint function, you will be able to accurately locate a buried 1. -
Page 20: Target Recovery
Be sure not to wear rings, bracelets or a watch, as they will produce a signal when you are recovering targets. A Minelab PRO-FIND Series pinpointer is another useful tool for quickly narrowing down the location of a buried target within a hole. -
Page 21: Detect Modes
Contents Detect Modes EQUINOX is equally adaptable for all target types and ground conditions… just select your detecting location and go! Detect Modes are based on common detecting locations, making it easy for anybody to confidently choose the right Mode for their detecting session. This section explains the differences between the Detect Modes, and includes some great tips to help you master each Mode. -
Page 22: Detect Modes
Contents Detect Modes | 22 Detect Modes EQUINOX Series redefines all-purpose detecting, with Detect Modes that are based on common detecting locations. Simply select the best match and begin detecting. EQUINOX Series features Detect Modes, each representing a Adjusting Search Profiles common detecting use: Park, Field, Beach, and Gold*. -
Page 23: Park
Contents Park | 23 Park Great for high-trash recreational areas, including most general detecting. Park Mode is for searching in urban parks, or other recently inhabited sites where there may be coins and jewellery. There is often also lots of common metal litter including aluminium foil, pull-tabs, bottle-caps etc. Park Mode is a good starting point for other general uses, such as freshwater detecting, or use for artefact hunting by accepting all ferrous Target IDs. -
Page 24: Field
Contents Field | 24 Field Ideal for detecting in historical fields for the widest range of target sizes. Field Mode is for searching open pasture, cropped or ploughed fields and historically occupied sites. These environments generally contain ferrous trash and coke from previous human occupation. In highly infested sites, Field Mode is well suited for rejecting coke and detecting hammered coins and ancient artefacts amongst the iron trash. -
Page 25: Beach
Contents Beach | 25 Beach Optimised for all salty conditions – dry sand, wet sand, surf, underwater. Beach Mode is for salt water beaches including dry sand, wet sand, surf and underwater conditions. The salt that is typically present causes the sand and water to be very conductive, causing salt noise to be detected. Multi-IQ is better able to reduce this noise than any single-frequency can. -
Page 26: Gold
Contents Gold* | 26 Gold* Best suited for gold nugget prospecting in mineralised goldfield locations. Gold Mode* is for gold nugget prospecting. Generally, gold nuggets are found in remote goldfields where targets are more sparsely located. Gold Mode* uses a special audio that has a continuous sound, with more subtle variation than the other Detect Modes. This audio signal begins when the coil first approaches the target and then continues until the coil moves away. - Page 27 Contents Detect Screen Functions The Detect Screen will be displayed while you are actively detecting. Key detecting information can be viewed and adjusted on-the-go. Detect Screen functions are the detector settings or status displays that are accessible when you are in the Detect Screen.
-
Page 28: Frequency
Contents Frequency | 28 Frequency With EQUINOX you can operate across a wide spectrum of frequencies simultaneously for maximum results, or you can operate in a single frequency. Frequencies and Detect Modes EQUINOX Series detectors have simultaneous multi-frequency capability with a technology called Multi-IQ, as well as a selection The EQUINOX Detect Modes have different selections of Multi and of single frequencies. -
Page 29: Multi-Iq Technology
SMALL GOLD * 20 kHz and 40 kHz are not available as single operating frequencies in EQUINOX 600. The Multi-IQ frequency range shown applies to both EQUINOX 600 and 800. This diagram is representative only. Actual sensitivity levels will depend upon target types and sizes, ground conditions and detector settings. -
Page 30: Target Id & Discrimination
Contents Target ID & Discrimination | 30 Target ID & Discrimination A detected target is shown as both a number and a segment on a scale. These indicate its ferrous or non-ferrous properties for quick and easy identification. Target ID Discrimination Scale As the coil is swept over a target, the detector digitally processes This circular scale corresponds to the 50 Target IDs, grouped... -
Page 31: Typical Target Examples
Contents Target ID & Discrimination | 31 Typical Target Examples While both the Target ID numbers and Discrimination Scale give a good representation of a target’s ferrous and non-ferrous properties, desired and undesired targets can fall anywhere within the overall range from -9 to 40. Here are some common examples for good and bad targets, showing the Tone Regions where they will likely be detected. -
Page 32: Backlight
Backlight | 32 Backlight The EQUINOX LCD has a backlight for improved screen contrast in poor light conditions. EQUINOX 600 has 2 backlight level settings, Off and High. EQUINOX 800 has 4 backlight level settings, Off, High, Medium, and Low. -
Page 33: User Profile
Contents User Profile* | 33 User Profile* EQUINOX 800 features an additional User Profile side button that saves a copy of the current detector settings for future quick access. User Profile stores the set values of all current local settings so that you can access them instantly later. -
Page 34: Sensitivity
Contents Sensitivity | 34 Sensitivity EQUINOX is highly sensitive and has 25 Sensitivity levels. It is important to set the correct Sensitivity level for your detecting conditions. Recommended Sensitivity Settings Sensitivity adjusts the detector’s level of response to targets and the environment by controlling the amount of amplification Some experimentation with the Sensitivity level may be required applied to signals received by the detector (sometimes called Rx... -
Page 35: Depth Gauge
Contents Depth Gauge | 35 Depth Gauge The Depth Gauge indicates the approximate relative depth of a detected target. The Depth Gauge is a guide only; fewer arrows indicate a shallower target, more arrows indicate a deeper target. The accuracy can vary depending on the target type and ground conditions. -
Page 36: Pinpoint
Contents Pinpoint | 36 Pinpoint Switching to Pinpoint when you find a target activates the target signal strength visualisation on the Discrimination Scale to help you accurately locate the buried target. Pinpointing a Target With Pinpoint enabled, the discrimination pattern is temporarily disabled so that EQUINOX will detect all metals. -
Page 37: Settings Menu
Contents Settings Menu The Settings Menu contains many adjustable settings for improving performance. You can adjust Noise Cancel, Ground Balance, Volume, Target Tones and more…... -
Page 38: Settings Menu
The Settings Menu remembers if an Advanced Setting was last accessed and will return you to that setting next time the Settings Tone Pitch button is pressed. Tone Break Iron Bias Threshold Pitch is not available in the EQUINOX 600. -
Page 39: Noise Cancel
Discrimination Scale indicates progress. Reject button to initiate Auto Noise Cancel. Auto Noise Cancel can also be initiated on the EQUINOX 600 by pressing the Minus (–) or Plus (+) buttons. 4. During the Auto Noise Cancel process the Discrimination Scale... -
Page 40: Ground Balance
Contents Ground Balance | 40 Ground Balance Ground Balance reduces noise caused by ground mineralisation, allowing good targets to be detected more clearly. Auto Ground Balance The Ground Balance setting calibrates the detector to the local ground in order to eliminate the false signals caused by With Auto Ground Balance, the detector automatically determines mineralisation. -
Page 41: Tracking Ground Balance
Contents Ground Balance | 41 Tracking Ground Balance When Tracking Ground Balance is active, the detector continuously adjusts the Ground Balance automatically during detecting. This ensures that Ground Balance is always set correctly. Tracking Ground Balance is the default and recommended method for Gold Mode. -
Page 42: Volume Adjust
Contents Volume Adjust | 42 Volume Adjust The Volume Adjust setting controls the level of all detector sounds to make them louder or more quiet. Volume Adjust changes the loudness of all detector audio, including detection signals, the threshold tone, and confirmation tones. -
Page 43: Tone Volume (Advanced Setting)
Regions can be adjusted depending on the selected Target Tone setting. When adjusting the Tone Volume setting, press the Only the ferrous tone (t1) can be adjusted on the EQUINOX 600. Accept/Reject button to advance to the next Tone 5. Repeat until all Tone Regions have been adjusted. -
Page 44: Threshold Level
With the EQUINOX 800, the pitch of the Threshold tone can be Minelab recommends using a Threshold Level setting of 0 (off ) for set higher or lower via the Threshold Pitch Advanced Setting Park, Field and Beach applications, unless you want to hear audio (page 45). -
Page 45: Threshold Pitch* (Advanced Setting)
Contents Threshold Pitch* (Advanced Setting) | 45 Threshold Pitch* (Advanced Setting) This EQUINOX 800 Advanced Setting allows you to set the threshold tone to be higher or lower pitched. Set the level to the most comfortable pitch for your hearing. Threshold Pitch allows you to adjust the audio pitch of the Threshold tone. -
Page 46: Target Tone
Contents Target Tone | 46 Target Tone The Target Tone Setting controls the number of different tones you will hear for different types of targets and the number of adjustable Tone Regions for Advanced Settings. Target Tone allows you to divide the Target ID range Examples showing the default Tone Region end positions for Park Mode. -
Page 47: Tone Pitch (Advanced Setting)
1, 20 Tone Pitch is not available in Gold Mode*. 1, 6, 12, 18, 25 EQUINOX 600 allows only the first Tone Pitch to be adjusted. 1, 20 EQUINOX 800 allows all Tone Pitches to be adjusted. Adjusting Tone Pitch: 1, 2, or 5 Tones 1. -
Page 48: Adjusting Tone Pitch: 50 Tones
Contents Tone Pitch (Advanced Setting) | 48 Adjusting Tone Pitch: 50 Tones The Tone Pitch setting of When a Target Tone setting of 50 is selected for a Search 1, 24 represented on the t2: 500 Hz Discrimination Scale when the Profile, the Tone Pitch Advanced Setting behaves Tone Break setting is -5. -
Page 49: Accept/Reject
Contents Accept/Reject | 49 Accept/Reject You can create your own discrimination patterns to detect or ignore specific target types, so you can dig more treasure and less trash. Accepting/Rejecting Detected Targets Targets are represented by both a Target ID number and an individual segment on the Discrimination Scale (page 30). -
Page 50: Tone Break (Advanced Setting)
Adjusting Tone Break Number of Tones Park | Beach Field EQUINOX 600 allows only the ferrous Tone Break position (t1) to be 0, 10, 20, 30 2, 10, 20, 30 adjusted. EQUINOX 800 allows 4 Tone Break positions (t1, t2, t3, t4) to be adjusted. -
Page 51: Recovery Speed
Recovery Speed settings. EQUINOX 600 has 3 Target Recovery Speeds, and EQUINOX 800 has 8 1. Use the Settings button to navigate to Recovery Speed in the recovery speeds. -
Page 52: Iron Bias (Advanced Setting)
The following shows the equivalent Iron Bias settings between the non-ferrous response. Also, a ferrous target adjacent to a non- two models. EQUINOX 600 offers fewer adjustment increments and ferrous target can produce a similar response. a lower maximum Iron Bias than the 800 model. -
Page 53: Detector Audio
Contents Detector Audio EQUINOX Series detectors have many audio options to suit any preference and detecting situation. Wireless headphones can be used with the EQUINOX Series. EQUINOX is compatible with Bluetooth® aptX™ Low Latency and Minelab's super-fast Wi-Stream audio technology. -
Page 54: Audio Options
17 ms 40 ms, giving a faster detection response. Series detector. between EQUINOX and the WM 08 Wireless Minelab ML 80* headphones use aptX™ However, Bluetooth® technology has a Module. Low Latency technology, and will deliver high audio latency of 100 ms. -
Page 55: Wm 08 Wireless Audio Module
4 devices connected When WM 08 is not in use, ensure that the plastic dust-cap is screwed firmly into the headphone socket. EQUINOX is not compatible with Minelab WM 10 and Charging the WM 08 WM 12 wireless audio modules. Avoid having the WM 08 in close proximity to other Going detecting with a fully charged WM 08 battery is wireless electronic devices e.g. -
Page 56: Ml 80 Wireless Headphones
EQUINOX 800 is supplied with Minelab ML 80 Bluetooth® aptX™ Low Latency headphones. These headphones are also available A short press of the Wireless button when wireless is active will separately as an accessory and are compatible with EQUINOX 600. switch Wireless off. Wireless Headphone Connection Icons... -
Page 57: Ml 80 Factory Reset
Contents ML 80 Wireless Headphones | 57 ML 80 Factory Reset End a Call Factory Reset will return the headphones to factory presets, and Press the Multi-Function button to end a call. will unpair all paired wireless devices. Transfer a Call 1. Turn the headphones off. Press the Multi-Function button for 1 second, until a beep is 2. -
Page 58: Wired Headphones
Connecting Wired Headphones Connecting Waterproof Headphones The EQUINOX 600 is supplied with wired Both EQUINOX 600 and 800 are waterproof, headphones. Any standard 3.5 mm (1/8-inch) and can be fully submerged to a depth of 3 headphones can also be connected to metres (10-feet). - Page 59 Contents Care & Safety This section contains supplementary information on how to look after your EQUINOX, along with product technical specifications.
-
Page 60: Equinox Accessories
EQX 11 Double-D Smart Coil | Part No. 3011-0334 (Standard EQUINOX 600 | 800 coil) The waterproof 11-inch round Double-D coil has good all-round performance for general detecting. It provides a good balance between sensitivity, weight, and ground coverage. -
Page 61: Maintenance & Safety
Contents Maintenance & Safety | 61 Maintenance & Safety The EQUINOX is a high-quality electronic instrument, finely engineered and packaged in a durable housing. Taking proper care of your detector is vital to ensure its ongoing reliability. • Ensure the coil cable is in good condition and not subject to General Detector and Accessories Care undue stress. -
Page 62: Battery Charging Recommendations
In no event shall Minelab Electronics Pty Ltd (Minelab) or any of its related entities be liable for any direct, indirect, incidental, special, consequential damages or loss, to property or life, whatsoever arising out of or connected with the charging of a Minelab EQUINOX unit with a charging accessory that does meet relevant CE, C-Tick, EAC, UL/ETL or other in-country compliance regulations, or is not of the quality and certified standard as described in this recommendation. -
Page 63: Factory Presets
Contents Factory Presets | 63 Factory Presets The factory preset detector settings are optimised for ease of use. They will help you start detecting successfully with minimal adjustment. Detect Mode Search Profiles Park 1 Park 2 Field 1 Field 2 Beach 1 Beach 2 Gold 1*... -
Page 64: Troubleshooting
Contents Troubleshooting | 64 Troubleshooting If you experience any of the listed problems, try the recommended actions first before contacting an Authorised Service Centre. Problem Recommended Action 1. Connect the EQUINOX USB charger to the detector and a power source. If the detector functions then the Detector does not turn on detector is OK. -
Page 65: Error Codes
Contents Error Codes | 65 Error Codes Some detector faults will display an error code on the Target ID Display. Error Code Recommended Action 1. Check that the coil connector is connected properly at the back of the control unit. 2. -
Page 66: Technical Specifications
Bluetooth® aptX™ Low Latency Other Accessories USB Charging cable, Multi Language Screen protectors Software Upgradeable Yes, via USB connection (Windows and Mac OS) Register your product warranty online at register.minelab.com. Warranty Please refer to www.minelab.com/warranty-conditions for full warranty terms and conditions. -
Page 67: Software Updates
0°C to +40°C (+32°F to +104°F) Waterproof Wireless Technologies Wi-Stream™ Software Upgradeable Detector Compatibility EQUINOX Series Register your product warranty online at register.minelab.com. Please refer Warranty to www.minelab.com/warranty-conditions for full warranty terms and conditions. ML 80 Wireless Headphones Specification Bluetooth® Version V4.1 •... - Page 68 (in this manual) from the exact Model that you purchased. Rules. These limits are designed to provide reasonable protection In addition, Minelab reserves the right to respond to ongoing against harmful interference in a residential installation. technical progress by introducing changes in design, equipment This equipment generates, uses and can radiate radio frequency and technical features at any time.
- Page 69 Australia & Asia Pacific Europe & Russia North, South & Central America Middle East & Africa + 61 8 8238 0888 +353 21 423 2352 +1 630 401 8150 +971 4 254 9995 minelab@minelab.com.au minelab@minelab.ie minelab@minelab.com minelab@minelab.ae...
Need help?
Do you have a question about the EQUINOX 600 and is the answer not in the manual?
Questions and answers