Advertisement
Advertisement
Table of Contents

Related Manuals for CHC LT500H


Summary of Contents for CHC LT500H
- Page 1 LT500 S ERIES ETTING TARTED UIDE GNSS H ANDHELD ECEIVER...
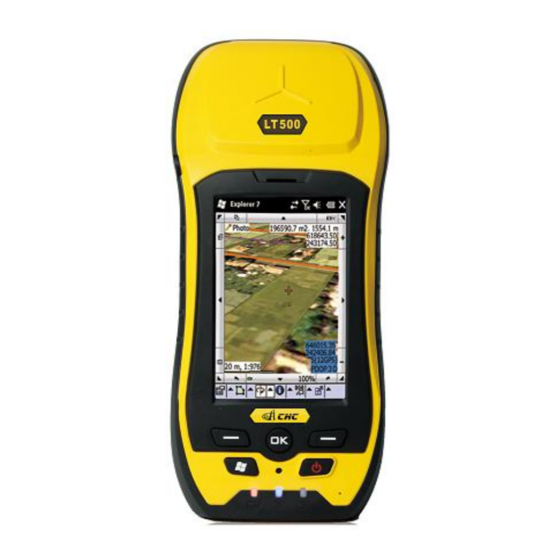
- Page 2 CONTENTS Introduction.............................. 2 1.1. Technical Assistance.........................2 1.2. Your Comments........................2 1.3. Safety Information........................2 1.4. Warning and Cautions......................2 1.5. Use and Care..........................3 Overview..............................4 2.1. Features........................... 4 2.2. Specifications........................... 4 Description..............................6 3.1. Front View..........................6 3.2. Rear View..........................9 3.3. Bottom View..........................
-
Page 3: Introduction
1. I NTRODUCTION Thank you for choosing CHC LT500 Series GNSS Handheld Receiver. This Getting Started Guide will provide useful information about your receiver. It will also guide you through your first steps of using LT500 Series in the field. - Page 4 1.5. U SE AND The LT500 Series is designed to withstand the rough environment that typically occurs in the field. However, the LT500 Series is high-precision electronic equipment and should be treated with reasonable care. Page 3...
-
Page 5: Specifications
VERVIEW 2.1. F EATURES The CHC LT500 Series offers 3 different options to meet requirements of various applications with adoption of Windows Mobile® WEHH operating system. Featuring with outstanding specifications and cutting-edge technologies integrating with gyro, laser alignment and accelerometer, the LT500 series makes your work more efficient. - Page 6 System configuration Windows Mobile® WEHH operation system 4.3” sunlight readable screen Resolution: 480 X 800 pixel Processor: 1 GHz Memory: Internal 512 MB RAM and 16 GB internal flash storage External Micro SD card slot up to 32 GB ...
-
Page 7: Description
3. D ESCRIPTION 3.1. F RONT GNSS Antenna External Antenna Connector Speaker Touch Screen Microphone Page 6... - Page 8 Left Function Key Right Function Key OK Key Windows Button Power Button Reset Key Wi-Fi Indicator Power Indicator Satellite Indicator Power Button Turn ON: Press the button for 1-2 seconds, the Power Indicator will turn on and the boot screen will appear, and then the LT500 will enter the operation system after 30 seconds.
- Page 9 Right Function Key This key is a shortcut key to the pre-set function or menu. Power Indicator (Red) The indicator turns ON when LT500 is turned on and OFF when the LT500 is powered off. Satellite Indicator (Blue) ...
- Page 10 3.2. R Camera Centering Laser Bracer Point-touch Pen Page 9...
- Page 11 3.3. B OTTOM TF Card Slot USB Port SIM Card Slot Battery Slot Latch Catch of Battery Power Port of Battery Battery Page 10...
-
Page 12: Bottom View
4. F IRST PERATION 4.1. I SIM C NSERT THE TORAGE ARD AND ATTERY Refer 3.3 Bottom View to find the SIM card and storage card slot, and then insert the cards into slots correctly. Insert the battery into the battery slot until the latch catch of the battery fix the battery to the device. - Page 13 4.6. E (GPRS/ W STABLISH IRELESS ONNECTION LUETOOTH First of all, Press the Windows Button or tap the windows icon → [Settings] → [Connections] → [Wireless Manager] turn Bluetooth/Phone/Wi-Fi function. NOTE: The function of Wi-Fi may not available when the device is being connected with PC which is connected to the Internet by USB data cable.
-
Page 14: Install Software
Using Bluetooth Press the Windows Button or tap the windows icon → [Settings] → [Bluetooth] → [Devices] tab → [Add new device…] → system will search for Bluetooth Devices → select the device to connect with → [Next] → enter the passcode →... -
Page 15: Charge The Battery
Choose a location to install the program, tap [Install] icon to start installation. NOTE: CHC recommends installing 3rd party software on Device Memory and select the MMC Card to save your projects data. 4.9. C HARGE THE ATTERY Squeeze the latch catch of the battery, and then draw out the ... - Page 16 LTSet3.0. In home interface click on [Connection]. For LT500T: Device=LT500T, COM=COM1, Baud=38400 For LT500H:Device=LT500H, COM=COM1, Baud=115200 Click on [Connect], wait a few moments for the connection status to change to ‘Connected’ and Blue light on. Click on [Back], then click on [I/O]: enable NMEA messages as required for your application.
- Page 17 Click on [Set], wait for the successful message and click ‘OK’ to close the tip. Click on ‘Command’ tab on the top of the screen : if you connected to the internal GPS, then NMEA message should be sreaming through the top gray display box.
- Page 18 Enter a NTRIP sauce name, IP address and Port then click on [Get]. The sauce list will be retrieved from the server and will populate the [Mountpoint] drop down list. NOTE: Make sure that device has been connected to Internet. ...
- Page 19 Select the desired Mount point, then enter the Username and Password. Press [Save] then click on [Login]. NOTE: If the mount point is a virtual reference server, then the LT500T must be tracking satellites. The GGA message must have a valid Latitude and Longitude. If the ‘Receive Data’ counter is incrementing, then you have successfully connected to the network.
- Page 20 In [Current] tab → [Manufacturer: NMEA GPS Receiver] → [Model: Generic]. In [Comms] tab → [Type: Cable] → [Port: COM6] → [Baud: 115200] with LT500H/ [Baud: 38400] with LT500T. In [Receiver] tab → select the relevant antenna type → input Antenna Height.
- Page 21 → [Status]. Tap [Set] → configure corresponding [Port] and [Baud Rate]. For LT500H: [COM: COM 6] → [Baud Rate: 115200] For LT500T: [COM: COM 6] → [Baud Rate: 38400] When the software works with the device successfully, you will see the SkyPlot in GNSS Status interface.
- Page 22 8. C OMMON ETTINGS Backlight Setting Press the Windows Button or tap the windows icon → [Settings] → [System] → [BL] → move the cursor to adjust the backlight according to your requirements. NOTE: You can also tap [another] on the lower left corner, or [Settings] →...
- Page 23 CHC - Shanghai HuaCe Navigation Technology Ltd. Building C, NO. 599 Gaojing Road, Qingpu District, 201702 Shanghai, China Tel: +86 21 542 60 273 Fax: +86 21 649 50 963 Email: sales@chcnav.com support@chcnav.com Website: www.chcnav.com Page 22...
Need help?
Do you have a question about the LT500H and is the answer not in the manual?
Questions and answers