Table of Contents
Advertisement
Quick Links
Advertisement
Table of Contents

Related Manuals for Tektronix PA3000


Summary of Contents for Tektronix PA3000
- Page 1 PA3000 Power Analyzer User Manual *P077115201* 077-1152-01...
- Page 3 PA3000 Power Analyzer User Manual www.tek.com 077-1152-01...
- Page 4 Copyright © Tektronix. All rights reserved. Licensed software products are owned by Tektronix or its subsidiaries or suppliers, and are protected by national copyright laws and international treaty provisions. Tektronix products are covered by U.S. and foreign patents, issued and pending. Information in this publication supersedes that in all previously published material.
- Page 5 Tektronix, with shipping charges prepaid. Tektronix shall pay for the return of the product to Customer if the shipment is to a location within the country in which the Tektronix service center is located. Customer shall be responsible for paying all shipping charges, duties, taxes, and any other charges for products returned to any other locations.
-
Page 7: Table Of Contents
Soft keys ....................... Menu and Help keys..................Operational and alphabetical keys ................Number and formula keys ................... Logging data to a storage device ................Connecting signals ....................Input overview ....................To connect a simple current transformer ..............PA3000 Power Analyzer User Manual... - Page 8 Graph and waveform commands................Interface commands ..................Datalog commands ................... Screen save commands..................Math commands ....................System configuration commands................User configuration commands................Sending and receiving commands ................Communications examples .................. PA3000 software....................PWRVIEW PC software ................... PA3000 Power Analyzer User Manual...
- Page 9 Example 2: Efficiency testing three phase applications ..........Example 3: Energy consumption testing..............Example 4: Standby power measurements (IEC 62301 Ed. 2.0)........Example 5: Inrush current testing................. Reference information ..................Measured parameters ..................Accuracy equations ..................Sum equations....................Communication ports..................Index PA3000 Power Analyzer User Manual...
- Page 10 Table of Contents List of Figures Figure i: Tektronix PA3000 Power Analyzer..............xvii Figure 1: Typical PA3000 input connections ..............Figure 2: Rear panel input module ................Figure 3: Result screen (four-channel instrument).............. Figure 4: Left and right arrow hard keys ................
- Page 11 Table of Contents Figure 38: AC-DC efficiency measurement wiring diagram ..........Figure 39: Efficiency measurement on the PA3000 ............Figure 40: Harmonic bar chart on the PA3000 ............... Figure 41: Efficiency measurement with the PWRVIEW software........Figure 42: Efficiency Trend Chart ................
- Page 12 Table 21: Communication ports on the rear panel ............Table 22: Ethernet pin descriptions................Table 23: GPIB port pin configuration descriptions ............Table 24: Auxiliary input-output pin descriptions ............Table 25: RS-232 connector pin descriptions ..............PA3000 Power Analyzer User Manual...
-
Page 13: Important Safety Information
Ground the product. This product is grounded through the grounding conductor of the power cord. To avoid electric shock, the grounding conductor must be PA3000 Power Analyzer User Manual... - Page 14 Use only insulated voltage probes, test leads, and adapters supplied with the product, or indicated by Tektronix to be suitable for the product. Observe all terminal ratings. To avoid fire or shock hazard, observe all ratings and markings on the product.
- Page 15 Use care when lifting and carrying the product. This product is provided with handles for lifting and carrying. Use only the Tektronix rackmount hardware specified for this product. Probes and test leads Before connecting probes or test leads, connect the power cord from the power connector to a properly grounded power outlet.
-
Page 16: Service Safety Summary
Use care when servicing with power on. Dangerous voltages or currents may exist in this product. Disconnect power, remove battery (if applicable), and disconnect test leads before removing protective panels, soldering, or replacing components. PA3000 Power Analyzer User Manual... -
Page 17: Terms In This Manual
find out the nature of the potential hazards and any actions which have to be taken to avoid them. (This symbol may also be used to refer the user to ratings in the manual.) The following symbol(s) may appear on the product: PA3000 Power Analyzer User Manual... -
Page 18: Compliance Information
EN 61000-3-2. AC power line harmonic emissions EN 61000-3-3. Voltage changes, fluctuations, and flicker Mfr. Compliance Contact. Tektronix, Inc. PO Box 500, MS 19‐045 Beaverton, OR 97077, USA www.tek.com This product is intended for use in nonresidential areas only. Use in residential areas may cause electromagnetic interference. -
Page 19: Safety Compliance
This location is a typical office/home environment. Temporary condensation occurs only when the product is out of service. Pollution degree 3. Conductive pollution, or dry, nonconductive pollution that becomes conductive due to condensation. These are sheltered locations PA3000 Power Analyzer User Manual xiii... - Page 20 Only mains power supply circuits have an overvoltage category rating. Only measurement circuits have a measurement category rating. Other circuits within the product do not have either rating. Mains overvoltage Overvoltage category II (as defined in IEC 61010-1). category rating PA3000 Power Analyzer User Manual...
-
Page 21: Environmental Considerations
This symbol indicates that this product complies with the applicable European Union requirements according to Directives 2012/19/EU and 2006/66/EC on waste electrical and electronic equipment (WEEE) and batteries. For information about recycling options, check the Support/Service section of the Tektronix Web site (www.tek.com). PA3000 Power Analyzer User Manual... - Page 22 Compliance information PA3000 Power Analyzer User Manual...
-
Page 23: Preface
The Tektronix PA3000 is a powerful and versatile precision power analyzer. Designed to provide clear and accurate measurements of electrical power and energy on all electrical products, the PA3000 is both an easy to use bench instrument and a fast and programmable automatic test interface. - Page 24 Preface xviii PA3000 Power Analyzer User Manual...
-
Page 25: Getting Started
Ensure this product is installed in such a way that its power cable is accessible at all times and can easily be disconnected. PA3000 Power Analyzer User Manual... -
Page 26: Power On
1. Check that the power analyzer is in good condition with no signs of damage. 2. Follow the Connection Sequence described in the Before you begin - safety section. (See page 1.) 3. Press the power switch to turn on the power analyzer. PA3000 Power Analyzer User Manual... -
Page 27: Concept Of Global, Group, And Channel Parameters
Wiring section of The Menu System chapter. (See page 47, Wiring.) Global, group, and channel The PA3000 has many different settings that affect both the appearance of the results and the actual results. To make the instrument easier to operate, settings settings might have an effect on one or more parameters. -
Page 28: Connecting To The Product Under Test
(low or high power), see the information on using current and voltage transducers. (See page 28, Connecting signals.) To measure power, connect the measuring terminals of the PA3000 in parallel with the supply voltage and in series with the load current as shown in the following figure. -
Page 29: Figure 2: Rear Panel Input Module
For plug-connected single phase products, the simplest and safest way to make a connection to the product under test is to use a Tektronix Break Out Box. This provides a line socket for connection of the product and 4 x 4 mm sockets for direct connection to the PA3000 terminals as described above. -
Page 30: Results Screen
1 phase, 2 wire. Each row shows the measurement type Vrms, the measured value, 248.4 and the measurement units, V. Normal engineering notation is used to describe units, mV = millivolts (10e-3) and MV = megavolts (10e+6). PA3000 Power Analyzer User Manual... -
Page 31: Navigating The Results Screen
Figure 4: Left and right arrow hard keys The PA3000 has the option of fixed or auto ranging. Default is auto range. If you choose a fixed range, or the peak of the input signal is larger than the range, then an over range condition will occur. -
Page 32: Navigating The Menu System
Getting started Navigating the menu system The menu system provides complete access to all settings of the PA3000. To access the menu system, press the (MENUS key). To return to the measurement display at any time, simply press again or press (RESULT key). -
Page 33: On-Screen Help
Help does not exist on every screen and at every level; if you press without any help showing then there is no help available at this level. PA3000 Power Analyzer User Manual... - Page 34 Getting started PA3000 Power Analyzer User Manual...
-
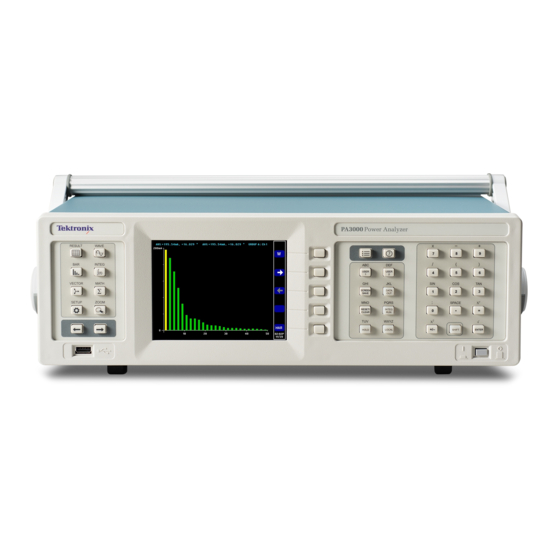
Page 35: Front Panel
Left and right arrow hard keys USB connection for flash drives 640 x 480 TFT display Soft keys Menu and Help keys Number and formula keys Front mounted on / off switch Operational and alphabet keys PA3000 Power Analyzer User Manual... -
Page 36: Quick View Keys
The ZOOM key changes the number of results displayed on the screen. It will go from four columns, to two columns, to one column, and then to four columns with math results at the bottom. Pressing again will return the display to four columns. PA3000 Power Analyzer User Manual... -
Page 37: Results Screen
Measurements menu. (See page 36, Measurements.) The number of harmonics displayed, the minimum and maximum hold columns displayed, and the display of the Sum column are controlled using the Measurement Configuration menu. (See page 38, Measurement Configuration menu.) PA3000 Power Analyzer User Manual... -
Page 38: Waveform Screen
Changing the group is done by using the left and right arrow hard keys at the bottom left of the display. This changes the group of and the waveforms displayed. PA3000 Power Analyzer User Manual... -
Page 39: Bar Chart Screen
Harmonics do not need to be displayed as results for the bar chart to show harmonics. If harmonics are never displayed, and never configured, then the bar chart would be based on the default harmonic setup. PA3000 Power Analyzer User Manual... - Page 40 Works on a per-group basis. Changes the harmonic selected by one to the right (higher order). Changes the harmonic selected by one to the left (lower order). Jumps to the harmonics setup menu. PA3000 Power Analyzer User Manual...
-
Page 41: Integrator Screen
One of the following results can be displayed at any one time: Watt Hours VA Hours VAr Hours Amp Hours Watts Average PF Average Volts Amps Watts Fundamental VA-Hours (VAHf) Fundamental VAr-Hours (VArHf) Correction VArs PA3000 Power Analyzer User Manual... - Page 42 This allows for the best viewing of the graph. Any time during integration, you change the plots by pressing the INT soft key. This takes you directly to the integrator waveform setup menu with the appropriate group selected. PA3000 Power Analyzer User Manual...
-
Page 43: Vector Screen
In addition to displaying a vector line, the magnitude and phase angle of the vector are displayed to the right of the vector diagram. Both the voltage and current information is shown even if the vector is not. PA3000 Power Analyzer User Manual... -
Page 44: Math Screen
Math screen. The Math screen displays user configured values. These can be a selection of desired values displayed on one easy-to-read screen, or basic measurements mathematically manipulated to show a required a value. Figure 12: Math screen PA3000 Power Analyzer User Manual... -
Page 45: Setup Screen
This screen shows instrument configuration including information, such as when the unit was last verified and last adjusted, the serial number of the unit and the firmware version, and information on the installed analog cards. PA3000 Power Analyzer User Manual... -
Page 46: Front Panel Usb Port
Press the key again to stop the data logging. For additional information on the front panel USB port refer to the discussion under Communication ports, later in this document. (See page 146, Front panel USB host port.) PA3000 Power Analyzer User Manual... -
Page 47: Soft Keys
Move the selected measurement up or down in the list. Move selected measurement up one row Move selected measurement down one row. Select highlighted item. Cancel Apply value. Delete one character to the left of the cursor. Clear the text entry. PA3000 Power Analyzer User Manual... -
Page 48: Menu And Help Keys
flash drive connected to the front panel USB port. The screen is saved as a bit mapped file in a PA3000 folder on the flash drive. The file name is automatically assigned by the instrument, such as SCREEN01.BMP;... -
Page 49: Number And Formula Keys
1 / SIN. Number one or, with SHIFT, sine function 2 / COS. Number two or, with SHIFT, cosine function 3 / TAN. Number three or, with SHIFT, tangent function 0 / :. Number zero or, with SHIFT, a colon) PA3000 Power Analyzer User Manual... -
Page 50: Logging Data To A Storage Device
The directory structure created will contain the last five digits of the serial number of the PA3000 used and the date at the start of data logging. The file name will reflect the time at the start of data logging in 24-hour clock format and will have a .csv extension. -
Page 51: Figure 16: Example Data File
Additional information on the front panel USB port and the USB flash drive requirements is available later in this document. (See page 146, Front panel USB host port.) PA3000 Power Analyzer User Manual... -
Page 52: Connecting Signals
Figure 17: Signal inputs on rear panel (Channel 1 shown) Table 2: Signal inputs on rear panel Item Description Voltage high connection (VHI) Voltage low connection (VLO) T1AH, 250 V fuse to protect the 1 A shunt PA3000 Power Analyzer User Manual... - Page 53 Voltages of up to 600 V can be connected directly to the red and black 4 mm VHI and VLO safety sockets at the rear of each measurement channel of the PA3000. Current The PA3000 has two built-in current shunts. The first shunt allows currents of up...
-
Page 54: To Connect A Simple Current Transformer
For example, the Tektronix CL200 produces an output current that is 1/100 of the current being measured. To measure the correct current on the PA3000, use the scaling function of the analyzer to scale, or multiply, the CT output current. -
Page 55: To Connect An External Resistive Shunt
To connect an external resistive shunt Using a resistive shunt is a straightforward method of extending the current measuring range of the PA3000. The shunt resistor is connected in series with the load and the voltage across the shunt is directly proportional to current. - Page 56 EXT ALO and ALO are connected inside the PA3000 and so connections to AHI, ALO, and A1A can have the same potential as EXT ALO. 3. Set up the PA3000 to measure current from the EXT AHI and EXT ALO terminals.
-
Page 57: To Connect A Transducer With A Voltage Output
Enter the new scale factor (such as 0.1) Press 5. Press to return to the measurement display. The PA3000 is now ready to make measurements using a current transducer with a voltage output. PA3000 Power Analyzer User Manual... -
Page 58: To Connect A Voltage Transformer / Transducer
The output of the transducer is connected to the normal VHI and VLO terminals. Normally the positive or HI output of the transducer will be marked with the point of an arrow or a + symbol. Connect this terminal to the VHI input of the PA3000. Voltage scaling A voltage transformer (VT) produces a voltage output, which is proportional to the voltage being measured. -
Page 59: Power For External Transducers
Figure 21: External resistive shunt connections Power for external transducers The PA3000 has a ±15 V power supply for the purpose of providing power to external transducers. The supply is capable of supplying 250 mA per rail on each analog card (250 mA on +15 V and 250 mA on -15 V). The connector is conveniently placed next to the inputs on each analog card. -
Page 60: The Menu System
The menu system The menu system This section describes some of the key menus of the PA3000. Measurements Use the Measurements menu to set the order in which the measurements appear on the screen; default measurements are: V , Watt, VA, PF, and Freq. This is on a per-group basis. - Page 61 Move selected measurement down (gray if at the bottom of the list already). Place the measurement in the selected position. The soft keys will change back to the standard measurement screen keys. PA3000 Power Analyzer User Manual...
-
Page 62: Measurement Configuration Menu
The following figure shows an example of a measurement being moved. Figure 23: Example of a moved measurement Measurement Configuration menu Use the Measurement Configuration menu to change the way some results are computed and displayed. Figure 24: Measurement Configuration menu PA3000 Power Analyzer User Manual... - Page 63 This equation only produces a valid number if the RMS is not less than the fundamental. If the fundamental is larger than the RMS the display shows - - - - -. The equations are: PA3000 Power Analyzer User Manual...
- Page 64 Cylindrical-Rotor Synchronous Generators" and are most often used on standby power generators and UPS. The harmonics included in a TIF measurement are from 1 to 73 odd and even. The formula for voltage and current TIF are: Default reference = Fundamental PA3000 Power Analyzer User Manual...
-
Page 65: Table 3: Weighing Factors For Tif
Sum results are available in all wiring configurations except 1 phase, 2 wire (1P2W). (See page 47, Wiring.) PA3000 Power Analyzer User Manual... -
Page 66: Modes
The menu system Sum Voltage and Sum The PA3000 provide a choice between two methods of summing voltage values and current values. The voltage methods are unrelated to the current methods. For Current Formulas a list of the sum voltage and current formulas, refer to sum equations later in this document. - Page 67 Integrator mode provides measurements for determining energy consumption by integrating measurements over a specified period or by running continuously. Integration can be started manually, by a threshold trigger, or at a specific value. In addition, for certain parameters, average values are also available. PA3000 Power Analyzer User Manual...
- Page 68 0.0 will run indefinitely. Configure Level. Select a channel, signal, threshold, or direction. CVArs Power Factor. Specify the desired power factor to be used for the correction VArs in the range of ±1.0 V. PA3000 Power Analyzer User Manual...
- Page 69 The LED under the key turns off if there is no more integration going on within any group. Resetting integration values. The RESET/CLEAR key will reset the integration values to zero for all stopped groups. It has no effect on groups that are running integration. PA3000 Power Analyzer User Manual...
-
Page 70: Table 4: Effects Of Frequency Range Settings In Pwm Mode
Table 4: Effects of frequency range settings in PWM mode Update rate >10 Hz (seconds) <900 Hz 1 – 100 Hz 0.1 Hz – 10 Hz 20.2 20.4 20.4 20.5 20.4 20.3 20.8 20.7 21.0 20.9 20.4 20.8 21.0 21.0 20.8 PA3000 Power Analyzer User Manual... -
Page 71: Inputs
(voltage by default) of the first channel in the group. Below are figures showing how each channel would be connected for each different wiring mode. Figure 25: Single-phase, two-wire and DC measurements. Select 1 phase, 2 wire mode PA3000 Power Analyzer User Manual... -
Page 72: Figure 26: Single-Phase, Three-Wire. Select 1 Phase, 3 Wire
Figure 26: Single-phase, three-wire. Select 1 phase, 3 wire Figure 27: Three-phase, three-wire (2 Wattmeter method). Select 3 phase, 3 wire Figure 28: Three phase, three wire (3 Wattmeter method). Select 3 phase, 3 wire (3V3A). PA3000 Power Analyzer User Manual... -
Page 73: Figure 29: Three-Phase, Three-Wire (3 Wattmeter Method). Select 3 Phase, 4 Wire
Line-to-neutral measurements are only valid in the 3p3w and the 3p3w (3V3A) wiring configurations. The neutral current (AN) values in the math formulas is the phase 3 line current when in the 3p3w wiring configuration. PA3000 Power Analyzer User Manual... -
Page 74: Table 5: Input Ranges
flashing on and off. In addition, the “Vrms” and/or “Arms” will flash to indicate whether the over-range is on either the voltage channel, the current channel, or both. PA3000 Power Analyzer User Manual... - Page 75 Source. Many measurements (including rms volts, amps and watts) are based on calculations are dependent on the correct fundamental frequency being determined by the power analyzer. The PA3000 uses proprietary techniques to determine frequencies that eliminate problems created by noise when simple zero-crossing techniques are used.
- Page 76 Amps scaling. Enter the scale factor of the transducer being used. For example, the Tektronix CL1200 produces 1 A for every 1000 A flowing in the opening of the CL. It is a 1000:1 current transformer. Enter the scale factor 1000 and the power analyzer will display the correct current.
-
Page 77: Graphs And Waveforms
Analog inputs are made available to the MATH setup. They can be incorporated into the MATH formula and displayed on the MATH screen. (See page 56, Math results.) Graphs and waveforms The PA3000 provides different ways to display data: Waveforms Harmonic bar charts Vector diagrams... -
Page 78: Interfaces
Integrator mode.) Additional information is available for displaying the integrator waveforms. (See page 17, Integrator screen.) Interfaces This menu can be used to set up the remote control interfaces of the PA3000. RS-232 baud rate 9600, 19200, and 38400 (default) are available. - Page 79 Use the dead socket termination port to manually disconnect a dead session on an open port. An existing Ethernet connection will be terminated and closed when the connection to the dead socket termination port is made. PA3000 Power Analyzer User Manual...
-
Page 80: Datalog
To select this function for viewing, go to the MATH menu list showing FN1 – FN30 and press to select the function. Next press to display the result value of the function; the math results display shows “EFFICIENCY 39.95 mW” PA3000 Power Analyzer User Manual... -
Page 81: Table 6: Valid Channel Parameters
ACMN – Amps Corrected Rectified Mean PFAV – PF Average WHM<1-99> – Watts Harmonic Magnitude (1-99) VCF – Volts Crest Factor CORRVARS – Correction VArs The valid group parameters are GRP<A-D>: followed by one of the following parameters: PA3000 Power Analyzer User Manual... -
Page 82: Table 7: Valid Group Parameters
. Shown as ^2 and will square the preceding number . Shown as ^ and will take the preceding number to the power of the following number √. Shown as SQRT() and will take the square root of the number between the brackets PA3000 Power Analyzer User Manual... -
Page 83: System Configuration
An averaging depth of between 1 and 10 can be specified. The default value is 10. With the update rate set to 0.5 seconds, this corresponds to values being averaged over five seconds. If the range is changed, the averaging is reset. PA3000 Power Analyzer User Manual... - Page 84 LOCAL key is pressed. Pressing the LOCAL key to switch the display on will not return the instrument to local mode. PA3000 Power Analyzer User Manual...
-
Page 85: User Configuration
Load Default Configuration Choosing this option by pressing sets every menu option of the PA3000 to its factory default. The defaults are listed in previous sections of this chapter. Load from USB Load a configuration from a file on an attached USB flash drive. -
Page 86: Remote Operation
Interfacing with RS-232 systems The RS-232 port is a standard PC type 9-way male D-type located on the rear of the instrument and can be used for remote control of the PA3000. A modem cable should be used. The RS-232 port uses 8 bits, no parity, one stop bit and hardware flow control. -
Page 87: Interfacing With Gpib Systems (Optional)
Status reporting Status byte The PA3000 uses a similar status byte to IEEE 488.2. The PA3000 Status Byte Register (STB) contains the ESB and DAS bits. These two bits indicate a non-zero state in the Standard Event Status Register (ESR) or the Display Data Status Register (DSR) respectively. -
Page 88: Figure 32: Status Byte Register
Read by “:DSE?” and set by “:DSE <value>”. Register (DSE) Figure 34: Display Data Status Enable Register Table 12: Display data status enable register bit definitions Name Description Enable OVV bit Enable OVA bit Enable NDV bit Enable DVL bit PA3000 Power Analyzer User Manual... -
Page 89: Figure 35: Standard Event Status Register
Read by “*ESE?” and set by “*ESE <value>”. Enable Register (ESE) Figure 36: Standard Event Status Enable Register Table 14: Standard event status enable register bit definitions Name Description Enable CME bit Enable EXE bit Enable QYE bit PA3000 Power Analyzer User Manual... -
Page 90: Command Listing
Angle brackets indicate values to be specified < >. Commands and responses are sent as ASCII strings terminated with a line feed. The PA3000 is not case sensitive and white space characters are ignored except where required between command and parameter. -
Page 91: Ieee 488.2 Standard Commands And Status Commands
*IDN? Unit identity Syntax *IDN? Returns Tektronix, PA3000, serial number, firmware version Description The serial number is the serial number of the main chassis. The firmware version is the version of the firmware suite, which includes all processors. *CLS Clear event status... - Page 92 This command has the same affect as *RST :CFG:USER:LOAD 0 (loading the default user configuration). Allow at least three seconds after sending the *RST command before sending further commands to allow all defaults to be processed and set. PA3000 Power Analyzer User Manual...
-
Page 93: Channel And Group Commands
:INST:NSELC? Return active channel Syntax :INST:NSELC? Returns <channel number> Description This command returns the number of the channel selected (between 1 and 4) depending on number of channels installed. PA3000 Power Analyzer User Manual... -
Page 94: Unit Information Commands
:SYST:CTYPE? <channel number> Where <channel number> is 0 through 4 Returns Tektronix, <card type>, <serial number>, <hardware revision> <card type> is either CPU for the main card, or ANALOG for a channel card. <serial number> is a 12 character string. - Page 95 WAV – Average Watts PFAV – Average Power Factor CVAR – Correction VArs VAHF – Fundamental VA-hours VARHF – Fundamental VAr-hours VF – Fundamental Volts rms AF – Fundamental Amps rms WF – Fundamental Watts PA3000 Power Analyzer User Manual...
- Page 96 If it is not, then the last selected group will be affected (or group 1 if no group has previously been selected). These results are only available for displaying / returning when the group is in integrator mode. PA3000 Power Analyzer User Manual...
- Page 97 1 through 51. Description The move command is used to change the order of results on both the screen in the returned results using :FRD?. :FRF? can be used to confirm the order of results. PA3000 Power Analyzer User Manual...
-
Page 98: Measurement Configuration Commands
71.), the power analyzer can display all harmonics, or just the odd number harmonics from the first harmonic up to the number specified. This command works on a group. Use the :INST:NSEL command first to select the active group. PA3000 Power Analyzer User Manual... - Page 99 This command works on a group. Use the :INST:NSEL command first to select the active group. PA3000 Power Analyzer User Manual...
- Page 100 Where <value> is the maximum harmonic to display in the range of 2 to 100. Description For total harmonic distortion (THD) readings, <value> specifies the maximum harmonic number used in the formula. This command works on a group. Use the :INST:NSEL command first to select the active group. PA3000 Power Analyzer User Manual...
- Page 101 This command returns the status of the minimum value column. A 0 will be returned if disabled; a 1 if enabled. This command works on a group. Use the :INST:NSEL command first to select the active group. PA3000 Power Analyzer User Manual...
- Page 102 Where <method> is 1 or 2 to select the summation method Description These commands select the summation method used for the Min, Max, and Sum columns. Refer to the sum equations later in this document. (See page 142, Sum equations.) PA3000 Power Analyzer User Manual...
-
Page 103: Mode Setup Commands
Where <value> is the power frequency in the range of 45 to 1000 Hz Description This command sets the power frequency for ballast mode. (See page 42, Ballast mode.) Because this command works with a group, use the :INST:NSEL command first to select the active group. Syntax :MOD:BAL:FREQ? PA3000 Power Analyzer User Manual... - Page 104 This command sets the integrator start date when used in clock start method. The data in input is in the same format as the user has requested. Syntax :MOD:INT:ST:LVL:CH <channel> Where <channel> is 1 through 4 PA3000 Power Analyzer User Manual...
- Page 105 This command returns the numerical identifier of the selected measurement. Syntax :MOD:INT:ST:LVL:THRES <threshold> Description This command sets the threshold level, a floating point number from ±1e9 Syntax :MOD:INT:ST:LVL:DIR <direction> Where <direction> is 0 for ≥ and 1 for ≤ PA3000 Power Analyzer User Manual...
- Page 106 This command stops integration on all running integrators. Syntax :MOD:INT:RESET Description This command resets integration on all integrators. NOTE. There are no specific PWM Motor mode commands other than the normal :MOD:PWM :MOD:PWM command to select PWM Motor mode. PA3000 Power Analyzer User Manual...
-
Page 107: Input Setup Commands
Remote operation Input setup commands The input setup commands correspond to the Inputs menu. (See page 47, Inputs.) They are used to control how signal inputs to the PA3000 are channelled and controlled. :WRG Wiring configuration Syntax - Set 1 phase, 2 wire... - Page 108 When there are multiple channels in a group, and the group is set to auto range, each channel will find the best range for signals applied. Use the :INST:NSELC command first to select the active channel. PA3000 Power Analyzer User Manual...
- Page 109 0 – Voltage channel 1 – Current channel 2 – External counter input 1 3 – External counter input 2 Because this command works with a group, use the :INST:NSEL command first to select the active group. PA3000 Power Analyzer User Manual...
- Page 110 0 – >10 Hz 1 – 1 Hz to 100 Hz 2 – 0.1 Hz to 10 Hz Because this command works with a group, use the :INST:NSEL command first to select the active group. PA3000 Power Analyzer User Manual...
- Page 111 Use the :INST:NSEL command first to select the active group before using the GRP option. Syntax :SCL:VLT? :SCL:AMP? :SCL:EXT? VLT – Voltage channel scaling AMP – Current channel scaling EXT – External shunt scaling PA3000 Power Analyzer User Manual...
-
Page 112: Graph And Waveform Commands
These commands return the enable or disable status of the waveform graph display. The commands are all channel based commands. Select the channel with :INST:NSELC before using these commands. Returns 1 if the waveform is enabled or 0 if the waveform is not enabled. PA3000 Power Analyzer User Manual... -
Page 113: Interface Commands
Syntax :COM:IEE:ADDR <address> Where <address> is an address in the range of 1 to 30 Description This command sets the GPIB address for the PA3000. Syntax :COM:IEE:ADDR? Returns The GPIB address for the power analyzer. If -1 is returned, no GPIB card is installed. -
Page 114: Datalog Commands
Where <stop/start> 0 = stop; 1 = start Description This command has the same function as pressing the DATA OUT key. If a USB flash drive is present, it will log data to the flash drive. PA3000 Power Analyzer User Manual... -
Page 115: Screen Save Commands
Where <funcNumber> is a valid math function number between 1 and 30 <enable> is 1 to enable the display of the function and 0 to disable it. Description This command will enable or disable math function in the Math screen. PA3000 Power Analyzer User Manual... -
Page 116: System Configuration Commands
20%. The command will also set the depth of the auxiliary inputs to the same value. Syntax :AVG? Description This command returns the averaging value as an integer. Syntax :AVG:CH <depth> PA3000 Power Analyzer User Manual... - Page 117 This command sets whether the autozero function for the channels is enabled or disabled. Syntax :SYST:ZERO? Description This command returns the autozero function for the channels. 0 if the function is disabled or 1 if the function is enabled. PA3000 Power Analyzer User Manual...
- Page 118 In this case, the <time value> should be in the format specified. For example, if the specified format were 0 (12 Hour), then the command would be: :SYST:TIME:SET 08:32:20P For 12 hour clock, A should be used for AM and P for PM. PA3000 Power Analyzer User Manual...
-
Page 119: User Configuration Commands
This command changes the name of the configuration to aid in finding it again. Tip: When saving or loading configurations, allow at least three seconds after sending the :CFG:USER:LOAD <value> command before reading a 1 for success, or 0 for failure. PA3000 Power Analyzer User Manual... -
Page 120: Sending And Receiving Commands
Remote operation Sending and receiving commands There are many ways in which to send commands to the PA3000, but there are some common rules for all methods: All instructions should be terminated with a line feed (ASCII 10) character. All returned information will be terminated by a line feed (ASCII 10) character. -
Page 121: Communications Examples
":FRD?" command to get selected results. // This enables the NDV bit. :DSE 2 While strDSR <> "2" :DSR? strDSR = received data Loop :FRD? Receive results PA3000 Power Analyzer User Manual... - Page 122 *RST Identify the instrument and returns a string *IDN? that can be used by the user in the software “Tektronix, PA3000, Serial Number, Firmware Version”. Select group 1. :INST:NSEL 1 Set Channel 1 and Channel 2 for 3 phase 3 :WRG:3P3 wire setup as part of group 1.
- Page 123 Loop Read the measured data, which will be :FRD:GRP1? shown as follows in floating point format: , Watts, A , Freq, Power Factor, VA Power, V , Watts, A , Freq, Power Factor, VA Power. PA3000 Power Analyzer User Manual...
-
Page 124: Pa3000 Software
Transfer, view, and save measurement data in real-time from the instrument, including waveforms, harmonic bar charts, and plots Log measurement data over a period of time Communicate with and download data from multiple Tektronix power analyzers simultaneously PA3000 Power Analyzer User Manual... -
Page 125: Firmware Update Utility
The PA3000 has been designed to add new features by updating the firmware within the product. The firmware is updated by using a free PC software program. This program can be found under the PA3000 section of the Tektronix Web site (www.tek.com). Download the software and install it on your PC. - Page 126 CAUTION. Do not remove power from the PA3000 during the download. During the second stage of the download, the PA3000 screen will go blank and the SHIFT key will blink. After the second stage completes, the PA3000 will restart with the normal screen and additional firmware sections will be downloaded.
-
Page 127: Application Examples
Application examples Application examples Most single and three phase power measurements can be made on a PA3000 using the default settings. The power analyzer is fully auto-ranging and because of its proprietary frequency detection technique and peak ranging, it will adjust itself to make the required measurements to the published specification irrespective of... -
Page 128: Example 1: Efficiency Testing Single Phase Applications
It makes it easier and safer to connect the input AC signal on the DUT using the 4 mm safety leads provided with PA3000. 2. Connect the output DC terminals on the second channel of the PA3000 using the provided safety leads. The current shunt on the PA3000 is connected in series with the output load;... -
Page 129: Figure 38: Ac-Dc Efficiency Measurement Wiring Diagram
Figure 38: AC-DC efficiency measurement wiring diagram Method 1: Efficiency The following steps describe the process for setting up the PA3000 for efficiency measurements on and AC-DC power supply. This procedure can also be used for measurements on single testing efficiency on other applications such as: UPS systems, LED drivers, or... - Page 130 Results screen. The PA3000 is now set up for making AC and DC measurements on the first and second channels respectively. 6. Power on the DUT from the AC source; an appropriate load can be applied to the DUT at this point.
- Page 131 Waveforms and harmonics. To monitor AC input waveforms and harmonics, use key respectively. Switch between channels by using the arrow keys on the left panel. Various options for viewing waveforms and harmonics can be selected from within the Graphs and Waveforms menu. PA3000 Power Analyzer User Manual...
-
Page 132: Figure 40: Harmonic Bar Chart On The Pa3000
Application examples Figure 40: Harmonic bar chart on the PA3000 Method 2: Efficiency The following steps describe the process for setting up the PWRVIEW software with a PA3000 for efficiency measurements. measurements on single phase AC-DC power supplies. (PWRVIEW software) Figure 41: Efficiency measurement with the PWRVIEW software... - Page 133 Application examples 1. Connect the PA3000 to the computer with the PWRVIEW software installed using the supplied USB cable. Ethernet or GPIB can also be used, if desired. 2. Open the PWRVIEW software by double-clicking the desktop icon. 3. Click the Add button to connect the PA3000.
-
Page 134: Figure 42: Efficiency Trend Chart
For optimum results, select maximum number of harmonics to display in the setup area. Selecting 100 harmonics for the PA3000 gives the best results. If no harmonics are selected, waveform feature will display a blank screen. -
Page 135: Figure 43: Logging Setup
Select the desired data set and export to either an Excel or a .csv format. Custom limits. Custom limits can also be set with any of the measurement parameters. Custom limits help set limits based on various standards or test specifications. PA3000 Power Analyzer User Manual... -
Page 136: Example 2: Efficiency Testing Three Phase Applications
Applications such as motor drives, wind power turbines, and other large loads rely on three phase power delivery to make the system more efficient and economical. This example discusses how the PA3000 can help with three phase efficiency measurements. The example applies to various three phase AC-DC, DC-AC Inverters, and AC-AC converter applications such as PWM motor drive, three phase inverters, three phase UPS systems, and wind power. - Page 137 PWM motor drive using the PA3000. 1. Connect the single phase AC input on the PWM motor drive to the first channel of the PA3000 using a Tektronix Breakout Box (BB1000) as shown in wiring diagram.
-
Page 138: Figure 45: Pwm Motor Drive Efficiency (1 Phase In And 3 Phase Out)
Application examples Figure 45: PWM motor drive efficiency (1 phase in and 3 phase out) 4. After making all of the connections, set the PA3000 to the default configuration: a. Press b. Scroll down to User Configuration and press c. Select Load Default Configuration, and then press to confirm. - Page 139 Further settings if required Torque and speed inputs. The overall efficiency of a motor drive system requires measuring real-time speed and torque data. PA3000 has four analog and two counter inputs to enable various auxiliary input measurements such as torque and speed.
-
Page 140: Figure 46: Vector Graph On The Pa3000
Interfaces → USB Host Data Out. The log file will be saved as a .csv file. Waveforms, harmonics, and vector graphs. Waveforms, harmonics, and vector graphs can be enabled for all three phase signals. Figure 46: Vector graph on the PA3000 PA3000 Power Analyzer User Manual... -
Page 141: Figure 47: Pwm Motor Drive Efficiency (3 Phase In And 3 Phase Out)
(See page 47, Wiring.) Figure 47: PWM Motor drive efficiency (3 phase in and 3 phase out) 3. After making all of the power connections, connect the PA3000 to the computer with the PWRVIEW software installed using the supplied USB cable. - Page 142 Further settings if required Torque and speed inputs. The overall efficiency of a motor drive system requires measuring real-time speed and torque data. The PA3000 has four analog and two counter inputs to enable various auxiliary input measurements such as torque and speed.
-
Page 143: Figure 48: Auxiliary Inputs Setup For Torque And Speed Measurements
Formula column on the measurement grid. Waveform, Harmonics, and Trend chart. In the measurement grid, you can view waveforms, harmonics, and trend charts by clicking the respective icons on the menu bar. PA3000 Power Analyzer User Manual... -
Page 144: Figure 49: Harmonic Bar Chart
For optimum results, select the maximum number of harmonics to display in the setup area. Selecting 100 harmonics for the PA3000 gives the best results. If no harmonics are selected, waveform feature will display a blank screen. -
Page 145: Example 3: Energy Consumption Testing
Test Setup The following steps describe the process to set up energy consumption measurements on a home or office appliance using a PA3000. This method can be used for testing energy consumption of any DUT that plugs into the AC wall socket for power. -
Page 146: Figure 50: Energy Consumption Measurements Wiring Diagram
Application examples 1. Connect the AC input on the DUT to the first channel of the PA3000 using a Tektronix Breakout Box (BB1000) as shown in the wiring diagram. The breakout box taps in to the current signal and measures the voltage across the input terminals. -
Page 147: Figure 51: Energy Consumption Testing On The Pa3000
Select Load Default Configuration, and then press to confirm. The PA3000 will load the defaults and display a confirmation screen. Press and then return to the Main Menu by pressing 2. To enable the Integrator mode, go to Modes → Select Mode → Integrator. - Page 148 The PA3000 will display integration parameters such as: Hr, Whr, VAHr, and AHr. 6. Power on the DUT and the results on the PA3000 should start updating. The integration results will display zero until it is triggered either manually using the INTEG RUN key on the front panel or by the selected start method.
- Page 149 Application examples message will display. This will not harm the PA3000. The range should not be set too high as this will compromise the overall accuracy. Method 2: Energy The following steps describe the process to set up energy consumption tests on home or office appliances using a PA3000 along with the PWRVIEW software.
-
Page 150: Figure 52: Integration Trend Chart
Select the desired data set and export to either an Excel or a .csv format. Custom limits. Custom limits can also be set with any of the measurement parameters. Custom limits help set limits based on various standards or test specifications. PA3000 Power Analyzer User Manual... -
Page 151: Example 4: Standby Power Measurements (Iec 62301 Ed. 2.0)
The standby power and the measured current are low compared to the normal operating point of the DUT. The PA3000 should accurately measure currents as low as 100 μA, along with the full-load current. The PA3000 offers low current measurement ranges and very low noise to accurately measure the standby current and power. -
Page 152: Figure 54: Standby Power Measurements Wiring Diagram
Connect the DUT using a Tekronix Breakout Box (BB1000) as shown in the wiring diagram. (See Figure 54.) Use the 1 A shunt on the PA3000 for better accuracy if the expected current is below 1 A. Use the VLO Source connection for voltage. Using the VLO Source terminal for standby power measurements, moves the voltage low node to the source side of the current shunt. -
Page 153: Figure 55: Standby Power Mode
Application examples Method 1: Standby power The front-panel mode of the PA3000 is designed to give product designers a fast, yet reliable, check of standby power consumption. quick check (PA3000 direct) Enabling standby power mode automatically sets a long averaging time to average the typical power variations and bursts and it disables low-level blanking so that very low power and current values can be displayed. -
Page 154: Figure 56: Full Compliance Iec 62301 Standby Power Test
Ranging → Current Range and then choose a suitable fixed range, based on the measurements made during auto-ranging. If the range is too low, a warning message will display. This will not harm the PA3000. The range should not be set too high, as this will compromise the overall accuracy. - Page 155 8. Enter the appropriate information on the respective pages of the wizard and then click through all of the steps to correctly set up the PA3000 for the test. 9. If the input current is less than 1 A, use the 1 A shunt on the PA3000 for better resolution and accuracy.
-
Page 156: Figure 57: Iec 62301 Ed. 2.0 Standby Power Test Report
Figure 57: IEC 62301 Ed. 2.0 Standby power test report Further settings if required Ranging. By default, the PWRVIEW software sets up the PA3000 current range in Auto-Up-Only. The Auto-Up-Only option ranges up the PA3000 until it finds the highest range where the input signal is not clipped. This helps with setting the best range for the test. -
Page 157: Example 5: Inrush Current Testing
PWRVIEW software. This example discusses the PA3000 setup to measure inrush currents. Test Setup Complete the following steps to set up the PA3000 to take the inrush current measurements: Connect the DUT using a Tekronix Breakout Box (BB1000) as shown in the wiring diagram. -
Page 158: Figure 58: Inrush Current Measurement Wiring Diagram
Application examples Figure 58: Inrush current measurement wiring diagram Method 1: Inrush current The following steps describe the process for setting up the PA3000 for the inrush current measurements. measurements (PA3000 direct) 1. Set the PA3000 to the default configuration: a. -
Page 159: Figure 59: Min-Max Columns For The Inrush Current Measurement
Application examples 3. The PA3000 automatically blanks all the results that are lower than ten percent of the range. Blanking is continuously active and can interfere with recording the inrush event. To disable the blanking, go to the Main Menu, go to System Configuration →... -
Page 160: Figure 60: Inrush Current Measurement
Screen save. The screen save function allows you to save the current screen from the PA3000. This can be useful for quickly capturing the inrush current readings. Press the SCREEN SAVE key to save the data as a .bmp file to a flash drive connected to the front panel USB connector. - Page 161 4. Click the Add button to connect the PA3000. All available instruments will be listed in the selection panel. 5. Select the desired instrument (the PA3000) and then click Connect. 6. On the Setup page, select the Group A tab.
- Page 162 Results tab and then click the Measure icon. The dialog box will present all the archived data. Select the desired data set and export to either an Excel or a .csv format. PA3000 Power Analyzer User Manual...
-
Page 163: Reference Information
Amps (A) Rectified Mean Voltage Volts (V) Rectified Mean Current Amps (A) Voltage Crest Factor Current Crest Factor Voltage Total Harmonic Distortion Voltage Distortion Factor Voltage Telephone Influence Factor Current Total Harmonic Distortion Current Distortion Factor PA3000 Power Analyzer User Manual... - Page 164 Amps (A) Watts harmonic n Watts (W) r = real part of V or I q = imaginary or quadrature part of V or I V and I are complex numbers in the form r+jq PA3000 Power Analyzer User Manual...
-
Page 165: Accuracy Equations
, and PF W Accuracy VA Accuracy Accuracy PF Accuracy Fundamental Power – W , VA , VA , and PF Accuracy Accuracy Accuracy Accuracy Distortion – DF, THD, and TIF DF Accuracy THD Accuracy PA3000 Power Analyzer User Manual... -
Page 166: Sum Equations
Method 1 or Method 2, as shown in the following tables. Use the method that meets your needs. Table 17: One phase, three wire sum equations Method 1 Method 2 Method 1 Method 2 PA3000 Power Analyzer User Manual... -
Page 167: Table 18: Three Phase, Three Wire Sum Equations
Table 17: One phase, three wire sum equations (cont.) Method 1 Method 2 Method 1 Method 2 Method 1 Method 2 Table 18: Three phase, three wire sum equations Method 1 Method 2 Method 1 Method 2 Method 1 Method 2 PA3000 Power Analyzer User Manual... -
Page 168: Table 19: Three Phase, Four Wire Sum Equations
Method 1 Method 2 Method 1 Method 2 Method 1 Method 2 Method 1 Method 2 Method 1 Method 2 Method 1 Method 2 Table 19: Three phase, four wire sum equations Method 1 Method 2 PA3000 Power Analyzer User Manual... - Page 169 Method 1 Method 2 Method 1 Method 2 Method 1 Method 2 Method 1 Method 2 Method 1 Method 2 Method 1 Method 2 Method 1 Method 2 Method 1 Method 2 Method 1 Method 2 PA3000 Power Analyzer User Manual...
-
Page 170: Communication Ports
Table 19: Three phase, four wire sum equations (cont.) Communication ports The PA3000 is fitted with RS-232, Ethernet, and USB as standard. GPIB is available as an option. A USB host port is located on the front panel; other communication ports are located on the rear panel. -
Page 171: Table 21: Communication Ports On The Rear Panel
Ethernet port GPIB port (Optional) Auxiliary port RS-232 port Host/Client port (Unused) USB peripheral port. USB 2.0 compatible Full Speed (12 Mbits/s) Ethernet port. IEEE 802.3 compatible, 10Base-T Connector: RJ-45 with Link and Activity indicators PA3000 Power Analyzer User Manual... -
Page 172: Table 22: Ethernet Pin Descriptions
Ground Data (Rx-) Ground Ground IEEE 488 / GPIB (Optional). The IEEE 488 port is compatible with normal GPIB cables that will work with the PA3000. Table 23: GPIB port pin configuration descriptions Signal name Signal name Data 1 Data 5... -
Page 173: Table 24: Auxiliary Input-Output Pin Descriptions
Reference information Auxiliary inputs/outputs. The PA3000 is fitted with a number of auxiliary inputs and outputs. They are: 4 analog inputs 2 counter inputs 4 digital outputs The pin connections on the auxiliary connect are: Table 24: Auxiliary input-output pin descriptions... - Page 174 Reference information PA3000 Power Analyzer User Manual...
- Page 175 4 :MATH:FUNC:EN, 91 :FRD?, 74 *CLS, 67 dead socket connection, 55 frequency settings command, 85 :COM:ETH, 89 :DISP:DATA?, 91 Frequency Source menu, 51 :COM:ETH:MAC, 90 display data command, 91 :FRF?, 73 :COM:ETH:STAT, 89 PA3000 Power Analyzer User Manual...
- Page 176 78 :INST:NSELC, 69 maximum hold columns, 41 :INST:NSELC?, 69 measured parameters, 139 Integrator Graph menu, 53 hard keys integrator mode, 43 left and right, 7 configuring, 44 harmonics configuration integrator mode command, 80 command, 74 PA3000 Power Analyzer User Manual...
- Page 177 85 command, 74 :MOD:PWM, 82 shunts read selected results command, 73 :MOD:SBY, 80 inputs, 51 rear panel mode command, 79 soft keys, 23 inputs, 28 software PA3000 download software, 101 updating firmware, 101 PA3000 Power Analyzer User Manual...
- Page 178 :SYST:POWER, 95 command, 76 :SYST:TIME, 94 transducer :SYST:ZERO, 93 :WAV, 88 connections, 33 Waveform screen, 14 waveforms, 53 wiring configuration unit information commands, 70 command, 83 :CAL:DATE?, 70 wiring configurations, 47 :SYST:CTYPE?, 70 :WRG, 83 PA3000 Power Analyzer User Manual...
Need help?
Do you have a question about the PA3000 and is the answer not in the manual?
Questions and answers