Table of Contents
Advertisement
Quick Links
Advertisement
Table of Contents

Related Manuals for Rear view safety RVS-OP7


Summary of Contents for Rear view safety RVS-OP7
- Page 1 Optian 7 Driver Assist System with DVR RVS-OP7 User Manual...
- Page 2 Driver Assist ADAS CAM Thank you for purchasing 『ADAS CAM』. This manual contains the functional explanation and operating method of ADAS CAM. Please read instructions carefully before attempting to operate. This manual may be subject to change without any prior notice 『...
- Page 3 Main Features of ADAS CAM ADAS Functions Verified by Automakers Intelligent Lane Departure Warning via Vehicle’s Turn Signal Connection! Low-speed Front Collision Warning ! Easy But Professional Installation Mode ! Full HD Crystal Clear Image Quality ! ...
-
Page 4: Optional Features
Optional Features Display Module RS232/U-ART Communication Security Lock Cover & Key Vibrator... -
Page 5: Table Of Contents
Contents 6. Menu Guide 1. Safety Caution • Video Playback • Basic Menu • Warning • Configurations • ADAS CAM • Caution • Vehicle Type Settings • DVR • Voice Settings 2. Accessories & Functions 7. Data Manager • Check Accessories •... -
Page 6: Safety Caution
Safety Caution [Warning!] If user does not comply with manual instructions , severe injuries or damages can be caused. ! Do not use modified power-supply cables , use ! Do not change settings while driving on the only genuine products supplied by the road as it may cause traffic accident. -
Page 7: Caution
[Caution!] If user does not comply with manual instructions , severe injuries or damages can be caused. ! Do not connect cable wires randomly as it may ! Do not remove SD card when the product is cause product or vehicle damages. Connect operating as it may cause product damage. - Page 8 [Caution!] If user does not comply with manual instructions , severe injuries or damages can be caused. ! ADAS functions are designed to assist the ! Tinted windscreens will affect the brightness driver, however, it is not a substitute for careful and clarity of recorded videos.
-
Page 9: Accessories & Functions
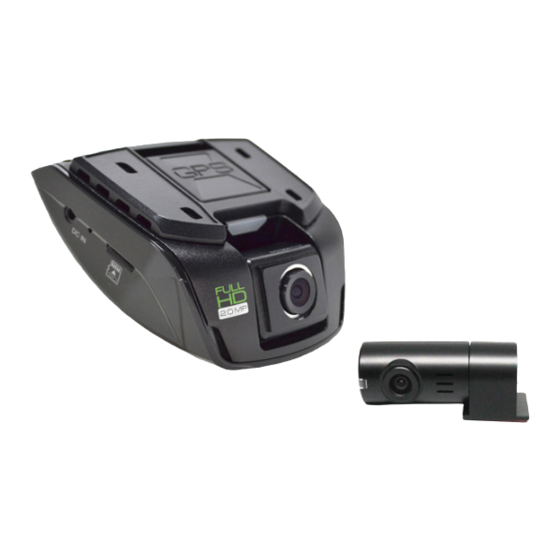
Accessories & Functions [Check Accessories ] Dual HUB 6p mount Micro SD card (32GB) / Adapter Power/ Vehicle Signal Secondary Camera Cable Main Body Optional Accessories Security Display Module Vibrator Cover Lock • Specifications of the above accessories are subject to change according to the components supply. •... -
Page 10: Main Body & Functions
[Main Body & Functions] Internal GPS Touch DC power port Security Manual (3.5 pi) Recording Button (REC) Menu Micro SD card Button socket Camera Volume Angle Adjustment Adjuster Front Button Camera (Full HD) Power Supply Extra Secondary Camera Connection Connection... - Page 11 [Vehicle Wire Connection via Dual HUB] • Display module and Vibrator can be connected via HUB ③ ④ ⑤ ① Main Body ②Vehicle Signal ③Display ④ Comm ⑤Vibrator Comm Vibrator Display Product↔HUB HUB↔Vehicle Display External Device Vibrator Cable Cable Module Communication (RS232 or TTL) Main Body...
- Page 12 [Secondary Camera] A Secondary Camera can be attached to the rear / inside/ side of the car to record videos. A 10m power cable is provided DC Power Port N/R Button • Normal(N) : Integral Bracket Indicating LED Rear images are shown in an opposite direction to those shown in the room mirror, but the number plate of the car in the rear appears normal.
-
Page 13: Product Installation
Product Installation [Precautions] - Prior to installation, turn off vehicle ignition when parked on flat ground - When installing in passenger vehicles, avoid installing in a place where it interferes with movement of rear mirror . - Install within 20cm range from the center of windscreen for stable ADAS performance - Install near the rear mirror in Sedan or RV . - Page 14 -If the calibration is not done on flat ground , ADAS functions may not perform properly. Ensure to calibrate camera on flat ground. Good • Correct Angle Adjustment : Horizon guide line matches with the actual horizon. • Camera angle is wrongly adjusted : Guide line is above the horizon •...
- Page 15 [ Basic Installation Guide ] This instruction shows how to install the main body and basic components. Please read carefully before installation. How to tighten the bracket Press the bracket and slide it upwards until it Place the bracket as shown in the image; is fixed with a click sound hang the bracket on the GPS module.
-
Page 16: Display
*OPTIAN 7 must be installed in a professional installation shop *Before attempting to install, please read instructions carefully [ Main-body installation] Clean installation If powered on , follow surface of windscreen the installation guide to (windshield) start setup. Remove tape off If setup process finishes, bracket and install in a a Live-view screen will... - Page 17 [ Secondary Camera Installation ] *Ensure to connect a When attaching the secondary camera after secondary camera to the turning off the power of rear window, place the the main body. holder at right side. * When attaching the secondary camera to the * When connecting the rear window, avoid cable of the secondary...
-
Page 18: Installation Mode
[Installation Mode] * Install Mode is to support easy setup for proper ADAS performance . * Install Mode appears when booting up for the first time. If Installation finishes, it will not appear again. * If setup values are inputted differently in menu screen or manager program , the latest inputted values will apply. * Check Power Connection It’s the starting screen ②Check whether power... - Page 19 * Check Indicator Lights Check indicator signal <NO> connection, Move to the [Camera Setup] screen, To connect turn indicator Refer to next page signal , press YES <YES> <NO> Check turn signal wire If both Left & Right arrows connection, are turned on , Press YES.
-
Page 20: Camera Settings
[Camera Settings] * Input Spec * Camera setting To perform ADAS To calibrate camera properly, input your angle correctly, make vehicle specifications, sure the vehicle is Press OK to continue parked on the flat ground, Press OK to continue Input the installed height Adjust the camera lens from the ground by angle by following the... -
Page 21: Main Functions
Main Functions Forward Collision Warning(Dual FCW) The FCW function generates a warning signal when there is a potential risk of collision with a vehicle ahead by calculating distance and relative speed . Types of Warnings /Dual Warning Logic ① HMW( Headway Monitoring Warning ) : - To keep a safe distance with a front vehicle while driving on the road - The variables are host vehicle’s speed and the distance to a preceding vehicle - Warning : One-off Audible Alarm / Timing Indication (ex:0.7, 0.9…... - Page 22 Lane Departure Warning(LDW) The LDW function generates an audible signal if the vehicle departs from the driving lane while driving above the set operating speed. LDW will help avoid or mitigate any lane departure accidents caused by drowsiness or carelessness on the road. The LDW function only works when the driving speed is over the set operating start speed .
- Page 23 Front Car Departure Alert (FCDA) The FCDA function can detect the movement of a vehicle in front while waiting for the traffic light to change in a traffic jam, and will inform the driver of any front movement through a warning tone.
- Page 24 Pedestrian Detection ( PD ) PD alerts the driver to any possible collision with a pedestrian ahead on the road . PD function helps prevent or mitigate a collision with a pedestrian on urban road or in crossroad Operating Start Speed : 05~30km/h 4.
- Page 25 CAR_DVR The DVR function supports 2 different resolution modes ;Full HD/ HD Types of Recording ① Continuous Recording : Records video data with 30-second segment in the Continuous File folder of SD card. ② Event Recording: Records video data automatically into the Event File folder when an impact is detected, it will immediately save the previous 15 seconds prior to impact and start recording video for next 15 seconds.
- Page 26 DIT Data Management 1) Explanation - stores driver’s route coordinates data and image files . - In the DIT folder , GPS and CAPTURE folders will be generated - GPS folder : GPS data will be recorded every 10 seconds and will be saved as a file daily.
-
Page 27: Start
Start [Booting up] When power is applied , the intro loading screen will appear followed by a voice message- “Hi, have a nice and safe trip today.” Logo Image Loading Image • The Logo & Loading images can be replaced upon request. * Even power is connected to B+ , the product will automatically restart when starting vehicle engine . -
Page 28: Screen Types & Explanation
[Screen Types & Explanation] Front Monitoring Live-view Mode ∙ shows the video is being recorded If a front vehicle is detected , HMW time will be indicated in Green . Center When warning signal is generated, TTC will turn Red. ( 0.7 as shown Number in the image ) A Red vehicle icon will appear when generating FCW signal... - Page 29 ADAS Display Mode • In the front monitoring Live View Mode, touch the LCD screen to switch to ADAS Display Mode • Indications - LDW : When lane lines are detected , the lines in the display turn Green , the violated line will turn Red . - FCW : When a front vehicle is detected , the vehicle icon will appear.
-
Page 30: Menu Guide
Menu Guide [Basic Menu] User can enter each functional setting in the basic menu screen. • The Basic Menu screen will appear when pressing the side M button or bottom home button of LCD. • Press each icon to enter into each corresponding setting menu . -
Page 31: Adas Cam
[ADAS CAM] In ADAS Setup menu, User can change settings of FCW, LDW, FCDA and PD. 1) Operating Settings Each function can be turned ON/OFF • Touch the button to switch between ON and OFF • 2) FCW Operating Speed : press the Left / Right arrow to change •... - Page 32 [DVR] In DVR setup menu , User can change recording operation and resolution. 1) Basic Setup Continuous Recording function can be turned ON/OFF ( If OFF, only Event files • can be recorded ) Voice recording can be turned ON/OFF ( If OFF, video sound will not be •...
- Page 33 [DVR] In DVR setup menu , User can change recording operation and resolution. 4) Voltage Setup • It is recommended to measure the voltage level at ACC On, and then input the prevention voltage value. * If prevention voltage value is below 12V, the vehicle battery could be discharged. [Play Movie] The recorded Video files in modes of Continuous/ Event / Parking can be checked instantly.
- Page 34 [Configuration] In Configuration menu , the operation settings can be configured . 1) Volume Control • Speaker Volume Adjustment : the speaker volume can be adjusted. (0~15) • MIC Volume Adjustment : the MIC input volume can be adjusted . (0~15) 2) Voice Alarm •...
- Page 35 [Configuration] System Setup sets LCD screen display and Screen OFF mode. • LCD setting : turns ON/OFF speed, speed unit, smart UI, and horizontal line • LCD display : on the display. language type can be selected. • Language : •...
- Page 36 [Configuration] 4-3) Language • The default language is English 4-4) System Info • User can check S/W & H/W Version information • When [Reset Setup] button is pressed, the values stored in the system will be initialized, and the system will enter into Install Mode. : return to the previous menu...
-
Page 37: Vehicle Type Settings
[Install] OPTIAN installation settings. If values entered through Install mode are arbitrarily modified, it may cause ADAS function errors. 1) Vehicle Type • Choose vehicle type. * If user selects a vehicle type, the values of Width and Height will be automatically set in 「Dimensions」... - Page 38 [Vehicle Type Setting] 3) Dimension * To perform ADAS properly , input actual vehicle width and installation height by using the arrow button. Camera * Measure the height from the ground Height to the main body of camera Vehicle width * Blinker Active If the display arrow light blinks continuously even when turn indicators are off, change High/Low settings of...
-
Page 39: Data Manager
DATA MANAGER Installation of Data Manager Program In data manager program , user can view FHD videos in a wider screen. Also, user can check additional information, such as vehicle GPS and acceleration data. 1) Release the provided zip file 2) If (setup.exe) is launched, user can install by following Visual C++ 2010 Runtime Libraries (x86) guide. -
Page 40: Screen Composition
[Screen Composition] ⑮ ② ① ⑥ ⑬ ⑭ ③ ⑦ ⑨ ⑩ ⑪ ⑧ ④ ⑫ ⑤ 1) Main Screen 6) Video Play Bar 11) Recording Date & GPS co-ordinates 2) Sub Screen 7) Video Play Time 12) Acceleration sensor data: impact level & speed graph 3) GPS Location on the map 8) Video Volume 13) Play/DIT Mode Change... - Page 41 [Screen Composition (DIT Mode)] ② ① ⑥ ⑬ ③ ⑦ ⑧ ⑨ ⑩ ⑪ ④ ⑫ ⑤ 1) DIT data list 6) Video Play Bar 11) Recording Date & GPS co-ordinates 2) Main camera screen 7) Video Play Time 12) Acceleration sensor data: impact level & speed 3) Location tracking window 8) Video Volume graph...
- Page 42 [Button Description] Open file Stop Open SD card Play Previous File Zoom in on the video playing main screen Play Zoom out on the video playing main screen Pause Switch between the main screen video and sub screen Play Next File Format SD card Normal playing speed Configuration...
- Page 43 [Set Up Main Function] Press the configuration button to set up ADAS, DVR and B2B special functions • ADAS CAM 1) ON/OFF Set up FCW, LDW, FCDA, PD function ON/OFF 2) FCW - to change operating start speed and warning sensitivity - A Higher value can enable a more responsive warning 3) LDW...
- Page 44 • DVR 1) Common Setup to turn ON/OFF the functions of Continuous Recording and Voice Recording. 2) Impact Level to adjust the event recording sensitivity. 3) Voltage Level to set up the voltage level for battery discharge prevention 4) Motion Level to adjust the motion detection sensitivity during parking hrs.
- Page 45 • SETUP 1) Volume Control to adjust the volume levels of a speaker and a microphone. 2) Voice Alarm to turn ON/OFF the voice alarming for each function. 3) LCD Setting to set up main body, external device and PIP screen output on LCD.
- Page 46 • INSTALL 1) Vehicle Type - choose your vehicle type * After selecting the vehicle type, for more accurate ADAS functions, please input exact installation parameters. 2) Install Position - Choose the installation position from the driver's point of view. - input installation height and width - input the offset distance from the center of the windshield...
- Page 47 • Special 1) Time Zone GMT can be set - Press [Apply Current PC Time zone] to sync with the GMT setting of your PC 2) Function On / Off to turn ON/OFF B2B special function.
-
Page 48: Maintenance
Maintenance [ Micro SD Card Maintenance ] SD card is a consumable product. If not maintained well, errors may occur and videos may not be recorded properly. Ensure to use the micro SD card approved by the manufacturer. SD Card Insert/Remove Before inserting or removing the SD card , ensure to turn off power Regular Check When video is recorded properly, a blinking REC sign will appear on the video monitor or... -
Page 49: Troubleshooting
[Troubleshooting] Q. Power does not turn on. Q. ADAS warning function does not operate. • Check if the power cable is correctly connected to • Check if the function is set to OFF. the product. • Check if the volume is set to ‘0’. •... - Page 50 [DISPLAY] (Sold Separately) User can easily check ADAS detection and warning statuses. Volume Adjustment Angle Adjustment Screw Meaning Number HMW Time to Collision Recording Activated Vehicle Detection & Warning Lane Detection & Warning Pedestrian Detection & Warning Turn Signal Activation Brake Signal Activation (when brake wire is connected ) Error or Functions OFF...
- Page 51 [Vibrator] (Sold Separately) Warnings can be effectively sensed by the driver through the instant vibratory warning method. The vibration strength can be adjusted from level 1 to level 3 or can be turned off. Strength Adjustment * How to apply vibratory device Lever Place the vibrator inside the pocket of cover and wrap around the seat belt...
-
Page 52: Optional Devices
OPTIONAL DEVICES [Cover Lock] The Cover Lock is designed to prevent theft and unauthorized setting changes. Bottom Keyhole Head Tape Cable Lock Position OPTIAN Open... - Page 53 [Specification] The specification of ADAS CAM is subject to change without a prior notice for product improvement. ADAS CAM Name Full HD(1920 x 1080) Operating Front Camera 12V, 24V 100 x 82 x 42 (mm) Voltage Minimum Rear Camera HD (1280x720) Operating (Option) 65 x 28.3 x 32.5 (mm)
Need help?
Do you have a question about the RVS-OP7 and is the answer not in the manual?
Questions and answers