Table of Contents
Advertisement
Quick Links
XYZprinting 3D Printer
ENG : Read this user manual in the SD or USB Card before using your printer.
DEU : Lesen Sie vor der Benutzung Ihres Druckers diese Bedienungsanleitung auf der SD- oder USB-Karte.
ESP : Lea primero- La información regulatoria Lea el documento en se encuentra en la tarjeta SD o USB antes de utilizar la impresora.
FRA : Veuillez lire ce manuel d'utilisation dans la carte SD ou USB avant d'utiliser votre imprimante.
ITA : Prima di utilizzare la stampante leggere il Mauale d'uso della scheda SD o del dispositivo USB.
Quick Guide
The manual is mainly intended for users to understand how to use the
da Vinci Color 3D printer ("da Vinci Color") correctly. In this manual,
users can learn more about the operating tips, application skills and
maintenance of the da Vinci Color 3D printer.
For more information on the da Vinci Color 3D printer and the
complete XYZprinting product line, please contact your local dealer or
visit the official website of XYZprinting: http://www.xyzprinting.com.
HD23FC1X071
ENG
2
2
Change Ink 10
3
Print test page 10
4
6
Printing 12
Advertisement
Table of Contents

Subscribe to Our Youtube Channel
Related Manuals for XYZ Printing ds Vinci Color


Summary of Contents for XYZ Printing ds Vinci Color
-
Page 1: Table Of Contents
XYZprinting 3D Printer Quick Guide Important Safety Precautions Ink Installation 9 Product exterior Change Ink 10 Specifications Print test page 10 Unpacking Color calibration 11 Main screen Ink Calibration 11 WiFi setting 7 Convert and slicing file 12 Print bed calibration (leveling) 8 Printing 12 Z-offset check 8 Problem code and handling 13... - Page 2 您可以透過XYZmaker對列印機軔體及軟體進行手動更新,建議您初次使用列印機時,先利用網路連線執行乙次 手動更新以獲得最新資源。 您可以透过XYZmaker对打印机韧体及软体进行手动更新,建议您初次使用打印机时,先利用网络连线执行几 次手动更新以获得最新资源。 You may use XYZmaker to initiate manual updates to the printer firmware and software. When using the print- er for the first time, we recommend connecting to the Internet and performing manual update once to obtain the latest resources.
-
Page 3: Important Safety Precautions
Important Safety Precautions CAUTION Heavy object. Watch Your Hands. 2 person lift required ● Do not move the machine by yourself as it is heavy. ● Do not place the printer in a dusty, humid or outdoor environment. ● Do not place the printer on a soft or tilted surface. Otherwise, the machine will fall / flip over and become damaged or cause personal injury. -
Page 4: Specifications
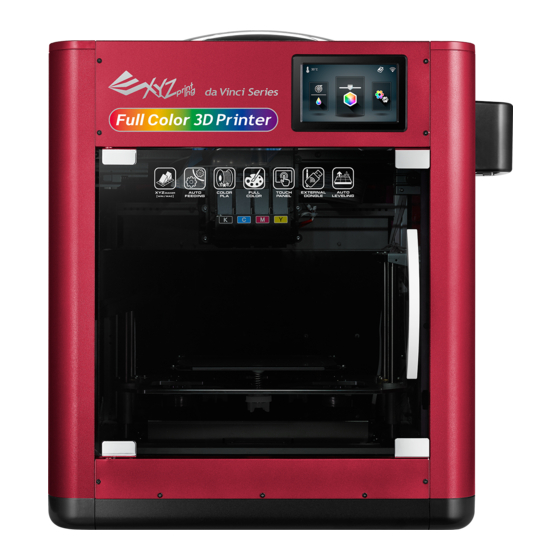
Accessory Checklist Accessory Checklist Precautions and Instructions of Maintenance Tools Quick Guide Top Cover The following tools are intended for use under the guidance or guard- USB drive Guide Tube ianship of an adult only. Do not allow children unfamiliar with the tools 3D Color-inkjet PLA PC Mylar x 2 to have access to them in case of danger. -
Page 5: Unpacking
Unpacking Move the printer to a table or plat- form. (Do not move the printer by Remove the plastic wrap and PP. yourself as it is heavy.) Remove the packaging materials, top cover box, assessory box and plastic cover. Open the front door. Remove the Remove the tape on the body (4 in Remove the foam on the cartridge tape from the supporting aterials... - Page 6 Unpacking Insert the guide tube through the top Remove the cable tie and foam in front and back of the front door. cover, and then insert one end into the printing module. Place the top cover down with the Insert the other end of the guide tube into the feed module and guide tube going through the hole in secure it tightly.
-
Page 7: Main Screen
Main screen Settings Filament/Ink loading USB Printing Menu and unloading This menu can be used to import This includes the functions in Home files (.3cp) from a USB drive to the Page 1: This includes Filament, Ink Load machine for printing without a com- Settings of the Print-Bed, Print- and Unload. -
Page 8: Wifi Setting
WiFi setting Before setting the WiFi, please insert the WiFi dongle into USB port on the top of printer. 1. Tap ADD and the printer will 2. Tap the access point to be 3. Enter the password for the 4. Confirm the connection is used. -
Page 9: Print Bed Calibration (Leveling)
Print bed calibration (leveling) 1. Select Calibration. 2. Confirm the operation. 3. Wait while the sensor measures the height of the print bed at three different locations. Once the mea- 4. After the calibration is surement is complete, the printer will automatically level the print bed. successfully completed, tap to confirm. -
Page 10: Ink Installation
Ink Installation The da Vinci Color uses four color inks which can be replaced separately. Ink Guidance 1. Prepare several paper towels and the 2. Unpack the ink cartridge. 3. Remove the cartridge cover. ink cartridge. 4. Press the cartridge head against the 5. -
Page 11: Change Ink
Change Ink Tap the ink, the screen will show the status of the ink, including "Ink Low", "No Ink", "Invalid Ink", and "Invalid Color" 1. Tap Change Ink and tap to 2. Confirm the operation. 3.Wait until the cartridge moves 4. -
Page 12: Color Calibration
Color calibration 1. Tap Calibration. 2. Tap Color. 3. Please fix the printing paper onto the print bed. 4. Take out the printed paper and tap PROCEED. 5. Check the printed calibration 6. For horizontal alignment, 7. For vertical alignment, enter 8. -
Page 13: Convert And Slicing File
Convert and slicing file Connect the printer and computer with a USB cable and install the “XYZmaker” on the computer to transfer the files you want to print. The “XYZmaker” is compatible with operating systems of Windows 7 or higher and Mac OS 10.8 or higher. You can install it by using the includ- ed USB drive or downloading the installer from the official XYZprinting website. -
Page 14: Problem Code And Handling
Problem code and handling When a problem occurs with the printer, the service code will be displayed on the printer screen and / or the software interface. Please refer to this service code description form for preliminary testing. Service Symptom Action Code OO11 Print head heated for too long...
Need help?
Do you have a question about the ds Vinci Color and is the answer not in the manual?
Questions and answers