XYZprinting da Vinci 1.0 / 1.0A Manual
- User manual (27 pages) ,
- Product manual (8 pages) ,
- User manual (26 pages)
Advertisement
Overview
This manual provides detailed instructions on how to use your new da Vinci 1.0/1.0A 3D Printer. The instructions are for your safety and to properly maintain your printer. Visit our website http://www.xyzprinting.com or contact your sales representative to get the latest available information on your da Vinci 1.0/1.0A 3D Printer.
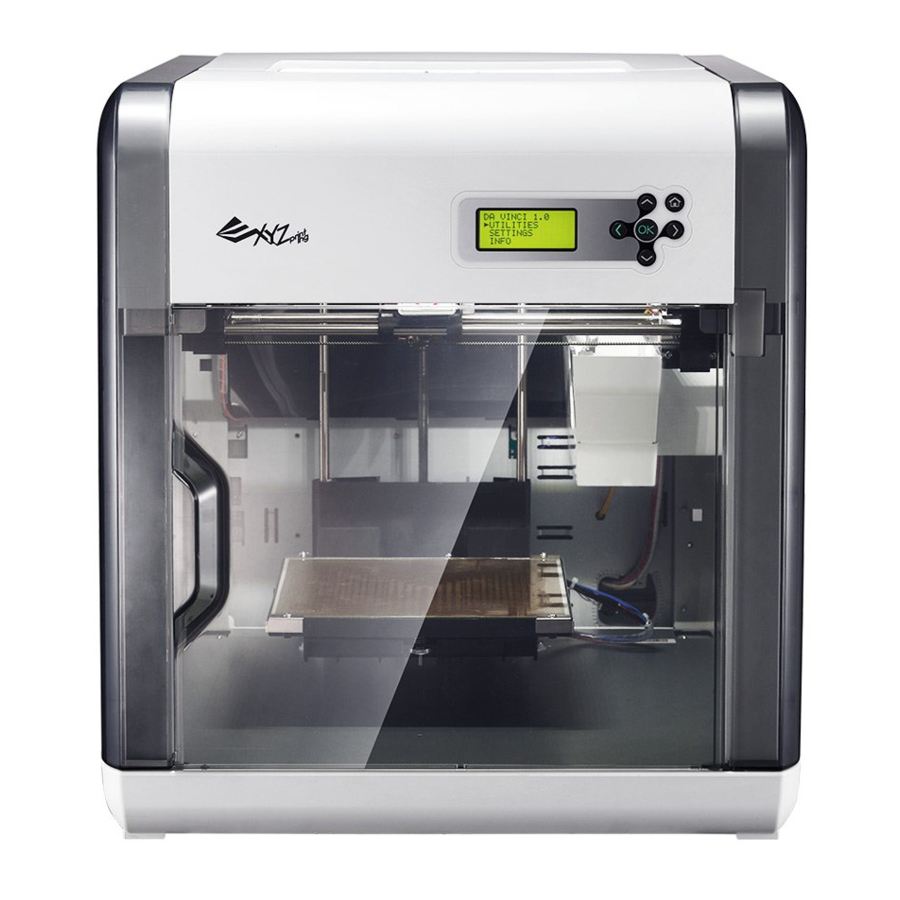
* The illustration is for da Vinci 1.0A, for the display on da Vinci 1.0, please check the printer.
This chapter describes the unpacking and set up of the printer. Before proceeding to this chapter, please make sure read the "Important Safety Instruction" Chapter. Important Safety Instruction is acknowledged carefully.
Open the Box
 Note: Cable tie illustrated in step 4 in this section is used to fix the extruder during transportation.
It should be removed before powering on the printer, or the printer may not function normally.
- Open the box and remove the accessories and the cushion.
![]()
- Take out the printer by holding the side handles.
![]()
- Remove plastic bag and tapes.
![]()
- Open the top cover, then remove packaging supports and tapes from inside.

- Remove the cardboard.
![]()
- Remove the print bed shipping tapes and foam cushioning pieces.

- Remove the bottom screw and the plastic piece under print bed.
![]()
- Remove the drip tray packaging tapes.
![]()
- Use the USB cable to connect the printer to PC. Connect the power cord to the printer then turn on the power switch.
![]()


Attention
- Retain the box and packing material. If the need arises, it will be used to transport the unit.
- This device without packing material or box is weighted around 23Kg (50lb). Handle the printer carefully to prevent personal injury and damage of the printer.
Parts and Features

Display Panel: information on printer status.
Control Panel: use to operate functions in the printer.
Extruder Module: to be used for printing 3D objects.
Z-Axis Rod: to be used to provide print-enabled lifting heated bed module.
Front Door: to be used for operating or maintenance.
Print bed: provides a flat surface to lay the 3D model.
Cartridge Slot: space for placing the filament cartridge.
USB Port: used for connecting the USB cable.
Power switch: this switch turns on/off the power of the printer.
Power Connector: to be used to connect the power cord.
Attention
Once the 3D printer is turned off, wait at least 3 seconds before turning it on again.

Install and Set Up
Parts name and functions

Connect the Cable

- USB Port
- Power Outlet

- Make sure to set the power switch to the "off " position before inserting the power cord.
- Make sure the power cord is properly connected. Incorrect use may cause damage to the printer.
- Make sure to remove the power cord from printer if you are storing or not using the printer for an extended period of time.
- Make sure to avoid power strips to power the printer. Use a wall outlet.
Connect USB Cable and Power Cord
Connect the printer power cord and USB cable to the back of the printer.
Power On the Printer
Please switch the power button to "I" icon, the information of printer will be shown on the panel, it is ready to print.

Load the Filament
Install Cartridge
- Remove filament stopper and tape.
![]()
- Install the new filament cartridge into the empty slot.
![]()
- Place and push to click the cartridge locker into the slot.

- Push the filament through the filament guide tube to the hole of the extruder and press "LOAD FILAMENT" function on the display menu.

![information]() Tips:Grasping the release arms while inserting, it will make it easier to push filament into the extruder.
Tips:Grasping the release arms while inserting, it will make it easier to push filament into the extruder.


Note: Before pushing the filament into the guide tube, it is advised to cut the tip of the filament off at a 45˚ angle with a cutting pliers, filament loading will be easier.
Load filament
- Choose"UTlLlTlES" and press"OK" to continue.
![]()
- Choose "CHANGE CART" and press "OK".
![]()
- Choose"LOADFILAMENT" and press "OK".
![]()
- Please wait for extruder to reach working temperature.
![]()
- Please wait for completion of filament loading.
![]()
- Check if the nozzle outputs filament and press "Ok" to go back to main menu.
![]()


Sample print
Apply glue to print bed before printing Glued area depends on the measurement of the object(s) to be printed.

- Choose"UTILITIES" and press "OK" to continue.
![]()
- Choose "BUILD SAMPLE" and press "OK" to continue.
![]()
- Select one of the samples.
![]()
- Select "YES"andpress "OK" to start printing.
![]()
- Remove the printed object when the print bed has descended. Cover a damp cloth on the print bed (while cold) for 2—3 minutes Then wipe the moistened glue from the print bed with the damp cloth gently.
![]()


Unload filament
Note: To avoid clogging the extruder, complete the "UNLOAD FILAMENT" procedure before changing the cartridge. Do not cut filament from the extruder.
- Choose " UTILITIES" and press "OK" to continue.
![]()
- Choose "CHANGE CART" and press "OK".
![]()
- Choose "UNLOAD FILAMENT" and press "OK".
![]()
- Remove filament slowly when printer has reached working temperature as instructed. Then remove cartridge locker and the cartridge unloaded.


Attention
Shipping notice:
- Please unload the filament before printer shipping.
- Please use the regular carton and protection material.
- Do not put the printer in the carton while extruder or heated bed still warm and make sure both are completely cool down before packing.
Printer Functions
Functions of Control Panel Key on the printer:
| Button | Functions |
 | Direction Up |
 | Direction Down |
 | Back to pervious menu |
 | Forward to submenu |
 | OK; confirm selection/settings |
 | Home Button, return to main menu |

| Function | Description |
| UTILITIES | Printer adjustment / Change filament / Sample printing |
| SETTINGS | The parameters of printer |
| INFO | The firmware and printer statistical information |
| MONITOR MODE | Monitor of extruder and heated bed working temperature and printing progress |
UTILITIES

| Function | Description |
| CHANGE CARTRIDGE | Loads/unloads filament |
| HOME AXES | Moves the extruders and print bed to default "home" location |
| JOG MODE | Manually adjusts the movement of X/Y/Z Axis for printer maintenance |
| BUILD SAMPLE | Prints sample build |
| CLEAN NOZZLE | Heat the extruder and move it to the center for manual cleaning |
| CLEAN DRIPBOX | Move the extruder to the center for manual dripbox cleaning |
LOAD FILAMENT
- Choose "CHANGE FILAMENT" > "LOAD FILAMENT".

- Please wait for extruder to reach working temperature.

- Push the filament through the filament guide tube to the hole of the extruder and press "OK" button.


- Please follow instructions on the panel and press "OK" to finish this process; it is normal if filament color comes out not you excepted in the beginning.
Some filament left over inside the extruder form last printing.


UNLOAD FILAMENT
- Choose "CHANGE FILAMENT" > "UNLOAD FILAMENT".

- Please wait for extruder to reach working temperature.

- Pull the filament through the filament guide tube to the hole of the extruder and press "OK" button.


Remove filament slowly when printer has reached working temperature as instructed. Then remove cartridge locker and the cartridge unloaded.

HOME AXES
- Choose the HOME AXES function and press "Yes",extruder and heated bed will move to proper positions.

- Wait for extruder and heated bed moving process finish.

- Refer the information from display panel, process complete message will be shown, press "OK" to return main screen.


JOG MODE
- Choose the proper axis and press "OK" to next steps.
Options: X AXIS / Y AXIS / Z AXIS

- Select adjustment degree
- Use Upper / Down button to switch adjustment degree.
- Use Left / Right Button to apply a default scale.


BUILD SAMPLE
- Choose printing sample.

- Press "OK", printer will be start to print.

- Printing status will be refresh on the LCD panel
- BUILDING: the percentage of printing finish.
- TIME PASS: elapsed build time.
- ESTIMATED: estimation of build time.


SETTINGS

| Function | Directions | Default |
| BUZZER | Buzzer for alerting | On |
| AUTO HEAT | Keep the extruders and print bed at working temperature when printer is powered on | Off |
| LANGUAGE | Set the language displayed on the panel. Available options: English & Japanese | English |
| RESTORE DEFAULT | Apply default settings |
INFO

| Function | Directions |
| STATISTICS | Used time of printer |
| SYSTEM VERSION | Version of firmware |
| CARTRIDGE STATS | Capacity, remaining of filament |
STATISTICS
Printer version information will be shown on the display panel

SYSTEM VERSION
Printer version information will be shown on the display panel

CARTRIDGE STAT
Some information related to filament which in the printer will be shown as below:
- REMAINING: remaining length of filament
- CAPACITY: original length of filament


MONITOR MODE
You can get the temperatures of information via Monitor Mode function
- EXTRUDER: Proper working temperatures is 210ºF/ 410ºF
- PLATFORM: Proper working temperatures is 90ºF/ 194ºF


This print bed has been factory calibrated before shipping. Recalibration is necessary if there are print issues when starting to pr•nt or the nozzle gets too close to the print bed. When in doubt, it is recommended to contact service center for more information.
Print bed adjustment flow chart

To clean the molted filament from nozzle thoroughly, it is recommended to activate "CLEAN NOZZLE" function to keep heating the extruder for better cleaning.

Print bed adjustment steps
- Click "INFO>SYSTEM VERSION" using the function keys to make sure your firmware is the latest.
![]()
- Click "UTILITIES>CALIBRATE" using the function keys and select "Yes" to perform calibration.

- The printer starts automatic measurement. Wait for 2—3 minutes and verify the data shown.
![warning]() Note: During the measurement process, the print bed and print module will be heated. Care should be taken during operation!
Note: During the measurement process, the print bed and print module will be heated. Care should be taken during operation!
![]()


- If SUCCESS is shown.

- The printer does not need adjustment and press OK to exit.
- If FAIL is shown

- The printer needs adjustment, refer to the values shown. If the 3 values are more than +1-20 from each other, this will result in a "FAIL" calibration.


- Refer to the values for adjustment:
Step-by-step adjustment- Adjust the screw at Point A to reduce the difference between the 1st and the 2nd measurements.
- Adjust the screw at Point B based on your evaluation of the results obtained from the previous steps.
- Finally, adjust the screw at Point C to reduce the difference between all measurements
![warning]() Note:
Note:
* Please adjust the values to between 230~260
* 3 values should be no more than +/- 20 from each other.

View the printer from the front when making adjustment- Rotate the screw to the left to raise the bed (value increases)
- Rotate the screw to the right to lower the bed (value decreases)
Each full turn leads to a change of 50 to the values shown

Use small dial turns to approximate the desired value


- After the adjustment is finished, perform step 2 Wait until SUCCESS is shown and press OK to complete calibration.


Reminder
If the value shown is always ERR,ERR,ERR, follow the steps below to clean.
- Clean the surface of the print head using the copper brush. (Clean the contact point between the print head and print bed).
- Wipe and clean the measurement points as shown in step 4.
- Perform the calibration process again.


Q&A
Q1. Are there any suitable applications or software for this printer?
A1. The packaged CD contains the XYZ Ware software. After installation it will use an available internet connection and look for the latest release to perform an automatic update.
For further information and instruction of the service code, please refer to: http://support.xyzprinting.com/manuals
| Service Code | Display Panel Description |
| 0010 | Extruder or heated bed higher/lower than maximum/minimum temperature during printing |
| 0011 | Extruder or heated bed cannot heat to the specified temperature |
| 0013 | The temperature of heated bed reach to warning range limited |
| 0014 | The temperature of extruder reach to warning range limited X axis motor failed results moving failed or X axis home sensor failed results home |
| 0030 | X axis motor failed results moving failed or X axis home sensor failed results home detect failed |
| 0031 | Y axis motor failed results moving failed or Y axis home sensor failed results home detect failed |
| 0032 | Z axis motor failed results moving failed or Z axis home sensor failed results home detect failed |
| 0040 | Memory storage cannot read/write |
| 0050 | Flashrom cannot read/write |
Information and usage of the advanced maintenance tools
Scraper
Scraper is used to remove printed objects from print bed when printing is completed. (Caution: do not remove the printed object while the print bed is hot.)

Cleaning
Wire Cleaning wire is used to remove the filament left in the path inside the clogged nozzle.
(
Print bed may be hot during cleaning, please keep away from the platform to avoid personal injury.) When cleaning the printer nozzle, gears or filament path please ensure to keep hands clear of the print bed which may be hot.

Copper Brush
Copper brush is used to clean and remove molten filament left on the tip or surface of the extruder and inside the drive gear. When the printer fails to calibrate consistently; clean and remove the filament from extruder(s) surface.

Specifications
| FEATURES | da Vinci 1.0/1.0A 3D Printer | FEATURES | da Vinci 1.0/1.0A 3D Printer |
| Print Technology | Fused Filament Fabrication(FFF) | Nozzle Diameter | 0.4 mm |
| Printer Head | Single Head | AC Input | 100-240V, 50~60Hz |
| Build Volume(W x D x H) | 20 x 20 x 20 cm | Connectivity | USB 2.0 x 1 |
| Layer Resolution Settings | Standard 200 microns | Display | FSTN LCM (16 Characters x 4) |
| Speed 300 microns | Control Method | Key x 6 | |
| Ultra fast 400 microns | Indicator | Buzzer | |
| Custom 100-400 microns | Lighting | LED | |
| Filament Diameter | 1.75 mm | Weight | 26 Kg |
Cleaning and Maintenance
This section describes how to properly clean the printer under the following conditions:
Fail to calibrate or printed object is polluted by different color filament
- Printer calibration failed constantly
![]()
- Printed object is polluted by different color filament


- Make sure the heated bed has been moved to the appropriate location, or use JOG MODE feature to adjust Z—AXIS.

- Clean up the measurement points.

- Choose "UTILITIES ", and press "OK"
![]()
- Choose"CLEAN NOZZLE" and press "OK".
![]()
- Choose"YES"andpress "OK".
![]()
- Wait until the extruder heats up and moves to the front.
![]()
- Clean the surface of the print head using the cooper brush.

- Press "OK" when finish cleaning.
![]()


Clean the heated bed after printing finish
- Remove the printed object when the print bed has descended. Cover a damp cloth on the print bed (while cold) for 2-3 minutes.
- Wipe the moistened glue from the print bed with the damp cloth gently.
- After cleaning is completed, wipe again with a dry cloth to ensure the print bed is completely dry.
![]()

Empty the drip box
When drip box is full, use "JOG MODE", and choose "Y-AXIS" to move the extruder to the appropriate location.

- Choose "UTILITIES", and press "OK".
![]()
- Choose "CLEAN DRIPBOX" and press "OK"
![]()
- Choose "YES" andpress "OK" to move the extruder from the dripbox.
![]()
- Wait until the extruder moves to the center of the chamber.

- Take out the drip box and empty the box.
![]()
- When the box is empty, reinstall the dripbox and press OK.
![]()


Service
If you need warranty service, please contact the original dealer or email us at supportus@xyzprinting.com.
If you need more information about our warranty services, please log in to www.xyzprinting.com, select "support (product support)" where you will find complete details of all the warranty conditions.
Important Safety Instruction
The maintenance tools provided should only be handled by an adult. Please keep the tools away from children. Incorrect handling or maintenance of the printer may cause damage to the product or personal injury.
Please read this manual carefully before operating the printer. The following warnings and attention notices are a best effort attempt to cover all scenarios; unfortunately it is not possible to do so. In the case of performing maintenance procedures that are not described in this manual the burden of safety falls to the customer side.
For basic safety and precautions adhere to the following:
- Do not let children operate this device without adult supervision. Electric shock hazard. Moving pars can cause serious injury.
- Do not place the printer on an unbalanced or unstable surface. Printer may fall or tumble causing harm and/or injury. Printer may fall or tumble causing harm and/or injury. and/or injury.
- Do not place any objects on top of the printer. Liquids and objects that fall into the printer can lead to printer damage or safety risks.
- Do not use flammable chemicals or alcohol wipes to clean this device.
- Do not disassemble or replace the printer cover with none XYZprinter covers.
- Do not touch heated surfaces during or after operation. Heated surfaces can cause severe burns.
- Insert and secure the power cord firmly for proper usage and to avoid potential electricity and fire dangers.
- Do not attempt to service the printer beyond the instructions specified in this document. In the case of irrecoverable problem, contact XYZprinting service center or your sales representative.
Attention
- Please place and use the printer in a well ventilated area. The process of heating the filament will produce a small amount of non-toxic odor. Having a well ventilated area will ensure a more comfortable environment.
- This printer is only to be used with filament specified by XYZprinting.
- Make sure to set the power switch to the off position and remove the power cord before transporting the device.
- Some components of the printer are moving during operation. Do not attempt to touch or change anything inside before power off the printer.
This 3D Printer - when used with a styrene filament (ABS / HIPS / or PC-ABS) can expose you to chemicals, including Styrene, which is known to the State of California to cause cancer. For more information, visit www.p65warnings.ca.gov
Documents / Resources
References

Download manual
Here you can download full pdf version of manual, it may contain additional safety instructions, warranty information, FCC rules, etc.
Advertisement


Need help?
Do you have a question about the da Vinci 1.0 and is the answer not in the manual?
Questions and answers