Sharp MX-M850 User Manual
Hide thumbs
Also See for MX-M850:
- Manual (141 pages) ,
- Quick start manual (108 pages) ,
- Specifications (16 pages)
Table of Contents
Advertisement
Quick Links
Advertisement
Chapters
Table of Contents

Related Manuals for Sharp MX-M850


Summary of Contents for Sharp MX-M850
- Page 1 MODEL: MX-M850 MX-M950 MX-M1100 User's Guide...
-
Page 2: Table Of Contents
• SADDLE UNIT ......60 IMPORTANT POINTS ABOUT PAPER ... 26 • FINISHER (FOR THE MX-M850) / SADDLE • NAMES AND LOCATIONS OF TRAYS ..26 STITCH FINISHER . - Page 3 SHARP OSA ....... . 71 • APPLICATION COMMUNICATION MODULE (MX-AMX2) ......71 •...
-
Page 4: About This Manual
SHARP Service Department. • Aside from instances provided for by law, SHARP is not responsible for failures occurring during the use of the product or its options, or failures due to incorrect operation of the product and its options, or other failures, or for any damage that occurs due to use of the product. - Page 5 Operation manuals in PDF format The manuals in PDF format provide detailed explanations of the procedures for using the machine in each mode. To view the PDF manuals, download them from the hard drive in the machine. The procedure for downloading the manuals is explained in "How to download the manuals in PDF format"...
-
Page 6: Before Using The Machine
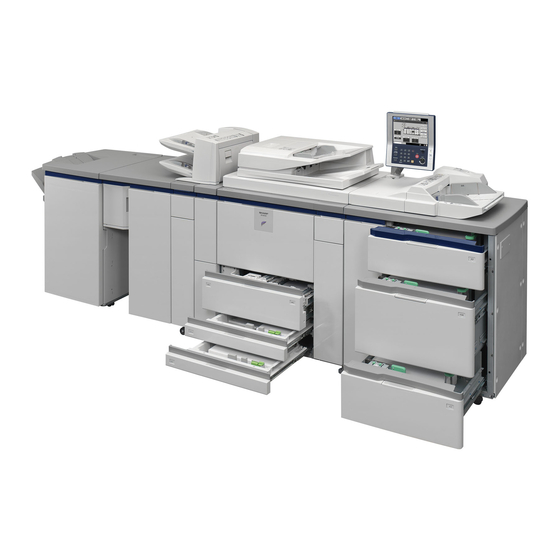
BEFORE USING THE MACHINE This chapter provides basic information about the machine. Please read this chapter before using the machine. PART NAMES AND FUNCTIONS EXTERIOR (3) (4) Finisher* Automatic document feeder This can be used to staple output. The optional punch This automatically feeds and scans multiple originals. - Page 7 (12) (13) (14) (15) (16) (17) (18) (19) Finisher (for MX-M850) / Saddle stitch finisher* (14) Tray 4 This can be used to staple output. The punch module can This holds paper. Transparency film, tab paper, and be installed to punch holes in output. The saddle stitch other special media can also be loaded.
-
Page 8: Inside And Connector
INSIDE AND CONNECTOR (20) (21) (22) (23) (24) (25) (26) (27) (20) Toner cartridges (24) Service-only connector These contain toner for printing. When the toner runs out in the cartridge, replace the cartridge with a new Caution cartridge. This connector is for use only by service technicians. (21) Main power switch Connecting a cable to this connector may cause the This is used to power on the machine. -
Page 9: Automatic Document Feeder And Document Glass
AUTOMATIC DOCUMENT FEEDER AND DOCUMENT GLASS Document feeding area cover Scanning area Open to remove a misfed original. Originals placed in the document feeder tray are scanned here. Original guides Do not allow paper or other material to cover the These help ensure that the original is scanned correctly. -
Page 10: Operation Panel
OPERATION PANEL HOME PROOF COPY SYSTEM SETTINGS JOB STATUS LOGOUT (1) (2) (3) (4) (5) (6) (8) (9) (10) Status indicators [JOB STATUS] key Green and red indicators will light or blink to indicate the Press this key to display the job status screen. The job machine's status. - Page 11 HOME PROOF COPY SYSTEM SETTINGS JOB STATUS LOGOUT (11) (12) (13) (14) (15) (16) (11) [STOP] key ( Press this key to stop a copy job or scanning of an original. (12) [START] key ( Press this key to copy or scan an original. This key is also used to send a fax in fax mode.
-
Page 12: Touch Panel
TOUCH PANEL The touch panel (screen) shown in this manual is a descriptive image. The actual screen is slightly different. USING THE TOUCH PANEL Example 1 DOCUMENT MANUAL COPY IMAGE SEND FILING FINISHING Job status screen. Print Job Scan to Fax Job Internet Fax Job Queue... -
Page 13: Settings)
Example 4 Plain Function Review Special Modes Plain Shift:Right Plain Margin Shift 2-Sided Copy Front:1/2inch/Back:1/2inch 8½x11 Edge:1/2inch Erase 11x17 Output Center:1/2inch Exposure 8½x11 8½x11 11x17 Front:2-Sided/Back:Insert Auto 11x17 Covers/Inserts File Insertion A:10 Page/B:10 Page 8½x14 11x17 Quick File Copy Ratio Original Paper Select 100%... - Page 14 USING THE TOUCH PANEL (System Settings) This section explains special operation methods that are common to all system settings. Some of these steps are omitted in the explanations of each of the system settings, so refer to this section when configuring a setting.
-
Page 15: System Bar
SYSTEM BAR The system bar appears at the bottom of the touch panel. The items that appear in the system bar are explained below. Plain Special Modes Plain Plain 2-Sided Copy 8½x11 11x17 Output Exposure 8½x11 8½x11 11x17 Auto 11x17 File 8½x14 11x17... -
Page 16: Print/Send Status (Job Status)
PRINT/SEND STATUS (JOB STATUS) This screen appears when the [JOB STATUS] key on the operation panel is pressed. The screen shows lists of the jobs that are reserved and in progress, and jobs that have been completed. This screen is used to check jobs, move a job to the top of the job queue, or delete a job. -
Page 17: Status Indicators
STATUS INDICATORS There are status indicators at the top of the operation panel. There are both red and green indicators, and these light or blink to indicate the machine's status. Green indicator Red indicator About status indicator lighting and blinking The status indicators light or blink to indicate the following conditions. -
Page 18: Turning The Power On And Off
TURNING THE POWER ON AND OFF The machine has two power switches. The main power switch is at the lower left after the front cover is opened. The other power switch is the [POWER] key ( ) on the operation panel at the top right. Main power switch [POWER] key When the main power switch is switched on, the main... -
Page 19: Energy Save Functions
ENERGY SAVE FUNCTIONS This product has the following two energy save functions that conform to the Energy Star guidelines to help conserve natural resources and reduce environmental pollution. Preheat Mode (low power mode) Preheat mode automatically lowers the temperature of the fusing unit and thereby reduces power consumption if the machine remains in the standby state for the interval of time set in "Preheat Mode Setting"... -
Page 20: User Authentication
USER AUTHENTICATION User authentication restricts the use of the machine to users that have been registered. The functions that each user is allowed to use can be specified, allowing the machine to be customized to meet the needs of your workplace. When the administrator of the machine has enabled user authentication, each user must log in to use the machine. - Page 21 Touch the [OK] key. User Authentication After the entered user number is authenticated, the user count screen will appear briefly. Usage status: used/remaining pages Black-white : 87,654,321/12,345,678 Full color : 87,654,321/12,345,678 2-color : 87,654,321/12,345,678 Single color: 87,654,321/12,345,678 Admin Login When page limits have been set in "Pages Limit Group List" in the system settings (administrator), the number of pages remaining will appear.
-
Page 22: Authentication By Login Name / Password
AUTHENTICATION BY LOGIN NAME / PASSWORD The following procedure is used to log in using a login name and password received from the administrator of the machine or the administrator of the LDAP server. User Authentication Login Name User Name Password Auth to: Login Locally... - Page 23 Touch the [Password] key. User Authentication A text entry screen for entering the password will appear. Enter your password that is stored in "User List" in the system Login Name settings (administrator). User Name User 0001 Password If you are logging in to an LDAP server, enter the password that Auth to: Login Locally is stored with your LDAP server login name.
- Page 24 Touch the [OK] key. User Authentication After the entered login name and password are authenticated, the user count screen will appear briefly. Login Name User Name User 0001 Usage status: used/remaining pages Password Black-white : 87,654,321/12,345,678 Full color : 87,654,321/12,345,678 Auth to: Login Locally 2-color...
-
Page 25: Home Screen
HOME SCREEN When the [HOME] key is pressed on the operation panel, the home screen appears in the touch panel. Shortcuts to functions can be registered as keys in the home screen. When a shortcut key is touched, the screen for that function appears. -
Page 26: Loading Paper
LOADING PAPER IMPORTANT POINTS ABOUT PAPER This section provides information that you should know before loading paper in the paper trays. Be sure to read this section before loading paper. NAMES AND LOCATIONS OF TRAYS The trays are identified by the names indicated below. For the names of the peripheral device trays, see "TRAY LOCATIONS AND NAMES"... -
Page 27: Useable Paper
• SHARP standard plain paper (21 lbs. (64 g/m )). For paper specifications, see the specifications in the Safety Guide. • Plain paper other than SHARP standard paper (16 lbs. to 28 lbs. (60 g/m to 105 g/m Recycled paper, colored paper and pre-punched paper must meet the same specifications as plain paper. Contact your dealer or nearest SHARP Service Department for advice on using these types of paper. - Page 28 • The image quality and toner fusibility of paper may change due to ambient conditions, operating conditions, and paper characteristics, resulting in image quality inferior to that of SHARP standard paper. Contact your dealer or nearest SHARP Service Department for advice on using these types of paper.
-
Page 29: Tray Settings For Tray 1 And Tray 2
TRAY SETTINGS FOR TRAY 1 AND TRAY 2 LOADING PAPER Up to 1200 sheets of 8-1/2" x 11" or A4 size paper can be loaded in tray 1. Up to 800 sheets of 8-1/2" x 11" or A4 size paper can be loaded in tray 2. For detailed information on the paper that can be loaded, see the specifications in the Safety Guide and "PAPER TRAY SETTINGS"... -
Page 30: Changing The Paper Size
Gently push tray 1- tray 2 into the machine. Push the tray firmly all the way into the machine. If you loaded a different type of paper than was loaded previously, change the paper type setting as explained in "PAPER TRAY SETTINGS"... - Page 31 Attach the paper size guide and transparent sheet appropriately for the size of paper to be used. (1) Align the bottom of the paper size guide with the appropriate slot on the base of the tray. Align the paper size guide with the slot for the paper size to be used (indicated by the paper size mark).
-
Page 32: Tray Settings For Tray 3 And Tray 4
TRAY SETTINGS FOR TRAY 3 AND TRAY 4 LOADING PAPER AND CHANGING THE PAPER SIZE Up to 500 sheets of 7-1/4" x 10-1/2"R to 12" x 18" size paper (B5R to A3W size paper) can be loaded in tray 3. Up to 500 sheets of 5-1/2"x 8-1/2"R to 12"x 18"... - Page 33 Insert the paper into the tray. Load the paper with the print side face down. The stack must not be higher than the indicator line (maximum of 500 sheets). Indicator line Gently push the paper tray into the machine. Push the tray firmly all the way into the machine. •...
- Page 34 Pull out the tray and attach the guide. Move the guide plate to the triangle mark. Next, attach the guide over the guide plate as shown. After attaching the guide, see step 2 of "LOADING PAPER AND CHANGING THE PAPER SIZE"...
-
Page 35: Peripheral Device Trays
PERIPHERAL DEVICE TRAYS This section explains the large capacity trays and the large capacity tray. TRAY LOCATIONS AND NAMES The trays are identified by the names indicated below. For detailed information on the sizes and types of paper that can be loaded in each tray of the machine, see the specifications in the Safety Guide and "PAPER TRAY SETTINGS"... -
Page 36: Paper That Can Be Used In The Peripheral Device Trays
PAPER THAT CAN BE USED IN THE PERIPHERAL DEVICE TRAYS This section explains what paper can be used in the peripheral devices. For detailed information on the sizes and types of paper that can be loaded in each tray of the machine, see the specifications in the Safety Guide and "PAPER TRAY SETTINGS"... -
Page 37: Tray Settings For The Large Capacity Trays (Mx-Lcx4)
This section explains the procedures for adding paper to tray 5, tray 6, and tray 7, and for changing the paper size of tray 5 and tray 6. If you need to change the paper size of tray 7, consult your dealer or nearest SHARP service department. - Page 38 Re-insert paper guide D at the desired paper size. Adjust the paper size selector knob to the new paper size. Fan the paper. Fan the paper well before loading it. If the paper is not fanned, multiple sheets may feed at once and cause a misfeed. Insert the paper in the tray so that it goes against the left side of the tray.
- Page 39 Loading tab paper and transparency film In addition to plain paper, tab paper, transparency film, and other special media can be loaded in tray 5 and tray 6. To load tab paper or transparency film in tray 5 and tray 6 follow the steps below. Loading tab paper To use tab paper, the special guide must be attached as explained below.
-
Page 40: Tray Settings For The Large Capacity Trays (Mx-Lcx5)
TRAY SETTINGS FOR THE LARGE CAPACITY TRAYS (MX-LCX5) Loading paper and changing the paper size Up to 1000 sheets of 5-1/2" x 8-1/2"R to 12" x 18" size paper (A5R to A3W size paper) can be loaded in tray 5 and tray 7. - Page 41 Adjust the right paper guide to the paper size. (1) Release the lock lever on the paper guide and adjust the paper guide to the desired paper size. (2) Push the lock lever on the paper guide down so it is horizontal to secure the paper guide.
- Page 42 Loading tab paper and transparency film In addition to plain paper, tab paper and transparency film can also be loaded in the large capacity trays (MX-LCX5). This section explains the procedures for loading tab paper and transparency film, and points to note. Loading tab paper To use tab paper, the special guide must be attached as explained below.
-
Page 43: Tray Settings For The Large Capacity Tray (Mx-Lcx6)
SETTINGS" (page 80) in the System Settings. The paper size of the large capacity tray (MX-LCX6) can only be changed by a service technician. If you need to change the paper size, consult your dealer or nearest SHARP Service Department. Pull out the paper tray. -
Page 44: Tray Settings For The Large Capacity Tray (Mx-Lcx3N)
TRAY SETTINGS FOR THE LARGE CAPACITY TRAY (MX-LCX3N) Loading paper Up to 3000 sheets of 8-1/2" x 11" to 12" x 18" (B5 to A3W) size paper can be loaded in the large capacity tray (MX-LCX3N). For detailed information on the paper that can be loaded, see the specifications in the Safety Guide and "PAPER TRAY SETTINGS"... -
Page 45: Paper Table
Place the paper in the center of the Indicator line paper table. Load the paper with the print side face up. When a certain amount of paper is placed on the paper table, the paper table will automatically descend slightly and then stop. - Page 46 Changing the paper size To change the paper size of the large capacity tray (MX-LCX3N), follow the procedure below. This procedure only explains how to change the paper size. For the procedures for opening/closing the tray and loading paper, see "Loading paper"...
- Page 47 Change the right paper guide to the paper size to be used. (1) While holding up the paper guide lock, slide the paper guide to the paper size to be used. (2) Release the paper guide lock. (3) Move the paper guide slightly to the right and left so that it locks into place.
-
Page 48: Loading Paper In The Bypass Tray
LOADING PAPER IN THE BYPASS TRAY When the bypass tray is installed, plain paper, tab paper, transparency film, and other special media can be printed on. Up to 100 sheets can be loaded in the MX-MFX1, or up to 500 sheets in the MX-MFX2, to enable continuous printing like with the other trays. - Page 49 Loading paper in the bypass tray (MX-MFX2) If you are changing the paper in the bypass tray, press the operation button and remove the previously used paper. After the button is pressed, the paper table will descend. While the paper tray descends, the operation button indicator will blink. After the paper tray finishes descending, the indicator will light solidly.
- Page 50 Bypass tray paper settings After loading paper in the bypass tray, configure settings for the loaded paper. Touch the [Paper Select] key. Plain Special Modes Plain Plain 2-Sided Copy 8½x11 11x17 Output Exposure 8½x11 8½x11 11x17 Auto 11x17 File 8½x14 11x17 Quick File Copy Ratio...
-
Page 51: Set The Paper Size
Example: recycled paper has been selected Set the paper size. [Auto-Inch] key Paper Select When the paper inserted in the bypass tray is a standard inch Bypass Tray Type/Size Setting size (8-1/2" x 11", etc.), the paper size will be detected Type Size automatically and the appropriate paper size set. -
Page 52: Important Points When Using The Bypass Tray
IMPORTANT POINTS WHEN USING THE BYPASS TRAY • When using plain paper other than SHARP standard paper or special media other than SHARP-recommended transparency film, or when printing on the reverse side of previously used paper, the paper must be loaded one sheet at a time. -
Page 53: Originals
ORIGINALS This chapter explains how to place originals in the automatic document feeder and on the document glass. PLACING THE ORIGINAL PLACING ORIGINALS IN THE AUTOMATIC DOCUMENT FEEDER This section explains how to place originals in the automatic document feeder. Allowed original sizes Minimum original size Maximum original size... - Page 54 Adjust the original guides to the size of the originals. Place the original. Make sure the edges of the originals are even. Indicator Insert the originals face up all the way into the document feeder line tray. Insert a number of originals that does not exceed the indicator line on the document feeder tray.
-
Page 55: Placing The Original On The Document Glass
PLACING THE ORIGINAL ON THE DOCUMENT GLASS This section explains how to place the original on the document glass. Allowed original sizes When a non-standard size original is placed in copy Maximum original size mode, see "SPECIFYING THE ORIGINAL SIZE" in the Copier Guide. - Page 56 Placing a thick book When scanning a thick book or other thick original, follow the steps below to press the book down. (1) Push up the far side of the automatic document feeder. The hinges supporting the automatic document feeder will release and the rear side of the automatic document feeder will rise.
-
Page 57: Peripheral Devices
Output device that enables the use of the staple function and offset function. MX-FNX6 On the special finisher for the MX-M850, up to 50 sheets of paper can be loaded. Output device that enables use of the staple function, offset... - Page 58 Product name Product number Description Punches holes in copies and other output. Requires the finisher MX-PNX3B (MX-FNX5). Punch module Punches holes in copies and other output. Requires the finisher MX-PNX4B (MX-FNX6) or a saddle stitch finisher. Paper loaded in the inserter can be inserted into output as Inserter MX-CFX2 covers and inserts.
-
Page 59: Names And Functions Of The Parts Of The Peripheral Device
• The finisher cannot be installed when a finisher (for the MX-M850), or saddle stitch finisher is installed. • Paper that can be punched is 5-1/2" x 8-1/2" to 11" x 17" (16 lbs. to 65 lbs. cover) (A5 to A3 (52 g/m... -
Page 60: Saddle Unit
FINISHER The finisher (for the MX-M850) and saddle stitch finisher are equipped with the offset function, which offsets each set of output from the previous set, and the staple sort function, which staples each set of output. The saddle stitch finisher is also equipped with the saddle stitch function, which automatically staples and folds each set of output at the centerline. -
Page 61: Folding Unit
FOLDING UNIT When the paper folding unit is installed, output can be folded to reduce the paper size by a half. Cover (upper) Open this cover to remove a paper misfeed. To open the cover, first pull it forward and then up. Cover (lower) Open this cover to remove a paper misfeed. -
Page 62: Inserter
INSERTER The inserter can be used to insert blank or pre-printed paper in printed output as inserts or covers without printing on the inserts/covers. In addition, the paper loaded in the inserter can be directly fed to peripheral devices such as the finisher or saddle unit for stapling or punching. - Page 63 Loading paper Follow the steps below to load paper in the inserter. Adjust the guide to the size of the paper you are loading. Squeeze the guide lock lever to adjust the guide. When you have finished moving the guide, release the lever. When loading paper larger than 8-1/2"...
- Page 64 Paper loading orientation When loading paper in the inserter, the front side of the paper should face up When inserting covers or inserts in a copy job, load the paper in the same orientation as the originals. Loading tab paper When loading tab paper in the inserter, the front side of the tab paper should face up.
-
Page 65: Manual Finishing Mode
MANUAL FINISHING MODE When the inserter is installed, finishing operations such as stapling or punching can be performed without performing a copy or print operation. Touch the [MANUAL FINISHING] key to change modes. The following screen will appear. For information on manual finishing functions, see the following pages. Set the output function. -
Page 66: Using Manual Finishing
USING MANUAL FINISHING The procedure for using manual finishing is explained below. Before beginning the procedure, configure the paper settings in the system settings for the paper you will load in the inserter. ☞ PAPER TRAY SETTINGS (page 80) Touch the [MANUAL FINISHING] key. DOCUMENT MANUAL COPY... -
Page 67: Function
STAPLE FUNCTION / SADDLE STITCH FUNCTION When a finisher or saddle stitch finisher is installed, the loaded paper can be stapled into a sheaf. (Staple function) When a saddle unit or saddle stitch finisher is installed, the paper can be stapled in two places on the centerline and folded to make a pamphlet. - Page 68 Stapling positions and stapling results Stapling result Stapling positions Horizontally-oriented Vertically-oriented paper paper Slant staple 1 staple at top left corner Slant staple 1 staple at bottom left corner 2 staples at left edge Slanted stapling can be used when one staple at the top of the paper is selected Saddle stitch function To select saddle stitch, touch the [Saddle Stitch] key in the manual finishing screen.
-
Page 69: Punch Function
• When the hole punch function is selected, the saddle stitch or paper folding function cannot be used. • When the finisher (for the MX-M850) or the saddle stitch finisher is installed, 8-1/2" x 11R" to 11" x 17" (16 lbs. to 90 lbs. -
Page 70: Paper Folding Function
PAPER FOLDING FUNCTION When the paper folding unit is installed, output can be folded to reduce the paper size by a half. Paper sizes that can be folded using the paper folding function are 8-1/2" x 11"R, 8-1/2" x 14", 11" x 17", A4R, B4, and For detailed information on the sizes and types of paper that can be folded, see the specifications in the Safety Guide. -
Page 71: Sharp Osa
Sharp OSA (Open Systems Architecture) is an architecture that enables external applications to be directly connected to a digital multifunction machine over a network. When a digital multifunction machine that supports Sharp OSA is used, the operation panel controls and functions of the machine such as scan send can be linked to an external application. -
Page 72: External Account Module (Mx-Amx3)
The two modes for using an external account application operate as explained below. External authentication mode When the [Enable Authentication by External Server] checkbox is selected in "External Account Setting" of "Sharp OSA Settings" in the system settings (administrator), the machine enters external authentication mode. When the machine is powered on in external authentication mode, the machine accesses the external account application and displays the login screen. - Page 73 External count mode When only the [External Account Control] setting is enabled in "External Account Setting" of "Sharp OSA Settings" in the system settings (administrator), the machine enters external count mode. Unlike external authentication mode, when the machine is started in "external count mode", the login screen of the external account application is not displayed.
-
Page 74: System Settings
SYSTEM SETTINGS The system settings are used to configure a variety of parameters to suit the aims and needs of your workplace. The system settings are also used to display or print out the current settings and status of the machine. The system settings allow you to make the machine easier to use. -
Page 75: System Settings List
SYSTEM SETTINGS LIST When the system settings are accessed with general rights, the following items appear. Depending on the machine specifications and peripheral devices installed, it may not be possible to use some settings. ■ Total Count Item Factory default setting Page ■... - Page 76 ■ Paper Tray Settings Item Factory default setting Page ■ PAPER TRAY SETTINGS ● TRAY SETTINGS Tray 1 Plain, 8-1/2" x 11" Tray 2 Plain, 8-1/2" x 11" Tray 3 Plain, Auto-Inch Tray 4 Tray 5* MX-LCX4: Plain, 8-1/2" x 11" MX-LCX5: Plain, Auto-Inch MX-LCX6: Plain, 8-1/2"...
-
Page 77: Total Count
TOTAL COUNT This function shows the page count in each mode. Touch the [Total Count] key to use the function. JOB COUNT This displays or prints out the counts of all jobs. • 11" x 17" (A3) size paper is counted as two sheets. •... -
Page 78: Default Settings
DEFAULT SETTINGS The default settings for operation of the machine can be configured. Touch the [Default Settings] key and select the settings. CLOCK ADJUST Use this to set the date and time in the machine's built-in clock. Clock Adjust Set the time. Item Settings If your region is ahead of GMT (Greenwich Mean Time), select [+]. -
Page 79: Keyboard Select
KEYBOARD SELECT The layout of the keyboard that appears in text entry screens can be changed. The following selections are available. English (US) English (UK) French German LIST PRINT (USER) Lists showing the settings and information stored in the machine can be printed. Touch the [List Print (User)] key and select the settings. -
Page 80: Paper Tray Settings
PAPER TRAY SETTINGS Paper tray and paper type settings are explained in this section. Touch the [Paper Tray Settings] key to configure the settings. TRAY SETTINGS These settings specify the paper type, paper size, and functions allowed for each paper tray. When the [Tray Settings] key is touched, a list appears showing the trays and the current settings. - Page 81 Tray Settings Paper Tray Paper Type Size Plain, Pre-Printed, 8-1/2" x 11", A4 Tray 1 Recycled, Letter Head, Pre-Punched, Color, User 8-1/2" x 11", A4 Type Tray 2 In addition to the paper Auto-Inch (12" x 18", 11" x 17", 8-1/2" x 14"* , 8-1/2"...
- Page 82 Paper Tray Paper Type Size MX-LCX4 8-1/2" x 11", 5-1/2" x 8-1/2"R, A4, B5, A5R, 9" x 12" (A4W) In addition to the paper (Use the paper selector knob on the tray to change the paper size.) ☞ types of trays 1 and 2, TRAY SETTINGS FOR THE LARGE CAPACITY TRAYS (MX-LCX4) Heavy Paper 1 to 3* (page 37)
- Page 83 Paper Tray Paper Type Size In addition to the paper Auto-Inch (12" x 18", 11" x 17", 8-1/2" x 14"* , 8-1/2" x 13-2/5"* , 9" x 12", types of trays 1 and 2, 8-1/2" x 11", 8-1/2" x 11"R* , 7-1/4"...
-
Page 84: Paper Type Registration
PAPER TYPE REGISTRATION Store a paper type when the desired paper type does not appear as a selection or when you wish to create a new set of paper properties. Up to 10 paper types can be stored. Item Description Store any name. -
Page 85: User Control
USER CONTROL This section explains settings for user control. Touch the [User Control] key to configure the settings. • User Control settings can only be configured when "User Authentication Setting" in the system settings (administrator) is enabled. • Depending on the user that logged in, it may not be possible to use the settings below. MODIFY USER INFORMATION The information of the currently logged in user can be edited. -
Page 86: Troubleshooting
TROUBLESHOOTING This chapter provides solutions to possible printing problems. See the following table of contents to locate the appropriate page for your question or problem. PROBLEMS RELATED TO MACHINE OPERATION • Specified machine functions cannot be used..........87 •... -
Page 87: Problems Related To Machine Operation
This may damage the hard drive or cause the data being stored or received to be lost. • If you are unable to solve a problem using the information in this chapter, please contact your dealer or nearest SHARP Service Department. PROBLEMS RELATED TO MACHINE OPERATION... -
Page 88: The Operation Panel Cannot Be Used
In this event, stop using the machine, unplug the power plug, and contact your dealer or nearest SHARP Service Department. (When contacting your dealer or nearest SHARP Service Department, inform them of the displayed error code.) Printing is not Is a tray out of paper? Add paper as instructed by the message in the touch panel. -
Page 89: The Original Size Is Not Automatically Selected Or The Wrong Size Is Selected
Problem Point to check Solution The original size is not Is the original curled or folded? The correct original size cannot be detected if the automatically selected original is curled or folded. Straighten the original. or the wrong size is Did you place an original smaller than Original sizes smaller than 5-1/2"... -
Page 90: Problems Related To Paper Feeding And Output
(page 26) Are multiple sheets feeding at once? Fan the paper well before loading it. Are you using paper that is not within Use SHARP-recommended paper. Using paper that is the specifications? not supported may result in misfeeds, creases, or smudges. -
Page 91: Paper Does Not Feed From The Paper Tray
Problem Point to check Solution The paper misfeeds. Is 5-1/2" x 8-1/2" (A5) size paper Load 5-1/2" x 8-1/2" (A5) size paper in tray 4 (the loaded? second tray) or in the bypass tray. For the paper trays in which A5 size paper can be loaded, see "PAPER TRAY SETTINGS"... -
Page 92: Results
"CLEANING THE BYPASS FEED ROLLER" in the Maintenance Guide Smudges appear on Are you using paper that is not within Use SHARP-recommended paper. Using paper that is printed output. the specifications? for other models or special paper that is not supported may result in misfeeds, creases, or smudges. -
Page 93: Devices
Problem Point to check Solution Part of the image is Has the correct paper size been set? If you are using a special size, be sure to specify the cut off. paper size. If the size of paper loaded in a tray was changed, be sure to check the paper size setting. -
Page 94: Stapling Does Not Take Place (Including Saddle Stitch)
Problem Point to check Solution Stapling does not take Does a message appear instructing you Remove jammed staples. ☞ place (including to check the staple unit? "3. REMOVING MISFEEDS" in the Maintenance saddle stitch). Guide Does a message appear instructing you Replace the staple cartridge. -
Page 95: Punching Does Not Take Place
Problem Point to check Solution Punching does not Does a message appear instructing you Dispose of punch scraps. ☞ take place. to check the punch module? "DISCARDING PUNCH WASTE" in the Maintenance Guide Is a different size of paper mixed in? Punching is not possible when different widths of paper are mixed together. -
Page 96: Other Problems
Auto Clear or disable Auto Clear in "Auto Clear Setting". ➞ System Settings (Administrator) > "Operation Settings" > "Other Settings" > "Auto Clear Setting" You forgot the Was the administrator password Contact your dealer or nearest SHARP Service administrator changed from the factory default Department. password. setting? * For the factory default administrator password, see "TO THE ADMINISTRATOR OF THE MACHINE"... -
Page 97: Entering Text
ENTERING TEXT This chapter explains the text entry screen. FUNCTIONS OF THE MAIN KEYS Description This changes the text entry screen from the lower case screen to the upper case screen. The upper case screen will continue to appear until the [Caps] key is touched again so that it is no longer highlighted. The Caps [Caps] key is convenient when you wish to enter all capital letters. -
Page 98: Keyboard
The layout of the keys in the text entry screen in the touch panel differs slightly from the layout of the keys on the external keyboard. Use a SHARP-recommended external keyboard. For the recommended keyboards, please contact your dealer or nearest SHARP Service Department. - Page 99 User's Guide MODEL: MX-M850 MX-M950 MX-M1100 SHARP ELECTRONICS CORPORATION 1 Sharp Plaza, Mahwah, New Jersey 07430-1164. www.sharpusa.com SHARP ELECTRONICS OF CANADA LTD. 335 Britannia Road East, Mississauga, Ontario, L4Z 1W9 MX1100-US-USR-Z4...
Need help?
Do you have a question about the MX-M850 and is the answer not in the manual?
Questions and answers