Advertisement
Quick Links
Download this manual
See also:
User Manual
Advertisement

Related Manuals for Felix printers Tec 4


Summary of Contents for Felix printers Tec 4
- Page 1 Quick Start Guide Tec 4 www.felixprinters.com/support support@felixprinters.com Zeemanlaan 15 3401 MV IJsselstein The Netherlands...
- Page 2 Printer placement highly flamable objects. Place the FELIXprinter on a stable table/desk. This will keep it safe from small children. Use the FELIXprinter in a dry environment. FELIXprinters Quick Start Guide for the FELIX Tec 4 Page 2...
- Page 3 2.2 Calibrate Z-Probe 2.3 Change filament Chapter 3 – Print 3.1 Ensure a Succesfull Print 3.2 Printing via SD Card 3.3 Remove a 3D Printed Object 3.4 Remove Support Material FELIXprinters Quick Start Guide for the FELIX Tec 4 Page 3...
- Page 4 • Optimized for Simplify3D and Repetier-Host • Diameter nozzle: 0.35 mm (optional 0.5mm) • Max temperature: 275 °C Contact Website info@FELIXprinters.com www.FELIXprinters.com Zeemanlaan 15, 3401 MV IJsselstein, The Netherlands FELIXprinters Quick Start Guide for the FELIX Tec 4 Page 4...
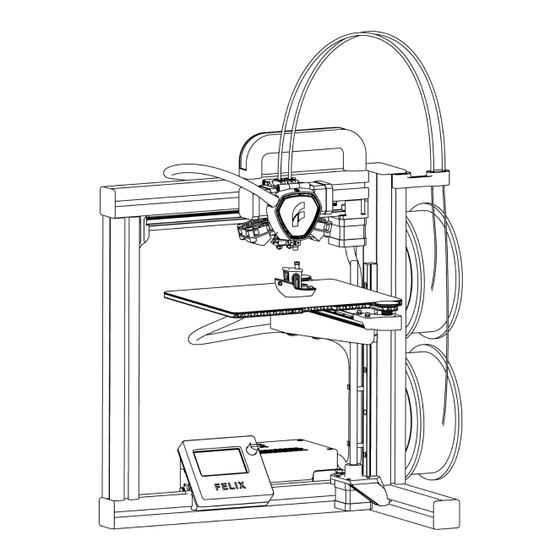
- Page 5 Flexible BuildPlate Build Platform Filament Filament spool holder Power Switch Power Connection Display unit USB Computer Cable SD Card Slot FELIXprinters Quick Start Guide for the FELIX Tec 4 FELIXprinters Quick Start Guide for the FELIX Tec 4 Page 5...
-
Page 6: What's In The Box
2 x M8x16 Screw *We recommend to use the following tools: Spray Container with Alcohol, Paper Cloth, Scissors and Long Nose Pliers FELIXprinters Quick Start Guide for the FELIX Tec 4 FELIXprinters Quick Start Guide for the FELIX Tec 4... - Page 7 Chapter 1: Unboxing 1.2 Unboxing Open the box, remove the bumper and take out the Carefully remove the FELIX Tec 4 from the box. miscellaneous parts from the bumper. FELIXprinters Quick Start Guide for the FELIX Tec 4 FELIXprinters Quick Start Guide for the FELIX Tec 4...
- Page 8 Chapter 1: Unboxing Remove the foam protection from the printer frame. Remove the five red protective cable ties using cutting pliers or a scissor. FELIXprinters Quick Start Guide for the FELIX Tec 4 Page 8...
-
Page 9: Installing The Handle
2. Twist the T-nut 90 degrees in place. two hexagon screws. Use a hex key size 5. 3. Repeat this for both T-nuts. 2. Press the handle cover on the handle FELIXprinters Quick Start Guide for the FELIX Tec 4 Page 9... - Page 10 Install the filament guide and spool holder(s) by placing 2. Lower the front of the Flexible BuildPlate and make one edge in the T-slot and twisting it in place. sure all edges are inside the build platform. FELIXprinters Quick Start Guide for the FELIX Tec 4 Page 10...
- Page 11 1. Make sure the power switch is turned off. The unboxing is done, you can now switch on the 2. Insert the power cable. printer! 3. Insert the USB cable when printing via computer. FELIXprinters Quick Start Guide for the FELIX Tec 4 Page 11...
- Page 12 If not repeat the two thumbscrews. 45° to the right (clockwise). Now select Measure steps 3 and 4 untill levelled correctly Again. FELIXprinters Quick Start Guide for the FELIX Tec 4 Page 12...
- Page 13 Flexible Build- ry button to continue. When satisfied, press the button to continue. Plate and the nozzle. This is important for the first layer to stick during printing. FELIXprinters Quick Start Guide for the FELIX Tec 4 Page 13...
-
Page 14: Change Filament
Place the filament into the print-head. We will feed the filament completely through the extrud- ers on the next page. FELIXprinters Quick Start Guide for the FELIX Tec 4 Page 14... - Page 15 Press to continue. comes out of the nozzle. Use the tweezers to remove the thread of filament. FELIXprinters Quick Start Guide for the FELIX Tec 4 Page 15...
- Page 16 Degrease the Flexible BuildPlate using alcohol, tweezer. Select Preheat/Cool in the Control Menu to methylated spirit or acetone and wipe it clean with a make the residue soft and easy to remove. paper towel. FELIXprinters Quick Start Guide for the FELIX Tec 4 Page 16...
-
Page 17: Printing Via Sd Card
If you want to Stop printing, press the rotary before leaving your printer unattended. Make button and select Cancel Print. sure the material sticks properly to the Flexible BuildPlate. FELIXprinters Quick Start Guide for the FELIX Tec 4 Page 17... - Page 18 Now you can easily remove BuildPlate at both ends. the Flexible BuildPlate by pulling it fowards. FELIXprinters Quick Start Guide for the FELIX Tec 4 FELIXprinters Quick Start Guide for the FELIX Tec 4 Page 18...
- Page 19 3D model. ed to the 3D model using long nose pliers. FELIXprinters Quick Start Guide for the FELIX Tec 4 FELIXprinters Quick Start Guide for the FELIX Tec 4 Page 19...
- Page 20 Simplify3D is the recommended software to operate For experienced users who love to tweak we also the FELIX Tec 4. support repertier-host open source 3D software. www.felixprinters.com/simplify3d www.felixprinters.com/repetier-host FELIXprinters Quick Start Guide for the FELIX Tec 4 Page 20 Page 20...
- Page 21 Choose the beste aligning lines for both the X Enter both the X and Y values and select and Y value. In this example the best aligning continue. Y value is 3. FELIXprinters Quick Start Guide for the FELIX Tec 4 Page 21...
- Page 22 If satisfied tighten the hex screw size 3 and put the fan cover back in it’s original position. FELIXprinters Quick Start Guide for the FELIX Tec 4 Page 22...
- Page 23 FELIXprinters Quick Start Guide for the FELIX Tec 4 Page 23...
- Page 24 Help us to improve our products and services. It only takes a few minutes! www.felixprinters.com/survey (a small reward is waiting for you) Manuals & tutorials FELIX Community www.felixprinters.com/support www.felixprinters.com/community Quick Start Guide FELIX Tec 4 V1-2017 www.felixprinters.com/support Zeemanlaan 15 support@felixprinters.com 3401 MV IJsselstein The Netherlands...
Need help?
Do you have a question about the Tec 4 and is the answer not in the manual?
Questions and answers