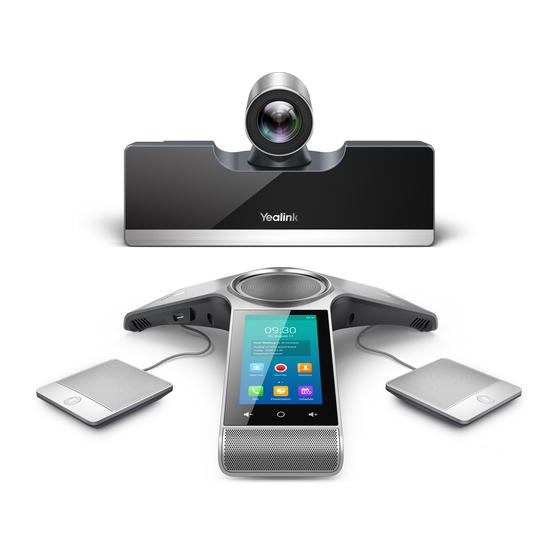
Yealink VC500 Quick Start Manual
Full hd video conferencing endpoint
Hide thumbs
Also See for VC500:
- Quick start manual (24 pages) ,
- Manual (4 pages) ,
- Administrator's manual (281 pages)

Related Manuals for Yealink VC500


Summary of Contents for Yealink VC500
- Page 1 Yealink Network Technology CO., LTD Yealink VC500 Full HD Video Conferencing Endpoint Quick Start Guide V30.2 Applies to firmware version 71.30.0.2 or later...
-
Page 3: Packaging Contents
Mount onto a TV stand or a tripod Put on a Flat Surface You can put the VC500 codec on a conference room table, and make sure that the slope is not more than 5 degrees so that the VC500 can operate correctly. - Page 4 Stick a Velcro onto the back of the TV, and make sure that the bracket and the back of the TV are tightly positioned against each other. If your VC500 codec cannot be mounted on the top of a TV when the bracket has reached the given location, you should remove the bracket, and then convert its direction.
- Page 5 TV is more than 77 mm. In this situation, do not mount the VC500 on the top of a TV. Mount on a Wall The recommended height for VC500 codec positioning is 1.5m-1.8m above the ground. Screw specification: T4×30 Hole depth: 30mm...
- Page 6 Secure the bracket using the T4×30 screws. Push the VC500 codec along the track of the bracket. Secure the VC500 codec onto the bracket using the M3×8 screws. Mount on a Ceiling If you choose the ceiling-mounted installation, you need to purchase a bracket separately. The bracket must meet the following requirements: Able to bear a weight of at least 10.5kg (23.15 lb.) and has a thickness between 2mm (0.08 in.) and 3 mm (0.12 in.).
-
Page 7: Remote Control And Cable Ties Installation
Push the VESA accessory along the track of the VC500 codec. Secure the VESA accessory to the VC500 codec using the M3×8 screws. Align the location pillar at the location hole , and then secure the bracket to the VESA accessory using the 1/4”-20 UNC screw. -
Page 8: Network Deployment
Configure the desired platform and log in. Traditional Deployment If you do not log into the Cloud platform, you can choose traditional deployment method to deploy your VC500, and dial the IP address of other device to make a call. -
Page 9: Configure Port Mapping
Head Office If you deploy VC500 in the head office, at least one static public IP address is required in the head office to allow branch offices to connect. Do one of the following to deploy VC500: Option1: To deploy the VC500 on a public network, at least one static public IP address is required, you need to assign a static public IP address to the VC500. -
Page 10: Bandwidth Requirements
. Troubleshooting After installation and deployment, you can test the VC500 by dialing the Yealink Demo Room. If you can’t dial out successfully, please contact your IT administrator to check the internal network configuration. - Page 12 “Easy collaboration, high productivity.” The company’s high-quality UC terminal solutions enhance the work efficiency and competitive advantages of its customers in over 100 countries. Yealink is the world’s second-largest SIP phone provider and is number one in the China market.
Need help?
Do you have a question about the VC500 and is the answer not in the manual?
Questions and answers