
Related Manuals for DeVilbiss PD1000


Summary of Contents for DeVilbiss PD1000
- Page 1 ® ® ilbiss ulse omPaCt onserVing eViCe erViCe anual Model PD1000 CAUTION-Federal (U.S.A.) law restricts this device to sale by or on the order of a physician.
-
Page 2: Table Of Contents
PROVIDER'S NOTES ..............DEVILBISS GUIDANCE AND MANUFACTURER’S DECLARATION ...... -
Page 3: Installation And Operation
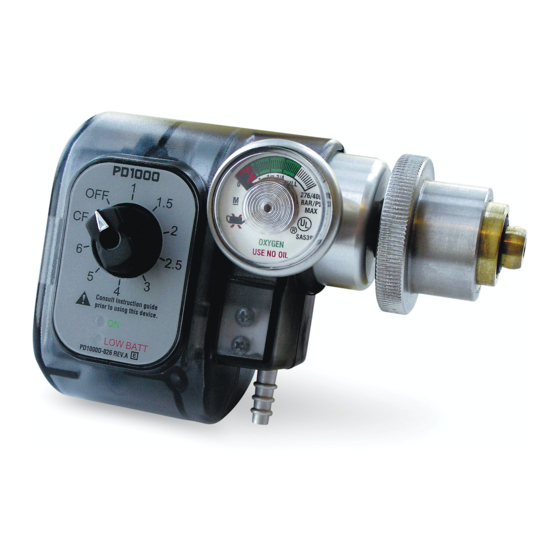
(Part #9286-RD) is in place and in good condition (Section VI, A). Position the guide pins into the tank post holes, and tighten the knob until the PD1000 is securely in position and there are no seal leaks. Cannula Fitting b. -
Page 4: Maintenance Procedures
Section III-A and connect a nasal cannula. Battery Indicator 3. Open the tank valve and verify that the PD1000 Lights contents gauge indicates that there is a full tank. 4. Verify that there are no leaks around the tank seal between the PD1000 and the oxygen tank. -
Page 5: Troubleshooting
The cannula fitting is broken. Type IV- Close the tank valve, loosen the knob and verify that the post, the PD1000 regu- lator yoke and the tank surfaces are smooth and free of burrs. If they are smooth, There is leakage between the replace the regulator seal (#9286-RD). -
Page 6: Service Instructions
E R V I C E I N s T R u C T I O N s VI. sERVICE INsTRuCTIONs C. Cover/Regulator and Gauge Removal Position the PD1000 face down so that the back cover A. Regulator seal Replacement is facing up. Remove the 5 cover screws (Figure 11) Start by closing the tank valve so that no pressure is and then remove the rear cover. -
Page 7: Cannula Fitting Removal/Replacement
s E R V I C E I N s T R u C T I O N s D. Cannula Fitting Removal/Replacement First remove the front and back covers. NOTE-When removing or installing the cannula fitting, orient the manifold so the fitting faces down to prevent any debris from falling into the manifold which could obstruct the continuous flow orifice. -
Page 8: Parts And Illustrations
PA R T s A N D I L L u s T R AT I O N s VII. PARTs AND ILLusTRATIONs regulator/Gauge regulator Hose Solenoid/Manifold INTErNAl PArTS lISTS regulator Seal 9286-RD Regulator Seal PD1000D-604 Solenoid/Manifold PD1000D-605 Vacuum Switch PD1000D-606 Regulator/Gauge PD1000D-607... -
Page 9: Pneumatic Diagram
P N E u M AT I C D I A G R A M / u N I T s P E C I F I C AT I O N s VIII. PNEuMATIC DIAGRAM IX. uNIT sPECIFICATIONs Weight 14. -
Page 10: Devilbiss Guidance And Manufacturer's Declaration
PA R T s R E T u R N A N D O R D E R I N G P O L I C Y XI. DEVILbIss GuIDANCE AND MANuFACTuRER’s DECLARATION WARNING Medical Electrical Equipment needs special precautions regarding EMC and needs to be installed and put into service according to the Electromagnetic Compatibility [EMC] information provided in the accompanying documents. -
Page 11: Parts Return And Ordering Policy
DeVilbiss PulseDose Compact Conserving Device is warranted to be free from defective workmanship and material for a period of three years from date of purchase. Any defective part(s) will be repaired or replaced at DeVilbiss Healthcare's option if the unit has not been tampered with or used improperly during that period. Make certain that any malfunction is not due to inadequate cleaning or failure to follow the instructions. - Page 12 800-338-1988 • 814- 443 - 4 8 81 • w ww. DeVil bi ssH ea lt hc ar e. co m DeVilbiss ® and PulseDose ® are registered trademarks of DeVilbiss Healthcare. © 2014 DeVilbiss Healthcare LLC. 03.14 All Rights Reserved.
Need help?
Do you have a question about the PD1000 and is the answer not in the manual?
Questions and answers