Table of Contents
Advertisement
Quick Links
Copyright
© 2001 Proxim, Inc., Sunnyvale, CA. All rights reserved. Covered by one or more of the
following U.S. patents: 5,412,687; 5,844,900; 5,875,179; 5,913,174; 6,006,090; and 5,231,634.
This user's guide and the software described in it are copyrighted with all rights reserved. No
part of this publication may be reproduced, transmitted, transcribed, stored in a retrieval
system, or translated into any language in any form by any means without the written permis-
sion of Proxim, Incorporated.
Trademarks
Harmony, RangeLAN, the RangeLAN logo, RangeLAN2, and Proxim are trademarks of
Proxim, Inc. All other trademarks are the property of their respective owners.
Limited Warranty, Disclaimer, Limitation Of Liability
For a period of one (1) year from the date of purchase by the retail customer, Proxim warrants
the Harmony OpenAir Access Point Model 7550 against defects in materials and workman-
ship. Proxim will not honor this warranty if there has been any attempt to tamper with or
remove the product's external foil label.
This warranty does not cover and Proxim will not be liable for any damage or failure caused by
misuse, abuse, acts of God, accidents, or other causes beyond Proxim's control, or claim by
any entity other than the original purchaser.
If, after inspection, Proxim determines there is a defect, Proxim will repair or replace the
Access Point at no cost to you. To return defective merchandise to Proxim, please call Proxim
Technical Support 1-408-731-2640 to obtain a Return Merchandise Authorization (RMA)
number.
In no event shall Proxim, Incorporated be responsible or liable for any damages arising:
G
From the use of the product
G
From the loss of use, revenue or profit of the product
G
As a result of any event, circumstance, action, or abuse beyond the control of
Proxim, Incorporated
Whether such damages be direct, indirect, consequential, special or otherwise and whether
such damages are incurred by the person to whom this warranty extends or a third party.
Harmony OpenAir Access Point Model 7550 User's Guide
Part # 7360.0137
Rev. B
1
Advertisement
Table of Contents

Related Manuals for Proxim 7550


Summary of Contents for Proxim 7550
- Page 1 Proxim, Inc. All other trademarks are the property of their respective owners. Limited Warranty, Disclaimer, Limitation Of Liability For a period of one (1) year from the date of purchase by the retail customer, Proxim warrants the Harmony OpenAir Access Point Model 7550 against defects in materials and workman- ship.
- Page 2 Warranty Return Policy If you have a problem with the Harmony OpenAir Access Point Model 7550, please call Proxim Technical Support at 1-408-731-2640. Proxim Technical Support will assist with resolving any technical difficulties you may have with your Proxim product.
-
Page 3: Table Of Contents
Contents 1. Introduction ....................5 The Harmony Family .......................... 6 System Requirements .......................... 7 The Product Package ........................... 7 2. Installation ....................8 Installation Procedure .......................... 8 Mounting Option ..........................11 Using the Optional Harmony Power System ..................12 LED Indicators ..........................13 3. - Page 4 6. Troubleshooting ..................27 How to Obtain Help with Your LAN Installation ................27 LED Error Codes ..........................27 Common Problems and Solutions ..................... 28 A. Parameters ....................31 B. Harmony OpenAir Access Point Specifications ........32 C. How to Reach Technical Support ............33 Index .......................
-
Page 5: Introduction
1. Introduction Thank you for choosing Proxim’s Harmony OpenAir Access Point Model 7550, a member of Proxim’s Harmony wirefree infrastructure family. The Harmony product line is the first wirefree networking solution to support all current and future wireless LAN standards, including OpenAir, IEEE 802.11b, and future 10 Mbps frequency hopping and 5 GHz technologies, within a single, homogeneous architecture. -
Page 6: The Harmony Family
The Harmony Family The Harmony OpenAir Access Point Model 7550 is a member of a product family that provides a complete wirefree networking solution. The Harmony Access Point Controller Model 7560 centralizes the manage- ment, security, and filtering capabilities of a wireless LAN. The Access Point Controller communicates with Harmony Access Points over the Ethernet network to provide wirefree network access for mobile clients. -
Page 7: System Requirements
The Product Package Each Harmony OpenAir Access Point comes with: One Harmony OpenAir Access Point Model 7550 One 10Base-T crossover adapter One power adapter (12V, 1 Amp) One Harmony OpenAir Access Point Model 7550 User’s Guide One warranty registration card... -
Page 8: Installation
2. Installation This chapter describes the installation procedure for the Harmony OpenAir Access Point Model 7550 and includes a description of the LED indicators found on the unit. Installation Procedure Follow these steps to install the Harmony OpenAir Access Point Model 7550. - Page 9 If you are not using the Harmony Power System and an AP Power Over LAN Module to supply power to the Access Point, connect the 10Base-T crossover adapter, included with the product, to the 10Base-T port located on the back panel of the Access Point.
- Page 10 Note: Use the Access Point only with the power adapter supplied by Proxim in the product package. Using another power supply may damage the Access Point. All three LEDs on the top of the Access Point will light up when the unit is powered on.
-
Page 11: Mounting Option
The mounting holes are shown Figure 2. These holes are a #6-32 tap and 0.175" deep. Screws and mounting tools are not provided by Proxim, but an AP Wall Mounting Kit is available. Contact your Proxim reseller for details. -
Page 12: Using The Optional Harmony Power System
Using the Optional Harmony Power System The optional Harmony Power System provides remote DC power to Harmony Access Points over the unused pins of a Category 5 Ethernet cable. This product simplifies Access Point installation: you only need to run a single cable to the Access Point to provide both power and data. -
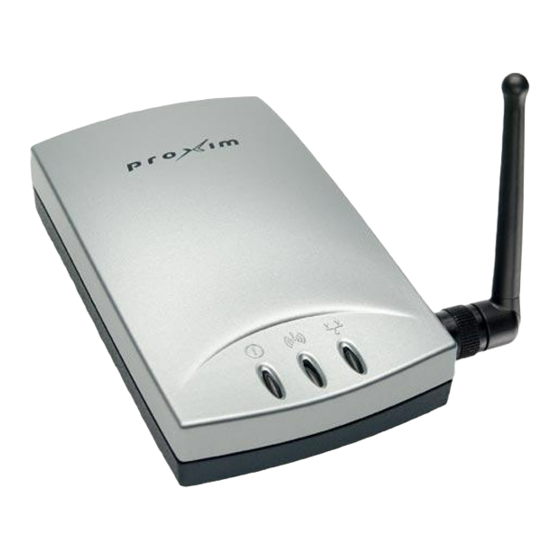
Page 13: Led Indicators
Status LED: This LED, located on the left side (with the unit orientated so that you can read the Proxim logo), is green when the unit is powered up and operational. The LED is amber during initialization and when the Access Point is not partnered with a Harmony AP Controller. - Page 14 Status LED Radio LED Ethernet LED Figure 4 Harmony OpenAir Access Point’s Top Panel LEDs There are also four LEDs on the back panel of the Harmony OpenAir Access Point, as shown in Figure 5. Master LED: This LED, located between the DC power jack and the serial port, will turn green when the unit is powered on and operational.
- Page 15 Link LED: This LED, located to the right of the 10Base-T connector, will turn green when the Access Point has a physical connection to the Ethernet network. However, this LED reflects Ethernet activity as well as link integ- rity. Therefore, when an Ethernet cable is attached and there is Ethernet activity, the LED will blink off momentarily.
-
Page 16: Wirefree Operation
3. Wirefree Operation Harmony Architecture The Harmony wirefree infrastructure family provides network connectivity to mobile clients without the use of wires or cabling. Each Harmony System must include at least one Access Point Controller. The AP Controller centralizes the management, security, and filtering capabilities of a wireless LAN. -
Page 17: The Openair Specification
The OpenAir Specification The OpenAir standard describes a set of wireless protocols used by frequency hopping spread spectrum devices that operate in the 2.4 GHz frequency band at a data rate of 1.6 Mbps. An OpenAir radio changes its operating frequency several times a second. The order in which an OpenAir changes frequencies is known as a hopping pattern or Channel. -
Page 18: Roaming Guidelines
Proxim strongly recommends that you perform a site survey to determine the best location for each Access Point in the facility, as described in Proxim’s free one-day technical training class. See Proxim’s Web site at http://www.proxim.com/support/ for more information on the technical... -
Page 19: Configuration Parameters
4. Configuration Parameters The first time a Harmony OpenAir Access Point is connected to the network, the Harmony System will automatically configure the Access Point using the OpenAir AP Default settings. In addition, a Harmony OpenAir Access Point may be manually configured via the Harmony System’s Web browser interface. -
Page 20: Partnered Ap Controller
Partnered AP Controller Each Access Point is partnered with one of the AP Controllers (APCs) on the network. If you do not wish to specify which AP Controller the Access Point should partner with, then select the Any option. Otherwise, select an AP Controller from the list of available devices and the Access Point will partner with it. -
Page 21: Subchannel
This will minimize interference between the two radios. Note: Proxim recommends that you manually assign Channels if you have more than 15 Harmony OpenAir Access Points on one network. Subchannel The Subchannel is a software code that is appended to each radio packet. -
Page 22: Master Name
In general, Access Points that share the same Channel should have different Subchannels and be installed as far away from each other as possible, based on the results of your site survey of the facility. Master Name The optional Master Name parameter specifies an alphanumeric name to simplify the identification of each Access Point when using a mobile client’s radio diagnostic tools. -
Page 23: Ip Addressing
When configured to Auto, the default setting, the Access Point automatically deter- mines the number of units synchronized to it and adjusts this parameter accordingly. Proxim recommends that you configure each of your OpenAir Access Points to Auto so that each Access Point can change this setting as necessary. - Page 24 If you want the Access Point to receive an IP address via the first or second method described above, then choose the Use DHCP option within the Access Point’s configu- ration screen (accessed via the Web browser interface). Note that Use DHCP is the Access Point’s default setting.
-
Page 25: Performance Hints
Antenna Options The OpenAir Access Point is shipped with a standard directly connected antenna. To install the antenna, screw it clockwise onto the antenna connector. Proxim sells several antenna alternatives, including higher gain omnidirectional and directional antennas that can increase the range of the products. Each of these antennas ship with installa- tion and mounting instructions. -
Page 26: Using Harmony With Other Openair-Compatible Products
Using Harmony With Other OpenAir-Compatible Products Harmony OpenAir products are designed to be compatible with existing devices that use the OpenAir standard, such as Proxim’s RangeLAN2 product line. For example, a RangeLAN2 PC Card can communicate with a Harmony OpenAir Access Point, and a Harmony OpenAir PC Card can communicate with a RangeLAN2 Access Point. -
Page 27: Troubleshooting
“How to Reach Technical Support.” How to Obtain Help with Your LAN Installation If you require assistance to install your LAN, Proxim can put you in contact with a Harmony reseller in your area. The reseller is an expert in the design, installation, and... -
Page 28: Common Problems And Solutions
Common Problems and Solutions Problem 1: The AP Controller does not automatically detect a new Access Point. Solution 1: Follow these steps if an Access Point is not automatically recognized and configured by an AP Controller: Confirm that the Access Point’s Link LED is on. This means that the Access Point has a network connection. - Page 29 Solution 2: The serial port is nonfunctional. Configure the Access Point using the Harmony System’s Web browser interface. Problem 3: My Harmony OpenAir PC Card will not synchronize to the Harmony OpenAir Access Point. Solution 3: Follow these steps if an OpenAir client adapter cannot synchronize with the Access Point: Try to bring the devices closer together;...
- Page 30 Open the Harmony System’s Web browser interface to determine if the Access Point has successfully partnered with an AP Controller. If the Access Point is not partnered with an AP Controller, refer to the steps in Solution #1 above. Also, confirm that the AP is enabled.
-
Page 31: Parameters
A. Parameters Parameter Name Range Default AP Name 1-21 characters unit's physical address Enable AP Enabled/Disabled Enabled Partnered AP Controller Domain 0-15 Channel 1-15 Assigned by Harmony System Subchannel 1-15 Assigned by Harmony System Master Name 1-11 characters MASTER Security ID 1-20 characters blank Normal, Light, Very... -
Page 32: Harmony Openair Access Point Specifications
The following technical specification is for reference purposes only. Actual product’s performance and compliance with local telecommunications regulations may vary from country to country. Proxim, Inc. will only ship products that are type approved in the destination country. Network Interfaces... -
Page 33: How To Reach Technical Support
What Harmony products are installed on the network? What were you doing when the error occurred? What error indication did you see? Can you reproduce the problem? You can reach Proxim Technical Support by voice, fax, e-mail, or mail: Tel: 800-477-6946 or 408-731-2640 Fax:... -
Page 34: Index
Index 100Base-TX 10 10Base-T 7, 10, 32 10Base-T Crossover Adapter 7, 9, 28 Access Point. See Harmony Access Point Access Point Controller. See Harmony Access Point Controller Allow New APs to Be Added Automatically 28 Antenna Installation 8 Options 25 Placement Considerations 26 AP Defaults 16, 19 AP Name 19, 31... - Page 35 FCC 2, 32 Firmware Upgrade 30 Frequency Hopping. See Spread Spectrum: Frequency Hopping Group Membership 24 Harmony 802.11b PCI Card 6 Harmony Access Point 802.11b 6, 18 OpenAir 6 Configuration 19–24 Firmware Upgrade 30 Installation Procedure 8–10 LED Indicators 10 Mounting 11 Harmony Access Point Controller 6, 7, 8, 16, 20 Harmony AP Power Over LAN Module.
- Page 36 MAC Optimize 22–23, 31 Master LED 14 Master Name 22, 31 Microwave Oven 25 Mounting 11 OpenAir Interoperability 26 Specification 17 Operating Temperature 32 Output Power 32 Partnered AP Controller 20 Partnered APC 31 Performance Hints 25–26 Physical Address 19 Power Adapter 7 Power System.
- Page 37 Status LED 13, 29 Access Point 10 Blinking Amber 30 Error Codes 27 Solid Amber 29 Subchannel 18, 21–22, 31 Technical Support 33 Throughput 30 Troubleshooting 27–30 Upgrade 30 Warranty 1–2...
Need help?
Do you have a question about the 7550 and is the answer not in the manual?
Questions and answers