Table of Contents
Advertisement
Advertisement
Table of Contents

Related Manuals for DirectOut Technologies EXBOX.BLDS


Summary of Contents for DirectOut Technologies EXBOX.BLDS
- Page 1 EXBOX.BLDS User‘s Manual Version 1.3...
- Page 2 DirectOut GmbH cannot be held responsible for any misleading or incorrect information provided throughout this manual. DirectOut GmbH reserves the right to change specifications at any time without notice. DirectOut Technologies® is a registered trademark of the DirectOut GmbH. © DirectOut GmbH, 2017 page 2 of 64...
-
Page 3: Table Of Contents
First Aid (in case of electric shock) Defective Parts/Modules Updates Intended Operation Conditions of Warranty Conformity & Certificates Contact Contents Accessory Chapter 3: Installation Installing the Device CHAPTER 4: Operation Introduction Global Control Input / Output EXBOX.BLDS Manual - Version 1.3 page 3 of 64... - Page 4 BLDS Generator Examples CHAPTER 6: Troubleshooting and Maintenance Troubleshooting Maintenance CHAPTER 7: Technical Data Appendix A - Wiring Sketches Hirose HR10 (DC PSU) DSUB-9 (female) - GPI DSUB-9 (female) - GPO Index page 4 of 64 EXBOX.BLDS Manual - Version 1.3...
-
Page 5: About This Manual
TI P S ! indicate useful hints and shortcuts. NOTE S! are used for important points of clarification or cross references. WA R NINGS! alert you when an action should always be observed. EXBOX.BLDS Manual - Version 1.3 page 5 of 64... -
Page 6: Chapter 1: Overview
Welcome to EXBOX.BLDS, DirectOuts MADI Redundancy Switch with Buffer Loop Detection System™. The EXBOX.BLDS switches - automated or manually triggered - between two MADI inputs. For enhanced observation with automated switching the Buffer Loop Detection System™ (BLDS) can be used. -
Page 7: Feature Summary
2 x Hirose connector (9-24 V) * The device is available in two different versions: SC/SC or BNC/SC (see picture on page 6). The SC I/O may be ordered as single-mode upon request. EXBOX.BLDS Manual - Version 1.3 page 7 of 64... -
Page 8: Applications
Chapter 1: Overview Applications EXBOX.BLDS can be used as a plain signal switch or for sophisticated observation of MADI signals with automated switch-over and revert. Typical applications include: • Signal distribution • Playback applications, e.g. live performances • Observing MADI transmission with external... - Page 9 Audio Pilote Tone means the presence of an audio signal with a level > - 42 dBFS in channel 56 @ 1 FS (28 @ 2 FS). Trigger after downtime > 10 ms. EXBOX.BLDS Manual - Version 1.3 page 9 of 64...
-
Page 10: Chapter 2: Legal Issues & Facts
80 %, non- condensing. • The cabinet of the device will heat up. Do not place the device close to heating sources (e.g. heaters). Observe the environmental conditions. page 10 of 64 EXBOX.BLDS Manual - Version 1.3... -
Page 11: First Aid (In Case Of Electric Shock)
Check their pulse and reanimate if their respiration is poor. Lay the body down and turn it to one side. Call for a doctor immediately. • Having sustained an electric shock, Always consult a doctor. EXBOX.BLDS Manual - Version 1.3 page 11 of 64... -
Page 12: Defective Parts/Modules
To access the latest documentation, please visit the DirectOut website: www.directout.eu. This guide refers to firmware version 4.1. page 12 of 64 EXBOX.BLDS Manual - Version 1.3... -
Page 13: Intended Operation
CHAPTER 2: Legal issues & facts Intended Operation EXBOX.BLDS is designed for switching MADI signals (AES10). WA R NING! No compensation can be claimed for damages caused by operation of this unit other than for the intended use described above. Consecutive damages are also excluded explicitly. -
Page 14: Conditions Of Warranty
All claims of warranty will expire once the device has been opened or modified, or if instructions and warnings were ignored. For warranty claims please contact the dealer where your device was acquired. page 14 of 64 EXBOX.BLDS Manual - Version 1.3... -
Page 15: Conformity & Certificates
Due to the directive 2002/96/EC for waste disposal this device must be recycled. For correct recycling please dispatch the device to: DirectOut GmbH, Leipziger Str. 32 09648 Mittweida Germany Only stamped parcels will be accepted! WEEE-Reg.-No. DE 64879540 EXBOX.BLDS Manual - Version 1.3 page 15 of 64... -
Page 16: Contact
CHAPTER 2: Legal issues & facts Contact DirectOut GmbH Leipziger Str. 32, 09648 Mittweida, Germany Phone: +49 (0)3727 5665-100 Fax: +49 (0)3727 5665-101 Mail: sales@directout.eu www.directout.eu page 16 of 64 EXBOX.BLDS Manual - Version 1.3... -
Page 17: Contents
CHAPTER 2: Legal issues & facts Contents The contents of your EXBOX.BLDS package include: • 1 x EXBOX.BLDS • 1 x external power supply unit (9 - 24 V) • 1 x Manual To complete the delivery, download the USB serial driver and the BLDS Generator application from the website. -
Page 18: Accessory
CHAPTER 2: Legal issues & facts Accessory BOX.MOUNT XL - for optimal rack mount of up to three devices in a 19’’ frame (No: DOAPA0886): page 18 of 64 EXBOX.BLDS Manual - Version 1.3... -
Page 19: Chapter 3: Installation
Proper operation can only be guaranteed between temperatures of 5º C and 45º C and a maximum relative humidity of 80%, non-condensing. Ensure that the unit has sufficient air circulation for cooling. EXBOX.BLDS Manual - Version 1.3 page 19 of 64... - Page 20 MADI port(s) before use. NOTE ! Retain the protective cap if the optical port is unused. This will protect against soiling which can lead to malfunction. Connect signal cable(s) for the MADI signals. page 20 of 64 EXBOX.BLDS Manual - Version 1.3...
- Page 21 The external power supply must be connected to the mains using the three-cord power leads supplied with the device. Only supply the voltages and signals indicated (9 - 24 V DC) to the device. EXBOX.BLDS Manual - Version 1.3 page 21 of 64...
- Page 22 2.5 A. Check the LED display on the front panel. While the device is booting the currently installed fi rmware is indicated in the display - e.g. fi rmware version 4.1. page 22 of 64 EXBOX.BLDS Manual - Version 1.3...
- Page 23 • follow the installation instructions in the ‘Installation Guide for USB Control’ TI P Keep any packaging in order to protect the device should it need to be dispatched for service. EXBOX.BLDS Manual - Version 1.3 page 23 of 64...
- Page 24 Chapter 3: Installation This page is left blank intentionally. page 24 of 64 EXBOX.BLDS Manual - Version 1.3...
-
Page 25: Chapter 4: Operation
• 44.1 kHz or 48 kHz = 1 FS • 88.2 kHz or 96 kHz = 2 FS • 176.4 kHz or 192 kHz = 4 FS EXBOX.BLDS Manual - Version 1.3 page 25 of 64... -
Page 26: Global Control
Connect the power supply here (9 - 24 V DC). N OTE The device does not provide a power switch. Connecting a working power supply to the device will power up the device immediately. page 26 of 64 EXBOX.BLDS Manual - Version 1.3... -
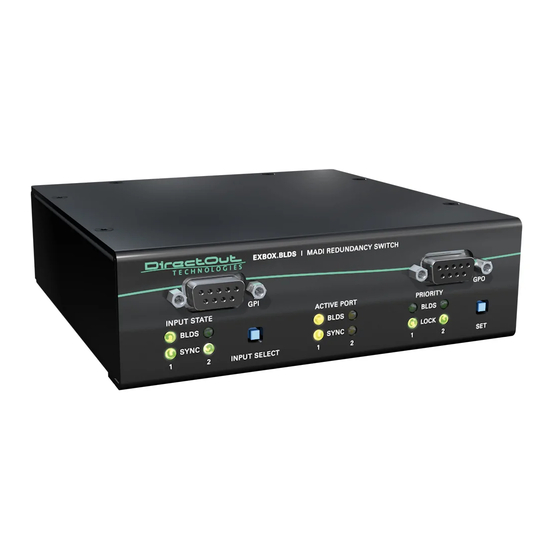
Page 27: Input / Output
CHAPTER 4: Operation Input / Output EXBOX.BLDS detects the signal status of each MADI input. A LED indicates the status (lock, sync, BLDS) of each input discretely. MADI 1 OUT SC socket MADI 1 output - connect here for MADI output signal. - Page 28 LED blink slow / off / blink slow = in sync, MADI input not selected as audio and clock source LED blink fast / off / blink fast in sync, valid BLDS present, MADI input not selected page 28 of 64 EXBOX.BLDS Manual - Version 1.3...
-
Page 29: Usb
LEDS - see „Input State“ on page 30. USB socket (2.0, type Mini B) Connect here for fi rmware updates NOTE Needs DirectOut USB Serial driver to be installed. The driver is available at www.directout.eu. EXBOX.BLDS Manual - Version 1.3 page 29 of 64... -
Page 30: Input State
BLDS signal at MADI input 2. LED OFF = no BLDS signal detected LED ON = BLDS signal detected LED heartbeat = watchdog active* * See „Watchdog“ on page 41. page 30 of 64 EXBOX.BLDS Manual - Version 1.3... - Page 31 LED ON = signal is in sync with internal reference NOTE The synchronization of the BLDS signal takes a few seconds. During this period the BLDS LEDs are flashing. EXBOX.BLDS Manual - Version 1.3 page 31 of 64...
-
Page 32: Input Selection
Three GPIs may be used to select or to force an input - see „Control via GPI“ on page 40. Push button to select the INPUT SELECT MADI input. Press to alter the selection. page 32 of 64 EXBOX.BLDS Manual - Version 1.3... - Page 33 CHAPTER 4: Operation This page is left blank intentionally. EXBOX.BLDS Manual - Version 1.3 page 33 of 64...
-
Page 34: Output State
LED OFF = no BLDS signal present or MADI input 2 is not selected for the output LED ON = BLDS signal is present and MADI input 2 is selected for the output LED heartbeat = watchdog active* page 34 of 64 EXBOX.BLDS Manual - Version 1.3... - Page 35 * See „Watchdog“ on page 41. The activation state of each port and the presence of the BLDS signal is also monitored by four GPOs - see „Monitoring via GPO“ on page 44. EXBOX.BLDS Manual - Version 1.3 page 35 of 64...
-
Page 36: Priority Setting
Selection manual switching Priority condition: lock on input #1 – revert to #1, when lock is regained Priority condition: lock on input #2 – revert to #2, when lock is regained page 36 of 64 EXBOX.BLDS Manual - Version 1.3... - Page 37 #2, when BLDS is regained. No priority – standard yes, if redundancy requiring both BLDS at both inputs – inputs switchover at loss of detect BLDS, no revert BLDS EXBOX.BLDS Manual - Version 1.3 page 37 of 64...
- Page 38 #1 – revert to #1, when Audio Pilote Tone is regained. Priority condition: Audio Pilote Tone and lock on input #2 – revert to #2, when Audio Pilote Tone is regained. page 38 of 64 EXBOX.BLDS Manual - Version 1.3...
- Page 39 • any audio signal with a level > - 42 dBFS • present in channel 56 @ 1 FS (ch 28 @ 2 FS) • trigger at loss > 10 ms • revert immediately at detection EXBOX.BLDS Manual - Version 1.3 page 39 of 64...
-
Page 40: Control Via Gpi
Force Input 2 or switch* trigger watchdog INPUT Selection Input push button SELECT Selection Priority push button * See „DSUB-9 (female) - GPI“ on page 57 for wiring details. page 40 of 64 EXBOX.BLDS Manual - Version 1.3... - Page 41 Input Priority set to input 1 and watchdog active on GPI 1. Watchdog condition is true. Input Priority set to input 1 and watchdog active on GPI 1. Watchdog condition is false. EXBOX.BLDS Manual - Version 1.3 page 41 of 64...
- Page 42 The self test helps to trace a possible issue with the installation; i.e. if open contact is expected and the led is blinking (e.g. short-circuit) or if a closed contact is expected but the led is not blinking (e.g. broken link). page 42 of 64 EXBOX.BLDS Manual - Version 1.3...
- Page 43 CHAPTER 4: Operation This page is left blank intentionally. EXBOX.BLDS Manual - Version 1.3 page 43 of 64...
-
Page 44: Monitoring Via Gpo
– forced but no Sync Input 1 signal lock blinking, Input 2 is used when input is for output – forced but no Sync Input 2 signal lock page 44 of 64 EXBOX.BLDS Manual - Version 1.3... - Page 45 Input 2 is used for output – BLDS present at output 2 watchdog active* * See „Watchdog“ on page 41 See „DSUB-9 (female) - GPO“ on page 58 for wiring details. EXBOX.BLDS Manual - Version 1.3 page 45 of 64...
-
Page 46: Chapter 5: Working With Blds
BLDS Generator The application is available for Windows® and OS X®. Download the application at www.directout.eu Unpack the zip archive and open the ‘BLDS_Generator.exe’ (Windows®) or ‘BLDS Generator.app’ (OS X®). page 46 of 64 EXBOX.BLDS Manual - Version 1.3... - Page 47 Click ‘Generate’ to save the a 24 bit mono .wav fi le with the settings specifi ed. NOTE The BLDS signal is designed so that it is 16 bit safe and the level is below - 60 dBFS. EXBOX.BLDS Manual - Version 1.3 page 47 of 64...
- Page 48 This violates the BLDS condition resulting in possibly unwanted behaviour. Adjust the priority setting to trigger the switch according to BLDS detection - see „Priority Setting“ on page 36. page 48 of 64 EXBOX.BLDS Manual - Version 1.3...
-
Page 49: Examples
BLDS signal. Input 1 is prioritized and active. If input 1 fails (BLDS error), input 2 is used. Once input 1 regains signal the switch will revert to input 1. EXBOX.BLDS Manual - Version 1.3 page 49 of 64... - Page 50 Example 4 - Manual switching Both MADI inputs detect a valid input signal without valid BLDS signal. No input is prioritized and input 2 is active. No automatic switch-over will occur at signal loss. page 50 of 64 EXBOX.BLDS Manual - Version 1.3...
-
Page 51: Chapter 6: Troubleshooting And Maintenance
Never use objects for cleaning. No signal at Connections Check the connections the output (input / output) and change the cables if port. are mixed up. necessary. Check the routing matrix. EXBOX.BLDS Manual - Version 1.3 page 51 of 64... - Page 52 Change the source at the input is defective not stable. use appropriate cables. bad signal condition (Jitter > 1 ns) - e.g. due to exceeded length or bad screening attenuation of signal cable. page 52 of 64 EXBOX.BLDS Manual - Version 1.3...
-
Page 53: Maintenance
To clean the device, use a soft, dry cloth. To protect the surface, avoid using cleaning agents. NOTE The device should be disconnected from the power supply during the cleaning process. EXBOX.BLDS Manual - Version 1.3 page 53 of 64... -
Page 54: Chapter 7: Technical Data
The connected power supply must provide a current limiting to a maximum of 2.5 A. Environmental Conditions • Operating temperature +5°C up to +45°C • Relative humidity: 10% - 80%, non condensing page 54 of 64 EXBOX.BLDS Manual - Version 1.3... -
Page 55: Usb Port
• 4 x Voltage input 2 V - 24 • 1 x DSUB-9 socket female • 4 x FET Switch (0 V - 24 V) • 1 x Voltage Source (5 V, max 200 mA) EXBOX.BLDS Manual - Version 1.3 page 55 of 64... -
Page 56: Appendix A - Wiring Sketches
DC + DC + DC - DC - NOTE To ensure proper operation all pins should be connected. NOTE Ground is connected with the chassis of the plug (safety class 1). page 56 of 64 EXBOX.BLDS Manual - Version 1.3... -
Page 57: Dsub-9 (Female) - Gpi
DSUB-9 (female) - GPI Signal Effect Voltage 1 GPI 1 (force input 1, watchdog) Voltage 2 GPI 2 (force input 2, watchdog) Voltage 3 GPI 3 (selection input) Voltage 4 GPI 4 (selection priority) EXBOX.BLDS Manual - Version 1.3 page 57 of 64... -
Page 58: Dsub-9 (Female) - Gpo
5P (+5 V) GND (FET) GPO 1 (sync input 1) GND (FET) GPO 2 (sync input 2) GND (FET) GPO 3 (BLDS input 1) GND (FET) GPO 4 (BLDS input 2) page 58 of 64 EXBOX.BLDS Manual - Version 1.3... - Page 59 Appendix A - Wiring Sketches This page is left blank intentionally. EXBOX.BLDS Manual - Version 1.3 page 59 of 64...
-
Page 60: Index
Power supply ....... 7 Defective Parts/Modules ..12 Priority Setting Dimensions ......54 characteristics ....36 DSUB-9 examples ....... 49 Pinout ....... 57 , 58 Redundancy Modes ... 36 Environmental conditions 19, 54 page 60 of 64 EXBOX.BLDS Manual - Version 1.3... - Page 61 DSUB-9 (female) - GPO .. 58 Hirose HR10 (DC PSU) .. 56 Support ......51 Technical data ....54 Troubleshooting ....51 Updates ......12 USB ........55 Warranty ......14 Watchdog ......41 EXBOX.BLDS Manual - Version 1.3 page 61 of 64...
- Page 62 Index page 62 of 64 EXBOX.BLDS Manual - Version 1.3...
- Page 63 Index EXBOX.BLDS Manual - Version 1.3 page 63 of 64...
- Page 64 DirectOut GmbH Leipziger Strasse 32 T: +49-3727-5665-100 09648 Mittweida F: +49-3727-5665-101 Germany www.directout.eu...
Need help?
Do you have a question about the EXBOX.BLDS and is the answer not in the manual?
Questions and answers