Table of Contents
Advertisement
Advertisement
Table of Contents

Subscribe to Our Youtube Channel
Related Manuals for 909 CK14DD


Summary of Contents for 909 CK14DD
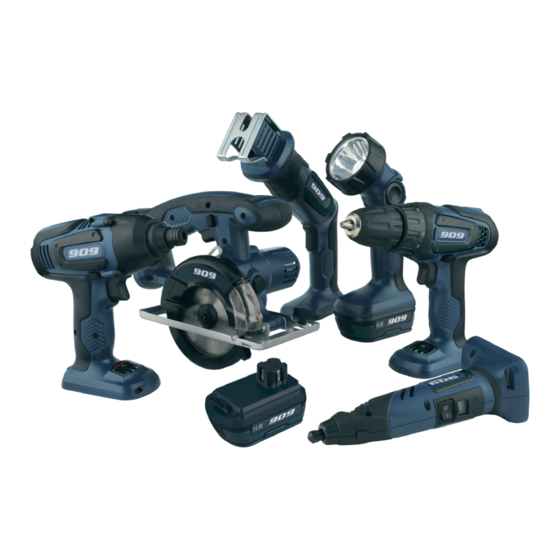
- Page 1 INSTRUCTION MANUAL 6PCE14 14.4V 6 CORDLESS TOOL COMBINATION SET...
-
Page 2: Table Of Contents
CONTENTS Warranty Power Tools For full details please visit us at www.909.com Warranty Know your product: Impact Driver Introduction Using the impact driver Environmental protection Inserting a driver or nut setter bit into the impact driver Description of symbols Operating tips... -
Page 3: Introduction
Manual before using your new 909 Power Tool. Take special care to heed the Cautions and Warnings. Conforms to relevant standards Your 909 power tool has many features that will make for electromagnetic compatibility. your job faster and easier. Safety, performance, and dependability have been given top priority in the For safe operation read instruction manual. -
Page 4: General Safety Rules
General safety rules 3) Personal safety a) Stay alert, watch what you are doing and use WARNING. Read all safety warnings and all instructions. common sense when operating a power tool. Do not Failure to follow the warnings and instructions may result in use a power tool while you are tired or under the electric shock, fire and/or serious injury. -
Page 5: Additional Safety Rules For Drills And Impact Wrenches
b) Do not use the power tool if the switch does not turn b) Recharge only with the charger specified by the it on and off. Any power tool that cannot be controlled manufacturer. A charger that is suitable for one type with the switch is dangerous and must be repaired. -
Page 6: Additional Safety Rules For Circular Saws
• Do not let anyone under 18 years operate this tool. which the tool is being used. It is also imperative that you observe the accident prevention regulations in force in your • Only use accessory bits in good condition. area. - Page 7 f. When ripping always use a rip fence or straight edge c. When restarting a saw in the workpiece, centre the guide. This improves the accuracy of cut and reduces saw blade in the kerf and check that saw teeth are the chance of blade binding.
-
Page 8: Additional Safety Rules For Reciprocating Saws
be released. For all other sawing, the lower guard should • Avoid cutting nails. Inspect the work piece and remove all operate automatically. nails and other foreign objects before beginning sawing. d. Always observe that the lower guard is covering the •... -
Page 9: Additional Safety Rules For Rotary Tools
• After long working periods external metal parts and pressure. You will get better results and you will be taking accessories could be hot. better care of your tool. • Do not force the saw; let the tool do the work at a •... -
Page 10: Additional Safety Rules For The Torch
60 Hz. The use of any other mains adapter units or the use of the plug pack with another type of power supply may lead • Do not plug anything other than your 909 tool into the to personal and property damage. charger, as other objects may touch dangerous voltage... -
Page 11: Additional Safety Rules Related To The Battery Pack And Battery Safety
• If the tool or charger is damaged in any way. • Use only the 909 batteries supplied with the 909 Tool or • If the battery pack is not charged within the time frame as 909-approved replacements. -
Page 12: When To Charge The Battery
to dangerous levels in the direct sunlight and on high • Handle batteries with care to avoid shorting the battery temperature days. THINK BEFORE LEAVING YOUR with conducting materials, such as nails, screws, metal LITHIUM ION BATTERY PACK IN STORAGE. watch bands, rings, bracelets, and keys. -
Page 13: Know Your Product: Battery And Charger
Know your product: Battery and Charger 1. Battery Pack 2. Battery Release Button 3. Plug Pack Charger 4. Charger Base... -
Page 14: Unpacking
Due to modern mass production techniques, it is unlikely in this manual. that your 909 Power Tool is faulty or that a part is missing. Another feature of the drill/battery pack is the low voltage If you find anything wrong, do not operate the tool until the cut out feature. -
Page 15: To Obtain The Best Life For The Battery
1 Connect the power output lead from the Plug Pack can short battery packs and cause a fire or explosion. Charger (3) to the back of the charger base (4). Always unplug the charger when not in use and store in 2 Connect the plug pack charger (3) to a mains power a dry secure place. - Page 16 conditions causing the original excessive temperature When the red light is glowing and the orange and green has been corrected. indiicators are not, the battery charge is approx 25% or less and recharging is advised. Low voltage cut out To check the battery level, depress the trigger fully and The battery pack used on this tool is fitted with a low allow the tool to run freely.
-
Page 17: Know Your Product: Drill
3. Forward reverse control 4. LED Light 5. Battery level indicator 6. 19 + Drill position clutch collar Specifications Tool Model #: CK14DD Voltage: 14.4Vdc Drill no-load speed: 0 – 580 min Torque settings: 19 + 1 drill... -
Page 18: Using The Drill
Drilling uses the forward mode. The reverse mode is Using the drill intended for the removal of screws and assisting to remove Trigger switch jammed drill bits. Use the forward/reverse switch (3) to select the direction Adjustable torque of rotation, then pull the trigger (2). This trigger switch is an This drill is equipped with 19 electronic variable speed control which enables the user to torque settings plus one drill... - Page 19 2. Ensure the drill bit is fully inserted, so that the chuck • Keep the drill bit sharp. jaws grip the straight section of the bit. • Reduce pressure, as the drill is about to break through 3. Holding the rear section of the chuck firmly, rotate the the item being drilled.
-
Page 20: Know Your Product: Impact Driver
Know your product: Impact Driver This Impact Driver is mainly used for screwdriving in wood or metal sheet and driving nuts and bolts. Use the tool and accessories only for intended applications. All other applications are expressly ruled out. 1. 1/4 inch (6.35 mm) hex drive 2. -
Page 21: Using The Impact Driver
Using reverse directions enables the screws, nuts or bolts to Using the impact driver be loosened or removed. Trigger switch Inserting a driver or nut setter bit into the Use the forward/reverse switch (3) to select the direction impact driver of rotation, then pull the trigger (2). - Page 22 pilot and clearance holes should be drilled. Always hold the Fastening with screws machine straight on the bolt to be tightened. This procedure will enable you to fasten materials together The best method to determine the right impacting/tightening with your tool without stripping, splitting or separating the duration is by means of a trial.
-
Page 23: Know Your Product: Trim Saw
Know your product: Trim Saw Specifications This 14.4V trim saw is designed for light and short-term use Tool Model #: CK14TS around the home and domestic applications. It is particularly Voltage: 14.4Vdc useful for trimming plywood and similar sheet material. It is NOT suitable for metal cutting blades or discs. -
Page 24: Using Your Trim Saw
Tighten the depth adjustment locking knob (3). Using your Trim Saw Making a cut Switching on and off Mark the line of cut on the workpiece. Adjust the depth of Attach the battery pack (1). cut as required. To switch on, press the lock off button (4) from either side, When making 90°... - Page 25 Remove the saw blade from the Using the parallel fence inner flange and pull it out. The parallel fence (10) allows Note, this is a close fit and lifting you to make parallel cuts in a the plastic lever of the rotating sheet of wood, all at the same blade guard (13) will help.
- Page 26 firmly by pressing firmly on the spindle lock and rotating the blade bolt in a clockwise direction. Finally tighten the blade bolt using the hex key provided. The direction in which the blade rotates has WARNING. to be the same as the direction of the arrow marked on the housing.
-
Page 27: Know Your Product: Reciprocating Saw
Know your product: Reciprocating Saw Specifications Before using the Reciprocating Saw, familiarise yourself Tool Model #: CK14RS with all the operating features and safety requirements. Voltage: 14.4Vdc Use the tool only for the applications intended. All other applications are expressly ruled out Strokes per minute: 0–2000 SPM 1. -
Page 28: Installing A Saw Blade
once the saw has started. However, if the trigger switch Installing a saw blade is released, the lock-off button will re-engage as a safety CAUTION. Always ensure that the saw is switched off and precaution to prevent accidental operation. the battery is removed before making any adjustments. 3. -
Page 29: Metal Cutting
Metal cutting Metals such as sheet steel, pipe, steel rods, aluminium, brass and copper can be cut with your saw. Be careful not to bend or twist the blade and do not force the cutting action. We recommend that you use cutting oil to lubricate the cut when sawing soft metals and steel. -
Page 30: Know Your Product: Rotary Tool
Know your product: Rotary Tool Specifications Before using the Rotary Tool, familiarise yourself Tool Model #: CK14RT with all the operating features and safety requirements. Voltage: 14.4Vdc Use the tool only for the applications intended. All other Rotary Tool no-load speed: 8000–30,000 RPM applications are expressly ruled out Max. -
Page 31: Switching On And Off
If material is burning, reduce speed and also pressure on Switching on and off the tool. To Start the rotary tool Faster speeds are also suggested for grinding as slower 1. Attach the battery pack speeds have a tendency to clog the wheel. 2. - Page 32 holding the spindle lock button down and engaged, finger tighten the collet nut. Then tighten the colt nut with the small wrench WARNING: Make sure that the accessory is inserted as far as possible. Having too much shaft exposed could cause it to damage or bend.
-
Page 33: Know Your Product: Led Torch
Know your product: LED Torch 1. Lamp head 2. Switch 3. Handle 4. Battery pack 7. Handstrap attachment loop Tool Model #: CK14LT Voltage: 14.4Vdc Plug pack Model #: CK14LPP35 Charger base adaptor Model #: CK14LA Battery pack Model #: 144M Note. -
Page 34: Switching On And Off
Switching On and Off Globe replacement The LED used in this torch has a life of 30,000 hours and The lamp’s illumination is controlled only by pressing the should not require replacement. power switch. 1. Press the power switch and the single LED will be turned 2. -
Page 35: Maintenance
Maintenance • Store the tools, instruction manual and where necessary the accessories in the original packaging. In this way you will always have all the information and parts ready to hand. • Do not throw used batteries into fire or water. There is a danger of explosion! Please hand in non-working or used batteries, or tools with built-in batteries, to the environmentally-safe disposal unit at a municipal waste-...
Need help?
Do you have a question about the CK14DD and is the answer not in the manual?
Questions and answers