
Related Manuals for Queclink GV75W


Summary of Contents for Queclink GV75W
- Page 1 GV75W User Manual GV75W User Manual WCDMA/GSM/GPRS/GPS Tracker TRACGV75WUM001 Version: R1.00 TRACGV75WUM001 ‐ 0 ‐ ...
- Page 2 Release Document Control ID TRACGV75WUM001 General Notes Queclink offers this information as a service to its customers, to support application and engineering efforts that use the products designed by Queclink. The information provided is based upon requirements specifically provided to Queclink by the customers. Queclink has not undertaken any independent search for additional relevant information, including any information that may be in the customer’s possession. Furthermore, system validation of this product designed by Queclink within a larger electronic system remains the responsibility of the customer or the customer’s system integrator. All specifications supplied herein are subject to change. Copyright ...
-
Page 3: Table Of Contents
GV75W User Manual Contents Contents ............................ ‐ 2 ‐ Table Index ............................ ‐ 3 ‐ Figure Index ............................ ‐ 4 ‐ 0. Revision History .......................... ‐ 5 ‐ 1. Introduction .......................... ‐ 6 ‐ 1.1. Reference ........................... ‐ 6 ‐ 1.2. Terms and Abbreviations .................... ‐ 6 ‐ 2. Product Overview .......................... ‐ 7 ‐ 2.1. Appearance ........................ ‐ 7 ‐ 2.2. Parts List .......................... ‐ 7 ‐ 2.3. Interface Definition ...................... ‐ 8 ‐ 3. Getting Started .......................... ‐ 9 ‐ 3.1. Install a SIM Card ........................ ‐ 9 ‐ 3.2. Switch on the Device ...................... ‐ 10 ‐ 3.3. Power Connection ...................... ..‐ 10 ‐ 3.4. Ignition Detection ...................... ‐ 11 ‐ 3.5. Digital Input ........................ ..‐ 11 ‐ ... - Page 4 GV75W User Manual Table Index TABLE 1 : REFERENCE ........................ ‐ 6 ‐ TABLE 2: TERMS AND ABBREVIATIONS ..................... ‐ 6 ‐ TABLE 3: PARTS LIST .......................... ‐ 7 ‐ TABLE 4: DESCRIPTION OF GV75W INTERFACE ................. ‐ 8 ‐ TABLE 5: DESCRIPTION OF GV75W EXTENSION CABLE .............. ‐ 8 ‐ TABLE 6: ELECTRICAL CHARACTERISTICS OF IGNITION DETECTION .......... …‐ 11 ‐ TABLE 7: ELECTRICAL CONDITIONS OF NEGATIVE TRIGGER INPUTS .......... ‐ 11 ‐ TABLE 8: ELECTRICAL CONDITIONS OF DIGITAL OUTPUTS.............. ‐ 12 ‐ TABLE 9: DEFINITION OF DEVICE STATUS AND LED ................ ‐ 14 ‐ TRACGV75WUM001 ...
- Page 5 GV75W User Manual Figure Index FIGURE 1: APPEARANCE OF GV75W .................... ‐ 7 ‐ FIGURE 2: TYPICAL POWER CONNECTION .................. ‐ 11 ‐ FIGURE 3: TYPICAL IGNITION DETECTION .................. ‐ 11 ‐ FIGURE 4: CONNECTION FOR NEGATIVE TRIGGER INPUTS ............. ‐ 11 ‐ FIGURE 5: CONNECTION TO DRIVE AN LED .................. ‐ 12 ‐ FIGURE 6: CONNECTION TO DRIVE A RELAY ................... ‐ 12 ‐ FIGURE 7: THE CONNECTION OF UART WITH FEMALE DB‐9 ............ ‐ 13 ‐ FIGURE 8: THE CONNECTION OF UART WITH EXTERNAL DEVICES .......... .‐ 13 ‐ FIGURE 9: GV75W LED ........................ ‐ 13 ‐ TRACGV75WUM001 ‐ 4 ‐ ...
-
Page 6: Revision History
GV75W User Manual 0. Revision History Revision Date Author Description of Change 1.00 2016‐09‐09 Super Zhao Initial TRACGV75WUM001 ‐ 5 ‐ ... -
Page 7: Introduction
1. Introduction The GV75W is a compact waterproof GPS tracker designed for a wide variety of vehicle tracking applications. It has multiple I/O interfaces that can be used for monitoring or controlling external devices. Its built‐in GPS receiver has superior sensitivity and fast time to first fix. Its triple band ... -
Page 8: Product Overview
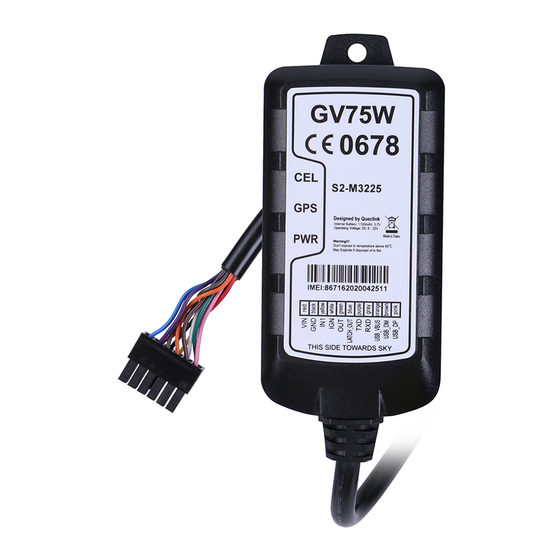
GV75W User Manual 2. Product Overview 2.1. Appearance Figure 1: Appearance of GV75W 2.2. Parts List Name Picture GV75W Tracker 102mm*46mm*20.5mm GV75W Extension Cable USB‐232 Cable (optional) 12V DC Supply (optional) GV75W_UART_USB_PWR_Convert_ CABLE (optional) Table 3: Parts List TRACGV75WUM001 ... -
Page 9: Interface Definition
Purple TXD UART TXD, RS232 8 Gray RXD UART RXD, RS232 9 Orange USB_VBUS USB power connector 10 Brown USB_DM USB digital negative 11 Pink RXD_DP USB digital positive Table 4: Description of GV75W Interface Index Colour Description Comment 1 Red Power External DC power input, 8‐32V 2 Black Ground System ground(connected to the vehicle’s frame directly) 3 Yellow Digital input Digital input, negative trigger 4 White Ignition ... -
Page 10: Getting Started
GV75W User Manual 3. Getting Started 3.1. Install a SIM Card Step 1: Remove the top cover. Step 2: Insert the SIM card into the SIM card holder. Note: Press down on the SIM card slightly to make it slide into the slot. Step 3: Place the top cover on the bottom cover, and tighten both covers until they snap. Note: Make sure that the seal ring is in place and there is no obvious gap between covers and seal ring. TRACGV75WUM001 ‐ 9 ‐ ... -
Page 11: Switch On The Device
Step 4: Turn over the device and tighten the screw with screw cushion. Step 5: Connect the device to extension cable or cut off the 12Pin Molex connector. 3.2. Switch on the Device The method to power on GV75W: Use external power to turn on. When the external power is removed, GV75W will switch to internal backup battery and keep on running. When internal backup battery is exhausted, GV75W will report a message and then turn off. 3.3. Power Connection The red wire is power wire and the black wire is ground wire. The input voltage range for this device is from 8V to 32V. The device is designed to be installed in vehicles that operate on 12V or 24V ... -
Page 12: Ignition Detection
GV75W User Manual Figure 2: Typical Power Connection 3.4. Ignition Detection Logical Status Electrical Status Active 5.0V to 32V Inactive 0V to 3V or open Table 6: Electrical Characteristics of Ignition Detection Figure 3: Typical Ignition Detection The white wire is used for ignition detection. It is strongly recommended to connect this wire to ignition key at “RUN” position as shown above. An alternative to connecting to the ignition switch is to find a non‐permanent power source (like the ... -
Page 13: Digital Output
GV75W User Manual 3.6. Digital Output The outputs are Open‐Drain type with no internal pull‐up resistor which can be used to control a relay. It means that the user has to connect a pull‐up resistor or a relay coil between the output pin and any positive voltage (32V max) to generate correct output. Each output can drive a continuous current of 0.15A. The green wire is low side 150mA max, and the blue wire is low side 150mA max with latch. The electrical conditions are shown in the following table: Logical State Electrical State Enable <1.5V, drive current is 0.15A Disable Open or the pull‐up voltage (max 32V) Table 8: Electrical Conditions of Digital Outputs Note: The relay output can be latched by the software, so even if the GV75W is restarted or powered down in some cases, the relay output will not change. To use the latch function, the main power and backup ... -
Page 14: Uart Interface
GV75W User Manual 3.7. UART Interface There is one UART interface on GV75W. UART is used for configuration, firmware download, and communicating with external devices such as CAN Bus module and RFID reader. Please note the UART interfaces are all RS232 level. For RS232 level, valid signals are 3V to 15V and ‐ 3V to ‐15V, and the ‐3V to +3V is not a valid level. 3V to 15V corresponds with logic 0 of TTL level, while ‐3V to ‐15V corresponds with logic 1. The examples of connections of UART with female DB‐9 and with external devices are shown as ... -
Page 15: Table 9: Definition Of Device Status And Led
GV75W User Manual CEL Device is searching GSM network. Fast flashing (Note 1) (Note 3) Device has registered to GSM network. Slow flashing (Note 4) SIM card needs pin code to unlock. ON GPS GPS chip is powered off. OFF (Note 2) GPS sends no data or data format error occurs. Slow flashing GPS chip is searching GPS info. Fast flashing GPS chip has gotten GPS info. ON PWR No external power and backup battery voltage is lower OFF (Note 2) than 3.35V. No external power and backup battery voltage is below Slow flashing 3.55V. External power in and backup battery is charging. Fast flashing External power in and backup battery is fully charged. ON Table 9: Definition of Device Status and LED ... -
Page 16: Troubleshooting And Safety Info
Please move GV75W into places quickly. register to the network. with good GSM coverage. The SIM card is PIN locked. Use SIM card without SIM PIN, or unlock SIM PIN. Messages can’t be The SIM card in GV75W doesn’t Try a GPRS supporting SIM card. reported to the support GPRS. backend server by APN is wrong. Some APNs cannot visit Ask the network operator for the GPRS. ... - Page 17 GV75W User Manual NOTE: This equipment has been tested and found to comply with the limits for a Class B digital device, pursuant to part 15 of the FCC Rules. These limits are designed to provide reasonable protection against harmful interference in a residential installation. This equipment generates, uses and can radiate radio frequency energy and, if not installed and used in accordance with the instructions, may cause harmful interference to radio ...
Need help?
Do you have a question about the GV75W and is the answer not in the manual?
Questions and answers