ESI ESRTP4RF User And Installation Instructions Manual
Rf programmable room thermostat with tpi, optimum stop, delayed & optimum start
Hide thumbs
Also See for ESRTP4RF:
- Installation instructions manual (20 pages) ,
- User instructions (20 pages)

Related Manuals for ESI ESRTP4RF


Summary of Contents for ESI ESRTP4RF
- Page 1 ESRTP4RF RF Programmable Room Thermostat with TPI, Optimum Stop, Delayed & Optimum Start User and Installation Instructions...
-
Page 3: Table Of Contents
INDEX User Instructions What is a Programmable Room Thermostat? Introduction to the ESRTP4RF What is Chronoproportional Controls (TPI)? What is Delayed Start? What is Optimum Start? What is Optimum Stop? What is Landlord Service? Quick Operating Guide Factory Pre-Set Programme... - Page 4 INDEX Setting the Time and Date Using the Copy Function Battery Replacement Resetting the Unit Manual Operation Installation Instructions Technical Data Installation Safety Instructions General Safety Instructions Maintenance Safety Notice Fitting the Programmable Room Thermostat Fitting the Receiver Commissioning / Configuring Wiring Diagram: RTP Receiver Setting TPI, Delayed &...
-
Page 5: User Instructions
User Instructions... -
Page 6: What Is A Programmable Room Thermostat
What is a Programmable Room Thermostat? An explanation for householders Put simply a Programmable Room Thermostat is a timer and thermostat combined in one unit. With a standard timer you choose your heating ON times and set your room thermostat (fitted usually away from the timer) to the desired comfort temper- ature required. -
Page 7: Introduction To The Esrtp4Rf
Introduction to the ESRTP4RF The ESRTP4RF is an easy to install and use Wireless 7 Day, 5/2 Day or 24 Hr Programmable Room Thermostat which offers four to six time and temperature changes each day, with different programmes available for weekdays and for... -
Page 8: What Is Delayed Start
domestic room thermostats, room thermostats with TPI increases boiler efficiency by firing the boiler at regular intervals, adjusting firing duration with demand, to maintain set room temperatures. This gives them a great advantage over other domestic room thermostats and achieves a constant ambient environment for the user e.g. -
Page 9: What Is Optimum Start
What is Optimum Start? The Optimum Start adjusts the starting time for home heating according to the temperature measured within the building. Instead of setting an arbitrary time for the heating to come on, the homeowner programmes the time that the home should be at the desired temperature. Up to 10% of domestic energy costs can be saved, as the warm up time is automatically reduced according to the ambient temperature. -
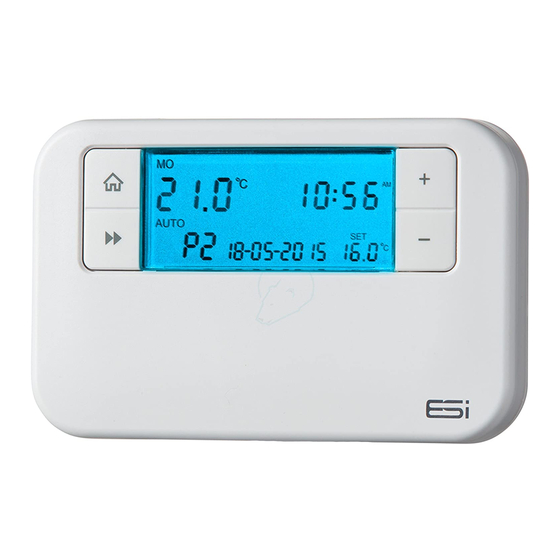
Page 10: Quick Operating Guide
Quick Operating Guide Home (takes you back to home screen) Next (moves you to next option within a function) Temporary Override/Settings Adjustment Accepts/Confirms selection in functions Copy (COPY) Holiday Mode Sets Time and Date Selects and adjusts Programme (PROG) Places Thermostat into Frost Protection Mode (OFF) Places Thermostat into Manual Mode (MAN) Runs Programme (AUTO) Reset... - Page 11 Programme Events Day Display Display Room Temperature Delayed Start (DS) / Frost Protection Mode Optimum Start (OS) is active Thermostat is receiving signal Date (DD-MM-YYYY) Thermostat is not Annual Service is due receiving signal (SERV) Time Display (12 hour Optimum Stop (OST) is AM/PM or 24 hour) active Holiday Mode Display...
-
Page 12: Factory Pre-Set Programme
Factory Pre-Set Programme This Programmable Room Thermostat has been designed to be a simple to use thermostat, requiring minimal user intervention with a pre-programmed heating profile. The pre-set heating times and temperatures will suit most people (see table below). To accept the factory pre-set programme, move the slider to AUTO which will revert the thermostat to Run Mode (the colon (:) in the LCD display will begin to flash). -
Page 13: Setting The Operation Mode (5/2 Day, 7 Day Or 24Hr)
Setting the Operation Mode (5/2 day, 7 day, 24hr) 1. Switch the slider to PROG. 2. Press +/– buttons to move between 7 day, 5/2 day or 24hr operation. 5/2 Day operation is shown by MO, TU, WE, TH, FR flashing (5 Day) and then SA, SU flashing (2 Day) 7 Day operation is shown by just one day flashing at a time... -
Page 14: All Day Setting
All Day Setting 1. Switch the slider to AUTO. 2. Press the A button under the facia. The display will now show AL (All Day). 3. Press the +/- button to set the temperature (increments of 0.5°c). 4. The mode will quit by 00.00 that day. Press the Home button to cancel and return to Auto Mode. -
Page 15: Holiday Mode
unhindered) and the display then alternates between the time left and the current time. When the next ON/comfort programme is arrived at, the temporary override will end and Auto mode is reactivated. 4. Press the Home button to cancel this function and reactivate Run mode. -
Page 16: Frost Protection
Frost Protection This function is provided as an option if it is desirable to turn the heating off permanently. It is usually used in summer. To set the Frost Protection Mode: 1. Switch the slider to OFF to enter the Frost Protection Mode. -
Page 17: Using The Copy Function
Using the Copy Function The unit is provided with a copy function which allows an adjusted programme to be copied to another day or set of days. This avoids the necessity of re-entering a desired programme for another day or sets of days. N.B. This function only works in 7 Day setting. -
Page 18: Resetting The Unit
Resetting the Unit To reset the programmer, hold reset for approx. 3 seconds. The system and programme will restore to the factory default settings. Hold the Next button and press the reset button to restore to factory default settings. Manual Operation It is possible to operate the receiver manually. -
Page 19: Installation Instructions
Installation Instructions... -
Page 20: Technical Data
Technical Data Programmable Room Thermostat Programming 7 Day, 5/2 Day & 24Hr 2 x 1.5V Lithium Batteries Power Supply (type: AA size) Temperature +/- 1oC at 20oC Sensor Type Temperature 5oC to 35oC Adjustment Range Plastic Thermoplastic, flame retardant Protection Rating IP30 127mm(L) x 81mm(W) Dimensions... -
Page 21: Installation Safety Instructions
Receiver Fixing Easy Fit Back Plate Power Supply Voltage 230VAC, 50Hz Power Consumption 6 (2)A. 230VAC SPDT (Volt Free Contact Type changeover contacts) Plastic Thermoplastic, flame retardant Transmission Distance Approx. 30m in open terrain Protection Rating IP30 135mm(L) x 90mm(W) Dimensions x 33mm(D) EN60730-1 EN 60730-2.7, EMC... -
Page 22: General Safety Instructions
3mm in all poles. The recommended cable sizes are 1.0mm sqr or 1.5mm sqr. No earth connection is required as the product is double insulated but ensure continuity of earth throughout the system. General Safety Instructions When fitting batteries, do not mix old and new batteries together. -
Page 23: Safety Notice
Safety Notice WARNING! ALWAYS ISOLATE THE AC MAINS SUPPLY BEFORE INSTALLING. THIS PRODUCT MUST BE FITTED BY A COMPETENT PERSON, AND INSTALLATION MUST COMPLY WITH THE GUIDANCE PROVIDED IN THE CURRENT EDITIONS OF BS767 (IEE WIRING REGULATIONS) AND PART “P” OF THE BUILDING REGULATIONS. - Page 24 Installation 1. Remove the front cover using a flat screwdriver in the two holes at the top of the programmer and separate from back plate. 2. If required, fix the back plate directly on the wall using suitable wall plugs and screws or mount over existing wall box.
-
Page 25: Fitting The Receiver
Fitting the Receiver Installation 1. Loosen the screws on the back-plate and remove from the Unit. 2. Fix the back-plate, terminals at the top, either direct onto a flat wall using wall plugs and screws or on a flush mounting single conduit box. Route the wires through the back of the wall plate and fit the wires to the wall-plate in accordance with the relevant diagram and in accordance with I.E.E. -
Page 26: Wiring Diagram: Rtp Receiver
5. If unsuccessful, repeat steps 2-3. If still unable to pair, leave the unit powered on for 5 minutes and repeat the steps above. 6. The programmer display will show symbol when it is able to receive signal and symbol when it is unable to receive signal. -
Page 27: Setting Tpi, Delayed & Optimum Start
N.B!! Volt free contacts. Setting TPI, Delayed or Optimum Start 1. Switch the slider to OFF. Press and keep holding the A and H buttons together (under the facia), then press the Next button to enter the technical settings. Release all buttons. -
Page 28: Setting Sensitivity/Swing And Calibration
OS (OP StAr OS): When ON, the programmer will run in Optimum Start mode 3. Press the Next button and press the +/- buttons to turn OP STOP (Optimum Stop) ON/OFF. 4. Press the Next button to enter the TPI settings. Press +/- to choose between:- OFF: Working under normal swing value 3 Cycles: ON/OFF one cycle is 20 minutes. - Page 29 Next button and the technical settings menu will be displayed. Release all buttons. 2. Press the Next button until you get to SER (service interval) Settings. A numeric password will be required to enter this section. The factory default password is 0000. N.B.
- Page 30 6. Press the Next button. Use +/- to set the due date (from 28 - 366 days). 7. The left of the LCD screen will display the recorded running time. Holding the C button for 2 seconds will zero to the time. 8.
- Page 32 ESi Controls Limited sales@esicontrols.co.uk www.esicontrols.co.uk Version 6.2.2...
Need help?
Do you have a question about the ESRTP4RF and is the answer not in the manual?
Questions and answers
What does un boil mean
The screen has become bitty, you cant see all of the numbers and letters , we’ve changed the batteries but still the same , any thoughts ?