Advertisement
Quick Links
Advertisement

Related Manuals for Multitek DIP40


Summary of Contents for Multitek DIP40
- Page 1 DIP40 IP INTERCOM DOORPHONE USER MANUAL V1.0 30.03.2015...
-
Page 2: Table Of Contents
DIP40 IP INTERCOM DOORPHONE USER MANUAL Thank you for choosing Multitek DIP40 IP INTERCOM doorphone. This user manual was prepared for using the device more efficiently. INDEX 1. Safety Warnings 2. Technical specification of the device 3. Installation 4. User features 5. -
Page 3: Safety Warnings
1. SAFETY WARNINGS For your own and the device safety, you should obey the security warnings; 1. Read the user manual carefully. 2. Read the safety warnings carefully. 3. Remarks about Transport, Shipment and Preservation - During transport and shipment keep the product with its case. The case will protect the product against the physical damages. -
Page 4: Technical Specification Of The Device
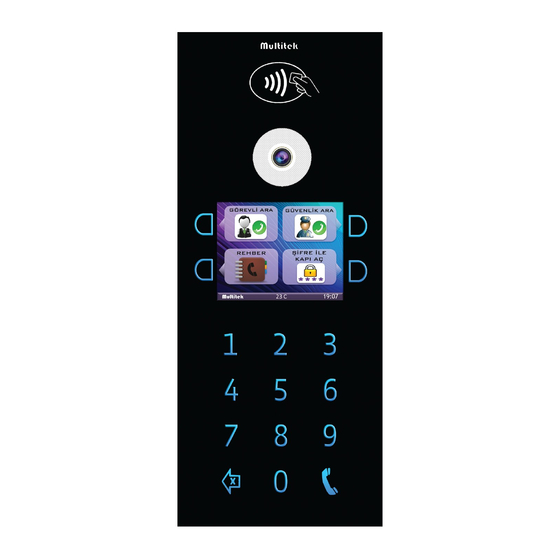
2.TECHNICAL SPECIFICATION OF THE DEVICE Screen : 4” TFT LCD, Resolution 320x240, LED backlight Camera : 2.0 Mpixel CMOS, adjustable angle, photo cell, night LEDS : 1.5GHz, RAM 1GB ,FLASH 4 GB Input : TF cart , USB , Ethernet Operating System : Android 4.2.2 Transmission : TCP/IP ,SIP protocol... - Page 5 APPEREANCE: SEPEAKER PROXIMITY / MIFARE READER CAMERA NIGHT VISION LEDS TOUCH FUNCTION BUTTONS (4 pcs) 4” TFT LCD SCREEN TOUCH KEY PAD LIGHT SENSOR MICROPHONE...
-
Page 6: Installation
Use RJ45 cable to connect the device to the network. Place DIP40 to the wall mount aparatus by using 4 pieces holding tins. Use 4 pieces 2.9mmx13mm screws given in the giftbox to fix DIP40 and the wall mount aparatus. - Page 7 BACK SIDE OF DIP40: CAMERA ANGLE ADJUSTMENT ETHERNET DOOR OPENER LED FRAME CONTACTS CONNECTION...
- Page 8 CAMERA ANGLE ADJUSTMENT: CAMERA ANGLE ADJUSTMENT: To change the camera angle, loose the screw shown inside of the RED circle. Then, the camera becomes loose to change the directions. When you find the proper position, tight the screw to place the camera. NETWORK CONNECTION:...
-
Page 9: User Features
4. USER FEATURES a) TOUCH BUTTONS ON THE SIDES OF THE SCREEN The functions of the buttons are shown on the screen icons. You may activate those functions by touching the corresponding buttons on the sides of LCD panel. The buttons may be touched in during any screen appearance. - Page 10 Main Screen The main screen shows the function of the buttons. The explanations are put on the side of the buttons as icons . The device screen shows also the time and the doorpanel environment temperature. b) USING BUTTONS AT SIDE OF THE SCREEN Calling “...
- Page 11 ii) PHONE BOOK feature The phone book is a list of room numbers and their names entered by the phone book program. It is used to search the names living in the apartment and call the rooms by touching a button. To start using the phone book feature , please touch the phone book button.
- Page 12 iii) TO ENTER DOOR PASSWORD TO OPEN THE DOOR Each room in a block may have a 4 digit passwords in order to open the main enterence door. (Please see the section 7 of this manual to enter a room password.) When the user touches OPEN DOOR WITH PASSWORD button the following screen is shown: ENTER PASSWORD...
- Page 13 Example : Calling 079 : Calling the other numbers from the keypad. It is also possible to call following numbers from the device by using the keypad : 841-849 Doorkeper numbers of the block that the doorpanel DIP40 belongs.
- Page 14 851-859 Block guards number of the block that the doorpanel DIP40 belongs. 901-919 site numbers-block 99. 921-959 site numbers-block 99. v) Opening the door during ringing or conversation of a room with the doorpanel When a room inside of a block is called from the doorpanel the room may open the door by touching the ‘UNLOCK DOOR’...
- Page 15 5. DEVICE PROGRAMMING It is possible to program some parameters of the DIP40 doorpanel by entering to the programming mode of the device.To enter the programming mode, please touch then dial from the keypad. The following screen appears. The page has four icons;...
- Page 16 The user touches related button to program the parameters of the device. a) PHONE BOOK SETUP If PHONE BOOK SETUP is touched, the page comes with the following icons : DELETE NAME to delete the recorded room number from the phone book. DELETE PHONEBOOK to delete all recorded room numbers from the phone book.
- Page 17 When the three digit room number is entered the corresponding name appears on the screen.(if there is any.) . For example , when 005 is entered , since MULTITEK was entered for the number 005 previously , the screen shows 005 MULTITEK .
- Page 18 ARE YOU SURE? If CANCEL is touched the previous page appears. ARE YOU SURE? If OK is touched the name and all numbers are erased and the previous page appaears. ARE YOU SURE?
- Page 19 The user first enter the room number in three digits.No need to enter the block number because the block number of the device is entered in some other program. For example , 005 as room number and is entered. ENTER THE NAME MULTITEK AND PRESS OK...
- Page 20 . After entering the name the user makes After making ENT , the new message appears as “TO SAVE TOUCH SAVE BUTTON” The following pages show the sequence of the operation for the name MULTITEK. TO SAVE MULTITEK TOUCH SAVE BUTTON If the SAVE button is touched the room number and the name is stored.
- Page 21 ADD PROXIMITY CARD This feature is used to assign some proximity cards to a room to open the main door by showing the proximity card to the device.The maximum number of the proximity cards assignable to a room is 5 . To assing a proximity card to a room the following touches are done and the message appears as“...
- Page 22 message “CARD RECORDED”.The next page becomes asking “DO YOU WANT TO RECORD ANOTHER CARD ?”.Note that it is possible to record up to 5 proximity cards to a room.Please see the following pages. If the proximity card is not read , the following screens are shown. NO CARD NO CARD If the proximity card is read the following pages are shown .
- Page 23 If this is the the fifth card recorded the following message appears ( immediately for 3 seconds .) ALL CARDS RECORDED ALREADY.NO MORE iii) DELETE PROXIMITY CARD(S) This feature is used to delete ALL proximity cards assigned to a room .To delete all proximity cards assigned to a room , the following touches are done with messsage appering “...
- Page 24 ALL CARDS WILL BE DELETED? ALL CARDS DELETED If CANCEL is touched the previous page appears as following pages ; ALL CARDS WILL BE DELETED? c) BLOCK SETUP This programming is used to enter the name, number of the apartment for the welcome page of the doorpanel .This part of the program is also used to change the block password.
- Page 25 APT. NAME & NO When APT.NAME & NO icon is touched the following pages appears with the message“ ENTER THE APARTMENT NUMBER AND PRESS OK “ ENTER THE APARMENT NUMBER AND PRESS OK The user enters the apartment number (example 152 ) and makes When is touched another page with the message “...
- Page 26 Then , is touched and SAVE follows it. SILVERSTONE’S SILVERSTONE’S If CANCEL is touched the previous page is shown. DOOR&BLOK NO When DOOR&BLOCK NO is touched the message “ ENTER THE DOOR&BLOCK NO AND PRESS OK “ is seen. The user enters the door or block number and and then makes SAVE.The following pages show the block no A for a sample.
- Page 27 When “CHANGE BLOCK PASSWORD”is touched the next page is seen as “ENTER THE OLD PASSWORD AND PRESS OK “.The default block password is 0000. ENTER THE OLD PASSWORD 0000 AND PRESS OK When you enter the old password and make you see the new message as “...
- Page 28 Then you make SAVE. TO SAVE TOUCH SAVE BUTTON If CANCEL is entered the previous page is shown. Note: If you forget the BLOCK PASSWORD you should re-install the device program with the TF card and re-program some parameters. 5.2 PARAMETERS The parameters section is used to program some functions of the door panel.
- Page 29 CHANGE COLOR : It is used to change the color of the buttons and the color of the light frame. LANGUAGES : It is used to change the language of the screen. BACK : It brings the previous page. NEXT PAGE : It brings the next page.
- Page 30 ii) BORDER COLOR This program is used to select the colors of the keys. The colors are selected by touching the related buttons. The following page shows three selected colors. The selected/ touch colors are thicked on the small boxes.When the color is changed the result is immediatelly seen on the frame colors.
- Page 31 DOOR RELEASE DURATION : It is used to enter the door release duration. DELETE ALL PASSWORDS : It is used to clear all door passwords entered. BACK : It returns the previous page. NEXT PAGE : NOT USED i) DOOR RELEASE DURATION Door release duration is used to program the door release duration of the panel.
-
Page 32: System Setup
DELETE ALL PASSWORDS DELETE ALL PASSWORDS is used to delete all passwords entered for opening the door. When the right upper button is touched, the following page appears with the message “ARE YOU SURE TO DELETE ALL PASSWORDS?” ARE YOU SURE TO DELETE ALL PASSWORDS? ARE YOU SURE TO DELETE ALL... - Page 33 When SYSTEM SETUP button is touched, the SYSTEM PASSWORD is asked. The SYSTEM PASSWORD as default is 0000.If the SYSTEM PASSWORD entered is not correct the page does not change. ENTER SYSTEM PASSWORD ENTER BLOCK PASSWORD SWORD ENTER BLOCK PASSWORD The page has the following icons to programm;...
- Page 34 ENTER BLOCK NUMBER AND PRESS OK The programmer enters the block number as 01 to 98 by using the keypad of the panel and makes OK. The next page asks to enter “ENTER DOOR NUMBER AND PRESS OK”. Example : Block number 02. ENTER DOOR NUMBER AND PRESS OK The programmer enters the door number between 01-19.
- Page 35 TO SAVE TOUCH SAVE BUTTON c) DIAGNOSTIC AND SYSTEM PASSWORD SETUP This section is used to make some diagnostic tests of the door panel and to change “SYSTEM PASSWORD” The diagnostic test are not used here. Only “CHANGE SYSTEM PASSWORD” is implemented.
- Page 36 When you entered the NEW password and make you see the new message as “RE- ENTER THE NEW PASSWORD AND PRESS OK “ .You re-enter the new password (for example 7447 ) and make . The new massege appears as “TO SAVE TOUCH SAVE BUTTON”. RE-ENTER THE NEW PASSWORD 7447 7447...
- Page 37 6.Manuel for entering the room password to open the door. Each room in an apartment may have a doorpassword to open the door release. If the apartment has more than one door the user should enter his password to each doorpanel seperately.
- Page 38 If the entered room number, or the old password is not valid the screen comes to the main page . After entering thre correct old password , the next page becomes the following , asking the new password: ENTER PASSWORD The user enters the new password in four digits.
- Page 39 The manager/technician enters CLR ENT 97, then the three digit room number from the door panel keypad. The following screen is shown. ENTER PASSWORD The manager/technician enters MASTER DOOR PASSWORD of the device. THE DEFAULT MASTER DOOR PASSWORD IS 0000. When the MASTER DOOR PASSWORD is entered the following page is shown;...
-
Page 40: Using Proximity Feature To Open The Door
Therefore, the new password for the room is entered and the new password is told to the room owner to assign a new password for himself. NOTE: MASTER DOOR PASSWORD is also changed by CLR ENT 98 800 .Here 800 is entered as the room number by manager/technician.
Need help?
Do you have a question about the DIP40 and is the answer not in the manual?
Questions and answers