
Related Manuals for Multitek DIP70


Summary of Contents for Multitek DIP70
- Page 1 DIP70 IP INTERCOM DOOR PANEL INSTALLATION AND USER MANUAL It obeys the rules of AEEE regulations.
- Page 2 IP INTERCOM DOOR PANEL INSTALLATION AND USER MANUAL Thank you for choosing Multitek DIP70 IP INTERCOM DOOR PANEL. This document explains the device properties. MULTITEK DIP70 HAS WARANTY FOR 2 YEARS AGAINST MANUFACTURING DEFECTS. Multitelk has rights to change the features of the device given in this document prior given any information.
-
Page 3: Table Of Contents
INDEX Subject Page 1. SAFETY WARNINGS 2. TECHNICAL SPECIFICATIONS OF THE DEVICE A. Technical Features B. ______________________________________________ Front Appearence C. Back Appearence 3. INSTALLATION Camera Angle Adjustment Network Connection 4. USING DOOR PANEL 4.1 Using Touch Panel Using The Function Icons of Main Screen ... - Page 4 6. RESET and SOFTWARE UPDATE 6.1 Door Panel Reset 6.2 Updating Door Panel Software 7. HELP and HINTS I cannot enter Settings menu I forgot my Settings password. Keypad disappeared, I can only see ring buttons on the screen ...
-
Page 5: Safety Warnings
1. SAFETY WARNINGS For your own and the device safety, you should obey the security warnings; 1. Read the user manual carefully. 2. Read the safety warnings carefully. 3. Remarks about Transport, Shipment and Preservation - During transport and shipment keep the product with its case. The case will protect the product against the physical damages. -
Page 6: Technical Specifications Of The Device
2.TECHNICAL SPECIFICATIONS OF THE DEVICE A. TECHNICAL FEATURES Touch Screen : 7” IPS LCD, Resolution 1024x600, LED backlight Camera : 2.0 Mpixel CMOS, 2.8mm lens,adjustable angle, photo cell, night LEDS : 1.5GHz, RAM 1GB, FLASH 4 GB Input : TF cart , USB, Ethernet Operating System : Android Transmission... -
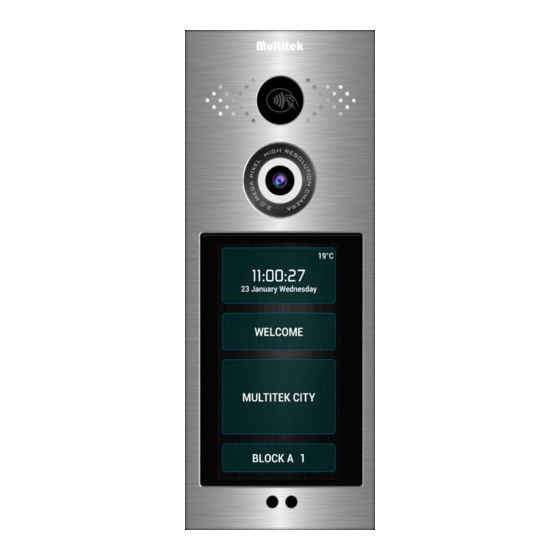
Page 7: Front Appearence
B. FRONT APPEARANCE: PROXIMITY CARD READER SPEAKER CAMERA NIGHT VISION LEDS LED’LERİ 7” IPS TOUCH SCREEN NEAR SENSOR SENSÖRÜ MICROPHONE... -
Page 8: Back Appearence
C. BACK APPEARANCE CAMERA ADJUSTMENT ETHERNET DOOR OPENER CONNECTION LIGHT FRAME RESET BUTTON CONNECTION SOCKET SOKETİ... -
Page 9: Installation
3.INSTALLATION INSTALLATION ON WALL: HOLDING TINS WALL MOUNT APARATUS WAL MOUNT APARATUS WALL INSTALLATION HOLES CABLE OPENING HOLDING TINS SCREWING Use five screws to mount the wall mount aparatus to the wall. Use the cable opening to carry out the installation cables. ... -
Page 10: Camera Angle Adjustment
CAMERA ANGLE ADJUSTMENT: CAMERA ANGLE ADJUSTMENT: To change the camera angle, loose the screw shown inside of the RED circle. Then, the camera becomes loose to change the directions. When you find the proper position, tight the screw to place the camera. NETWORK CONNECTION: Connect CAT6 cable coming from PoE switch to Ethernet socket. -
Page 11: Using Door Panel
4. USING DOOR PANEL 4.1 USING TOUCH PANEL You may use the functions of the device by touching the screen. When the screen does not sense you at the front the waiting screen GUI of the device is shown. When you come close to the panel the main screen GUI appears. 4.1.1 WAITING SCREEN The following pictures show the sample of the waiting screen. -
Page 12: Using The Function Icons Of Main Screen
4.2 USING THE FUNCTION ICONS of MAIN SCREEN 4.2.1 CALLING DOORKEEPER or GUARD: You touch the related icon on the screen. You see the related next pages. Calling Guard: Calling Doorkeeper: 4.2.2 CALLING ROOMS BY KEYPAD : By touching the keypad numbers, you enter the room number. Then, you make enter by touching icon . -
Page 13: Calling The Rooms By Phonebook
When a room is called from the door panel, the maximum ring duration is 30 seconds and the maximum conversation time is 60 seconds. The room numbers 1-9 may be called as 1-9 or 01-09 or 001-009. The room number 10-99may be called as 10-99 or 010-099. -
Page 14: Open The Door By Entering Door Password
4.2.3.b TO SEARCH A NAME IN THE PHONEBOOK: If you don’t know the room number you may search the name. When you touch SEARCH NAME line on the screen a keyboard appears. You edit the name that you look for. If the name is available the name and the corresponding room number appears and you touch the line to call. -
Page 15: Settings
5. SETTINGS ENTERING SETTINGS PAGE SETTINGS page is entered in two ways; 1. Entering SETTINGS by using the screen keypad: is dialed. 2. Entering SETTINGS if the device screen is button shape: Please press PASSWORD icon LONGER THAN 5 SECONDS. -
Page 16: Setting Page
SETTINGS PAGE The followings may be set at the setting page icons: GENERAL : Phonebook settings, Proximity Card definition, Apartment name. To enter USER PASSWORD is needed. Note: Default USER PASSWORD is 0000. ABOUT : Doorpanel block number, door number, door relay operation time, software versions are shown. SYSTEM : Doorpanel block number, door number, door relay operation time,camera type, door opener password are entered. -
Page 17: Phonebook
5.1.1 PHONEBOOK To reach phonebook settings go to SETTINGS GENERAL PHONEBOOK. 5.1.1.a EDIT NUMBER OF ROOMS: Define number of rooms in the phonebook, the default is 100 rooms per phonebook. Tap “EDIT NUMBER OF ROOMS” and enter of number rooms required for your apartment in the phonebook. “PHONEBOOK FILE IS CREATED”... -
Page 18: Default Phonebook
5.1.1.c DEFAULT PHONEBOOK: Touch DEFAULT PHONEBOOK to return back to default phonebook settings and delete the existing phonebook. When you select DEFAULT PHONEBOOK “ARE YOU SURE YOU WANT TO RETURN TO THE DEFAULT PHONEBOOK?” notification will appear. If YES is selected a brand new empty phonebook with 100 rooms will be created. 5.1.1.d SEND PHONEBOOK : Use SEND PHONEBOOK function to share phonebook data with the other BLOCK IP door panels in the network. -
Page 19: Add/Delete Card
5.1.2 ADD / DELETE CARD ADD / DELETE CARD menu is used to manage proximity cards. Enter from GENERAL icon. Up to 5 proximity cards can be allocated to each room. 5.1.2.a ADD CARD is used to add new proximity cards to a room. ADD CARD steps: ... -
Page 20: Block Name & Number
When you see “PLEASE SHOW CARD IN 20 SEC” notification, make proximity card reader on the outdoor panel read the card via holding the card on the upper part of the outdoor panel where proximity card reader is present. ... -
Page 21: Password Settings
BUILDING NAME MULTİTEK CITY BLOCK NO DOOR NO BLOCK A 5.1.4 PASSWORD SETTINGS a) CHANGE USER PASSWORD From SETTINGS GENERAL PASSWORD SETTINGS menu, user password and door password can be set. Initially enter old password (default password is 0000) Then, enter new password twice for confirmation. Enter default 0000 to “ENTER OLD PASSWORD”... -
Page 22: Weather
b) DOOR PASSWORD SETTINGS Door opening password can be active or passive. If it is passive the door opening password do no not function even the correct door opening password is entered. Door password can be activated from SETTINGS GENERAL PASSWORD SETTINGS ... -
Page 23: Ring Buttons
Samples: Partly cloudly weather, Clear suny wather and Rainy weather. 5.1.6 RING BUTTONS DIP70 IP DOOR PANEL can be reverted to “RING BUTTON WIEV” so that user can call rooms by touching the related button without using the keypad. Enter SETTINGS GENERAL RING BUTTONS... -
Page 24: About
5.1.6.a ENTER RING BUTTON NUMBER: Select number of ring buttons that will be present on the ring button screen. Note: If the ring button number is not defined, number of rooms defined in the phonebook will be used. 5.1.2 SİSTEM ÖZETİ: 5.1.6.b EDIT RING BUTTON NAMES: Names which will be present on the ring buttons are entered via this screen. -
Page 25: System (Settings)
5.3 SYSTEM (SETTINGS) Enter SETTINGS SYSTEM, enter system password. Default system password 0000. Note: Check page 15 for entering SETTINGS BLOK ŞİFRESİNİ GİR 5.3.1 CHANGE SYSTEM PASSWORD Enter SETTINGS SYSTEM(SETTINGS) CHANGE SYSTEM PASSWORD to update existing system password. Initially enter old password (default password is 0000) Then, enter new password twice for confirmation. -
Page 26: Change Ip
5.3.2 CHANGE IP TO DEFINE THE BLOCK NUMBER AND DOOR NUMBER OF THE DOOR PANEL If CHANGE IP icon is tapped at the SYSTEMS (SETTING) page CHANGE DEVICE IP appears. As a default the door panel is defined as the first block and the first door (01-01). If the door panel is connected to a different block and the door IP address of the device should be changed by entering the block number and the door number. -
Page 27: Relay Direction
When RELAY RELEASE TIME page appears it shows the current relay time and asks to enter the new duration. The new duration may be set between 01-99 seconds. 5.3.3.b RELAY DIRECTION: Some door panel opener mechanics may work different as NO or NC contacts. This section sets the relay direction parameter as NO or NC. -
Page 28: Camera Settings
5.3.4 CAMERA (SETTINGS) If CAMERA is tapped at the SYSTEM (SETTINGS) page CAMERA (SETTING) appears. The door panel may work with two different camera connections. 5.3.4.a INTERNAL CAMERA: As default the door panel shows the video of its INTERNAL CAMERA. But sometimes an external IP camera video is needed to be seen on the monitors. -
Page 29: External Camera
5.3.4.b INTERNAL CAMERA: If the internal camera of the door panel will be used INTERNAL CAMERA icon is tapped. The device is set to use INTERNAL CAMERA as default. 5.3.5 DELETE ALL DOOR PASSWORDS If “DELETE ALL DOOR PASSWORDS” icon is tapped at the SYSTEM (SETTINGS) page “DO YOU WANT TO DELETE ALL DOOR PASSWORDS?”... -
Page 30: Frame Color
5.3.6 FRAME COLOR Note: Light frame is an optional part of the door panel, surrounding thepanel with 75 pieces of RGB LEDs. If FRAME COLOR icon is tapped at the SYSTEM (SETTINGS) page FRAME COLOR SETTINGS page appears. By selecting the RED, GREEN, BLUE icons it is possible to change the color of the RGB LEDS on the frame It is possible to add a light frame to the door panel. -
Page 31: Sound
After selecting the desired language as ENGLISH, GERMAN, TURKISH or ARABIC “ SAVE “ icon should be tapped. 5.5 SOUND SETTINGS SOUND tap asks the USER PASSWORD. The default USER PASSWORD is 0000. SOUND icon is used to adjust the voice level of the door panel speaker. BLOK ŞİFRESİNİ... -
Page 32: Reset And Software Update
By connecting a laptop to the network and using Multitek technical service management software: Multitek technical service management software is used by trained system technicians and device software is updated. b) By using SD card: Please request an SD card from your dealer / Multitek for this activity. Updating the software: ... -
Page 33: Cannot Enter Settings Menu
Problem Solution I cannot enter Settings menu. Follow the steps in page 15. I forgot my Settings password. Reset your password by following steps in page 30 Keypad disappeared, I can only see ring buttons on Device is set to “ring button” mode, turn back to the screen.
Need help?
Do you have a question about the DIP70 and is the answer not in the manual?
Questions and answers