
Related Manuals for Illustra Pro LT 2MP Bullet


Summary of Contents for Illustra Pro LT 2MP Bullet
- Page 1 Illustra Pro LT 2MP Bullet Illustra Pro Compact Mini-Bullet Quick Start Guide 8200-1136-01 A0...
- Page 3 Notice The information in this manual was current when published. The manufacturer reserves the right to revise and improve its products. All specifications are therefore subject to change without notice. Copyright Under copyright laws, the contents of this manual may not be copied, photocopied, reproduced, translated or reduced to any electronic medium or machine-readable form, in whole or in part, without prior written consent of Tyco Security Products.
- Page 4 Notice of Use This manual is designed for administrators and users of the network camera. Please read it carefully before use. All requirements should be followed before using this camera. We are not responsible for any technical or typographical errors and reserve the right to change the product and manuals without notice.
-
Page 5: Product Features
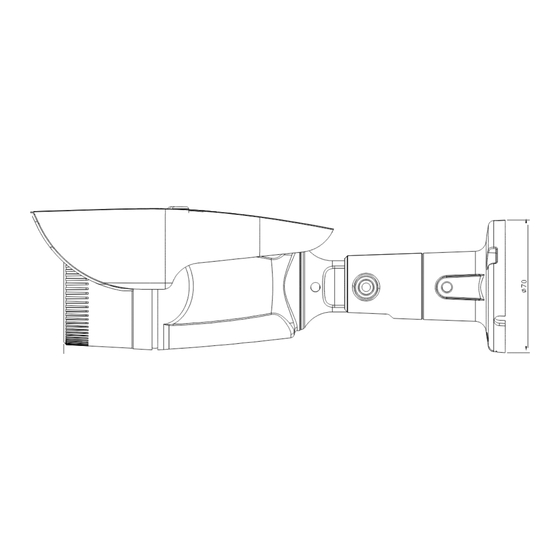
Product Features Product Features Features ADCi610-M022 IPL02B1BNWIY IPL02B2BNWIY Motion detection Motion detection High quality compression in real time High quality compression in real time streaming streaming Full frame rates @ Maximum resolution Full frame rates @ Maximum resolution 1920x1080 provides superior image 1920x1080 provides superior image quality... - Page 6 Product Features Dimension ADCi610-M022 ( Unit: mm ) Dimension IPL02B1BNWIY IPL02B2BNWIY ( Unit: mm ) Quick Start Guide...
-
Page 7: Package Contents
Product Features Package contents The package contains a camera, screws, anchors, a waterproof band, a ferrite core, a hex wrench driver, universal plugs, a quick installation guide, a CD ROM, a paper mounting template, and a microSD card (exclusive for the camera model, IQS02MFONWTY). Unpack the package carefully, and handle the equipment with care. - Page 8 Controls/Connectors Controls/Connectors ADCi610-M022 Sunshield CDS Light Sensor microSD / SDHC/ SDXC card slot Reset button Terminal Connector LAN Connector GREEN: DI WHITE: DI COM ORANGE: DO YELLOW: DO COM Power Terminal Connector Connector Connector Quick Start Guide...
- Page 9 Controls/Connectors IPL02B1BNWIY IPL02B2BNWIY Sunshield Terminal Connector LAN Connector microSD/SDHC/ SD Card SDXC card slot Video output Reset button Reset Video Out Cable socket PAL/NTSC button PAL/NTSC Note Models herein and their appearance are subject to change without any prior notice. ...
-
Page 10: Peripheral Connection
Controls/Connectors Peripheral Connection Sensor (DI) Connection Sensor(DI) can be connected to either a voltage type sensor or a replay type sensor like in the following figures. Settings can be done through the camera’s webpage. Input voltage range: 0VDC minimum to 5VDC maximum, Max 50mA CAUTION Do not exceed the maximum input voltage or relay rate. -
Page 11: Power Connection
Controls/Connectors Power Connection The camera can be powered from either 12VDC or PoE. If it is powered from 12VDC, connect an adaptor which can supply the camera with enough power. Also, refer to the characteristics of the polarity according to the image below. LAN Connection The LAN connector is an RJ45 LAN connector for 10/100 Base-T Ethernet. -
Page 12: Installation
Installation Installation 1. Place the paper mounting template that is included in the package on the desired installation surface. 2. Drill three holes in the correct positions based on the paper mounting template, and insert the plastic anchors into the holes. Attach the silicon waterproof band included in the package to the camera’s mounting surface by aligning it with the three alignment holes on the camera’s mounting... -
Page 13: Adjusting Angle Of The Camera
Installation Adjusting angle of the camera Adjust the angle of the camera by changing the heading direction by reference to the following pictures Wall Mount Ceiling Mount ① ② Model Shown: ADCi610-M022 A. Loosen the joint(③) with the hex wrench driver, and rotate the camera bracket 180 degrees if the bracket was fixed for wall mount(image on the left). -
Page 14: Specifications
Specifications extensively than the buttons Or, click One Touch Focus to automatically set the lens focus. Refer to the camera’s Configuration Manual for more detailed configuration about zoom and focus on the webpage. Specifications IPL02B1BNWIY ADCi610-M022 Model List IPL02B2BNWIY Camera Max. - Page 15 Specifications Color : 1.0 Lux(30IRE) Color : 0.5 Lux(30IRE) Min. Illumination B/W: 0 Lux(IR LED On) B/W: 0 Lux(IR LED On) CODEC H.264 Baseline, Main, High profile(MPEG-4 Part 10/ AVC), Video Compression MJPEG(Motion JPEG) Dual Stream, Configurable streams in H.264, MJPEG Video Streaming H.264: Controllable frame rate, bandwidth(VBR/CBR),GOP MJPEG: Controllable frame rate, JPEG quality...
- Page 16 Specifications Day & Night Removable IR cut filter Time stamp and text caption overlay Privacy Zone 4 configurable regions (Configure with IE only) Network Ethernet Standard 10 / 100 / Base-T QoS Layer 3 DiffServ, TCP/IP, UDP/IP, HTTP, HTTPS, FTP, Protocol RTSP, RTCP, RTP/UDP, RTP/TCP, mDNS, UPnP™, SMTP, DHCP, DNS, DynDNS, NTP, SNMPv1/v2c, IGMP, ICMP,...
- Page 17 Specifications Power Power Source / Consumption DC 12V, PoE IEEE 802.3af DC 12V, PoE IEEE 802.3af Class 2 / max. 6W Class 2 / max. 12W@DC12V Tolerance (Voltage Variation) ± 10% (DC10.8V ~ 13.2V) Interface Edge Storage 1x mircoSD/microSDHC/microSDXC memory card slot (card not included) 64GB Capacity Regulatory...
-
Page 18: Network Connection And Configuration
(e.g. 192.168.1.168) with the subnet mask, 255.255.255.0. If the default static IP address cannot be used on your network, use Illustra Connect to reassign an IP address to your camera, or reassign the IP address of your PC to be on the same network as the camera. Then, you can access the camera from your PC. -
Page 19: Type 3: Remote Connection Via The Internet
Network Connection and Configuration Type 3: Remote Connection via the Internet If the network where the camera resides is connected to the Internet, you can also provide remote access to your camera over the Internet. Typically a broadband router has built-in DHCP function to assign a local IP address to your camera. You can alternatively assign a fixed IP address to the camera to prevent it from frequent changing. - Page 20 Network Connection and Configuration Step 3: Verify the connection between the PC and the IP Cam 1. Launch Command Prompt by clicking the Start menu, Programs, Accessories and then Command Prompt. 2. At the prompt window, type ping x.x.x.x, where x.x.x.x is the IP address of the camera. 3.
-
Page 21: Using The Illustra Connect Tool To Manage Cameras
In addition to using the IE browser to access your camera, you can alternatively use the provided tool, Illustra Connect. Illustra Connect is a management tool designed to manage your network cameras on the LAN. It can: - help you find multiple network cameras. -
Page 22: Using Exacqvision Edge
Using exacqVision Edge Using exacqVision Edge Features to install and manage exacqVision Edge server software on the camera are found in Setup > Applications > exacqVision Edge on the camera’s web interface. The page will allow the installation or removal of Edge or if the software is installed, starting or stopping the server. exacqVision Edge cannot be run without a SD Card installed in the camera.
Need help?
Do you have a question about the Pro LT 2MP Bullet and is the answer not in the manual?
Questions and answers