Siemens SINUMERIK 840D sl Manual
Sinumerik 840d sl type 1b
ncu 7x0.3 pn, ncu 7x0.3b pn
Hide thumbs
Also See for SINUMERIK 840D sl:
- Function manual (2184 pages) ,
- Programming manual (1334 pages) ,
- Commissioning manual (1102 pages)
Table of Contents
Advertisement
Quick Links
SINUMERIK
SINUMERIK 840D sl type 1B
NCU 7x0.3 PN, NCU 7x0.3B PN
Manual
Valid for
SINUMERIK 840D sl / 840DE sl control
06/2014
6FC5397-1EP40-5BA1
Preface
Fundamental safety
instructions
System overview
Description
Application planning
Dimension drawings
Assembling
Connecting
Technical data
Connectable components
Spare Parts/Accessories
Appendix
1
2
3
4
5
6
7
8
9
10
A
Advertisement
Table of Contents

Related Manuals for Siemens SINUMERIK 840D sl


Summary of Contents for Siemens SINUMERIK 840D sl
- Page 1 System overview SINUMERIK Description SINUMERIK 840D sl type 1B NCU 7x0.3 PN, NCU 7x0.3B PN Application planning Dimension drawings Manual Assembling Connecting Technical data Connectable components Spare Parts/Accessories Appendix Valid for SINUMERIK 840D sl / 840DE sl control 06/2014 6FC5397-1EP40-5BA1...
- Page 2 Note the following: WARNING Siemens products may only be used for the applications described in the catalog and in the relevant technical documentation. If products and components from other manufacturers are used, these must be recommended or approved by Siemens. Proper transport, storage, installation, assembly, commissioning, operation and maintenance are required to ensure that the products operate safely and without any problems.
-
Page 3: Preface
Training For information about the range of training courses, refer to: ● http://www.siemens.com/sitrain SITRAIN - Siemens training for products, systems and solutions in automation technology ● http://www.siemens.com/sinutrain SinuTrain - training software for SINUMERIK FAQs You can find Frequently Asked Questions in the Service&Support pages under Product Support. - Page 4 Preface http://support.automation.siemens.com SINUMERIK You can find information on SINUMERIK under the following link: http://www.siemens.com/sinumerik Target group This documentation is intended for manufacturers of machine tools, particularly: ● Project engineers, electricians and installers ● Maintenance and service personnel Benefits The information in this manual facilitates installation and connection of the SINUMERIK 840D numerical control in the control cabinet.
-
Page 5: Table Of Contents
Table of contents Preface.................................3 Fundamental safety instructions........................9 General safety instructions......................9 Handling electrostatic sensitive devices (ESD)................12 Industrial security........................12 Residual risks of power drive systems..................13 System overview............................17 Application...........................17 System configuration........................17 Variants............................20 Ordering data..........................21 Description..............................23 Characteristics..........................23 Illustration............................23 Type plates..........................25 Operator control and display elements..................26 3.4.1 Overview of operating and display elements................26 3.4.2... - Page 6 Table of contents Fix the NCU using spacers......................41 Mounting the NCU without spacers.....................41 Mounting the NCU for external cooling..................42 Connecting..............................45 Overview.............................45 Safety information for wiring......................47 Opening the front cover.......................48 Power supply..........................49 7.4.1 Application...........................49 7.4.2 Requirements for the power supply.....................50 7.4.3 Connecting the power supply......................52 DRIVE-CLiQ components......................52 7.5.1...
- Page 7 Table of contents PP 72/48D PN..........................95 9.2.1 Description..........................95 9.2.2 Mounting............................97 9.2.3 Connecting..........................100 9.2.3.1 Interface overview........................100 9.2.3.2 X1 power supply........................100 9.2.3.3 X2 PROFINET...........................103 9.2.3.4 X111, X222 and X333 digital inputs/outputs................105 9.2.4 Parameter assignment......................111 9.2.4.1 Input / output images.........................111 9.2.4.2 Diagnostics via input image.......................112 9.2.5 Technical data...........................113 PP 72/48D 2/2A PN........................114...
-
Page 9: Fundamental Safety Instructions
Fundamental safety instructions General safety instructions DANGER Danger to life due to live parts and other energy sources Death or serious injury can result when live parts are touched. ● Only work on electrical devices when you are qualified for this job. ●... - Page 10 Fundamental safety instructions 1.1 General safety instructions WARNING Danger to life when live parts are touched on damaged devices Improper handling of devices can cause damage. For damaged devices, hazardous voltages can be present at the enclosure or at exposed components;...
- Page 11 Fundamental safety instructions 1.1 General safety instructions WARNING Danger to life through unexpected movement of machines when using mobile wireless devices or mobile phones Using mobile wireless devices or mobile phones with a transmit power > 1 W closer than approx.
-
Page 12: Handling Electrostatic Sensitive Devices (Esd)
Siemens recommends strongly that you regularly check for product updates. For the secure operation of Siemens products and solutions, it is necessary to take suitable preventive action (e.g. cell protection concept) and integrate each component into a holistic, state-of-the-art industrial security concept. -
Page 13: Residual Risks Of Power Drive Systems
● Keep the software up to date. You will find relevant information and newsletters at this address (http:// support.automation.siemens.com). ● Incorporate the automation and drive components into a holistic, state-of-the-art industrial security concept for the installation or machine. You will find further information at this address (http://www.siemens.com/... - Page 14 Fundamental safety instructions 1.4 Residual risks of power drive systems 1. Unintentional movements of driven machine components during commissioning, operation, maintenance, and repairs caused by, for example, – Hardware and/or software errors in the sensors, control system, actuators, and cables and connections –...
- Page 15 Fundamental safety instructions 1.4 Residual risks of power drive systems For more information about residual risks of the components in a drive system, see the relevant sections in the technical user documentation. NCU 7x0.3 PN, NCU 7x0.3B PN Manual, 06/2014, 6FC5397-1EP40-5BA1...
-
Page 17: System Overview
Integrated into the SINAMICS S120 drive system and complemented by the SIMATIC S7-300 automation system, the SINUMERIK 840D sl forms a complete digital system that is ideally suited for the mid to upper performance range. - Page 18 System overview 2.2 System configuration Components For operation, programming, and visualization purposes, the corresponding operating software is already integrated into the CNC software for the NCU and therefore runs on the high- performance NCU multi-processor module. For increased performance in the operating area, the SINUMERIK PCU 50.5 can be used.
- Page 19 A specific software release is required. More detailed information is available in the corresponding ProdIS for the particular software release. Figure 2-1 Typical topology of the SINUMERIK 840D sl complete system NCU 7x0.3 PN, NCU 7x0.3B PN Manual, 06/2014, 6FC5397-1EP40-5BA1...
-
Page 20: Variants
The scalability of the hardware and software – both from a CNC perspective and in terms of operation – means the SINUMERIK 840D sl can be used in many sectors. The possibilities range from simple positioning tasks up to complex multi-axis systems. -
Page 21: Ordering Data
System overview 2.4 Ordering data Application areas and performance ● Up to 8 axes may be implemented on an NCU 710. The NCU 710 can be expanded by up to 2 NX modules. One possible benefit would be increased drive control performance. ●... - Page 22 Ordering options The described products can be found in the following catalogs: ● You can find all of the devices that belong to the SINUMERIK 840D sl type 1B and SINAMICS S120 product families in Catalog NC 62. ● You can find SIMATIC products, which can be connected to the NCU, in Catalogs PM 10 and ST 80.
-
Page 23: Description
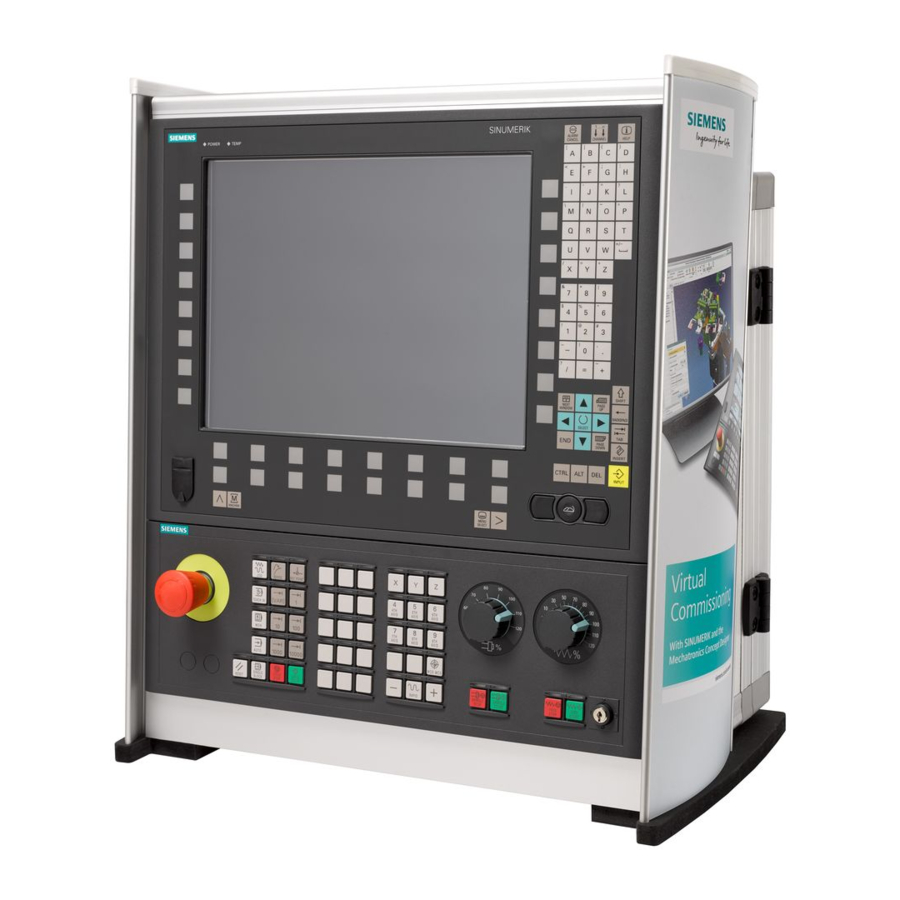
Description Characteristics The following elements designate an NCU: ● Battery-backed real-time clock ● Slot for a CompactFlash Card (behind the blanking cover) ● DRIVE-CLiQ interfaces for connecting to the drive ● Interfaces for operation behind a hinged front cover: – Ethernet ports –... - Page 24 Description 3.2 Illustration Figure 3-1 Illustration showing the NCU 730.3 PN Note For an NCU730.3B PN with PLC319, the option slot cannot be used. NCU 7x0.3 PN, NCU 7x0.3B PN Manual, 06/2014, 6FC5397-1EP40-5BA1...
-
Page 25: Type Plates
Description 3.3 Type plates Type plates Side-mounted type plate The following figure shows you all the information included on the type plate located on the side of the unit. Figure 3-2 Type plate MAC addresses A type plate for the MAC addresses of the PROFINET and Ethernet interfaces is attached to the front panel of the NCU: Figure 3-3 MAC addresses of the PROFINET/Ethernet interfaces... -
Page 26: Operator Control And Display Elements
Description 3.4 Operator control and display elements You can see this type plate when you open the front cover of the NCU. Note The contents of the individual type plate fields on the actual NCU may differ from those described in this Manual (e.g. updated product status, approvals and identifications not yet issued, etc.). -
Page 27: 7-Segment Display
Description 3.4 Operator control and display elements Name Function Status Meaning Flashing orange (0.5 Hz) Updating the firmware of the connected DRIVE-CLiQ components Flashing orange (2 Hz) Firmware update is complete for components. Wait for POWER ON for the components in question. Green NC powered up and everything in cyclic mode Flashing green/orange or red/... -
Page 28: Reset Button
Description 3.4 Operator control and display elements Critical messages ● During normal operation, "6" appears here and the dot flashes. ● An "8" indicates that the fan is defective or that the NCU is operating without a fan. Additional references Basic Software and Operating Software Commissioning Manual (IM7), Chapter "System startup displays". -
Page 29: Start-Up And Mode Selector Switch
Description 3.5 Dual fan/battery module 3.4.5 Start-up and mode selector switch Layout The NCU has two coding rotary switches in the lower section of the front panel: ● The upper switch (labeled SVC/NCK) is the NCK commissioning switch. Setting during normal operation: "0" ●... - Page 30 Description 3.5 Dual fan/battery module Additional information on the diagnostics buffer is provided in the Function Manual Basic Functions, see PLC signal DB10 DBX109.6 (fan temperature alarm). Fans The temperature is sensed at several locations within the NCU. The fan is automatically switched in when the temperature thresholds set in the factory are exceeded.
-
Page 31: Application Planning
4.1.1 Grounding concept Components The SINUMERIK 840D sl system consists of a number of individual components which have been designed so that the system complies with the appropriate EMC and safety standards. The individual system components are: ● Numerical Control Unit (NCU): ●... - Page 32 ● Only use cables approved by Siemens for the signal lines from and to the NCU. ● Signal cables may not be routed close to strong external magnetic fields (e.g., motors and transformers).
-
Page 33: Climatic And Mechanical Environmental Conditions
Climatic and mechanical environmental conditions 4.2.1 Shipping and storage conditions The components of the SINUMERIK 840D sl system exceed the requirements according to EN 61800‑2 with regard to shipping and storage conditions. The following data applies under the following conditions: ●... - Page 34 Application planning 4.2 Climatic and mechanical environmental conditions Type of condition Permissible range/class Biological environmental conditions Chemically active environmental conditions Maximum permissible Direct interaction in air/air: 30 k/h temperature change -40°/+30° C at 95% relative humidity Relative humidity 5 to 95 % Precipitation, rain 6 mm/min Not permitted...
-
Page 35: Operating Conditions
4.2.2 Operating conditions The components of the SINUMERIK 840D sl system are intended for a weatherproof, fixed location. The documented environmental conditions apply to the climate in the immediate vicinity of the units and to the entry of the cooling air. They exceed the requirements according to EN 60204-1, EN 61800-2, EN 61131-2 and IEC 62477-1. -
Page 36: Recycling And Disposal
The user must consider radio interference for the complete system. Particular attention should be paid to cabling. Please contact your sales representative for assistance and support. If compliance with limit value class C2 is required, please contact your local Siemens sales partner. -
Page 37: Dimension Drawings
Dimension drawings Figure 5-1 Dimension drawing NCU 720.3 PN and NCU 730.3 PN; dimensions in mm NCU 7x0.3 PN, NCU 7x0.3B PN Manual, 06/2014, 6FC5397-1EP40-5BA1... - Page 38 Dimension drawings Figure 5-2 Dimension drawing NCU 710.3 PN, NCU 710.3B PN, NCU 720.3B PN and NCU 730.3B PN; dimensions in mm NCU 7x0.3 PN, NCU 7x0.3B PN Manual, 06/2014, 6FC5397-1EP40-5BA1...
-
Page 39: Assembling
Assembling Safety information Note The NCU is exclusively intended for installation in ESD-protected zones. The CE-associated ESD interference immunity limit values can only be achieved via installation in the control cabinet. Only make physical contact using appropriate ESD protective measures. Open equipment These modules are open equipment. -
Page 40: Designs
Assembling 6.2 Designs NOTICE Cables not certified for the application can damage modules Only use Siemens cables for the DRIVE-CLiQ connections. Note Protecting unused DRIVE-CLiQ interfaces Close any unused DRIVE-CLiQ interfaces using the blanking covers provided. Note Function equipotential bonding for distributed DRIVE-CLiQ nodes Integrate all of the components that are connected via DRIVE-CLiQ in the functional equipotential bonding concept. -
Page 41: Fix The Ncu Using Spacers
Assembling 6.4 Mounting the NCU without spacers Fix the NCU using spacers Introduction Spacers can be used to mount the NCU on a bare-metal highly-conductive rear panel of a control cabinet. Note The mechanical stability for horizontal mounting is only guaranteed with the help of supports or similar. -
Page 42: Mounting The Ncu For External Cooling
Assembling 6.5 Mounting the NCU for external cooling Mounting the NCU for external cooling Introduction If the NCU must be externally cooled via the cooling ribs, then it can be directly mounted onto the rear of the control cabinet panel without using spacers. Prerequisites ●... - Page 43 Assembling 6.5 Mounting the NCU for external cooling Procedure 1. Remove the spacers. 2. Fit the seal around the cooling ribs of the NCU. Note The seal is not included with the NCU. They must be additionally ordered, see Ordering data (Page 21).
-
Page 45: Connecting
Connecting Overview Connection options The NCU has a series of interfaces via which the power supply and the remaining system components are connected. The front cover of the NCU must be open to make the connections. ● The various SINAMICS components are connected with the NCU via DRIVE-CLiQ. ●... - Page 46 Connecting 7.1 Overview SINUMERIK 840D sl NCU 7x0.3 PN DRIVE-CLiQ X100 SINAMICS S120 X101 Motor / Line Modules X102 X103 X104 NX10.3 / NX15.3 X105 6 digital inputs and Digital I/O X122 4 digital inputs/outputs 6 digital inputs and X132...
-
Page 47: Safety Information For Wiring
Connecting 7.2 Safety information for wiring Interface overview Table 7-1 Overview of the interfaces that can be used Interface Designation Connector type DRIVE-CLiQ X100 - X105 Spec. RJ45 socket Ethernet IE1/OP X120 Standard RJ45 socket Ethernet IE2/NET X130 Standard RJ45 socket Ethernet (service socket) X127 Standard RJ45 socket... -
Page 48: Opening The
Connecting 7.3 Opening the front cover Opening the front cover Introduction The interfaces are concealed behind a front cover. You must fold down this cover before you can wire up the interfaces. When the front cover is closed (flipped up), it automatically locks into place by means of a hook on the connector panel. -
Page 49: Power Supply
Connecting 7.4 Power supply Power supply 7.4.1 Application This interface is provided exclusively for connection of the external power supply. Note When using external power supplies (e.g. SITOP), the ground potential must be connected with the protective ground terminal (PELV). Pin assignment Table 7-2 Power supply X124... -
Page 50: Requirements For The Power Supply
Connecting 7.4 Power supply Position of power supply interface Figure 7-3 Power supply interface 7.4.2 Requirements for the power supply External 24 V power supply Power is supplied to the NCU by an external 24 V power supply (e.g.: SITOP). The following power consumption values for an NCU provide a configuration basis for calculating the 24 V DC power supply. - Page 51 Connecting 7.4 Power supply Requirements of DC power supplies DANGER Danger of death caused by unsafe power supply The DC power supply must be implemented as a circuit of Category PELV/DVC A according to EN 61800-5-1. WARNING Inadequately fused supply cables can be life-threatening In the case of supply lines >...
-
Page 52: Connecting The Power Supply
Connecting 7.5 DRIVE-CLiQ components 7.4.3 Connecting the power supply Wiring the screw-type terminal block The required 24 V DC load current supply is wired to screw-type terminal block X124. Power cables Table 7-5 Cable specification for X124 Features Version Connector type 4-pin screw terminal Connectable cable types and conductor cross-sections ●... - Page 53 Connecting 7.5 DRIVE-CLiQ components DRIVE-CLiQ pin assignment Table 7-6 DRIVE-CLiQ interface X100 - X105 Signal name Signal type Meaning Transmit data + Transmit data - Receive data + Reserved, do not use Reserved, do not use Receive data - Reserved, do not use Reserved, do not use + (24 V) Voltage supply for DRIVE-CLiQ, 450 mA maximum...
-
Page 54: Connectable Drive-Cliq Components
Connecting 7.5 DRIVE-CLiQ components Characteristic Version MOTION CONNECT (outside the control cabinet) Max. cable length 70 m 7.5.2 Connectable DRIVE-CLiQ components Components As a rule, all SINAMICS/SIMOTION components approved for SINUMERIK can be connected to an NCU using DRIVE-CLiQ. Table 7-8 Components with DRIVE-CLiQ Component Description... -
Page 55: Use Of Ethernet Interfaces
● X130 connects the NCU to the company network. ● X127 is used for commissioning and remote diagnostics via teleservice adapter IE. You can find further details in the following manuals: – SINUMERIK 840D sl Basesoftware and Operating Software Commissioning Manual – SIMATIC TS Adapter IE Manual Properties The interfaces are full duplex 10/100/1000 Mbit Ethernet ports. - Page 56 Connecting 7.6 Use of Ethernet interfaces Pin assignment Table 7-9 Ethernet interfaces X120, X130, X127 in the 10/100 Mbit mode Signal name Signal type Meaning Transmit data + Transmit data - Receive data + Reserved, do not use Reserved, do not use Receive data - Reserved, do not use Reserved, do not use...
- Page 57 Connecting 7.6 Use of Ethernet interfaces Name Color Status Meaning Activity Orange Data exchange No data exchange Position of the Ethernet interfaces Figure 7-5 Ethernet ports Cable specification Table 7-12 Cable specification for X120, X130, and X127 Characteristic Version Connector type RJ45 socket Cable type Industrial Ethernet cable (CAT5)
-
Page 58: Profinet
Connecting 7.7 PROFINET PROFINET 7.7.1 Application Application The following communication networks can be established via the PROFINET interface: ● PROFINET CBA: Communication between controllers as components in distributed systems ● PROFINET IO Communication between the PLC controller and field devices Properties The PROFINET interface X150 is equipped with an integrated 2-port switch and a TCP/IP address for the 2 ports. - Page 59 Connecting 7.7 PROFINET LED displays For diagnostic purposes, the RJ45 sockets are each equipped with a green and an orange LED. This allows the following status information about the respective PROFINET port to be displayed: Table 7-14 PROFINET ports LED displays Name Color Status...
-
Page 60: Profinet Cables
Connecting 7.7 PROFINET Cable specification For PROFINET, you always require a data transmission rate of 100 Mbit/s (Fast Ethernet) in full duplex mode. For data transfer purposes, you can use twisted-pair copper cables (4-wire, 100Base-T). Table 7-15 Cable specification for X150 ports 1, 2 Characteristic Version Connector type... -
Page 61: Preparing The Twisted Pair Cables
Connecting 7.7 PROFINET Cable Designation Order number IE FC Trailing Cable GP 2x2 4-wire TP installation cable for ground cable use 6XV1 870-2D (Type C) IE FC Trailing Cable 2x2 4-wire shielded TP installation cable for 6XV1 840-3AH10 (Type C) connection to FC OUTLET RJ45, for ground cable use IE FC Marine Cable 2x2... - Page 62 Connecting 7.7 PROFINET ① ② Strip the IE FC Cable 2x2 using a stripping tool and separate out the cores according to the color coding on the contact cover of the FC RJ45 plug. Open the case cover of the FC RJ45 plug and insert the strands into their respective end positions according to the color coding.
-
Page 63: Example Profinet Cba Configuration
Connecting 7.7 PROFINET Additional references For more information, please refer to: ● The Industry Mall ● The Catalog IK PI ● The manual titled "SIMATIC NET Twisted Pair and Fiber-Optic Networks" (entry ID: 8763736). 7.7.4 Example PROFINET CBA configuration The following figure shows a typical system configuration with PROFINET CBA. Figure 7-8 Example PROFINET CBA configuration Station name... -
Page 64: 7.8 Profibus Dp
Connecting 7.8 PROFIBUS DP Station name Module type Interface IP address Unit01 NCU 730.3 PN X120 192.168.200.11 X150 port 1 192.168.200.12 Unit02 CPU 319-3 PN/DP PN P1 192.168.200.22 Unit03 CPU 317-2 PN/DP PN P1 192.168.200.32 PROFIBUS DP 7.8.1 Application Connectable devices The following devices can be connected to the PROFIBUS DP interfaces: ●... - Page 65 Connecting 7.8 PROFIBUS DP Signal name Signal type Meaning P5EXT 5 V power supply for bus termination, external, short-circuit proof P24_SERV 24 V for teleservice, short-circuit proof, 150mA maximum 1XRS_DP RS-485 differential signal Reserved, do not use The 1P5 voltage is provided exclusively to supply the bus termination. Signal type: VO = Voltage output (power supply) O = Output;...
-
Page 66: Profibus Cables And Connectors
Connecting 7.8 PROFIBUS DP 7.8.2 PROFIBUS cables and connectors Cable specification The PROFIBUS cable is 2-wire, twisted, and shielded with defined technical data. Table 7-20 Cable specifications for X126 and X136 Characteristics Version Connector type 9-pin SUB D connector Cable type PROFIBUS cable Max. -
Page 67: Connection Components In Profibus
Connecting 7.8 PROFIBUS DP Connector features The bus connector is used to connect the PROFIBUS cables to the PROFIBUS DP interfaces (X126, X136), thus establishing a connection to additional nodes. Only bus connectors with a 35° cable outlet should be used in order to ensure that the front cover can be closed. -
Page 68: Rules For The Laying Of Profibus Cables
Connecting 7.8 PROFIBUS DP 7.8.4 Rules for the laying of PROFIBUS cables Laying of bus cables During laying of the PROFIBUS cable, you must avoid: ● twisting ● stretching and ● squeezing Supplementary conditions During laying of the indoor bus cable, you must also consider the following supplementary conditions (d = outer diameter of the cable): Table 7-23... -
Page 69: Disconnecting Stations From The Profibus
Connecting 7.8 PROFIBUS DP Wiring the bus connector 1. Proceed as follows to connect the bus connector: 2. Plug the bus connector into the corresponding interface on the NCU. 3. Screw the bus connector into place. As the NCU is located at the start or end of a segment, you must switch on the terminating resistor ("ON"... - Page 70 Connecting 7.8 PROFIBUS DP The following list provides examples of when using MPI (multi-point interface) may prove effective: ● If a PC/PG with an MPI is being used ● If an MPI-type handheld unit is being used Operate MPI like PROFIBUS The information on wiring the connector (terminating resistors) for PROFIBUS and the rules on the laying of cables for PROFIBUS apply to this interface as well.
-
Page 71: Digital Inputs/Outputs
Connecting 7.9 Digital inputs/outputs Digital inputs/outputs 7.9.1 DIO application Connecting sensors and actuators Digital inputs and outputs can be used to connect various sensors and actuators to the 14-pin connectors X122 / X132 / X142 on the front panel. The interfaces are permanently assigned: ●... - Page 72 Connecting 7.9 Digital inputs/outputs Pin assignment Table 7-24 X122 digital inputs/outputs Signal name Signal type Meaning Digital input 0 Digital input 1 Digital input 2 Digital input 3 DI16 Digital input 16 DI17 Digital input 17 Ground for DI0 - DI3, DI16, DI17 (isolated with respect to M) Ground DI/DO8 Digital input/output 8 (rapid input)
- Page 73 Connecting 7.9 Digital inputs/outputs Signal name Signal type Meaning IN/OUT0 Digital NC input 1 IN/OUT1 Digital NC input 2 Ground IN/OUT2 Digital NC input 3 IN/OUT3 Digital NC input 4 Ground IN/OUT4 Digital NC output 1 IN/OUT5 Digital NC output 2 Ground IN/OUT6 Digital NC output 3...
-
Page 74: Block Diagram
Connecting 7.9 Digital inputs/outputs 7.9.2 Block diagram Block diagram The following diagram shows the block diagram for the digital inputs/outputs of an NCU. ① Jumper open: Isolation for digital inputs ② can be parameterized as digital input/output Figure 7-12 Block diagram for digital inputs/outputs NCU 7x0.3 PN, NCU 7x0.3B PN Manual, 06/2014, 6FC5397-1EP40-5BA1... -
Page 75: Connecting Digital Inputs/Outputs
Connecting 7.9 Digital inputs/outputs Note The fast digital inputs/outputs must be shielded. 7.9.3 Connecting digital inputs/outputs Cable specification Table 7-27 Cable specification at X122 / X132 / X142 Features Version Connector type 14-pin spring-loaded terminals Connection option 0.2 to 1.5 mm Max. -
Page 76: Technical Data
Connecting 7.9 Digital inputs/outputs Using shielded cables When using a shielded cable for the bidirectional inputs/outputs, the following options are available for the shield connection: 1. Attach the cable shield to a grounded shielding bus immediately after the cable entry point in the cabinet (strip the insulation off the cable for this purpose). - Page 77 Connecting 7.9 Digital inputs/outputs Parameters Values Low signal level: -3 V to 5 V Input delay (typ.) L → H: 50 μs H → L: 100 μs Digital inputs/outputs at X122 / X132 / X142 Table 7-30 Technical data of the digital inputs/outputs of X122 / X132 / X142 Parameters Values As an input...
-
Page 78: Usb
Connecting 7.11 Measuring sockets 7.10 The USB interfaces are used exclusively for service purposes, correspond to the norm and are, therefore, not described in detail here. Table 7-31 Cable specification for X125 and X135 Characteristics Versions Connector type Double USB socket – type A Version USB 2.0 Current carrying capacity... - Page 79 Connecting 7.11 Measuring sockets Note The measuring sockets should be used exclusively for servicing purposes. The measurements may only be carried out by appropriately trained specialists. Interface assignments Table 7-32 Measuring sockets T0, T1, T2 Socket Function Technical data Test socket 1 Resolution: 8 bit.
-
Page 81: Technical Data
Technical data Table 8-1 Safety-related data Protection class I (protective conductor) as per EN 61800-5-1 Degree of protection to EN IP20 or IPXXB with option slot cover 60529 or option board inserted Approvals CE, cULus Declarations of conformity Directive 2004/108/EC (EMC) Pollution degree Cooling Open-circuit ventilation... - Page 82 0.. 12288 byte Can be manually expanded, drives > 10240, shift / adapt MD You can find a detailed description of the PLC data online in the service & support portal of Siemens AG: http://support.automation.siemens.com/WW/view/de/54058408 NCU 7x0.3 PN, NCU 7x0.3B PN...
-
Page 83: Connectable Components
Properties Using this module, you can expand the performance of an axis grouping of the SINUMERIK 840D sl CNC automation system. Each NX10.3 can control up to 3 additional axes and each NX15.3 can control up to 6 additional axes. - Page 84 Connectable components 9.1 NX10.3 / NX15.3 Illustration Figure 9-1 Illustration of the NX10.3 / 15.3 (without cover) NCU 7x0.3 PN, NCU 7x0.3B PN Manual, 06/2014, 6FC5397-1EP40-5BA1...
- Page 85 Connectable components 9.1 NX10.3 / NX15.3 Type plate The NX module type plate contains the following basic information: Figure 9-2 Type plate using the NX10.3 as example Note You might need to access the information provided on the side-mounted type plate after the equipment has been mounted.
- Page 86 Connectable components 9.1 NX10.3 / NX15.3 Color Status Description Green Continuous light CU_LINK is ready for communication and cyclic communication is running. Flashing light 0.5 Hz CU_LINK is ready for communication and no cyclic communication is running. Continuous light At least one CU_LINK fault is present. CU_LINK not ready for operation (e.g.
-
Page 87: Dimension Drawing
Connectable components 9.1 NX10.3 / NX15.3 9.1.2 Dimension drawing Figure 9-3 NX10.3 / 15.3 dimension drawing (dimensions in mm) NCU 7x0.3 PN, NCU 7x0.3B PN Manual, 06/2014, 6FC5397-1EP40-5BA1... -
Page 88: Mounting
Connectable components 9.1 NX10.3 / NX15.3 9.1.3 Mounting Mounting aids Figure 9-4 Mounting aids for the NX module NCU 7x0.3 PN, NCU 7x0.3B PN Manual, 06/2014, 6FC5397-1EP40-5BA1... - Page 89 Connectable components 9.1 NX10.3 / NX15.3 Designs WARNING Risk of fire through overheating if there are insufficient ventilation clearances Inadequate ventilation clearances cause overheating with a risk for personnel due to smoke and fire. Further, increased failures and shorter service life of the devices/systems can occur. Under all circumstances, maintain a ventilation clearance of 80 mm above and below the NX module.
-
Page 90: Connection
Connectable components 9.1 NX10.3 / NX15.3 9.1.4 Connection Power supply X124 Table 9-2 Pin assignment for X124 Function 24 V DC power supply (20.4 V - 28.8 V) Ground Note The two "+" and "M" terminals are jumpered in the connector and not in the device. This ensures that the supply voltage is looped through. - Page 91 Connectable components 9.1 NX10.3 / NX15.3 Characteristic Version MOTION CONNECT (outside the control cabinet) Max. cable length 70 m Table 9-5 Pin assignment, X100 - X103 Signal name Technical specifications Transmit data + Transmit data - Receive data + Reserved, do not use Reserved, do not use Receive data - Reserved, do not use...
- Page 92 Connectable components 9.1 NX10.3 / NX15.3 Figure 9-5 NX topology X122 digital inputs/outputs When commissioning the drive wizard, the digital inputs/outputs are correspondingly preassigned functions. For more information about terminal assignment, see: ● "Guidelines for machine configuration" System Manual, Chapter "Interfaces and their terminal assignment"...
- Page 93 Connectable components 9.1 NX10.3 / NX15.3 Table 9-8 Pin assignment for X122 Signal name Signal type Meaning DI 0 Digital input 0 DI 1 Digital input 1 DI 2 Digital input 2 DI 3 Digital input 3 DI 16 Digital input 16 DI 17 Digital input 17 Ground for DI0 - DI3, DI16, DI17 (isolated with respect to M)
-
Page 94: Technical Data
Connectable components 9.1 NX10.3 / NX15.3 Figure 9-6 Block diagram for digital inputs/outputs Additional references For information on commissioning NX components, please refer to the "Commissioning Manual IBN CNC: NCK, PLC, drive". 9.1.5 Technical Data Table 9-9 Safety-related data Protection class according to EN 61800-5-1 Class I (with protective conductor system) and Class III (PELV) Degree of protection to EN 60529... -
Page 95: Pp 72/48D Pn
Connectable components 9.2 PP 72/48D PN Pollution degree Cooling Open-circuit ventilation Mounting position Vertical PE/ground connection at the housing with M5 screw Torx / 3 Nm Table 9-10 Electrical and mechanical data Input voltage 24 V DC (20.4 – 28.8) Current drain (without DRIVE-CLiQ and digital outputs) 0.3 A Max. - Page 96 Connectable components 9.2 PP 72/48D PN Illustration Figure 9-7 PP 72/48D PN I/O module Figure 9-8 PP 72/48D PN type plate NCU 7x0.3 PN, NCU 7x0.3B PN Manual, 06/2014, 6FC5397-1EP40-5BA1...
-
Page 97: Mounting
Connectable components 9.2 PP 72/48D PN Note The type plate is located on the rear side of the mounting plate. It is advisable to make a note of relevant data as it is no longer visible after installation. LED displays Each PROFINET port has two integrated LEDs displaying the link status (green) and activity (orange);... - Page 98 Connectable components 9.2 PP 72/48D PN Note The type plate is fitted to the rear side of the mounting plate. It is advisable to make a note of relevant data as it is no longer visible after installation. NCU 7x0.3 PN, NCU 7x0.3B PN Manual, 06/2014, 6FC5397-1EP40-5BA1...
- Page 99 Connectable components 9.2 PP 72/48D PN Figure 9-9 PP 72/48D PN dimension drawing NCU 7x0.3 PN, NCU 7x0.3B PN Manual, 06/2014, 6FC5397-1EP40-5BA1...
-
Page 100: Connecting
Connectable components 9.2 PP 72/48D PN 9.2.3 Connecting 9.2.3.1 Interface overview Figure 9-10 I/O module connection options Table 9-12 PP 72/48D PN I/O module interfaces Interface Designation Type Power supply connection Screw-terminal block PROFINET IO X2 (ports 1 and 2) Socket PROFINET address DIP switch... - Page 101 Connectable components 9.2 PP 72/48D PN Requirements placed on the DC power supply WARNING Inadequately fused supply cables can be life-threatening In the case of supply lines > 10 m, protectors must be installed at the device input in order to protect against lightning (surge).
- Page 102 Connectable components 9.2 PP 72/48D PN Maximum current consumption: 3 x 4 A if all outputs are used simultaneously. Note It is the user's responsibility to ensure that the max. current consumption per DOCOMx pin (X111, X222, X333: Pins 47, 48, 49, 50) does not exceed 1 A. The power supply (+24 V DC) for the digital outputs must therefore be connected to all 4 pins per DOCOMx (X111, X222, X333: pins 47, 48, 49, 50).
-
Page 103: X2 Profinet
Connectable components 9.2 PP 72/48D PN 9.2.3.3 X2 PROFINET Data Transmission Rate and Cables For PROFINET, you require a data transmission rate of 100 Mbit/s (Fast Ethernet). The interfaces are designed for full-duplex mode; in other words, the ports can both transmit and receive. - Page 104 Connectable components 9.2 PP 72/48D PN Name Color Status Meaning Activity Orange Data exchange No data exchange PROFINET address (S1) A logical address can be assigned to the I/O module for communication with PROFINET using a 10-bit DIP switch S1. Table 9-19 General settings with switch S1 Meaning...
-
Page 105: X111, X222 And X333 Digital Inputs/Outputs
Connectable components 9.2 PP 72/48D PN Default device name pp72x48pn119 pp72x48pn118 pp72x48pn117 pp72x48pn116 pp72x48pn115 pp72x48pn114 pp72x48pn113 pp72x48pn112 " pp72x48pn15 pp72x48pn14 pp72x48pn13 pp72x48pn12 pp72x48pn11 pp72x48pn10 pp72x48pn9 pp72x48pn8 pp72x48pn7 pp72x48pn6 pp72x48pn5 pp72x48pn4 pp72x48pn3 pp72x48pn2 pp72x48pn1 pp72x48pn Note A newly set PROFINET address will only come into effect after power OFF/ON. 9.2.3.4 X111, X222 and X333 digital inputs/outputs Cable specification... - Page 106 Connectable components 9.2 PP 72/48D PN Pin assignment Table 9-21 Pin assignment X111 Signal name Type Signal name Type P24OUT Input 0.0 Input 0.1 Input 0.2 Input 0.3 Input 0.4 Input 0.5 Input 0.6 Input 0.7 Input 1.0 Input 1.1 Input 1.2 Input 1.3 Input 1.4...
- Page 107 Connectable components 9.2 PP 72/48D PN Signal name Type Signal name Type Input 5.0 Input 5.1 Input 5.2 Input 5.3 Input 5.4 Input 5.5 Input 5.6 Input 5.7 Not assigned Not assigned Not assigned Not assigned Output 2.0 Output 2.1 Output 2.2 Output 2.3 Output 2.4...
- Page 108 Connectable components 9.2 PP 72/48D PN Signal name Type Signal name Type Output 5.4 Output 5.5 Output 5.6 Output 5.7 DOCOM3 DOCOM3 DOCOM3 DOCOM3 VI: Voltage input / VO: Voltage output I: Signal input / O: Signal output / GND: Reference potential (ground) Digital inputs ●...
- Page 109 Connectable components 9.2 PP 72/48D PN ● Internal power supply (P24OUT): The internal power supply for the digital inputs (X111, X222, X333: Pin 2) is derived from the general power supply of module X1, pin 2 (P24). ● Technical data: Table 9-24 Electrical specification of the digital inputs: Digital inputs...
- Page 110 Connectable components 9.2 PP 72/48D PN Digital outputs ● Characteristics – No galvanic isolation. – Protection against: Short-circuit, overtemperature, and loss of ground. – Automatic disconnection in case of undervoltage. ● Terminal assignment for the digital outputs: The following figure shows an example of the terminal assignment for the digital outputs on connector X111.
-
Page 111: Parameter Assignment
Connectable components 9.2 PP 72/48D PN Digital outputs min. Standard max. Nominal Signal delay time T 0.5 ms Maximum switching frequency Resistive load 100 Hz Inductive load 2 Hz Lamp 11 Hz ● × R H_typical : Current operating voltage : Output current Maximum short-circuit current: 4 A (max. -
Page 112: Diagnostics Via Input Image
Connectable components 9.2 PP 72/48D PN Terminal Byte Bit7 Bit6 Bit5 Bit4 Bit3 Bit2 Bit1 Bit0 Pin18 Pin17 Pin16 Pin15 Pin14 Pin13 Pin12 Pin11 DI 7.7 DI 7.6 DI 7.5 DI 7.4 DI 7.3 DI 7.2 DI 7.1 DI 7.0 Pin26 Pin25 Pin24... -
Page 113: Technical Data
Connectable components 9.2 PP 72/48D PN Signal name Message Diag_1 Overload DO byte 3/2 Diag_0 Overload DO byte 1/0 Note The "alive and well" counter is a 3 bit modulo counter at the PP application level. The PP application can be monitored using this counter. Failure of the application software does not generally result in a communication failure, as this is developed in a hardware-supported manner. -
Page 114: Pp 72/48D 2/2A Pn
Connectable components 9.3 PP 72/48D 2/2A PN PP 72/48D 2/2A PN 9.3.1 Description Characteristics The I/O module is a simple module (without a separate enclosure) for connecting digital and analog input/outputs as part of an automation system based on PROFINET IO. The module has the following important features: ●... - Page 115 Connectable components 9.3 PP 72/48D 2/2A PN Illustration Figure 9-13 PP 72/48D 2/2A PN I/O module Figure 9-14 PP 72/48D 2/2A PN type plate NCU 7x0.3 PN, NCU 7x0.3B PN Manual, 06/2014, 6FC5397-1EP40-5BA1...
- Page 116 Connectable components 9.3 PP 72/48D 2/2A PN Note The type plate is located on the rear side of the mounting plate. It is advisable to make a note of relevant data as it is no longer visible after installation. LED displays Each PROFINET port has two integrated LEDs displaying the link status (green) and activity (orange);...
-
Page 117: Dimension Drawing
Connectable components 9.3 PP 72/48D 2/2A PN 9.3.2 Dimension drawing Figure 9-15 PP 72/48D 2/2A PN dimension drawing 9.3.3 Mounting The PP 72/48D 2/2A PN I/O module is mounted just the same as the PP 72/48D PN, see Mounting (Page 97). NCU 7x0.3 PN, NCU 7x0.3B PN Manual, 06/2014, 6FC5397-1EP40-5BA1... -
Page 118: Connection
Connectable components 9.3 PP 72/48D 2/2A PN 9.3.4 Connection 9.3.4.1 Interface overview Figure 9-16 Connection options of the PP 72/48D 2/2A PN I/O module Interface overview Table 9-33 Interfaces of the PP 72/48D 2/2A PN I/O module Interface Designation Type Power supply connection Screw-terminal block PROFINET IO... -
Page 119: X1 Power Supply
Connectable components 9.3 PP 72/48D 2/2A PN Signal type Meaning Input Output Bidirectional Supply voltage Protective ground (reference potential) Note Digital and analog signals must not be laid together within a cable. 9.3.4.2 X1 power supply Properties This interface is intended exclusively for the connection of the external 24 V power supply. On the module side, the power supplies are protected against: ●... - Page 120 Connectable components 9.3 PP 72/48D 2/2A PN Recovery time ≥ 50 s Events per hour ≤ 10 Transient voltage interruptions Outage time ≤ 3 ms Recovery time ≥ 10 s Events per hour ≤ 10 Digital inputs The 24 V supplied at X1 are used to supply the 72 digital inputs. If the internal supply voltage is not used to supply the digital inputs, this can optionally be replaced by an external power supply (24 V DC).
-
Page 121: X2 Profinet
Connectable components 9.3 PP 72/48D 2/2A PN Wiring the screw-type terminal block The required 24 V DC load power supply is wired to the screw-type terminal block (X1). DANGER Danger of death caused by unsafe power supply The 24 V direct voltage is to be configured as an extra-low voltage with protective separation - DVC A or PELV according to EN 61800-5-1. - Page 122 Connectable components 9.3 PP 72/48D 2/2A PN Signal name Signal type Meaning N.C. Reserved, do not use Receive data - N.C. Reserved, do not use N.C. Reserved, do not use Cable specification Table 9-38 Cable specification at X2, ports 1, 2 Characteristic Version Connector type...
- Page 123 Connectable components 9.3 PP 72/48D 2/2A PN Default device names The switch positions 1 to 8 define the default device name of the I/O module. There are up to 128 default device names. If these default device names are used, there is no need for initialization.
-
Page 124: X111, X222 And X333 Digital Inputs/Outputs
Connectable components 9.3 PP 72/48D 2/2A PN Default device name pp72x48pn5 pp72x48pn4 pp72x48pn3 pp72x48pn2 pp72x48pn1 pp72x48pn Note A newly set PROFINET address will only come into effect after power OFF/ON. 9.3.4.4 X111, X222 and X333 digital inputs/outputs Cable specification ● Connectors: 50-pin ribbon cable connectors 50-pin insulation displacement connectors with cable grip, ribbon cables and terminal converters are required for connecting digital inputs and outputs. - Page 125 Connectable components 9.3 PP 72/48D 2/2A PN Signal name Type Signal name Type DO 0.0 DO 0.1 DO 0.2 DO 0.3 DO 0.4 DO 0.5 DO 0.6 DO 0.7 DO 1.0 DO 1.1 DO 1.2 DO 1.3 DO 1.4 DO 1.5 DO 1.6 DO 1.7 DOCOM1...
- Page 126 Connectable components 9.3 PP 72/48D 2/2A PN Table 9-44 Pin assignment for X333 Signal name Type Signal name Type P24OUT DI 6.0 DI 6.1 DI 6.2 DI 6.3 DI 6.4 DI 6.5 DI 6.6 DI 6.7 DI 7.0 DI 7.1 DI 7.2 DI 7.3 DI 7.4...
- Page 127 Connectable components 9.3 PP 72/48D 2/2A PN Digital inputs ● Characteristics: – X222: DI 3.0 to 3.7 are connected as rapid inputs. – The inputs have no signaling (status LEDs). – The inputs are not isolated. – It is not possible to connect 2-wire BEROs. ●...
- Page 128 Connectable components 9.3 PP 72/48D 2/2A PN Table 9-45 Electrical specification of the digital inputs: Digital inputs min. max. Nominal High-level voltage (U 15 V 30 V 24 V Input current I at V 2 mA 15 mA Low-level voltage (U -3 V Signal delay time T 0.5 ms...
- Page 129 Connectable components 9.3 PP 72/48D 2/2A PN Digital outputs ● Characteristics – No galvanic isolation. – Protection against: Short-circuit, overtemperature, and loss of ground. – Automatic disconnection in case of undervoltage. ● Terminal assignment for the digital outputs: The following figure shows an example of the terminal assignment for the digital outputs on connector X111.
-
Page 130: Analog X3 Inputs/Outputs
Connectable components 9.3 PP 72/48D 2/2A PN Digital outputs min. Standard max. nominal Maximum switching frequency Resistive load 100 Hz Inductive load 2 Hz Lamp 11 Hz ● × R H_typical : Current operating voltage : Output current Maximum short-circuit current: 4 A (max. 100 μs, V = 24 V) : Maximum internal resistance = 0.4 Ω... - Page 131 Connectable components 9.3 PP 72/48D 2/2A PN Signal name Signal type Meaning Channel 2 current output for PT10 Channel 2 current input for PT100 AI2+ Channel 2 analog input + AI2- Channel 2 analog input - AO3+ Channel 3 current and voltage output + AO3- Channel 3 current and voltage output - AO4+...
- Page 132 Connectable components 9.3 PP 72/48D 2/2A PN Table 9-50 Technical data in the "PT100" operating mode Parameter Value Input range (rated value) - 200 ℃ to + 259 ℃ Standard EN60751 Resolution 16 bits (including sign) Accuracy +/- 2 ℃ Internal resistance Ri >>...
- Page 133 Connectable components 9.3 PP 72/48D 2/2A PN Measurement using a 3-wire connection system The following pins must be jumpered at connector X3 in order to perform the measurement in the PT100 using a 3-wire connection system: ● Temperature measurement with channel 1: Short-circuit pin 2 (CI 1) and pin 4 (AI 1-) and connect the jumper at connector X3 ●...
-
Page 134: Parameter Assignment
Connectable components 9.3 PP 72/48D 2/2A PN 9.3.5 Parameter assignment 9.3.5.1 Input / output images Input image The image comprises 3 slots (n, m, d ≙ start address): ● Slot 1: Digital inputs (DI) – n+0 … n+8 (9 byte) –... - Page 135 Connectable components 9.3 PP 72/48D 2/2A PN Byte Bit7 Bit6 Bit5 Bit4 Bit3 Bit3 Bit1 Bit0 AI 1.15 AI 1.14 AI 1.13 AI 1.12 AI 1.11 AI 1.10 AI 1.9 AI 1.8 AI 1.7 AI 1.6 AI 1.5 AI 1.4 AI 1.3 AI 1.2 AI 1.1...
-
Page 136: Assigning Parameters To The Analog Inputs / Outputs
The control type must be specified in the Analog Control Byte m+1 (bit 0), so that the 16 bit input and output values from and for the analog module are correctly interpreted by the control. In the SINUMERIK 840D sl control, the value "1" must be entered here. Note The control type must be set prior to the operating mode so that the first set of user data is not misinterpreted. - Page 137 Connectable components 9.3 PP 72/48D 2/2A PN Operating mode 2nd channel Bit 3 Bit 2 Current measurement Temperature measurement (Pt100) Assigning parameters to the analog outputs The analog outputs (AO) can be operated in the following operating modes: Operating mode 3rd channel Bit 5 Bit 4 No operating mode...
-
Page 138: Analog Value Representation
Connectable components 9.3 PP 72/48D 2/2A PN Examples of programming 1. Determine control type: 2. Set the operating mode: 3. Query the error status bit in cyclic operation: 9.3.5.3 Analog value representation Note The analog values of the inputs and outputs are written or read in 16 bit data format i.e. they must be accessed word by word. - Page 139 Connectable components 9.3 PP 72/48D 2/2A PN Analog inputs Table 9-57 Measured values in the voltage measurement operating mode 16 bit value (hex.) 16 bit value (dec.) Factor Voltage value [V] Overflow Deactivation Overrange Up to 11.75 V 0x19B5 6581 10 V 0x0CDA 3291...
- Page 140 Connectable components 9.3 PP 72/48D 2/2A PN Note If a Pt100 element is accidentally not connected in this operating mode and an input voltage higher than 0.25 V is output, the analog module automatically switches to the "no operating mode" operating mode and resets the gain factor to "1". This is signalized in Status Word 0 (channel-specific) in the input image.
-
Page 141: Examples
Connectable components 9.3 PP 72/48D 2/2A PN 9.3.5.4 Examples The following examples for assigning parameters to analog inputs / outputs are provided for the I/O module with device number "7". Table 9-62 Measured values and responses in the voltage measurement operating mode Address Voltage ±10 V 2.5 V... -
Page 142: Diagnostics Via Input Image
Connectable components 9.3 PP 72/48D 2/2A PN Table 9-64 Measured values and responses in the temperature measurement operating mode Address Pt100 Incorrect operating mode Resistor is not connected Operating mode QB72 16#AA 16#0F Format QB73 16#1 16#1 Value QW76 Value QW78 Operating mode IB72... - Page 143 Connectable components 9.3 PP 72/48D 2/2A PN Note The "alive and well" counter is a 3 bit modulo counter at the PP application level. The PP application can be monitored using this counter. Failure of the application software does not generally result in a communication failure, as this is developed in a hardware-supported manner.
-
Page 144: Technical Data
Connectable components 9.3 PP 72/48D 2/2A PN Value Cause Effect Remedy byte 1 Range exceeded at the Check input circuit and adjust, if required. inputs Range exceeded at the Correct the values in the user program. outputs The analog outputs retain their last specified value. Diagnostics via status bytes 0/1 In status byte 0, the set operating modes are reflected e.g. -
Page 145: Com01.3 Rs 232C (V.24) Module
Connectable components 9.4 COM01.3 RS 232C (V.24) module COM01.3 RS 232C (V.24) module 9.4.1 Description The COM01.3 RS 232C (V. 24) option board can be inserted into the option slot of the NCU. An NCU can be connected to a master computer or modem via COM port X491. The COM port has been designed in accordance with the "ANSI/EIA/TIA-232-F-1997"... - Page 146 Connectable components 9.4 COM01.3 RS 232C (V.24) module Type plate Note You might need to access the information provided on the type plate after mounting. Since the type plates after mounting the option board can no longer be read, we recommend that you at least note down the serial number before mounting.
-
Page 147: Installation/Mounting
Connectable components 9.4 COM01.3 RS 232C (V.24) module 9.4.2 Installation/Mounting NOTICE Damage to the option board by inserting and withdrawing in operation ● Option boards should only be inserted and removed when the NCU and option board are in a no-current condition. ●... -
Page 148: Cbe30-2
NCU link communication with a maximum of three NCUs can be configured. Additional NCUs can be integrated into the link communication on a project-for-project basis when regional Siemens partners are contacted. NCU 7x0.3 PN, NCU 7x0.3B PN Manual, 06/2014, 6FC5397-1EP40-5BA1... - Page 149 Connectable components 9.5 CBE30-2 When using a CBE30-2, the NCU is assigned an additional interface X1400, comprising 4 PROFINET ports. The NCU-Link is permanently wired via port 1 (in) and port 2 (out). Note The Communication Board Ethernet CBE30-2 cannot be used for the NCU730.3B PN with PLC 319 DP/PN.
- Page 150 Connectable components 9.5 CBE30-2 Type plate Note You might need to access the information provided on the type plate after mounting. Since the type plate after mounting the option board can no longer be read, we recommend that you at least note down the serial number before mounting. The following diagram shows you all of the information provided on the type plate.
-
Page 151: Installation/Mounting
Connectable components 9.5 CBE30-2 Name Color Status Meaning flashing (2 Hz) ● Failure of a connected NCU ● At least one of the assigned NCUs cannot be addressed ● Incorrect or no configuration. Sync Green Clock cycle system of the NCU is not synchronized to the send cycle. -
Page 152: Connection
Connectable components 9.5 CBE30-2 Installing the CBE30-2 A CBE30-2 is installed in the option slot of the NCU. ① Release the M3 fixing screws and remove the protective cover. ② Insert and secure the option board. Tightening torque of the M3 fixing screws: 0.8 Nm. Figure 9-25 Installing the CBE30-2 9.5.3... - Page 153 Connectable components 9.5 CBE30-2 *) Please use the Fast Connect connector as described in Chapter "PROFINET cables (Page 60)". Pin assignment Table 9-76 X1400 interface, ports 1 - 4 Signal name Signal type Meaning Output Transmit data + Output Transmit data - Input Receive data + Input...
-
Page 155: Spare Parts/Accessories
Spare Parts/Accessories 10.1 Replacing the dual fan/ battery module Procedure Proceed as follows to replace the dual fan/battery module but only observe points 3 and 4 if you want to replace the battery as well: 1. Gently push the dual fan/battery module backwards (by pressing on the pressure point) to release the module from its front interlock (snap-in hooks). - Page 156 Spare Parts/Accessories 10.1 Replacing the dual fan/ battery module 4. Connect the cable plug connector of the new battery to the mating connector in the dual fan/battery module and push the battery in. Figure 10-1 Battery replacement in the dual fan/battery module 5.
-
Page 157: Compactflash Card
Spare Parts/Accessories 10.2 CompactFlash Card 10.2 CompactFlash Card 10.2.1 Properties of the CompactFlash card Application The CompactFlash Card is delivered bootable. It is not supplied with the NCU and must be ordered as a separate component. The CompactFlash Card is inserted in the CF plug-in slot (X109 interface). NOTICE Inserting or withdrawing with the power connected can destroy the CF card The CompactFlash Card may only be inserted or removed when the control unit is... - Page 158 Spare Parts/Accessories 10.2 CompactFlash Card ② 3. Carefully insert the new CompactFlash Card into the slot until it clicks into place. The ③ marking provided on the CompactFlash Card is used as orientation: the two arrow heads point to one another. When properly installed, the card does not extend beyond the housing. 4.
-
Page 159: Appendix
Appendix Abbreviations American Wire Gauge B-MPI Handheld unit with MPI connection BERO Proximity limit switch CAT5 Quality class (category) for shielded twisted-pair cables. Class 5 states that these cables have a particularly low damping factor, making them suitable for 100 Mbit/s-FastEthernet networks. Component Based Automation: Component Based Automation Computerized Numerical Control Computerized numerical control Central Processing Unit Central processing unit... - Page 160 Appendix A.1 Abbreviations Thin Client Unit (communication with operator panels) Teleservice Association of Electrical Engineering, Electronics and Information Technology (Germany) Full duplex An Ethernet/PROFINET port can simultaneously transmit and receive data. NCU 7x0.3 PN, NCU 7x0.3B PN Manual, 06/2014, 6FC5397-1EP40-5BA1...
-
Page 161: Documentation Overview
Appendix A.2 Documentation overview Documentation overview NCU 7x0.3 PN, NCU 7x0.3B PN Manual, 06/2014, 6FC5397-1EP40-5BA1... -
Page 163: Index
Index Pin assignment, 53 Dual fan/battery module Battery replacement, 155 Properties, 29 Actuators, 45 Axes, 21 Axis expansion, 83 EMC Directives, 63 equipment, 39 Equipotential bonding, 31 Backup batteries, 34 Ethernet Battery Cable specification, 57 Backup time, 30 Pin assignment, 56 battery, 155 Bus connector, 67 MPI, 70... - Page 164 Index MAC addresses, 25 RESET button, 28 Measuring sockets, 78 RJ45 plug, 61 Messages, 27 Motor Module, 54 Mounting For segregated heat removal, 43 Sensor Module, 54 With spacers, 41 Sensors, 45 Without spacers, 41 Shield support, 130 MPI, 65 Shielding, 31 MPI bus Standard IE cables, 60...
Need help?
Do you have a question about the SINUMERIK 840D sl and is the answer not in the manual?
Questions and answers