Table of Contents
Advertisement
Quick Links
Advertisement
Table of Contents

Related Manuals for Kranzle W 11/135


Summary of Contents for Kranzle W 11/135
- Page 1 Original-Operating manual H i g h - p r e s s u r e c l e a n e r s W 11/135 W 13/230 W 15/200 W 19/160 Read and conform safety instructions before use! Keep instructions in a safe place for later use and pass them on to any future user.
-
Page 2: Dear Customer
Description Dear Customer We would like to congratulate you on your new high pressure cleaner and to thank you for the purchase. To ease your introduction to the use of the cleaner, we have provided the following pages of explanations, tips and hints. The equipment will assist you professionally in all cleaning tasks, e.g.: - Vehicles of all types - Machines etc. -
Page 3: Preparation For Use
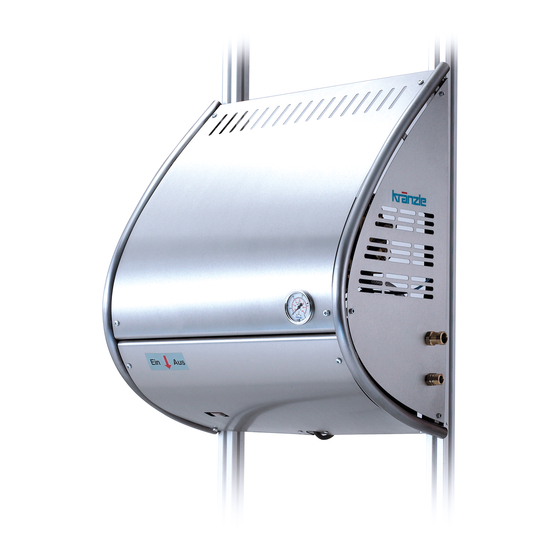
Preparation for use Stationary cold water high pressure cleaner The stationary wall-mounted systems are supplied with a stainless steel housing and equipped with an AQ pump (W11/135 with APG pump) and 10m steel fabric heavy duty hose. Pressure fully adjustable, automatic total-stop feature. After the gun is closed, the device continues to run for a time and then cuts out. -
Page 4: Water Supply System
Description Water supply system The water is fed under pressure (2 - 8 bar) to the HP pump. Then the water is fed under pressure from the HP pump to the safety spray lance. The high pressure jet is formed by the nozzle at the end of the lance. Environmental, refuse disposal and water protection regulations must be observed ! Lance with spray gun... -
Page 5: High Pressure Hose And Spraying Device
Description High pressure hose and spraying device The high pressure hose and spraying device supplied with the machine are made of high grade material. They are also optimized for the machine and marked as required by the appropriate regulations. If replacement parts are required, only such parts that are authorized by the manufacturer and which bear the markings required by the ap- propriate regulations may be used. - Page 6 Description With delayed motor cut-out Frequent, work-necessitated switching on and off of motors on machines of this size puts a heavy load on the power network and causes increased wear on internal electrical parts. That’s why the motor on the new KRÄNZLE appliances switches itself off 30 seconds after the trigger is released, and switches itself back on again when the trigger is pressed.
-
Page 7: Electrical Connection
Description W 11-135 230V/50Hz W 13-230; W 15-200; W 19-160 400V/50Hz Electrical connection The machine is supplied with an electrical power cord with plug. The mains plug must be fitted to a standard grounded socket with a 30mA residual current operated device. The socket must be protect- ed with a 16A delay action fuse on the mains side. - Page 8 Description Brief operating instructions: 1. Connect the high pressure hose with spray gun and machine. 2. Connect to suitable water supply. 3. Flush the air from the pump (open and close the spray gun several times). 4. Make the electrical connection - (400 Volt three-phase current). 5.
- Page 9 Preparation for use 1. Check oil level. There are two possibilities for checking the oil level of the pump: a) Oil must be visible in the viewing window b) The oil level must be between the two markings on the oil dipstick. To check the oil level, loosen the oil cover screw and take out the oil dip stick.
-
Page 10: To Shut Down The Pump
To shut down the pump: To shut down the pump: 1. Switch off the machine. Switch to „0“ position. 2. Cut off the water supply. 3. Open the spray gun briefly until the pressure is released. 4. Apply the safety catch on the spray gun. 5. Remove the water hose and spray gun. 6. -
Page 11: Care And Maintenance
Care and Maintenance Care and Maintenance Care and maintenance is required to keep the machine in good working order, and to allow you to enjoy the machine for as long as possible. IMPORTANT!!! Always remove the plug before working on the machine! Only use original Kränzle spare parts What to do! - Weekly, or after approx. - Page 12 Care and Maintenance Rules, directives, inspections Inspections performed by Kränzle - measurement of earth line resistance - measurement of voltage and current - inspection of tension consistency with +/- 1530 V - visual and functional check as per the inspection sheet provided Guidelines for liquid sprayers The machine conforms with the „Guidelines for liquid sprayers“.
-
Page 13: Safety Information
Safety Information Safety Information Important !!! The machine must be disconnected from the power supply when ser- vicing work is being carried out. The master switch should be in position „0“ and the plug out of the socket. Do not use the cleaner if electrical connections or other safety-relevant parts (e.g. - Page 14 Safety Information The machine may not be set up and used in rooms where there is a danger of fire or ex- plosion. The machine may not be used under water. Never direct the high-pressure jet at yourself or other persons just to clean clothing or shoes.
- Page 15 This is prohibited! Never allow children to use the high pres- sure cleaner! Never direct the wa- ter jet at the machine itself! Never direct the water jet at a power socket!
- Page 16 This is prohibited! Never direct the water jet at people or ani- mals! Do not damage the power cable or repair it incorrectly! Never pull the high pressure hose if it has formed kinks or “noo- ses”! Never pull the hose over sharp edges!
-
Page 17: Small Repairs - Do It Yourself
Small repairs - Do it yourself! Stopping leaks from hose or gun After closing the gun the manometer shows full pressure! The pressure regulator switches on and off contunuously! If the Pull out the First dis- manometer power plug! connect the shows full hose! pressure,... -
Page 18: Small Repairs
Small repairs - The nozzle is blocked! No water but the gauge shows full pressure ! but if you You should now have Rinse the hose through only get a few a powerful stream of first. water, drops from the lance remove the lance and clean Using the flat spray lance the nozzle. - Page 19 do it yourself! Nozzle dirty or sticky! The high-pressure Pressure gauge does not show full pressure. hose vibrates. Water comes out in spurts. If you do not use the high-pressure cleaner for some time the valves can stick. When a valve is blok- or the high the gauge ked,...
-
Page 20: Complete Assembly
Complete Assembly... -
Page 21: Spare Parts List
Spare parts list... -
Page 22: Valve Housing
Valve housing 17.1 19.1 19.1 Reparatur-Satz Manschetten ohne 40.517 Messingteile bestehend aus: 3x Pos. 13; 6x Pos. 14; 3x Pos. 15; 3x Pos. 18; 3x Pos. 23 Reparatur-Satz Ventile 40.062 1 bestehend aus: 6x Pos. 2; 6x Pos. 3; 6x Pos. 4... - Page 23 Spare parts list Spare parts list W13/230; W15/200; W19/160 Valve housing AQ-pump Description Qty. Ord.-No Ventilgehäuse AQ mit integr. UL 40.521 ohne integr. Druckschalter O-Ring 18 x 2 40.016 Einlass- / Auslass- Ventil 42.024 O-Ring 21 x 2 42.025 Ventilstopfen 42.026 Ventilstopfen mit R 1/4“...
-
Page 24: Unloader Valve
Unloader valve 22 21 20... - Page 25 Spare parts list Spare parts list W13/230; W15/200; W19/160 Unloader valve AQ-pump Description Qty. Ord.-No O-Ring 16 x 2 13.150 O-Ring 11 x 1,44 12.256 Edelstahlsitz 14.118 Sicherungsring 13.147 Edelstahlkugel 13.148 Edelstahlfeder 14.119 Verschlußschraube 14.113 Steuerkolben 14.134 Parbaks 16 mm 13.159 Parbaks 8 mm 14.123...
- Page 26 Motor...
- Page 27 Spare parts list Description Qty. Ord.-No Stator 112 5,5 kW 400V / 50Hz 40.540 A-Lager Flansch 40.530 Rotor 112 400V / 50Hz 40.531 Lüfterrad BG112 40.532 Lüfterhaube BG 112 40.533 Klemmkasten 40.534 Flachdichtung 43.030 Lüsterklemme 2,5 mm² 4-polig 43.031 1 PG-Verschraubung PG 13,5 40.539 Kegelrollenlager 31306...
- Page 28 Drive unit AQ...
- Page 29 Spare parts list Description Qty. Ord.-No Ölgehäuse 40.501 O-Ring 13,94 x 2,62 42.167 Ölablassstopfen R 3/8“ 42.019 Innensechskantschraube M 8 x 25 40.053 Sicherungsscheibe 40.054 Flachdichtung 40.511 Öldichtung 20 x 30 x 7 40.044 1 Wellenscheibe 40.043 Axial-Rollenkäfig 40.040 AS-Scheibe 40.041 11.1 Taumelscheibe AQ 12,75°...
- Page 30 Valve housing 28.1...
- Page 31 Spare parts list Spare parts list Kränzle W 11 / 135 Valve housing APG for plunger diameter 18 mm Description Qty. Ord.-No Ventilgehäuse 43.435 Ventilstopfen 41.714 Ventile (grün) für APG-Pumpe 41.715 1 O-Ring 16 x 2 13.150 O-Ring 15 x 2 41.716 Dichtstopfen R1/4“...
- Page 32 Unloader 22 21 20...
- Page 33 Spare parts list Spare parts list Kränzle W 11 / 135 Valve housing APG for plunger diameter 18 mm Description Qty. Ord.-No O-Ring 16 x 2 13.150 Steuerkolben 13.134 Parpaks 16 mm 13.159 Parpaks 8 mm 14.123 Spannstift 14.148 Kolbenführung spezial 42.105 Mutter M8 x 1 14.144...
- Page 34 Motor 4 6 7...
- Page 35 Spare parts list Description Qty. Ord.-No Ölgehäuse 41.417 Stator BG90 230V / 50Hz 23.003 Rotor für 2,2 kW - Motor 43.316 Paßfeder 6 x 6 x 20 41.483 1 Rillenkugellager 6205 - 2Z 43.317 Motor-Lager Schulterlager 7304 41.027 Öldichtung 25 x 35 x 7 41.024 Lüfterrad BG 90 43.319...
- Page 36 Transmission unit 18 mm 21 20...
- Page 37 Spare parts list Description Qty. Ord.-No Motor 2,2 kW 230 V 24.012 Taumelscheibe 12,5° 41.028-12,5 Axial-Rillenkugellager 3-teilig 43.486 O-Ring 88 x 2 41.021 1 Gehäuseplatte 18 mm 41.020 2 Öldichtung 18 x 28 x 7 41.031 Öleinfüllstutzen 43.438 Plungerfeder 41.033 Federdruckscheibe 41.034 Plunger 18 mm...
- Page 38 Control unit 230 V Description Qty. Ord.-No Schalter 14,5 A Amazonas 41.111 6 Kunststoffschraube 4,0 x 16 43.417 Kunststoffschraube 5,0 x 25 41.414 Kunststoffschraube 3,5 x 20 43.415 Lüsterklemme 5-pol. 43.326 1 Schütz 230V 50/60 Hz 46.005 Schaltkasten Unterteil 46.012 Schaltkasten Deckel 46.013 Steuerplatine Abschaltverz.
- Page 39 Control unit 400 V Description Qty. Ord.-No Schalter 14,5 A Amazonas 41.111 6 Kunststoffschraube 4,0 x 16 43.417 Kunststoffschraube 5,0 x 25 41.414 Kunststoffschraube 3,5 x 20 43.415 Lüsterklemme 5-pol. 43.326 1 Schütz 100-C12KN10 3x400V 50/60 Hz 1 46.005 1 Schaltkasten Unterteil 46.012 Schaltkasten Deckel...
- Page 40 Gun and HP lance...
- Page 41 Spare parts list...
-
Page 42: Wiring Diagram 230V 50Hz
Wiring diagram 230V 50Hz... - Page 43 Wiring diagram 400V 50Hz...
-
Page 44: Warranty
Warranty Guarantee The guarantee is only valid for material and manufacturing errors. Wearing does not fall within this gurantee. The instructions in our operating manual must be complied with. The operating instructions form part of the guarantee. The Guarantee is void if other parts are used than genuine Kränzle accessory parts or genuine Kränzle spare parts. -
Page 45: Ec Declaration Of Conformity
Nettoyeurs à Haute Pression I. Kränzle GmbH Elpke 97 . 33605 Bielefeld EC declaration of conformity We hereby declare, W 11/135; W 13/230 that the high-pressure models: W 15/200; W 19/160 techn. documentation available from: Manfred Bauer, Fa. Josef Kränzle Rudolf-Diesel-Str. -
Page 46: Inspection Report For Hp Cleaners
Inspection report for HP cleaners HP cleaners for industrial use have to be checked by an expert every 12 months! Inspection report on annually carried out Labour Safety Inspection (UVV) according to the Guidelines for Liquid Spray Equipment. (This inspection sheet serves as proof for the completion of the retest and must be kept carefully!) Kränzle test seals: Order no. - Page 47 Inspection report for HP cleaners HP cleaners for industrial use have to be checked by an expert every 12 months! Inspection report on annually carried out Labour Safety Inspection (UVV) according to the Guidelines for Liquid Spray Equipment. (This inspection sheet serves as proof for the completion of the retest and must be kept carefully!) Kränzle test seals: Order no.
- Page 48 I . K r ä n z l e G m b H E l p k e 9 7 D - 3 3 6 0 5 B i e l e f e l d Re p r i n t o n l y a l l o w e d w i t h t h e a u t h o r i s a t i o n o f K r ä n z l e . A s d a t e o f 1 2 / 0 8 / 2 0 1 4 Made Germany...
Need help?
Do you have a question about the W 11/135 and is the answer not in the manual?
Questions and answers