Table of Contents
Advertisement
Quick Links
User Manual
User Manual
Installation
Installation
Manual
Manual
™
Multiple-CPU, Multiple-Core 64-bit Scalable Server / Rugged 3U-High Subrack
Removable 1U-High Components
CPU & I/O Blades, Media Module, 2 Power Supplies
PCI-Express / SATA / Multiple Gigabit Ethernet, SFP Optical Transceiver, & USB Ports
Advertisement
Table of Contents

Related Manuals for Themis CoolShell CS-3U


Summary of Contents for Themis CoolShell CS-3U
- Page 1 User Manual User Manual Installation Installation Manual Manual ™ Multiple-CPU, Multiple-Core 64-bit Scalable Server / Rugged 3U-High Subrack Removable 1U-High Components CPU & I/O Blades, Media Module, 2 Power Supplies PCI-Express / SATA / Multiple Gigabit Ethernet, SFP Optical Transceiver, & USB Ports...
- Page 3 CoolShell CS-3U Installation Manual Version 1.1— December 2009 Themis Computer—Americas and Pacific Rim Themis Computer—Rest of World 47200 Bayside Parkway 5 Rue Irene Joliot-Curie Fremont, CA 94538 38320 Eybens, France Phone (510) 252-0870 Phone +33 476 14 77 80 Fax (510) 490-5529 Fax +33 476 14 77 89 World Wide Web http://www.themis.com...
- Page 4 Themis Computer assumes no responsibility for inaccuracies. Themis Computer retains the right to make changes to this publication at any time without prior notice. Themis Computer does not assume any liability arising from the application or use of this publication or the product(s) described herein.
- Page 5 CoolShell CS-3U Installation Manual Version Revision History ................... December 2009 Version 1.1 Table 1-1 • Modified , page 1-6, to change reliability to 16,800 hours, and Table 1-2 , page 1-6, to change vibration to 3G. • Assorted minor edits and changes throughout the manual.
-
Page 6: Safety Instructions
The device is designed to be used in horizontal position only. • Repairs may only be carried out by a person authorized by Themis Computer. • If extensions are made to the device, the legal stipulations and the device spec- ifications must be observed. -
Page 7: Table Of Contents
1.4 Packaging and Shipping ..................1-10 2. Installation and Operation ................... 2-1 2.1 Installation Procedures ................... 2-1 2.1.1 Subrack Installation ................... 2-1 2.1.2 CoolShell CS-3U Installation ..............2-3 2.1.3 Multiple Video Displays ................2-5 2.1.4 Audio Connection ..................2-6 2.2 Operation ....................... 2-7 2.2.1 Operation with Factory-Installed Linux ............ - Page 8 CoolShell CS-3U Installation Manual A.1.4 Stereo Audio Connectors ................A-4 A.2 I/O Blade ....................... A-5 A.2.1 USB 2.0 Connectors ................. A-5 A.2.2 DVI Video Output Connector ..............A-5 A.2.3 Stereo Goggle Connector ................A-7 A.3 Media Module ....................... A-8 A.3.1 Copper Gigabit Ethernet Ports ..............A-8 A.3.2 Optical Gigabit Ethernet Ports ..............
- Page 9 B.4.4.5 Branch 1 Rank Interleaving & Sparing ........B-12 B.4.4.6 Enhanced x8 Detection .............B-13 B.4.4.7 Crystal Beach Features .............B-13 B.4.4.8 Route Port 80h Cycles ..............B-13 B.4.4.9 Clock Spectrum Feature ............B-13 B.4.4.10 Enabling Multi-Media Timer ............B-13 B.4.4.11 USB Function ................B-13 Themis Computer...
- Page 10 CoolShell CS-3U Installation Manual B.4.4.12 Legacy USB Support ..............B-13 B.4.5 Advanced Processor Options ..............B-14 B.4.5.1 CPU Speed ................B-14 B.4.5.2 Frequency Ratio (Only when supported by the CPU) ....B-14 B.4.5.3 Hyperthreading (Only when supported by the CPU) ....B-14 B.4.5.4 Core-Multi-Processing (Only when supported by the CPU) ..B-14 B.4.5.5 Machine Checking (Only when supported by the CPU) ..B-14...
- Page 11 B.4.13 System Event Log/System Event Log (List Mode) .........B-26 B.4.14 Realtime Sensor Data ................B-27 B.5 Security Settings ....................B-28 B.5.1 Supervisor Password Is: ................B-28 B.5.2 User Password Is: ..................B-29 B.5.3 Set Supervisor Password ................B-29 B.5.4 Set User Password ...................B-29 B.5.5 Password on Boot ..................B-29 Themis Computer...
- Page 12 CoolShell CS-3U Installation Manual B.6 Boot Settings ......................B-30 B.6.1 Boot Priority Order/Excluded from Boot Orders ........B-30 B.7 Exit ........................B-31 B.7.1 Exit Saving Changes ................B-31 B.7.2 Exit Discarding Changes .................B-31 B.7.3 Load Setup Defaults .................B-32 B.7.4 Discard Changes ..................B-32 B.7.5 Save Changes ...................B-32 B.8 BIOS POST Messages ..................B-33...
- Page 13 Figure 2-3 Mate Subrack Alignment Holes with Alignment Guide-Pins ......2-2 Figure 2-4 CoolShell CS-3U 3RU Subrack Secured to the 19” Rack....... 2-3 Figure 2-5 Connect the Video Display Cable to One of the Two Middle DVI Connectors and the KB/M Cable to the Right-Hand USB Connectors Figure 2-6 Cable the Storage Expansion Subsystem to the CPU Blade......
- Page 14 CoolShell CS-3U Installation Manual Figure B-3 The Advanced BIOS Setup IPMI Submenu ..........B-24 Figure B-4 The System Event Log Submenu..............B-26 Figure B-5 The Realtime Sensor Data Submenu ............. B-27 Figure B-6 The BIOS Setup Security Submenu............... B-28 Figure B-7 The BIOS Setup Boot Submenu ..............
- Page 15 Table 1-1 General Specifications ..................1-6 Table 1-2 Environmental Specifications ................. 1-6 Table 1-3 Typical Noise Levels of the CoolShell CS-3U ..........1-7 Table 1-4 Regulatory Compliance Specifications............1-7 Table 1-5 CPU Blade Power Specifications (see Note 1) ..........1-8 Table 1-6 I/O Blade Power Specifications ..............
- Page 16 CoolShell CS-3U Installation Manual Themis Computer...
-
Page 17: Preface
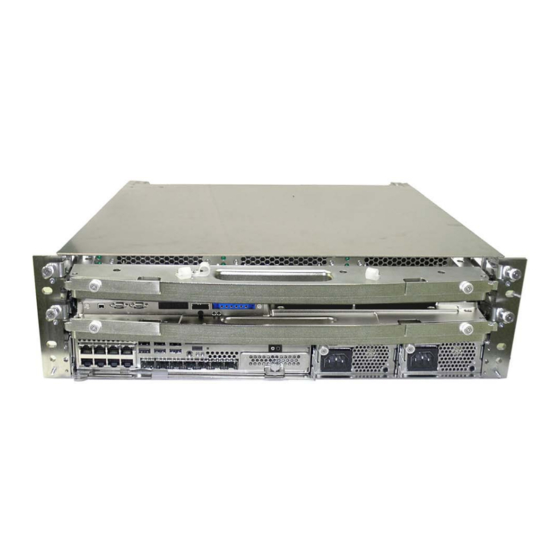
It provides instructions on how to install, configure, power up, and boot the CoolShell CS-3U (see photo below), which consists of the following 1RU- high components—all contained in a 3RU-high subrack mountable within a 19”... - Page 18 Product Summation The 3RU-high (5.25”) CoolShell CS-3U subrack has been designed to fit into a stan- dard 19” rack and has all of the benefits of Themis scalable server systems based on Themis rugged enterprise server (RES) and “CoolShell” technology; namely: •...
- Page 19 Preface Website Information CPU (Processor) Blade I/O Blade Media Module AC Power Supplies (850W each) Individual CoolShell CS-3U Components Wide Web by browsing the website http://www.themis.com. xvii Themis Computer...
- Page 20 I C - B I C - A I C - B Media Module PCI-Express (x8) + Reset I C - PS1 I C - PS2 AC Power Supplies +12V to All Units Generalized CoolShell CS-3U Flow Diagram xviii Themis Computer...
- Page 21 Your Comments are Welcome We are interested in improving our documentation and welcome your comments and suggestions. You can email your comments to us at docfeedback@themis.com. Please include the document part number in the subject line of your email. Notes, Cautions, Warnings, and Sidebars...
- Page 22 CoolShell CS-3U Installation Manual Themis Computer...
-
Page 23: Overview And Specifications
Chapter 1CoolShell CS-3U Overview and Specifications This chapter gives a general overview of the Themis CoolShell CS-3U and lists the important specifications associated with the system. Overview—CoolShell CS-3U The CoolShell CS-3U (see Figure 1-1 on page 1-2) consists of the following 1RU- high components—all contained in a 3RU-high subrack mountable within a 19”... -
Page 24: Figure 1-1 Coolshell Cs-3U Within Rugged 3Ru Subrack
CoolShell CS-3U Installation Manual The front-panel details each of the CoolShell CS-3U components are shown in Fig- ure 1-2, page 1-2 (CPU Blade), Figure 1-3 (I/O Blade) and Figure 1-4 (AC Power Supply) on page 1-3, and Figure 1-5, page 1-4 (Media Module). -
Page 25: Figure 1-3 I/O Blade Front Panel
Overview and Specifications Overview—CoolShell CS-3U USB 2.0 Ports USB 2.0 Ports LEDs LEDs To CPU Blade Native USB ports for keyboard/mouse PCI-Express I/O Blade Power Primary video used by and bootable USB ports Video Card Link Video Card Link BIOS during boot (DVD / disk / stick) Figure 1-3. -
Page 26: Figure 1-5 Media Module Front Panel
CoolShell CS-3U Installation Manual LED ON = Link OK PCI-Express LED Notes: LED OFF = Link Failed 12V Power OK DVD-ROM Boot Drive DVD Activity LED DVD Ejection Button Digital I/O Port (Remote I2C) Pluggable SATA Drive USB 2.0 Ports... -
Page 27: Storage Expansion Subsystem
Storage Expansion Subsystem Storage Expansion Subsystem In addition to the CoolShell CS-3U and its 3RU subrack, Themis has introduced a Storage Expansion Subsystem (see Figure 1-6)—used to provide increased stor- age—and installed within the same 19” rack above the 3RU subrack. [The installer may locate the Subsystem below the 3RU subrack if necessary.]... -
Page 28: Specifications
10 pounds Storage Expansion Subsystem 6.9 pounds Reliability 16,800 hours without failure 1.3.2 Environmental The CoolShell CS-3U is designed to meet the environmental requirements listed in Table 1-2. Table 1-2. Environmental Specifications Parameter Operating Non-Operating Temperature 0° to 50° C –40°... -
Page 29: Shock
The CoolShell CS-3U is designed to tolerate electrostatic pulses up to 15 kilovolts (KV) with no impact on system operation. 1.3.2.3 Noise Level Typical noise levels emitted by the CoolShell CS-3U are outlined in Table 1-3. The chassis is installed with four 38-mm fans contained side-by-side in a single fan assembly. -
Page 30: Hazardous Materials
1.3.5 Hazardous Materials Design of the CoolShell CS-3U is compliant with the standards IAW 29 CFR 1910, Subpart H and Z, FED STD 313, 40 CFR Chapter I, J, abd SD14. The CoolShell CS- 3U does not use ozone-depleting materials as defined in IAW SD 14 and 40 CFR Chapter I, Subchapter C. -
Page 31: I/O Blade
The maximum power from each socket is 60W according to the PCI-Express specifi- cation (calculated at 62.7W). The remaining power (150 – 60 = 90W) comes from the supplemental connectors (the 90 W results from 7.5A at 12V). The graphics card has 6 pins to carry this current. Themis Computer... -
Page 32: Packaging And Shipping
AC power cord is 8.5 pounds (4 kg). The approximate weight of a CoolShell CS-3U with a subrack, component systems, and one power supply is under 40 pounds (18.2 kg); its weight with two power sup- plies is under 43 pounds (see Table 1-1 on page 1-6). -
Page 33: Installation And Operation
Installation Procedures 2.1.1 Subrack Installation Before the CoolShell CS-3U can be properly installed, follow these steps to attach the empty 3RU subrack to a 19” RETMA rack: 1. Remove any Blades (CPU and I/O), power supplies, and the Media Module—... -
Page 34: Figure 2-2 Install Subrack Alignment Guide-Pins Onto The 19" Rack
CoolShell CS-3U Installation Manual Caution: Use industry-standard ESD grounding techniques when handling all electronic components. 2. Install subrack alignment guide-pins to the rear—2 per side—of the 19” rack (see Figure 2-2) with two screws per guide-pin. Subrack Alignment Guide-Pins 2.5”... -
Page 35: Coolshell Cs-3U Installation
Figure 2-4. 2.1.2 CoolShell CS-3U Installation Follow these steps to properly install the CoolShell CS-3U after the 3RU subrack has been firmly attached to the 19” rack: 1. Reinstall each of the CoolShell CS-3U components (CPU Blade, I/O Blade, Media Module, and power supplies) previously removed from the 3RU sub- rack. -
Page 36: Figure 2-5 Connect The Video Display Cable To One Of The Two Middle Dvi Connectors And The Kb/M Cable To The Right-Hand Usb Connectors
2-7, page 2-5) and the other ends to an isolated AC wall circuit. This will cause the CoolShell CS-3U to power on automatically (see following Note). Note: There is no master switch for turning power on or off. Instead, the system becomes active when power cords are connected to the power supplies. -
Page 37: Multiple Video Displays
The physical video port and the logical number assigned to it are not a fixed relationship. Instead, this is controlled by the sequence of device dis- covery and enumeration during system boot. Themis Computer... -
Page 38: Audio Connection
CoolShell CS-3U Installation Manual 2.1.4 Audio Connection To establish an audio link, connect the stereo audio cable adapter (shipped with the system, see Figure 2-8) to one of the two audio channels (Channel A or Channel B) on the front panel of the CPU Blade (see Figure 1-2 on page 1-2):... -
Page 39: Operation
• Select Separate X Screen, then press OK • Repeat for all monitors • Press the Save button • Save the xconfig file • Press Quit 3. Log out of the system, then log back into the system, after which all monitors should be active. Themis Computer... - Page 40 CoolShell CS-3U Installation Manual Themis Computer...
-
Page 41: Appendix A. Connector Pinouts
Appendix Connector Pinouts This appendix provides connector pinouts and signal descriptions for the I/O con- nectors installed on the component front panels of the CoolShell CS-3U. CPU Blade A.1.1 Power & Reset Connector Pinouts are described in Figure A-1; signal descriptions are shown in Table A-1. -
Page 42: Pci-Express Connector
CoolShell CS-3U Installation Manual Note: The Power & Reset Connector is used to provide power and reset control from the CPU Blade to the optional Storage Expansion Subsystem, or other op- tional subsystems to be developed in the future. A.1.2 PCI-Express Connector Pinouts are described in Figure A-2;... -
Page 43: Clock & I2C Bus Connector (Firewire 1394
Note: The Clock & I2C Connector is used to provide I2C bus and ancillary sig- naling for the PCI-Express bus between the CPU Blade to the optional Storage Expansion Subsystem, or other optional subsystems to be developed in the future. Themis Computer... -
Page 44: Stereo Audio Connectors
CoolShell CS-3U Installation Manual A.1.4 Stereo Audio Connectors The CPU Blade has two audio connectors: Stereo Channel A and Stereo Channel B. Pinouts are described in Figure A-4; signal descriptions are shown in Table A-4. Use the special audio cable adapter (male mini-DB9 to three stereo audio connectors) to connect to microphone, line-in, and line-out cables (see Figure 2-8 on page 2-6). -
Page 45: I/O Blade
CoolShell CS-3U Installation Manual Connector Pinouts I/O Blade Up to three NVIDIA 3700 graphics cards are installed on an I/O Blade. Each card supports two DVI video output connectors and one 3-pin mini-DIN stereo goggle connector. In addition, associated with each card is one pair of USB (Universal Serial Bus) 2.0 connectors. -
Page 46: Figure A-6 Video Connector Pinout
CoolShell CS-3U Installation Manual Video Connector Pinout Figure A-6. Video Connector Pinout Signal Descriptions Table A-6. Signal Definition Signal Definition TDMS Data2– Hot Plug Detect TDMS Data2+ TDMS Data0– TDMS Data2/4 Shield TDMS Data0+ TDMS Data0/5 Shield No Connection Ground... -
Page 47: Stereo Goggle Connector
(one per installed graphics card). Pinouts are described in Figure A-7; signal descriptions are shown in Table A-7. Stereo Goggle Connector Pinout Figure A-7. Stereo Goggle Connector Pinout Signal Descriptions Table A-7. Signal Definition +Power in Ground Stereo Sync Themis Computer... -
Page 48: Media Module
A.3.1 Copper Gigabit Ethernet Ports The CoolShell CS-3U supports eight copper RJ45 Gigabit Ethernet connectors. Each of the top four connectors contains two status LED indicators one (on the left) indi- cates lower (primary) RJ45 port activity, and one (on the right) indicates upper (sec- ondary) RJ45 port activity. -
Page 49: Optical Gigabit Ethernet Ports
TRD3- Transmit/Receive Data 3 – A.3.2 Optical Gigabit Ethernet Ports The CoolShell CS-3U supports seven optical Gigabit Ethernet connectors. Note: SFP (Small Form-Factor Pluggable) transceiver ports are provided with optical Ethernet ports. Port designations are described in Figure A-9. Receive... -
Page 50: Usb 2.0 Connectors
CoolShell CS-3U Installation Manual A.3.3 USB 2.0 Connectors The Media Module contains six USB 2.0 connectors. Pinouts are described in Figure A-10; signal descriptions are shown in Table A-9. Symbol USB Port USB 2.0 Connector Pinout Figure A-10. USB 2.0 Connector Pinout Signal Descriptions Table A-9. -
Page 51: Storage Expansion Subsystem
The Clock & I2C Bus connector has the same pinout and signal descriptions as the Clock & I2C Bus connector on the CPU Blade (see Section A.1.3, “Clock & I2C Bus Connector (Firewire 1394),” on page A-3). A-11 Themis Computer... - Page 52 CoolShell CS-3U Installation Manual A-12 Themis Computer...
-
Page 53: Appendix B. Bios Setup Utility
Appendix BIOS Setup Utility Introduction This chapter describes the Phoenix BIOS™ Setup utility for the CoolShell CS-3U. The Phoenix ROM BIOS is stored in a flash chip and can be easily upgraded using a floppy-disk-based program. Note: Due to periodic changes to the BIOS, some settings may have been added or Deleted and might not yet be recorded in this manual. -
Page 54: How To Change The Configuration Data
CoolShell CS-3U Installation Manual B.1.2 How To Change the Configuration Data The CMOS information that determines the system parameters may be changed by entering the BIOS Setup utility. This Setup utility can be accessed by pressing the <Delete> key at the appropriate time during system boot. (See following Section.) B.1.3... -
Page 55: Main Bios Setup
With the item highlighted, press the <Enter> key to access the submenu. Press the <Esc> key to exit the CMOS Setup Menu. The next section describes in detail how to navigate through the menus. Figure B-1. The Main BIOS Setup Menu Themis Computer... -
Page 56: Main Setup Features
CoolShell CS-3U Installation Manual B.3.1 Main Setup Features B.3.1.1 System Time To set the system date and time, key in the correct information in the appropriate fields. Then press the <Enter> key to save the data. B.3.1.2 System Date Using the arrow keys, highlight the month, day, and year fields, and enter the correct data. -
Page 57: Parallel Ata
Select Compatible to allow the SATA and PATA drives to be automatically- detected and be placed in the Legacy Mode by the BIOS. Select Enhanced to allow the SATA and PATA drives to be to be automatically-detected and be placed in the Native IDE Mode Themis Computer... -
Page 58: System Memory
CoolShell CS-3U Installation Manual Note: The Enhanced mode is supported by the Windows 2000 OS or a later ver- sion. When the SATA Controller Mode is set to “Enhanced”, the following will display: Serial ATA (SATA) RAID Enable Select Enable to enable Serial ATA RAID Functions. -
Page 59: Advanced Setup
If enabled, this feature will speed up the POST (Power On Self Test) routine by skip- ping certain tests after the computer is turned on. The settings are Enabled and Dis- abled. If Disabled, the POST routine will run at normal speed. Themis Computer... -
Page 60: Quiet Boot Mode
CoolShell CS-3U Installation Manual B.4.1.2 Quiet Boot Mode This setting allows you to Enable or Disable the graphic logo screen during boot-up. B.4.1.3 POST Errors Set to Enabled to display POST Error Messages if an error occurs during bootup. If set to Disabled, the system will continue to boot without displaying any error mes- sages even when a boot error occurs. -
Page 61: Memory Cache
Select “Write Through” to allow data to be cached into the buffer and written into the system memory at the same time. Select “Write Protect” to prevent data from being written into the base memory area of Block 512K-640K. Select “Write Back” Themis Computer... -
Page 62: Cache Extended Memory
CoolShell CS-3U Installation Manual to allow CPU to write data back directly from the buffer without writing data to the System Memory for fast CPU data processing and operation. The options are Uncached, Write Through, Write Protect, and Write Back. -
Page 63: Pci Parity Error Forwarding
OS requires a different Bus Master clock rate. Large Disk Access Mode This setting determines how large hard drives are to be accessed. The options are DOS or Other (for Unix, Novelle NetWare and other operating systems). B-11 Themis Computer... -
Page 64: Advanced Chipset Control
CoolShell CS-3U Installation Manual B.4.4 Advanced Chipset Control Access the submenu to make changes to the following settings. Caution: Be careful when changing the Advanced settings. Incorrect values en- tered may cause system malfunction. Also, a very high DRAM frequency or incor- rect DRAM timing may cause system instability. -
Page 65: Enhanced X8 Detection
Note: A TOE device is a specialized, dedicated processor that is installed on an add-on card or a network card to handle some or all packet processing of this add- on card. For the CoolShell CS-3U, the TOE device is built inside the ESB 2 SouthBridge chip. -
Page 66: Advanced Processor Options
CoolShell CS-3U Installation Manual B.4.5 Advanced Processor Options Access the submenu to make changes to the following settings. B.4.5.1 CPU Speed This is a display that indicates the speed of the installed processor. B.4.5.2 Frequency Ratio (Only when supported by the CPU) The feature allows the user to set the internal frequency multiplier for the CPU. -
Page 67: Execute Disable Bit (Only When Supported By The Cpu
The options are Disabled and Enabled. B.4.5.12 Intel Virtualization Technology (Only when supported by the CPU) Select Enabled to use the feature of Virtualization Technology to allow one platform to run multiple operating systems and applications in independent partitions, creat- B-15 Themis Computer... -
Page 68: Intel Eist Support (Only When Supported By The Cpu
CoolShell CS-3U Installation Manual ing multiple “virtual” systems in one physical computer. The options are Enabled and Disabled. Note: If there is any change to this setting, you will need to power off and restart the system for the change to take effect. Please refer to Intel’s web site for detailed information. -
Page 69: Serial Port B
This is a display to inform you of the event log validity. It is not a setting. B.4.7.2 Event Log Capacity This is a display to inform you of the event log capacity. It is not a setting. B-17 Themis Computer... -
Page 70: View Dmi Event Log
CoolShell CS-3U Installation Manual B.4.7.3 View DMI Event Log Highlight this item and press <Enter> to view the contents of the event log. B.4.7.4 Event Logging This setting allows you to Enable or Disable event logging. B.4.7.5 ECC Event Logging This setting allows you to Enable or Disable ECC event logging. -
Page 71: Flow Control
C, 75 C, 80 C, and 85 Highlight the entry and hit <Enter> to see monitor data for the following items: • CPU1 Temperature • CPU1 Second Core Temperature • CPU2 Temperature • CPU2 Second Core Temperature B-19 Themis Computer... -
Page 72: Fan Speed Control Modes
CoolShell CS-3U Installation Manual • System Temperature • Fan1–Fan8 Speeds—If the Auto Fan Control feature is enabled, the BIOS will automatically display the status of the fans indicated in this item. Note: In the Windows OS environment, the Supero Doctor III settings take pre- cedence over the BIOS settings. -
Page 73: Hardware Monitor Logic [Alternative 2
(12V) at all the time. The Options are: 1. Disable 2. 3-pin (Server) 3. 3-pin (Workstation) B.4.10.3 Voltage Monitoring The following items will be monitored and displayed: • Vcore A • Vcore B • -12V B-21 Themis Computer... -
Page 74: Cpu Temperature Threshold
CoolShell CS-3U Installation Manual • P1V5 • +3.3V • +12V • 5Vsb • 5VDD • P_VTT • Vbat Note: In the Windows OS environment, the Supero Doctor III settings take pre- cedence over the BIOS settings. When first installed, Supero Doctor III adopts the temperature threshold settings previously set in the BIOS. -
Page 75: Fan Speed Control Modes
Supero Doctor, since the SD III set- tings override the BIOS settings. For the Windows OS to adopt the BIOS temperature threshold settings, please change the SD III settings to be the same as those set in the BIOS. B-23 Themis Computer... -
Page 76: Ipmi (Only When An Ipmi Card Is Installed
CoolShell CS-3U Installation Manual B.4.12 IPMI (Only when an IPMI card is installed) Figure B-3. The Advanced BIOS Setup IPMI Submenu B.4.12.1 IPMI Specification Version This item displays the current IPMI Version. B.4.12.2 Firmware Version This item displays the current Firmware Version. -
Page 77: Clear System Event Logging
[Ignore this option when OS Boot Watch Dog is set to “Disabled”.] B.4.12.10Time Out Option This feature allows the user to determine what action to take in an event of a system boot failure. The options are No Action, Reset, Power Off, and Power Cycles. B-25 Themis Computer... -
Page 78: System Event Log/System Event Log (List Mode
CoolShell CS-3U Installation Manual B.4.13 System Event Log/System Event Log (List Mode) These options display the System Event Log (SEL) and System Event Log (SEL) in List Mode. Items include: • SEL (System Event Log) Entry Number • SEL Record ID •... -
Page 79: Realtime Sensor Data
BIOS Setup Utility Advanced Setup B.4.14 Realtime Sensor Data This feature displays information from motherboard sensors, such as temperatures, fan speed, and voltages of various components. Figure B-5. The Realtime Sensor Data Submenu B-27 Themis Computer... -
Page 80: Security Settings
CoolShell CS-3U Installation Manual Security Settings Choose Security from the Phoenix BIOS Setup Utility main menu with the arrow keys. You should see the display shown in Figure B-6. Security setting options are displayed by highlighting the entry using the arrow keys and pressing <Enter>. All Security BIOS settings are described in this section. -
Page 81: User Password Is
B.5.5 Password on Boot This setting allows you to require a password to be entered when the system boots up. The options are Enabled (password required) and Disabled (password not required). B-29 Themis Computer... -
Page 82: Boot Settings
CoolShell CS-3U Installation Manual Boot Settings Choose Boot from the Phoenix BIOS Setup Utility main menu with the arrow keys. You should see the display shown in Figure B-7. See details on how to change the order and specs of boot devices in the “Item Specific Help” window. All Boot BIOS settings are described in this section. -
Page 83: Exit
Highlight this item and hit <Enter> to save any changes you have made and to exit the BIOS Setup utility. B.7.2 Exit Discarding Changes Highlight this item and hit <Enter> to exit the BIOS Setup utility without saving any changes you may have made. B-31 Themis Computer... -
Page 84: Load Setup Defaults
CoolShell CS-3U Installation Manual B.7.3 Load Setup Defaults Highlight this item and hit <Enter> to load the default settings for all items in the BIOS Setup. These are the safest settings to use. B.7.4 Discard Changes Highlight this item and hit <Enter> to discard (cancel) any changes you have made. -
Page 85: Bios Post Messages
System RAM Failed at offset: nnnn System RAM failed at offset nnnn of in the 64k block at which the error was detected. Extended RAM Failed at offset: nnnn Extended memory is not working or not configured properly at offset nnnn. B-33 Themis Computer... - Page 86 CoolShell CS-3U Installation Manual System battery is dead - Replace and run SETUP The CMOS clock battery indicator shows the battery is dead. Replace the battery and run Setup to reconfigure the system. System CMOS checksum bad - Default configuration used The system CMOS has been corrupted or modified incorrectly, perhaps by an appli- cation program that changes data stored in CMOS.
- Page 87 There is an address conflict for the specified device. Allocation Error for: device Run the ISA or EISA Configuration Utility to resolve a resource conflict for the specified device. CD ROM Drive Identify the CD ROM Drive. B-35 Themis Computer...
- Page 88 CoolShell CS-3U Installation Manual Entering SETUP . . . Starting the Setup program. Failing Bits: nnnn The hex number nnnn is a map of the bits at the RAM address that failed the memory test. Each 1 (one) in the map indicates a failed bit. See errors 230, 231, or 232 above for offset address of the failure in System, Extended, or Shadow memory.
- Page 89 Display the address nnnn of the upper limit of Upper Memory Blocks, indicating released segments of the BIOS that can be reclaimed by a virtual memory manager. Video BIOS shadowed The video BIOS is successfully copied to shadow RAM. B-37 Themis Computer...
- Page 90 CoolShell CS-3U Installation Manual B-38 Themis Computer...
-
Page 91: Appendix C. Red Hat Enterprise Linux Installation
2. Make sure the operating system selection under advanced menu is set to “Linux” or “other” for Linux installation. C.2.2 Installing from CD-ROM To install Red Hat Enterprise Linux from a CD-ROM, insert the Red Hat Enterprise Themis Computer... -
Page 92: Language Selection
CoolShell CS-3U Installation Manual Linux CD into your CD-ROM drive and boot the system. The system will boot from CD-ROM and display the “Boot” prompt. Press [Enter], after which the following message appears: “Welcome to Red Hat Enterprise Linux” Note: The CD-ROM is required when booting the installation program, and again after subsequent CD-ROMs has been processed. -
Page 93: Keyboard Selection
On this screen (see Figure C-3 on page C-4), you can choose to perform automatic partitioning, or manual partitioning using Disk Druid. Automatic partitioning allows you to perform an installation without having to parti- tion your drive(s) yourself. If you do not feel comfortable with partitioning your sys- Themis Computer... -
Page 94: Figure C-3 Disk Partitioning
CoolShell CS-3U Installation Manual tem, it is recommended that you do not choose to partition manually and instead let the installation program partition for you. To partition manually, choose the Disk Druid partitioning tool. Figure C-3. Disk Partitioning Note: If you receive an error after the Disk Partitioning Setup phase of the instal- lation saying something similar to: The partition table on device hda was unreadable. -
Page 95: Automatic Partitioning
Remove all partitions on this system. Select this option to remove all partitions on your hard drive(s) (this includes partitions created by other operating systems such as Windows VFAT or NTFS partitions). Note: If you select this option, all data on the selected hard drive(s) is removed by the installation program. Themis Computer... -
Page 96: Partitioning Your System
CoolShell CS-3U Installation Manual Also, do not select this option if you have information that you want to keep on the hard drive(s) where you are installing Red Hat Enterprise Linux. Keep all partitions and use existing free space. Select this option to retain your current data and partitions, assuming you have enough free space available on your hard drive(s). -
Page 97: Adding Partitions
Red Hat Enterprise Linux Installation Installation Figure C-5. Disk Setup C.2.2.6 Adding Partitions To add a new partition, select the New button. The following dialog box appears: Figure C-6. Add Partition Themis Computer... - Page 98 CoolShell CS-3U Installation Manual Mount Point: Enter the partition's mount point. For example, if this partition should be the root partition, enter /; enter /boot for the /boot partition, and so on. You can also use the pull-down menu to choose the correct mount point for your partition.
-
Page 99: Boot Loader Configuration
GRUB (Grand Unified Bootloader), which is installed by default, is a very powerful boot loader. GRUB can load a variety of free operating systems, as well as proprietary operating systems with chain-loading (the mechanism for loading unsupported operating sys- tems, such as DOS or Windows, by loading another boot loader). Themis Computer... -
Page 100: Advanced Boot Loader Configuration
CoolShell CS-3U Installation Manual C.2.2.8 Advanced Boot Loader Configuration Now that you have chosen which boot loader to install, you can also determine where you want the boot loader to be installed. You may install the boot loader in one of two places: The master boot record (MBR). -
Page 101: Network Configuration
If you select Activate on boot, your network interface is started when you boot. If you do not have DHCP client access or you are unsure what to provide here, please contact your network administrator C-11 Themis Computer... -
Page 102: Figure C-10 Editing A Network Device
CoolShell CS-3U Installation Manual Figure C-10. Editing a Network Device If you have a hostname (fully qualified domain name) for the network device, you can choose to have DHCP (Dynamic Host Configuration Protocol) automatically detect it or you can manually enter the hostname in the field provided. -
Page 103: C.2.2.10Firewall Configuration
A properly con- figured firewall can greatly increase the security of your system. Figure C-11. Firewall Configuration Next, you can decide whether to enable a firewall for your Red Hat Enterprise Linux system. C-13 Themis Computer... -
Page 104: Time Zone Configuration
CoolShell CS-3U Installation Manual C.2.2.11 Time Zone Configuration Set your time zone by selecting the city closest to your computer's physical location. There are two ways for you to select your time zone: Using your mouse, click on the interactive map to select a specific city (represented by a yellow dot). -
Page 105: C.2.2.12Set Root Password
[Enter]. Then, enter the root password and press [Enter]. The installation program prompts you to set a root password for your system. You cannot proceed to the next stage of the installation process without entering a root password C-15 Themis Computer... -
Page 106: C.2.2.13Package Group Selection
CoolShell CS-3U Installation Manual The root password must be at least six characters long; the password you type is not echoed to the screen. You must enter the password twice; if the two passwords do not match, the installation program asks you to enter them again. -
Page 107: Figure C-15 Package Group Selection
Red Hat Enterprise Linux. Once a package group has been selected, click on Details to view which packages are installed by default, and to add or remove optional packages from that group (see Figure C-16 on page C-18). C-17 Themis Computer... -
Page 108: C.2.2.14Preparing To Install
CoolShell CS-3U Installation Manual Figure C-16. Package Group Details C.2.2.14Preparing to Install A screen preparing you for the installation of Red Hat Enterprise Linux now appears. For your reference, a complete log of your installation can be found in /root/install. -
Page 109: C.2.2.16Installation Complete
After installing all the packages, you will get the following message: Congratulations! Your Red Hat Enterprise Linux installation is now complete! Finally, the installation program prompts you to prepare your system for reboot. Remember to remove any installation media and press Reboot to reboot the system. C-19 Themis Computer... - Page 110 CoolShell CS-3U Installation Manual C-20 Themis Computer...
-
Page 111: Index
Quick Boot Mode B-7 SERR Signal Condition B-12 Quiet Boot B-8 USB Function B-13 Resume On Modem Ring B-8 Advanced Processor Options Summary Screen B-8 Adjacent Cache Line Prefetch B-15 Watch Dog B-8 C1 Enhanced Mode B-14 Index-1 Themis Computer... - Page 112 CoolShell CS-3U Installation Manual Boot Loader Configuration screen C-9 Power & Reset Connector A-1 Boot Settings B-30 Power & Reset Connector Pinout A-1 Boot Priority Order/Excluded from Boot Power & Reset Connector Pinout Signal Orders B-30 Descriptions A-1 Stereo Audio Connector Pinout A-4...
- Page 113 Video Connector Pinout A-6 BIOS Date B-4 Video Connector Pinout Signal Descrip- Extended Memory B-6 tions A-6 ICH RAID Code Base B-6 I/O Blade Power Specifications 1-9 LBA Mode Control B-5 I/O connectors A-1 Legacy Diskette A B-4 Index-3 Themis Computer...
- Page 114 CoolShell CS-3U Installation Manual Multi-Sector Transfer B-5 Notes xix Native Mode Operation B-5 NVIDIA 3700 graphics card xv Parallel ATA B-5 NVIDIA 3700 graphics cards A-5, A-7 SATA AHCI B-6 NVIDIA tools 2-7 SATA Controller Mode B-5 NVIDIA X Server Settings 2-7...
- Page 115 RoHS Compliance 1-7 Keyboard Selection C-3 Shock 1-7 Language Selection C-2 status LEDs 1-1, A-8 Network Configuration C-11 Stereo Audio Connector Pinout A-4 Package Group Details C-18 Stereo Audio Connector Pinout Signal Descrip- Package Group Selection C-17 Index-5 Themis Computer...
- Page 116 CoolShell CS-3U Installation Manual tions A-4 Stereo Audio Connectors A-4 vibration xvi Stereo Channel A A-4 Video Connector Pinout A-6 Stereo Channel B A-4 Video Connector Pinout Signal Descriptions Stereo Goggle Connector A-7 stereo goggle connector A-5 Video Display Cable 2-4...
- Page 117 Place Stamp Here Themis Computer 47200 Bayside Parkway Fremont, CA 94538 Attn: Publications Department Fold here; tape at top to seal...
- Page 118 Reader Comment Card We welcome your comments and suggestions to help improve the CoolShell CS-3U Installation Manual. Please take time to let us know what you think about this manual. • Information provided in the manual was complete. Agree___ Disagree___ Not Applicable___ •...
Need help?
Do you have a question about the CoolShell CS-3U and is the answer not in the manual?
Questions and answers