Table of Contents
Advertisement
Advertisement
Table of Contents

Subscribe to Our Youtube Channel
Related Manuals for Technogym IN DCKN2BB


Summary of Contents for Technogym IN DCKN2BB
- Page 1 USER MANUAL – EN IN DCKN2BB Treadmill TechnoGym Myrun...
-
Page 2: Table Of Contents
CONTENTS INTRODUCTION ............................. 3 SAFETY PRECAUTIONS ........................3 UNIT IDENTIFICATION ........................... 4 TECHNICAL PARAMETERS ........................5 PRODUCT DESCRIPTION ........................6 ACCESSORY ............................8 SAFETY KEY............................8 PROPER INSTALLATION ........................10 TRANSPORT............................11 LEVELLING ............................11 ELECTRICAL CONNECTION ....................... 12 TURNING ON AND OFF ........................13 MAINTENANCE ............................ -
Page 3: Introduction
INTRODUCTION Always consult a qualified and licensed medical professional or healthcare practitioner before beginning any nutritional or diet regime and any stretching or training programme. Remember that it is always good practice to make full inquiries and find out about possible effects that actions and choices you make may have on your health. -
Page 4: Unit Identification
Ask your physician for advice before starting any workout. If you feel faintly, stop immediately. Ask your physician before starting any workout again. People with certain diseases may use it only under supervision of a medicine doctor with special qualification. -
Page 5: Technical Parameters
TECHNICAL PARAMETERS Maximum power input 1500 W Stand-by power consumption Less than 0.5 W Weight of the unit 92 kg (203 lb) Maximum user weight 140 kg (309 lb) Maximum capacity of water-bottle holder 0.8 kg (1.8 lb) 0.8÷20 km/h ± 5% (up to 2 km/h ± 0.1 km/h) Speed (measured with user weight: 85 kg) Starting speed of a workout 1.2 km/h... -
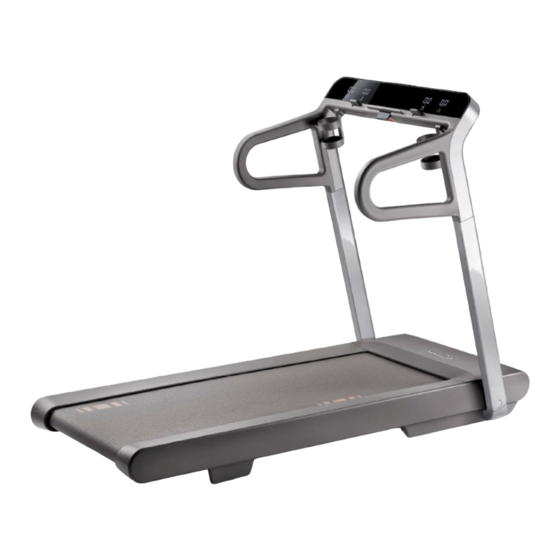
Page 6: Product Description
PRODUCT DESCRIPTION A. Treadmill belt – correctly cushioned running surface. B. Side handgrips – provide a safe support for you when you climb onto this device or if you lose balance. You can grasp them to do long strides. C. Footrests – you can move your feet from the belt and step onto the footrest for a short pause when being tired or endangered. - Page 7 Start Stop Quick Control Bottle Holder Attaching Displayed information on the screen during exercising: The elapsed time is initially shown in seconds. After the first 59 seconds have been run over, it switches to minutes and tens of seconds. For example: 3.1 means: 3 minutes and 10 seconds.
-
Page 8: Accessory
The belt gradient is shown as a percentage. Depending on the setting, it displays either the speed or the pace of the belt. The speed is displayed in kilometres per hour (km/h) or in miles per hour (mph). It depends on setting. The pace is displayed in minutes per kilometer (min/km) or in minutes per mile (min/mi), depending on the setting (more in the section “Setting the exercise data“). - Page 9 B. Clip The clip is connected to the safety key through a cord. It must be attached to your dress to protect you from falling if you are too far from the screen or drop back towards the belt edge. In some danger situation, the key will be pulled away to stop device operation without having to use any control key.
-
Page 10: Proper Installation
C. Main switch Using it you can switch this device ON and OFF. It also protects the electrical parts from overvoltage. The circuit breaker opens to protect the internal electronical parts. NOTE: Following symbol indicates moving parts. These areas must be maintained only by an expert. -
Page 11: Transport
2. Protect it from direct sunlight. 3. Don’t install it near water or in places with higher humidity. 4. We recommend to use a dedicated power-supply circuit. This should be fitted with a combined MCB/RCD with following characteristics: Type C10, if the main voltage is 200-240 Vac ... -
Page 12: Electrical Connection
ELECTRICAL CONNECTION Before connecting the unit to the mains power supply, ensure that the electrical installation complies with current regulations. Check the mains power supply specifications on the unit’s identification plate. The wall socket must be located in a place where the unit may be easily and safely plugged in and unplugged. -
Page 13: Turning On And Off
TURNING ON AND OFF Turn the unit on only after completing its assembly. To turn the unit on, flip the main switch to the on position (“I”). After a quick system check (reset), the equipment is ready for use. To turn the unit off, switch the main switch to the off position (“0”). Turn the unit off only at the end of the exercise, when the belt is not turning. -
Page 14: Maintenance
Even if the main switch is on, the unit will enter stand-by mode if it remains unused for more than 10 minutes. In stand-by mode, the display is turned off. All you need to do to restart all functions is to stand in front of the display, where the two presence detectors (A) are located. -
Page 15: Easily Solved Problems
5. Turning the screw clockwise moves the belt to the right, turning it anticlockwise moves it to the left. 6. The belt alignment adjustment is performed slowly: turn the adjustment screw by ¼ of a turn and then check the result before turning it again. 7. - Page 16 Power cord is damaged. Contact the technical support service. power cord Connect the power cord to the connected to the unit. unit. The main switch is off. Turn on the main switch. The main switch often turns Contact the technical support itself off.
-
Page 17: Fitting And Removing The Side Handgrips
FITTING AND REMOVING THE SIDE HANDGRIPS To fit the side handgrip: Insert the top of the handgrip into the slot above the profile (A). Place the lower end of the handgrip against the frame. Fully raise the lever (B). To remove the side handgrip, follow the fitting instructions in reverse order: ... -
Page 18: Working Out
Any distractions in the area around the treadmill may cause you to lose balance. MYRUN TECHNOGYM is intended to be used solely for the purpose for which it was designed and constructed, that is for simulated walking or running. Any other use of the treadmill is to be considered improper and therefore dangerous. -
Page 19: User Detection
Max HR = 207-0.7 x age (R. L. Gelish et all, Med Sci Sports Exerc., 2007 May, 39 (5): 281). Heart rate per minute Prevalent use of sugars Competitive athletes’ workouts (requiring a doctor’s certificate). Combined use of fats and sugars Significant improvement of aerobic efficiency. -
Page 20: Using A Tablet
Activate the Bluetooth on your personal device. The device will display all the IDs of other devices nearby Select the MYRUN TECHNOGYM ID and pair it to your own device. Start the exercise. You will be required to register the first time you access the app. -
Page 21: Terms And Conditions Of Warranty, Warranty Claims
When switching from kilometres to miles, the value “0.5” will be displayed as confirmation. When switching from miles to kilometres, the value “0.8” will be displayed as conformation. To display your pace instead of your speed, pull the quick speed control towards you, then press the key to start the exercise. - Page 22 According to valid legal regulations it depends whether the Buyer is the End Customer or not. “The Buyer who is the End Customer” or simply the “End Customer” is the legal entity that does not conclude and execute the Contract in order to run or promote his own trade or business activities. “The Buyer who is not the End Customer”...
- Page 23 The Seller shall settle the Warranty Claim within 30 days after the delivery of the defective Goods, unless a longer period has been agreed upon. The day when the repaired or exchanged Goods is handed over to the Buyer is considered to be the day of the Warranty Claim settlement. When the Seller is not able to settle the Warranty Claim within the agreed period due to the specific nature of the Goods defect, he and the Buyer shall make an agreement about an alternative solution.
Need help?
Do you have a question about the IN DCKN2BB and is the answer not in the manual?
Questions and answers