Table of Contents
Advertisement
Advertisement
Table of Contents

Subscribe to Our Youtube Channel
Related Manuals for VERITAS 9000A5


Summary of Contents for VERITAS 9000A5
- Page 1 Operating Instructions Veritas 9000A5...
-
Page 2: Table Of Contents
Veritas 9000A5 Dear Customer! Congratulations on the purchase of your sewing machine. GUARANTEE You have bought a top quality product which has been manufactured with great care. There is a three year guarantee on this device starting from the purchase date. -
Page 3: Safety Information
Veritas 9000A5 Safety information − When selecting the location where the device is to be used, the following Please read this information carefully before connecting your device points should be taken into consideration: to the mains power supply; it contains important safety and operating –... -
Page 4: Information About These Operating Instructions
Veritas 9000A5 Information about these Operating Instructions These Operating Instructions cannot cover all possible applications. Please keep these Operating Instructions in a safe place and pass on For more information or in case of problems not covered or inadequately to any future users. -
Page 6: Overview Of The Device And Operating Elements
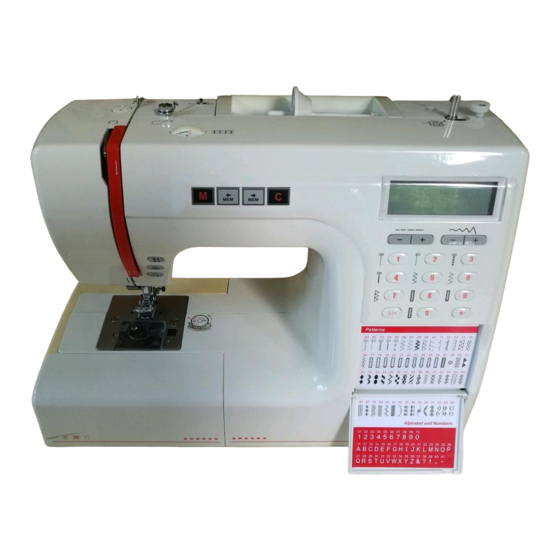
Veritas 9000A5 Overview of the device and operating elements Front side: 1. Tension dial 2. Bobbin thread winder guide 3. Upper thread guide 4. Presser foot pressure 5. Face side 6. Needle up/down 7. Auto-lock button 8. Thread cutter 9. Reverse 10. - Page 7 Veritas 9000A5 Overview of the device and operating elements LCD screen 1. Reverse sewing (see page 26) 2. Auto-stop (see page 9) 3. Auto-lock button (see page 9) 4. Needle stop above (see page 9) 5. Needle stop below (see page 9) 6.
-
Page 8: Overview Of The Accessories
Veritas 9000A5 Overview of the accessories Accessories (included in delivery scope): 1. Standard presser foot «T» 2. Zipper presser foot «I» «T» «I» «D» «M» 3. Buttonhole presser foot «D» 4. Overcasting presser foot «M» 5. Edging presser foot «E»... -
Page 9: Commissioning
Veritas 9000A5 Commissioning Connecting the machine to the mains power supply – Place the sewing machine onto a sturdy table – Insert the plug (2 inputs) of the power cable into the mains power socket on the sewing machine – Connect the mains plug to the mains power supply –... -
Page 10: Foot Control
Veritas 9000A5 Commissioning Foot control Only connect the foot control when the device is switched off. Avec la pédale de commande, la vitesse de couture peut être réglée de manière continue. The foot control is used for stepless regulation of the sewing speed. The firmer this is pressed, the quicker the machine runs. -
Page 11: Needle Stop Top/Bottom
Veritas 9000A5 Commissioning / operating elements Needle stop up/down Auto-lock button Reverse Needle stop up/down With the needle stop up/down function, the user can decide whether the needle should remain up or down (still in the fabric) when the machines stops. Press the... -
Page 12: Mounting The Presser Foot, Attaching The Seam Guide
Mounting the presser foot holder Veritas 9000A5 Using the presser foot Removal of the presser foot Attachment of the seam guide Commissioning Changing the needle Mounting the presser foot holder – Lift up the presser foot rod with the presser foot lift (a) –... -
Page 13: Winding The Bobbin Thread
Veritas 9000A5 Commissioning Winding the bobbin thread Winding the bobbin thread Please note: − When the bobbin winder switch is pushed to the right, “bobbin winding position”, the machine will not sew and the handwheel will not turn. To start sewing, push the bobbin winder switch to the left “sewing position”. -
Page 14: Inserting The Bobbin
Veritas 9000A5 Commissioning Inserting the bobbin Caution: − To avoid accidents when the machine is accidentally started, switch off the sewing machine (set main power switch to «O») before inserting or removing the bobbin Inserting the bobbin – Remove the bobbin cover –... -
Page 15: Threading The Upper Thread
Veritas 9000A5 Commissioning Threading the upper thread Threading the upper thread Note: It is important to thread correctly to prevent sewing problems. 1. Lift up the spool pin. Place the spool of thread on the spool pin so that the thread comes from the front of the spool, then place the spool cap at the end of the spool pin. -
Page 16: Using The Threader
Veritas 9000A5 Commissioning Using the threader Note: – To avoid accidents when the machine is accidentally started, switch off the sewing machine (set main power switch to «O») before threading Using the threader Raise the needle to its highest position and lower the presser foot using the presser foot lift. -
Page 17: Thread Tension
Veritas 9000A5 Commissioning Thread tension Thread tension – Basic thread tension setting: “4” Taut Loose – To increase the tension, turn the dial to the next number up. – To reduce the tension, turn the dial to the next number down. -
Page 18: Bringing Up The Bobbin Thread
Veritas 9000A5 Bringing up the bobbin thread Commissioning Cutting the thread Bringing up the bobbin thread 1. Lift the presser foot using the presser foot lift Hold the upper thread with the left hand. Turn the handwheel toward you (anti-clockwise) lowering, then raising the needle. -
Page 19: Two-Level Presser Foot Lift
Veritas 9000A5 Commissioning Note: – To avoid accidents when the machine is accidentally started, switch off the sewing machine (set main power switch to «O») before performing this task Two-level presser foot lift 1. The presser foot lift raises and lowers your presser foot. -
Page 20: Setting The Contact Pressure Of The Presser Foot
Veritas 9000A5 Commissioning Setting the contact pressure for the presser foot Setting the contact pressure for the presser foot The contact pressure for the presser foot can be set using the dial on the upper side. Normally the factory setting does not need to be adjusted. -
Page 21: Presser Foot Table
Veritas 9000A5 Overview of feet and their applications For some stitch types, twin needles can be used for more creativeness. The stitch width for twin needles may only be max. 3.5 Presser foot Application Needle Presser foot Application Needle General sewing, patchwork... -
Page 22: Selecting The Stitch
Veritas 9000A5 Sewing Selecting the stitch When the sewing machine (set main power switch to «I») is switched on, the straight stitch is automati- cally set and the stitch number «1» is shown on the LCD screen. When the stitch selection cover is opened, the printed label shows all the available stitches. -
Page 23: Overview Of Stitch Types
Veritas 9000A5 Sewing Overview of stitch types The following shows all the stitches of the three selection options The part that is marked in green indicates a rapport and/or unit of each stitch type respectively 02 03 04 05 06 07 08 09 10 11 12 13 14 15... -
Page 24: Setting The Stitch Length
Veritas 9000A5 Sewing Selecting the stitch length When you select a stitch, the machine will automatically set the recommended stitch width, which will be indicated by numbers on the LCD screen. The stitch width can be changed by pressing the stitch width buttons. -
Page 25: Imirroring
Veritas 9000A5 Coudre Mirroring When the mirroring key is pressed, the selected stitch pattern is mirror sewn. The mirror symbol is shown on the LCD screen. The mirror function is only deactivated when the mirror key is pressed again and the symbol disappears from the display. -
Page 26: Memory
Veritas 9000A5 Memory Saving stitches The machine has a program memory that can retain stitch patterns, letters and numbers. This means that whole names can be sewn simply in one go using patterns. Up to 30 stitches can be stored. Since stored patterns are not lost after the sewing machine is turned off, they can be recalled at any time. -
Page 27: Sewing With Saved Stitches
Veritas 9000A5 Memory Sowing with saved stitches The stitches stored in the machine can be called up and used at the touch of a button. – Press the -key to enter the memory mode ( appear in the display) Checking the stitches –... -
Page 28: Useful Sewing Applications
Veritas 9000A5 Useful sewing applications Sewing corners 1. Stop the sewing machine when you reach a corner. 2. Lower the needle into the fabric with the hand wheel or by pressing the -key. 3. Raise the presser foot. 4. Use the needle as a pivot and turn the fabric; lower the presser foot and resume sewing. -
Page 29: Sewing On Thick Fabric
Veritas 9000A5 Sewing / useful applications Sewing on thick fabric The black button on the right side of the presser foot will lock the presser foot in a horizontal position if you push it in before lowering the presser foot. -
Page 30: Straight Stitches, Zigzag Stitches And Needle Position
Veritas 9000A5 Veritas 9000A5 Sewing Straight stitches, zigzag stitches and needle positions Changing the needle position These settings apply only to patterns 01-05. The pre-set position is “3.5”, centre position. When you press the key «–», the needle position will move to the left. -
Page 31: Stretch Stitch
Veritas 9000A5 Veritas 9000A5 Sewing Stretch stitch For elastic and durable seams that expand with the fabric and do not tear. Ideal for elastic fabrics and woven goods. Also good for stressed seams on firm fabrics such as denim. Stretch straight stitch These stitches are highly suitable for use as decorative edging. -
Page 32: Overcasting Stitch
Veritas 9000A5 Sewing Overcasting stitch 1. Use the overcasting presser foot 2. Sew the fabric with the fabric edge against the guide of the overcasting foot. Note: − The overcasting foot should be used to sew with patterns 06 and 09 only. -
Page 33: Blindhem And Lingerie Stitches
Veritas 9000A5 Sewing Blindhem and lingerie stitches 11: Blindhem and lingerie stitches on firm fabric 12: Blindhem on stretch fabrics Note: – It takes practice to sew blindhems. – Always practice first 1. Fold the fabric as illustrated with the wrong side up. -
Page 34: Button Sewing
Veritas 9000A5 Sewing Button sewing Use the button sewing foot. 1. Move the feed dog adjustment lever to « » (b) to lower the feed dog. (Note: The stitch length cannot be adjusted as long as the feed dog is lowered.) 2. -
Page 35: Buttonhole Stitching
Veritas 9000A5 Sewing Buttonhole stitching 17: For thin or medium fabric 18: For horizontal buttonholes on blouses or shirts made from thin or medium fabric 19: For thin or medium fabric 20: For horizontal buttonholes on blouses or shirts made from thin... - Page 36 Veritas 9000A5 Sewing 4. Position the fabric under the presser foot so that the buttonhole mark is aligned with the centre of the buttonhole foot. Pull down the buttonhole lever, then push it to the back so that it is aligned with the white plate (labelled «PUSH»).
-
Page 37: Buttonholes On Stretch Fabrics
Veritas 9000A5 Sewing 7. Raise the presser foot and cut the thread. To sew the buttonhole once again, raise the presser foot and it will return to original position. When you have finished sewing buttonholes, push the buttonhole lever up until it stops. -
Page 38: Eyelet Stitching
Veritas 9000A5 Sewing Eyelet stitching 1. Select stitch type 28 and use the satin stitch presser foot. For belts etc. 2. Use the stitch width adjustment to select the eyelet size: A: Large / 7.0 mm B: Middle / 6.0 mm C: Small / 5.0 mm... -
Page 39: Darning
Veritas 9000A5 Sewing Darning 1. Press stitch type 29 for darning ( will appear in the display). Use the buttonhole presser foot 2. Baste the upper fabric and the under fabric together. Select the needle position. Place the buttonhole presser foot over the centre of the tear and lower. - Page 40 Veritas 9000A5 Sewing 4. Position the fabric so that the needle is 2mm (1/16 inch) in front of the area to be darned, 5. feed the upper thread through the opening of the foot and pull to the front 6. and then lower the presser foot lever.
-
Page 41: Faggots
Veritas 9000A5 Sewing Faggots 1. Place the turned over edges of the pieces of fabric at a clearance of 4 mm onto a thin piece of paper or water-soluble fleece and baste Thin paper Baste 2. Align the middle of the presser foot with the middle of the two edges of the fabric and start sewing 3. -
Page 42: Zipper Insertion
Veritas 9000A5 Sewing Zipper insertion Note: − When sewing with the zipper foot, only the straight stitch 01 with a centre needle position should be used. It is possible that the needle could hit the presser foot and break when sewing other patterns. - Page 43 Veritas 9000A5 Sewing Zipper inserted with one hidden side 1. Baste the zipper opening on the garment 5 mm 2. Bend over the left seam allowance. Bend over the right seam allowance by 3 mm 3. Attach the zipper foot. Attach the right side of the presser foot pin to the holder when sewing the left side of the zipper.
-
Page 44: Narrow Hemming
Veritas 9000A5 Sewing Narrow hemming Note: When sewing with the hemming foot, only the straight stitch 01 with needle position «3.5» in the centre may be used! It is possible that the needle could hit the presser foot and break when other patterns are used 1. -
Page 45: Sewing On Cords, Individual Strings And Triple Strings
Veritas 9000A5 Sewing Sewing on cords Sewing one or three cords to make attractive structures on jackets, waistcoats or borders. Mercerized yarn, knitting wool, cord, crochet yarn etc. can be used. Sewing single cords Draw the pattern onto the fabric. Place the cord from the right into the middle groove of the overcasting presser foot. -
Page 46: Buttonhole Seams
Veritas 9000A5 Sewing Sewing Sew buttonhole seams and decorative stitches with the satin stitch foot. This presser foot has a large recess on the lower side that enables thick stitch formations, such as tight zigzag stitches, to slide easily and the fabric to be moved evenly. -
Page 47: Quilting
Veritas 9000A5 Sewing Quilting Note: – When sewing with the quilting foot, only use the straight stitch 03 with the needle position «3.5» in the middle! It is possible that the needle could hit the presser foot and break when other patterns are used Insert the quilting guide in the presser foot holder as illustrated and set the space as you desire. -
Page 48: Ruffling
Veritas 9000A5 Sewing Ruffling Note: − When sewing with the pleater foot, only use the straight stitch 01 with the needle position «3.5» in the middle! It is possible that the needle could hit the presser foot and break when other patterns are used 1. -
Page 49: Pleating / Smoking
Veritas 9000A5 Sewing Pleating/smocking 1. Use the pleater to sow straight lines at 1 cm intervals across the whole smocking surface (see also sewing instructions for «Ruffling» on page 46) 2. Tie the threads together on one side. Pull the lower threads and distribute the pleats evenly. -
Page 50: Free-Motion Darning, Embroidery And Monogramming
Veritas 9000A5 Sewing Free-motion darning, embroidery and monogramming Note: − When sewing with the darning and embroidery foot, only use the straight stitch 01 with the needle position «3.5» in the middle! It is possible that the needle could hit the presser foot and break when other patterns are used Set the lever for lowering and/or lifting the feed dog to «... - Page 51 Veritas 9000A5 Sewing Embroidery Select the zigzag stitch pattern and adjust the stitch width as desired. Stitch along the outline of the design by moving the embroidery hoop (option). Make sure to maintain a constant speed. Fill in the design working from the outline towards the inside. Keep the stitches close together.
-
Page 52: Scallop Trim
Veritas 9000A5 Sewing Scallop trim 1. Sew on the hem line 2. Cut off the fabric close to the edge of the hem. Ensure that the thread is not cut... -
Page 53: Twin Needle (Extra Accessory)
Veritas 9000A5 Accessories (available separately) Twin needle Nota: − When using a twin needle with a zigzag stitch, the stitch width needs to lie between «1» and «3.0». The maximum stitch width is «3.5». No wider stitch width may be set in combination with the twin needle! When using twin needles, use the presser foot «T»... -
Page 54: Walking Foot (Extra Accessory)
Veritas 9000A5 Accessories (available separately) Walking foot The walking foot is an extra accessory and available separately. It is not supplied with the sewing machine. We recommend always sewing first without a walking foot. It is easier to guide the fabric with a standard presser foot and the user has a better view of the sewing area. -
Page 55: Maintenance
Veritas 9000A5 Maintenance Cleaning the hook Note: − To avoid accidents when the machine is accidentally started, switch off the sewing machine (set main power switch to «O») before inserting or removing the bobbin. Any bits of thread or fabric in the hook can lead to the sewing machine not functioning properly. -
Page 56: Cleaning The Lcd Display
Veritas 9000A5 Maintenance Cleaning the LCD screen Note: − Before cleaning the LCD screen and the surface of the sewing machine, always switch off the machine first and disconnect the power cable to avoid injury or electrical shocks. Carefully wipe down the front side with a soft dry cloth. -
Page 57: Troubleshooting
Veritas 9000A5 Troubleshooting If you cannot resolve a problem using this table, please contact Important: In the event of a malfunction, defective device or after the machine the service team on: +442030244354 has fallen down, disconnect the mains power plug immediately. - Page 58 Veritas 9000A5 Troubleshooting Malfunction Possible cause Remedy Page Seam error / – The wrong presser foot is used – Select the correct presser foot 6, 9, 28 ff Seam puckering – The thread tension is too high – Reduce the thread tension –...
-
Page 59: Disposal
Veritas 9000A5 Elimination − Old devices should be handed in to sales outlets for free, professional disposal − Dispose of devices with dangerous defects carefully and ensure that they are no longer used − Do not dispose of the devices in the household waste disposal system (environmental protection!) - Page 60 Service number for complaints: +442030244354 021D5A0106(GB) Jul/07...
Need help?
Do you have a question about the 9000A5 and is the answer not in the manual?
Questions and answers