
Subscribe to Our Youtube Channel
Related Manuals for VERITAS Marie


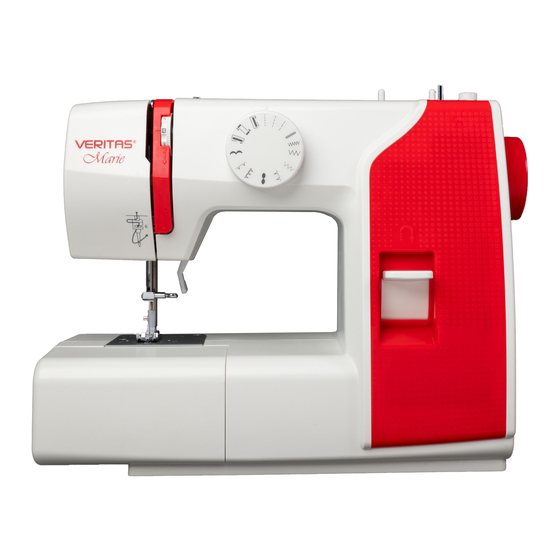
Summary of Contents for VERITAS Marie
- Page 1 SCHMETZ INSIDE Instruction manual www.facebook.com/veritassewing www.instagram.com/veritassewing www.veritas-sewing.com...
- Page 2 Before using it for the first time, we ask you to read the manual at hand carefully, paying special attention to the safety instructions. Persons who are not familiar with this manu- al must not use the appliance. We wish you much pleasure and great sewing successes! Questions concerning machine, service and customer care KONTAKT CONTACT www.veritas-sewing.com/en/service...
- Page 3 Important safety instructions When using an electrical appliance, basic safety should always be followed, including the following: Read all instructions before using this sewing machine. DANGER To reduce the risk of electric shock: An appliance should never be left unattended when plugged in. Always unplug this appliance from the electric outlet immediately after using and before cleaning.
- Page 4 Never place anything on the pedal. Never use the machine if the air vents are blocked, keep the air vents of the machine and the foot pedal free from dust, fusel and leftovers. The machine must only be used with designated foot controller, in order to avoid a hazard.
-
Page 5: Table Of Contents
Contents Principal parts of the machine ..............7 Accessories ....................8 Connecting the machine ................9 Sewing table ....................10 Free arm ......................19 Winding the bobbin .................11-13 Inserting the bobbin ................14-15 Threading the upper thread ..............16-18 Raising the bobbin thread ................19 Replacing the needle .................. - Page 6 Contents Zipper insertion....................35-37 Inserting a centered zipper ................35 Inserting a side zipper ..................36 Gathering ....................38 Free motion darning, embroidery and monogramming ......38-40 Darning ......................38 Preparation for embroidering and monogramming ........... 39 Monogramming....................40 Applique ..................... 41 Scallop stitching ..................42 Shell tuck stitching ....................42 Scallop stitching ......................
-
Page 7: Principal Parts Of The Machine
Principal parts of the machine Thread take-up lever 2. Tension dial 3. Face plate Thread cutter 5. Needle plate 6. Sewing table and accessory box Bobbin winder spindle 8. Bobbin winder stopper Pattern selector dial 10. Reverse sewing lever 11. Needle clamp screw 12. -
Page 8: Accessories
Accessories Standard All purpose foot 2. Zipper foot 3. Buttonhole foot Darning plate 5. L-screwdriver 6. Seam ripper/ brush Spool pin felt (2x) 8. Pack of needles Bobbin (3x) Optional* 10. Quilting foot 11. Overcasting foot 12. Hemmer foot 13. Blind hem foot 14. Satin stitch foot 15. -
Page 9: Connecting The Machine
Connecting machine to power source Attention: Always make sure that the machine is unplugged from power source and the main switch is on ("O") when the machine is not in use and before inserting or removing parts. Before connecting the power supply, make sure that the voltage and the frequency shown on the rating plate conform to your mains power. -
Page 10: Sewing Table
Sewing table Hold the sewing table horizontally, then pull toward the left to remove it from the machine. Attach the sewing table, and then push it to the right. The inside of the snap-in sewing table is used as an accessory box. Free arm Free-arm sewing is convenient for sewing tubular areas such as pant... -
Page 11: Winding The Bobbin
Winding the bobbin Place the thread and spool holder onto the spool pin. 2. Draw the thread from the spool through the upper thread guide. 3. Wind the thread clockwise around the bobbin winder tension discs. - Page 12 Winding the bobbin Place the thread end through one of the inner holes as illustrated and place the empty bobbin on the spindle. Notch Bobbin winder shaft spring 5. Push the bobbin to the right. 6. Hold the thread tail securely in one hand.
- Page 13 Winding the bobbin 8. After the bobbin has wound a few turns stop the machine and cut the thread near the hole of the bobbin. Continue filling the bobbin until it is full. Once the spool is full, it rotates slowly. Release the pedal or stop the machine.
-
Page 14: Inserting The Bobbin
Inserting the bobbin Attention: Turn the power switch to off ("O") before inserting or removing the bobbin. When inserting or removing the bobbin, the needle must be fully raised. Remove the sewing table, then open the hinged cover. Pull the bobbin case by the hinged latch. Hinged latch Remove the bobbin from the bobbin case. - Page 15 Inserting the bobbin Bobbin case finger Notch Hold the bobbin case by the hinged latch. Note: If the bobbin case is not properly placed back into the machine, it will fall out off the shuttle immediately after starting to sew.
-
Page 16: Threading The Upper Thread
Threading the upper thread Please Note: It is important to carry out the threading correctly otherwise sewing problems may result. Raise the needle to its highest position by turning the handwheel towards you (counterclockwise) so that the mark on the handwheel points directly up. Raise the presser foot to release the tension discs. - Page 17 Threading the upper thread 2. Place the thread and spool holder onto the spool pin. 3. Draw the thread from the spool through the upper thread guide. Guide the thread around the thread guide as illustrated. 5. Thread the tension module by passing the thread between the silver discs.
- Page 18 Threading the upper thread 6. Then, down and around the check spring holder. At the top of this movement pass the thread from right to left through the slotted eye of the take-up lever and then downwards again. 8. Now pass the thread behind the thin wire needle clamp guide.
-
Page 19: Raising The Bobbin Thread
Raising the bobbin thread Hold the upper thread with the left hand. Turn the handwheel towards you (counterclockwise) lowering it, then raise the needle. Mark on the handwheel Note: If it is difficult to raise the bobbin thread, make sure the thread is not trapped by the hinged cover or the sewing table. Gently pull on the upper thread to bring the bobbin thread up through the needle plate hole. -
Page 20: Replacing The Needle
Replacing the needle Attention: Turn the power switch to off ("O") when carrying out any of the above operations! Change the needle regularly, especially when it shows signs of wear or causes problems. Insert the needle following the illustrated instructions. Turn the handwheel towards you (counterclockwise) lowering, then raising the needle. -
Page 21: Matching Needle/ Fabric/ Thread
Matching needle/ fabric/ thread NEEDLE FABRICS THREAD SIZE 9-11 (65-75) Lightweight fabrics-thin cottons, Light-duty thread in cotton, voile, serge, silk, muslin, Qiana, nylon, polyester or cotton interlocks, cotton knits, tricot, wrapped polyester. jerseys, crepes, woven polyester, shirt & blouse fabrics. Medium weight fabrics-cotton, Most threads sold are 11-14 (80-90) satin, kettleclote, sailcloth,... -
Page 22: Changing The Presser Foot
Changing the presser foot Attention: Turn the power switch to off ("O") when carrying out any of the below operations! Removing the presser foot Raise the presser foot. Push the presser foot to disengage it from the cut-out. Cut-out presser foot Attaching the presser foot Install the pin of the presser foot into the cut-out of the presser foot holder. -
Page 23: Two-Step Presser Foot Lifter
Two-step presser foot lifter 1. The presser foot lifter raises and lowers your presser foot. 2. When sewing several layers or thick fabrics, the presser foot can be raised a second stage for easy positioning of the work. Please Note: The needle must always be at the highest position. -
Page 24: Thread Tension
Thread tension - Basic thread tension setting: "4" - To increase the tension, turn the dial up to the next number. To reduce the tension, turn the dial down to the next number. - Proper setting of tension is important for good sewing. - For all decorative sewing you will always obtain a nicer stitch and less fabric puckering when the upper thread appears on the bottom side of... -
Page 25: How To Choose Your Pattern
Thread tension Thread tension is too tight for straight stitch sewing. Turn the dial to the lower number. Normal thread tension for zig zag and decorative sewing. Correct thread tension is when a small number of the upper thread appears on the bottom side of fabric. -
Page 26: Useful Skills
Useful skills Various ways to achieve better results for your sewing projects are described below. Refer to these tips when sewing your project. A trial piece of fabric should be sewn because, depending on the type of fabric and stitching being sewn, the desired results may not be achieved. For the trial sewing, use a piece of fabric and thread that are the same as those used for your project and check the thread tension. -
Page 27: Reverse
Useful skills When sewing along a curve while using a zigzag stitch, select a shorter stitch length in order to obtain a finer stitch. Reverse Reverse stitching is used to secure the threads at the beginning and at the end of a seam. Press the reverse sewing lever and sew 4-5 stitches. -
Page 28: Sewing Thin Fabrics
Useful skills Sewing thin fabrics When sewing thin fabrics, the stitching may become misaligned or the fabric may not feed correctly. If this occurs, place thin paper or stabilizer material under the fabric and sew it together with the fabric. When you have finished sewing, tear off any excess paper. Stabilizer material or paper Sewing stretch fabrics Baste the pieces of fabric together, and then sew without stretching the fabric. -
Page 29: 3-Step Zigzag
3-step zigzag Sewing on lace and elastic, darning, mending, reinforcing edges. Set the machine as illustrated. Place the patch in position. The stitch length can be shortened to produce very close stitches. When mending tears, it is advisable to use a piece of backing fabric as reinforcement. -
Page 30: Overcasting Stitches
Overcasting stitches Sewing overcasting stitches along the edge of fabric prevent it from fraying. Using the all purpose foot Change the presser foot to the all purpose foot. Sewing the overcasting along the edge of the fabric so that the needle drops over the edge of the fabric on the right side. -
Page 31: Blind Hem
Blind Hem Secure the bottom of skirts and pants with a blind hem, this stitch will sew without stitches showed on the right side of the fabric. Blind hem for stretch fabrics. Blind hem for firm fabrics. Fold the fabric as illustrated with the reverse side up. First carry out an overcasting stitch as shown in left picture. Please Note: It takes practice to sew blind hem. -
Page 32: Buttonhole Stitch
Buttonhole stitch Buttonholes can be adapted to the size of the button. For stretch fabric or thin fabric, it is recommended to use a stabilizer for a better buttonhole finish. Please Note: Before sewing a buttonhole on your project, practice on a scrap piece of the same type of fabric. - Measure the diameter and thickness of the button and add 3mm (1/8 inch) for bartacks in order to obtain the correct buttonhole length;... -
Page 33: Making A Buttonhole On Stretch Fabrics
Buttonhole stitch Cut the center of the buttonhole being careful not to cut any stitches on either side. Use a pin on the buttonhole so you do not cut too many stitches. Please Note: When cutting the buttonhole with the seam ripper, do not place your hands in the cutting direction, otherwise injuries may result. -
Page 34: Button Sewing
Button sewing Install the darning plate. Position the work under the foot. Align two holes of the button with the slot of the presser foot and lower the foot to hold the button securely. Turn the handwheel to check that the needle goes cleanly into the left and right hole of the button. -
Page 35: Zipper Insertion
Zipper insertion This foot can be set to sew on each side of the zipper, the edge of the foot guides the zipper to ensure straight placement. Attention: Zipper foot should be used for sewing straight stitches only. It is possible that the needle could hit the presser foot and break when sewing other patterns. -
Page 36: Inserting A Side Zipper
Zipper insertion - Stitching around the zipper. Please Note: When sewing, be sure that the needle does not touch the zipper, otherwise the needle may bend or break. - Remove the basting and press. Inserting a side zipper - Place the right sides of the fabric together. - Page 37 Zipper insertion - Attach the zipper foot. Attach the right side of the presser foot pin to the holder when sewing the left side of the zipper. Attach the left side of the presser foot pin to the presser foot holder when sewing the right side of the zipper.
-
Page 38: Gathering
Gathering Ideal for clothing as well as home decor. It works best on thin to medium weight fabrics. - Set the pattern selection dial to straight stitch. - Loosen the tension of the upper thread so that the lower thread lies on the underside of the material. -
Page 39: Preparation For Embroidering And Monogramming
Free motion darning, embroidery and monogramming Preparation for embroidering and monogramming * Embroider hoop is not included with the machine. - Install the darning plate, see page 35. - Remove the presser foot and the presser foot holder. - Draw the desired lettering or design on the right side of the fabric. -
Page 40: Monogramming
Free motion darning, embroidery and monogramming Monogramming Install the darning plate, see page 35. Sew at constant speed, moving the embroidery hoop slowly along the lettering. When the letter is finished secure with reinforcement stitches at the end of the design. Embroidery Install the darning plate, see page 35. Stitch along the outline of the design moving the embroidery hoop. -
Page 41: Applique
Applique Cut out the applique design and baste it on the fabric. Sew slowly around the edge of the design. Basting Trim the excess material outside the stitching. Make sure not to cut any stitches. Remove the basting thread. -
Page 42: Scallop Stitching
Scallop stitching The wave-shaped repeating pattern, that looks like shells, is called "scalloping". It is used to decorate the collar of blouses and the edges of knitting projects. Shell tuck stitching Use a lightweight fabric (tricot, for example). Fold and stitch on the bias. When the needle swings to the right, allow the needle to just clear the folded edge of the fabric. After stitching, open the fabric and iron press the tucks flat to one side. -
Page 43: Maintenance
Maintenance Attention: When cleaning the machine, it must always be disconnected from the electricity supply. Remove the stitch plate: Turn the handwheel until the needle is fully raised. Open the hinged front cover and unscrew the needle plate screw with the screw driver. Cleaning the feed dog: Clean the feed dog and bobbin case with a brush. -
Page 44: Trouble Shooting Guide
Trouble shooting guide Before calling for service, check the following items. If the problem still persists, contact the place of purchase or your nearest authorized dealer. Problem Cause Correction Reference 1. The machine is not threaded 1. Rethread the machine. correctly. - Page 45 Trouble shooting guide Problem Cause Correction Reference 6. The presser foot that is used 6. Attach the presser foot that is not appropriate for the type is appropriate for the type Needle of stitch that you wish to of stitch that you wish to sew. breaks sew.
-
Page 46: Disposal
Trouble shooting guide Problem Cause Correction Reference 4. Thread is caught in the hook. 1. Remove the upper thread and bobbin case, turn the handwheel backwards and machine forwards and remove the is noisy thread remands. 5. The feed dogs are packed with 2.
Need help?
Do you have a question about the Marie and is the answer not in the manual?
Questions and answers