Table of Contents
Advertisement
ASSEMBLY AND INSTRUCTION MANUAL
Scan 83 Series
Congratulations on your new Scan wood-burning stove
You have purchased a product by one of Europe's leading manufacturer's of wood-burning stoves, and we are sure that you will have years of
pleasure with your purchase. To make the best possible use of your stove, it is important that you follow our advice and instructions.
Read through this Assembly and Instruction Manual carefully before you start to assemble your stove.
Product registration number
Please indicate the product registration number at any
enquiry
SCAN A/S - DK-5492 VISSENBJERG
Advertisement
Table of Contents

Subscribe to Our Youtube Channel
Related Manuals for SCAN Scan 83-8


Summary of Contents for SCAN Scan 83-8
- Page 1 ASSEMBLY AND INSTRUCTION MANUAL Scan 83 Series Congratulations on your new Scan wood-burning stove You have purchased a product by one of Europe’s leading manufacturer’s of wood-burning stoves, and we are sure that you will have years of pleasure with your purchase. To make the best possible use of your stove, it is important that you follow our advice and instructions.
-
Page 2: Table Of Contents
Fitting the flue connection piece in the rear outlet Adjusting the height of the top module Fitting the natural stone sides Fitting the natural stone top Heat-storage stone Scan 83 Maxi models Fitting the tile sides Instructions for use ..................25 CB technology... -
Page 3: Technical Data
The same applies to the fitting of accessories or extra equipment Instruction Manual. not supplied by Scan A/S. This could also be the case if parts that are necessary for the operation and safety of the stove are dismantled When you install any kind of fireplace or stove, you must inform the or removed. -
Page 4: Technical Data And Dimensions
In other words, you should let the fire die down until only the embers are left before refuelling. The Scan 83 Series is produced in accordance with type approval for the product, which also covers the product’s Assembly and Instruction Manual. - Page 5 TECHNICAL DATA Dimensional drawing for Scan 83-1 and Scan 83-2 230**** Height to beginning of flue connection piece at top outlet Centre rear outlet *** Centre of fresh air intake rear outlet **** Centre of fresh air intake bottom Scan 83 Målskitse Scan 83-1...
- Page 6 TECHNICAL DATA Dimensional drawing for Scan 83-3 and Scan 83-4 230**** Height to beginning of flue connection piece at top outlet Centre rear outlet *** Centre of fresh air intake rear outlet **** Centre of fresh air intake bottom Scan 83 Målskitse - Scan 83-2...
- Page 7 TECHNICAL DATA Dimensional drawing for Scan 83-5 and Scan 83-6 with natural stones/tiles top module 230**** Height to beginning of flue connection piece at top outlet Centre rear outlet *** Centre of fresh air intake rear outlet **** Centre of fresh air intake...
- Page 8 TECHNICAL DATA Dimensional drawing for Scan 83-7 and Scan 83-8 with natural stones top module 230**** Height to beginning of flue connection piece at top outlet Centre rear outlet *** Centre of fresh air intake rear outlet **** Centre of fresh air intake bottom Målskitse Scan 83 Maxi med fedtstenstop...
-
Page 9: Type Plate
Type plate for Scan 83 Series All Scan wood-burning stoves are provided with a product registra- All Scan wood-burning stoves are fitted with a type plate that speci- tion number. fies the approval standards and the distance to flammable materials. -
Page 10: Assembly
Check that the stove is not damaged before starting to install it. The flue connection piece and other loose parts are located in the stove’s combustion chamber. The Scan 83 Series comes attached to a wooden pallet on delivery. To remove the packaging, see the illustrations below. Scan 83, all types: •... -
Page 11: Height Adjustment Of Stove
Height adjustment of stove Remove the screws and fittings for securing the stove to the pallet. The Scan 83 Series has four adjustment screws under the stove. Use the adjustment screws to get the stove to stand straight and level. -
Page 12: Fresh Air Intake
AREAL: Krog Iversen & Co A/S 01-03-13 MATERIALE: VÆGT: DATO: SIGN: External combu- DK-5492 Vissenbjerg© orking Folder\Designs\Scan 83\90583034.idw DIMENSION: AREAL: Krog Iversen & Co A/S stion air via wall (109 x 152 mm) DK-5492 Vissenbjerg© C:\Working Folder\Designs\Scan 83\90583034.idw STI: External combu-... -
Page 13: Load-Bearing Subsurface
T400 designation, with G for the soot fire test. Connection with 90° elbow pipe If you opt to connect the Scan 83 with an elbow pipe, you should use a curved elbow, as this gives a better draught. -
Page 14: Erection
ASSEMBLY Erection: Positioning your wood-burning stove The stove must be set up so that the stove itself, the flue pipe, and the chimney can all be cleaned. Distance to furniture: 900 mm You should however assess whether furniture or other items might become excessively dry due to being too close to the stove. - Page 15 ASSEMBLY Installation with rotating base Flammable materials...
-
Page 16: Fitting The Flue Connection Piece In The Top Outlet
AREAL: Krog Iversen & Co A/S Afmontage topplade can 83 90583007 EMNE: TG.NR: Montage røgstuds i topafgang Scan 83 NAVN: EMNE: DK-5492 Vissenbjerg© TG.NR: C:\Working Folder\Designs\Scan 83\90583026.idw STI: 21-02-13 MATERIALE: VÆGT: DATO: 31-01-2013 VÆGT: DATO: SIGN: Gasket DIMENSION: AREAL: Krog Iversen & Co A AREAL: Krog Iversen &... -
Page 17: Fitting The Flue Connection Piece In The Rear Outlet
Unscrew the stove’s heat shield and remove it. Using cutting pliers, cut off the cover plate from the rear plate and the heat shield (only Scan 83 Maxi) at its securing points. The manufacturer has prepared the stove to take a top outlet. - Page 18 TG.NR: 21-02-13 MATERIALE: VÆGT: DATO: SIGN: DIMENSION: AREAL: Krog Iversen & Co A/S Remove the cover from the stove’s rear outlet. DK-5492 Vissenbjerg© C:\Working Folder\Designs\Scan 83\90583018.idw STI: Cover Hul i varmeskjold Scan 83 90583039 EMNE: TG.NR: 05-03-13 IALE: VÆGT: DATO:...
-
Page 19: Adjusting The Height Of The Top Module
Scan A/S DIMENSION: AREAL: Krog Iversen & Co A/S Højdejustering af topplade DK-5492 Vissenbjerg© Scan 83 NAVN: EMNE: TG.NR: 90583043 ng Folder\Designs\Scan 83\10583900-Manual.iam DK-5492 Vissenbjerg© C:\Working Folder\Designs\Scan 83\90583019.idw STI: Højdejustering af topplade Scan 83 90583 NAVN: EMNE: TG.NR: DATO: 08-03-2013 MATERIALE: VÆGT:... -
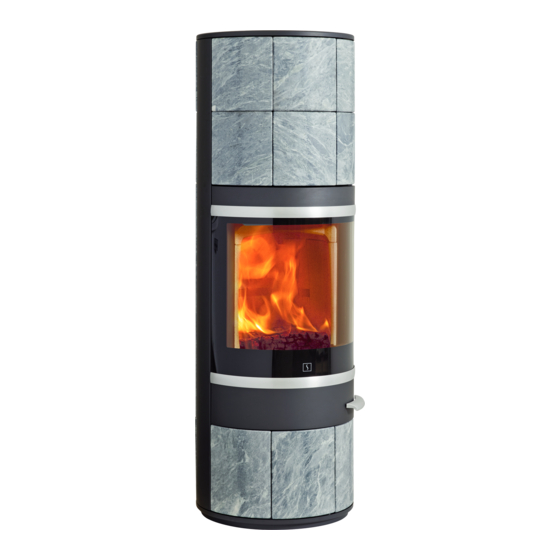
Page 20: Fitting The Natural Stone Sides
Fitting the natural stone sides Remove the top module and cover plate in the stove’s base Scan 83-5 / Scan 83-6 / Scan 83-7 / Scan 83-8 come supplied with loose natural stones for fitting to the stove. They should be mounted in the described order. - Page 21 ASSEMBLY Shorten the sealing tape supplied (7 metres/9 metres) to suitable Scan 83-7 / Scan 83-8 lengths and attach to the sides of the stove as indicated below. Scan 83-5 / Scan 83-6 Sealing tape Sealing tape Sealing tape Sealing tape...
- Page 22 Reposition the top module. 10583900-Manu TG.NR: NAVN: EMNE: 23-01-2013 DATO: SIGN: MATERIALE: VÆGT: DIMENSION: AREAL: Scan A/S DK-5492 Vissenbjerg© C:\Working Folder\Designs\Scan 83\10583900-Manual.iam STI: x3 M5x10 mm screws Fedtstensmontage Scan 83 90583046 EMNE: TG.NR: 15-03-2013 TERIALE: VÆGT: DATO: SIGN: Montage røgstuds i topafgang...
-
Page 23: Fitting The Natural Stone Top
You can buy a natural stone top as an accessory. Place the natural stone top on top of the top module. Heat-storage stones for Scan 83 Maxi models (Scan 83-3 / 83-4 / 83-7 / Fitting the natural stone top 83-8) are made from a special material with a high heat capacity. - Page 24 ACCESSORIES Mounting of the ceramic tiles Adjustment screws (Scan 83-5/Scan 83-6) for the top plate. Please note that the tiles are made of natural materials, and there- fore they can vary in structure and form. There may be minor cracks in the glazing which is especially visible in the bright colours.
-
Page 25: Instructions For Use
CB technology Scan 83 Brændkammer 90583012 EMNE: TG.NR: 01-02-13 DATO: SIGN: VÆGT: AREAL: Krog Iversen & Co A/S DK-5492 Vissenbjerg© Working Folder\Designs\Scan 83\90583012.idw Rysterist - askeskuffe Scan 83 90583013 NAVN: EMNE: TG.NR: Handle for riddling MATERIALE: VÆGT: DATO: 01-02-13 SIGN:... - Page 26 You can use any type of wood as fuel. F ( 1 : 5 ) Ash container The Scan 83 has been recommended as suitable for use in smoke Lukket control areas when burning wood. Ash container in closed position...
-
Page 27: Instructions For Operation
Lighting We recommend the use of fire lighters, or similar products, which are available from your Scan dealer. Using fire lighters helps light the wood more quickly and keeps the combustion process clean. Never use liquid lighting fuels! Due to the large size of this stove’s combustion chamber, it is impor-... -
Page 28: Handling Fuel
INSTRUCTIONS FOR OPERATION Continuous operation When the stove is not in use you can close the dampers to avoid a draught through the stove. It is important to obtain as high a temperature as possible in the combustion chamber. This results in best possible use of the stove If the stove has not been used for some time, you should check the and fuel, as well as achieving clean combustion. -
Page 29: Maintenance
Dispose of as ceramic waste. If the paint finish gets damaged, you can purchase repair paint in spray form from your Scan dealer. As slight differences in colour Combustion chamber lining: shade are possible, we recommend you spray a larger area to achieve Vermiculite or chamotte is not recyclable. - Page 30 25-01-13 MATERIALE: VÆGT: DATO: SIGN: 23750265 mm^2 DIMENSION: AREAL: Krog Iversen & Co A/S Upper baffle plate Holder for DK-5492 Vissenbjerg© C:\Working Folder\Designs\Scan 83\90583008.idw STI: upper baffle Snit gennem ovn Scan 83 NAVN: EMNE: TG.N plate 339,26 kg 25-01-13 DATO: MATERIALE: VÆGT:...
- Page 31 Lift the upper baffle plate and remove the pin. Pass the baffle plate edge-first and downwards out through the combustion chamber. Turn the baffle plate 90°, and lower it out through the combustion chamber. Stift for øverste røgvenderplade Scan 85 NAVN: EMNE: TG.NR 19-11-10 MATERIALE: VÆGT:...
- Page 32 STI: Afmontage brændkammerforing (side) Scan 83 NAVN: EMNE: TG.NR: 05-03-13 MATERIALE: VÆGT: DATO: DIMENSION: AREAL: Krog Iversen & Co A DK-5492 Vissenbjerg C:\Working Folder\Designs\Scan 83\90583035.idw STI: Øverste røgvenderplade Scan 85 90585039 NAVN: EMNE: TG.NR: 22-11-10 DATO: MATERIALE: VÆGT: SIGN: DIMENSION: AREAL: Krog Iversen &...
-
Page 33: Troubleshooting
TROUBLESHOOTING Troubleshooting The door does not close It may occur during transport that the locking device moves out if Smoke emissions its correct position, so that the door does not close properly. This can easily be adjusted, see below. • Damp wood •... - Page 34 Scan dealer. • In the event of any change in the original state of this Scan product or its accessories. • This warranty is only valid in the country to which this Scan product was originally supplied.
- Page 35 Own comments...
- Page 36 Version: Scan A/S - DK-5492 Vissenbjerg UK 90583500 08.02.2016...
Need help?
Do you have a question about the Scan 83-8 and is the answer not in the manual?
Questions and answers