Table of Contents
Advertisement
Ambient Weather WS-1075 Home Weather Station User Manual
Table of Contents
1.
Introduction ...................................................................................................................................................... 2
2.
Product Features ............................................................................................................................................... 3
3.
Warnings and Cautions ..................................................................................................................................... 4
4.
Pre-Installation Checkout and Site Survey ....................................................................................................... 4
4.1
Pre Installation Checkout ......................................................................................................................... 4
4.2
Site Survey ............................................................................................................................................... 5
5
Getting Started .................................................................................................................................................. 5
5.1
Parts List .................................................................................................................................................. 5
5.2 Recommend Tools ....................................................................................................................................... 6
6
Sensor Assembly Set Up .................................................................................................................................. 6
6.1
Power the Thermo-Hygrometer Transmitter ............................................................................................ 6
6.2
Connect and Mount the Sensor Array (Pole Mount) ................................................................................ 7
6.3
Alternate Mounting to a Horizontal Surface ............................................................................................ 8
6.4
Display Console ....................................................................................................................................... 9
6.4.1
Display Console Layout ...................................................................................................................... 9
6.4.2
Initial Display Console Set Up ........................................................................................................... 11
6.4.3
Radio Controlled Clock (RCC) .......................................................................................................... 11
6.4.4
Sensor Operation Verification ............................................................................................................ 12
7
Weather Station Installation ............................................................................................................................ 12
7.1
Pre Installation Checkout ....................................................................................................................... 12
7.2
Site Survey ............................................................................................................................................. 12
7.3
Best Practices for Wireless Communication .......................................................................................... 13
7.4
Final Installation of Sensor Array .......................................................................................................... 13
8
Console Operation .......................................................................................................................................... 14
8.1
Set (Program) Mode............................................................................................................................... 14
8.1.1
Set Mode Reference Guide ................................................................................................................ 14
8.1.2
Set Mode Operation ........................................................................................................................... 14
8.2
Quick Set Mode ..................................................................................................................................... 17
8.2.1
Quick Set Mode Reference Guide ..................................................................................................... 17
8.2.2
Quick Set Mode Operation ................................................................................................................ 17
8.3
History Mode ......................................................................................................................................... 18
8.4
Alarm Mode ........................................................................................................................................... 18
8.4.1
High Alarm Mode .............................................................................................................................. 18
8.4.2
Low Alarm Mode ............................................................................................................................... 20
8.4.3
Cancelling an Alarm .......................................................................................................................... 21
8.4.4
Outdoor Temperature/ Wind Chill / Dew Point Alarm ...................................................................... 21
Version 1.2
©Copyright 2016, Ambient LLC. All Rights Reserved.
Page 1
Advertisement
Table of Contents

Related Manuals for Ambient Weather WS-1075


Summary of Contents for Ambient Weather WS-1075
-
Page 1: Table Of Contents
Ambient Weather WS-1075 Home Weather Station User Manual Table of Contents Introduction ..............................2 Product Features ............................... 3 Warnings and Cautions ............................. 4 Pre-Installation Checkout and Site Survey ....................... 4 Pre Installation Checkout ......................... 4 Site Survey ............................... 5 Getting Started ..............................5 Parts List .............................. -
Page 2: Introduction
Warranty Information ..........................30 1. Introduction Thank you for your purchase of the Ambient Weather WS-1075 wireless weather station. The following user guide provides step by step instructions for installation, operation and troubleshooting. To download the latest manual and additional troubleshooting tips, please visit: http://ambientweather.wikispaces.com/ws1075... -
Page 3: Product Features
2. Product Features Figure 1 Figure 2 Version 1.2 ©Copyright 2016, Ambient LLC. All Rights Reserved. Page 3... -
Page 4: Warnings And Cautions
Indoor and outdoor temperature in degrees Fahrenheit or Celsius (user selectable) Indoor and outdoor relative humidity Barometric pressure reading in inHg or hPa, absolute or relative (user selectable) Detailed display of rainfall data in 1 hour, 24 hours, one week, one month and total since last reset (user selectable in mm or inch) ... -
Page 5: Site Survey
6. Visit Ambient Weather Mounting Solutions for assistance and ideas for mounting your weather station: http://www.ambientweather.com/amwemoso.html 5 Getting Started The WS-1075 weather station consists of a display console (receiver), a thermo-hygrometer transmitter unit, a wind speed sensor, a rain gauge, and mounting hardware. 5.1 Parts List... -
Page 6: Recommend Tools
Item 38mm Pole mounting U-bolts for rain gauge (smaller) 8mm U-Bolt nuts for rain gauge and wind speed pole mounting 5.2 Recommend Tools Precision screwdriver 8 mm wrench (for U-Bolt nuts) 6 Sensor Assembly Set Up 6.1 Power the Thermo-Hygrometer Transmitter 1. -
Page 7: Connect And Mount The Sensor Array (Pole Mount)
Note: Refer to Section 9.2 for pre-treating the connectors and sockets. Figure 4 6.2 Connect and Mount the Sensor Array (Pole Mount) Please reference Figure 5. 1. Attach the wind cups to the wind speed shaft. Press firmly, and the cups will snap into place. No set screw is required. -
Page 8: Alternate Mounting To A Horizontal Surface
Figure 5 6.3 Alternate Mounting to a Horizontal Surface Alternately, the wind gauge and rain gauge can be mounted to a horizontal surface using the 4 x 15mm set screws, as shown in Figure 6. Version 1.2 ©Copyright 2016, Ambient LLC. All Rights Reserved. Page 8... -
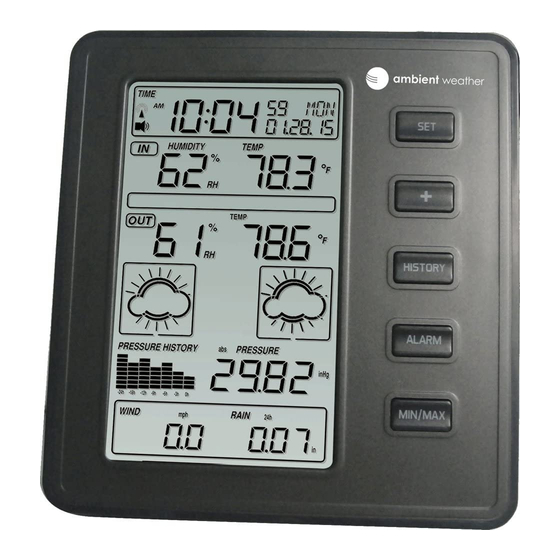
Page 9: Display Console
Figure 6 6.4 Display Console 6.4.1 Display Console Layout The display console layout is shown in Figure 7. Note that the alarm icons are only present when an alarm has been set, the low battery icon is only present when there is a low battery, and the SENSOR: will only be on during the initial search mode, and will flash once every 48 seconds thereafter. - Page 10 Figure 7 1. Time 15. General outdoor alarm icon 2. Alarm on indicator 16. Weather forecast icon 3. Day of week/ time zone 17. Weather tendency indicator 4. Date 18. Pressure unit (relative or absolute) 5. Indoor temperature display 19. Pressure with 24 hour history graph 6.
-
Page 11: Initial Display Console Set Up
6.4.2 Initial Display Console Set Up 1. Place the sensor array 5 to 10 feet from the display console. It is best to perform this operation prior to installing the sensor array. 2. Make sure the sensor array is already powered up and the transmitter light is flashing once every 48 seconds. -
Page 12: Sensor Operation Verification
period (maximum 10 minutes), no weather data will be transmitted to avoid interference. The sensor search icon will remain on. If the signal reception is not successful within 1 minute, the signal search will be cancelled and will automatically resume every two hours until the signal is successfully captured. The regular sensor array link will resume once RCC reception routine is finished. -
Page 13: Best Practices For Wireless Communication
5. Radio interference such as PCs, radios or TV sets can, in the worst case, entirely cut off radio communication. Please take this into consideration when choosing console or mounting locations. 6. Visit Ambient Weather Mounting Solutions for assistance and ideas for mounting your weather station: http://www.ambientweather.com/amwemoso.html 7.3 Best Practices for Wireless Communication... -
Page 14: Console Operation
8 Console Operation Note: The display console has five keys for basic operation: key, key, key, HISTORY key and key. ALARM MIN/MAX 8.1 Set (Program) Mode 8.1.1 Set Mode Reference Guide The following table is a quick reference guide for the SET Mode. See the next section for detailed programming. - Page 15 The following table provides times zones throughout the world. Locations in the eastern hemisphere are positive, and locations in the western hemisphere are negative. Hours from Time Zone Cities -12 IDLW: International Date Line West -11 NT: Nome Nome, AK -10 AHST: Alaska-Hawaii Standard Honolulu, HI CAT: Central Alaska...
-
Page 16: Set Date
8.1.2.2 Set Date 1. Change Year. Press the SET key to set the year. The year will begin flashing. Press the + key MIN/MAX key to change the year setting. 2. Change Month. Press the SET key to set the month. The month will begin flashing. Press the + key or key to change the month setting. -
Page 17: Quick Set Mode
8.1.2.5 Set Wind Units Wind Units. Press the key to set the wind units. The wind will begin flashing. Press the + key to alternate the display unit between km/h, mph, m/s, knots, and bft (or Beaufort scale). 8.1.2.6 Set Rain Units Rain Units. -
Page 18: History Mode
8.2.2.2 Relative and Absolute Pressure Display Relative and Absolute Pressure Display. Press the key to change the pressure display. The pressure will begin flashing. Press the + key to alternate the display between absolute and relative pressure. 8.2.2.3 Average Wind Speed and Wind Gust Average Wind Speed and Gust. - Page 19 Press the ALARM key to turn the alarm on or off (if the alarm is enabled, the alarm icon will be turned on). 2. Indoor Humidity High Alarm. Press the key to set the indoor humidity high alarm. The indoor humidity will begin flashing. Press the + key (increase) or MIN/MAX key (decrease) to change the indoor humidity alarm value.
-
Page 20: Low Alarm Mode
Press the ALARM key to turn the alarm on or off (if the alarm is enabled, the alarm icon will be turned on and the HI AL icon will be displayed). 9. Wind Speed High Alarm. Press the key to set the wind speed high alarm. The wind speed will begin flashing. -
Page 21: Cancelling An Alarm
6. Wind Chill Low Alarm. Reference Section 8.4.1. The low alarm is similar to the high alarm setting. 7. Dew Point Low Alarm. Reference Section 8.4.1. The low alarm is similar to the high alarm setting. 8. Barometric Pressure Low Alarm. Reference Section 8.4.1. The low alarm is similar to the high alarm setting. -
Page 22: Minimum Mode
Press the SET key to reset the maximum indoor humidity to the current value, date and time. 2. Maximum Indoor Temperature. Press the + key to display the maximum indoor temperature with the associated time and date stamp. Press the SET key to reset the maximum indoor temperature to the current value, date and time. -
Page 23: Other Console Features
to the maximum setting. 4. Minimum Outdoor Temperature. Reference Section 8.5.1. The minimum setting is similar to the maximum setting. 5. Minimum Wind Chill. Reference Section 8.5.1. The minimum setting is similar to the maximum setting. 6. Minimum Dew Point. Reference Section 8.5.1. The minimum setting is similar to the maximum setting. -
Page 24: Storm Threshold Indicator
are met, then the arrows will be fixed. Example 1: Pressure is decreasing, weather is deteriorating. Example 2: Pressure is increasing, weather is improving. 8.6.4 Storm threshold indicator The storm threshold (the negative rate of pressure change signifying a storm is expected) can be adjusted by the user from level 3 to level 9 (the default level 4). -
Page 25: Maintenance
hours. Maintenance We recommend the following maintenance actions approximately once per year. 9.1 Cleaning the Rain Gauge The rain gauge can fill up with debris. To clean the rain gauge, remove any debris from the top of the funnel. Press the two compression tabs on the sides of the rain gauge to expose the tipping mechanism. Remove any debris, insects and spider webs. -
Page 26: Battery Contacts
Figure 11 9.3 Battery Contacts Periodically inspect and clean the battery contacts. 10 Glossary of Terms Term Definition Absolute Barometric Relative barometric pressure, corrected to sea-level. To compare Pressure pressure conditions from one location to another, meteorologists correct pressure to sea-level conditions. Because the air pressure decreases as you rise in altitude, the sea-level corrected pressure (the pressure your location would be at if located at sea-level) is generally higher than your measured pressure. -
Page 27: Specifications
Term Definition Resolution Resolution is defined as the number of significant digits (decimal places) to which a value is being reliably measured. 11 Specifications 11.1 Wireless Specifications Line of sight wireless transmission (in open air): 300 feet Update Rate: 48 seconds 11.2 Measurement Specifications The following table provides the specifications for the measured parameters. - Page 28 Problem Solution Power down and power up the console by removing and re-inserting the batteries. Verify the remote sensor is flashing once per 45 seconds. The LED indicator is just above the battery compartment. Install a fresh set of batteries in the remote thermo-hygrometer.
-
Page 29: Accessories
Weather Station Mounting Pole mounting solutions, tripods, mast to mast Solutions mounting kits. The WS-1075 pole mount can be attached to a pole mounting solution with the included hose clamps. Energizer AA Lithium AA lithium batteries for cold weather Battery (2-pack) - Batteries climates. -
Page 30: Fcc Statement
The specifications of this product may change without prior notice. This product is not a toy. Keep out of the reach of children. No part of this manual may be reproduced without written authorization of Ambient, LLC. Ambient, LLC WILL NOT ASSUME LIABILITY FOR INCIDENTAL, CONSEQUENTIAL, PUNITIVE, OR OTHER SIMILAR DAMAGES ASSOCIATED WITH THE OPERATION OR MALFUNCTION OF THIS PRODUCT. - Page 31 owner’s manual; (3) damage resulting from the performance of repairs or alterations by someone other than an authorized Ambient, LLC authorized service center; (4) units used for other than home use (5) applications and uses that this product was not intended (6) the products inability to receive a signal due to any source of interference or metal obstructions and (7) extreme acts of nature, such as lightning strikes or floods.
Need help?
Do you have a question about the WS-1075 and is the answer not in the manual?
Questions and answers